Setup Guide
Page 3
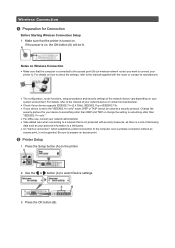
..., the ON button (A) will be used as your personal information to a third party. • An "Ad-hoc connection," which establishes a direct connection to the manual supplied with security measures, as there is a risk of disclosing data such as a security protocol. Use the or button (A) to the... manual of the network device vary depending on . Change the security protocol for Connection Before Starting Wireless Connection Setup 1. Make sure that the printer...
..., the ON button (A) will be used as your personal information to a third party. • An "Ad-hoc connection," which establishes a direct connection to the manual supplied with security measures, as there is a risk of disclosing data such as a security protocol. Use the or button (A) to the... manual of the network device vary depending on . Change the security protocol for Connection Before Starting Wireless Connection Setup 1. Make sure that the printer...

Setup Guide
Page 5
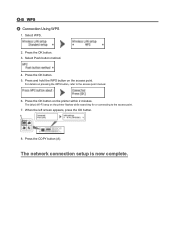
Press the COPY button (A). For details on the printer within 2 minutes. The network connection setup is now complete. Press the OK button on pressing the WPS button, refer to the access point. 3. The (blue) Wi-Fi lamp on the access point. Press and hold the WPS button on the printer flashes while searching for or connecting to the access point manual. 2. d-A Push Button Method d Connection Using WPS 1. When the left screen appears, press the OK button. 4.
Press the COPY button (A). For details on the printer within 2 minutes. The network connection setup is now complete. Press the OK button on pressing the WPS button, refer to the access point. 3. The (blue) Wi-Fi lamp on the access point. Press and hold the WPS button on the printer flashes while searching for or connecting to the access point manual. 2. d-A Push Button Method d Connection Using WPS 1. When the left screen appears, press the OK button. 4.
Setup Guide
Page 6
The (blue) Wi-Fi lamp on pressing the WPS button, refer to the access point. 7. When the left screen appears, press the OK button. 8. The network connection setup is now complete. d-B WPS d Connection Using WPS 1. Press the OK button on the access point. Press the OK button. 5. Press and hold the WPS button on the printer within 2 minutes. For details on the printer flashes while searching for or connecting to the access point manual. 6. Select WPS. 2. Press the COPY button (A). Press the OK button. 3. Select Push button method. 4.
The (blue) Wi-Fi lamp on pressing the WPS button, refer to the access point. 7. When the left screen appears, press the OK button. 8. The network connection setup is now complete. d-B WPS d Connection Using WPS 1. Press the OK button on the access point. Press the OK button. 5. Press and hold the WPS button on the printer within 2 minutes. For details on the printer flashes while searching for or connecting to the access point manual. 6. Select WPS. 2. Press the COPY button (A). Press the OK button. 3. Select Push button method. 4.

Setup Guide
Page 7
... multiple access points simultaneously. Wait for a while, then configure WPS settings again. Press the WPS button on only one access point. Failed to the manual supplied with the access point or contact its manufacturer. Timeout error The screen appears when WPS setup was not completed within a specified time. •...
... multiple access points simultaneously. Wait for a while, then configure WPS settings again. Press the WPS button on only one access point. Failed to the manual supplied with the access point or contact its manufacturer. Timeout error The screen appears when WPS setup was not completed within a specified time. •...


