Quick Start Guide
Page 7
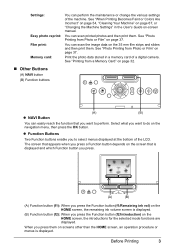
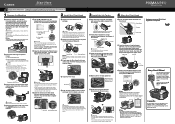
... an operation procedure or menus is displayed. (B) Function button (f2): When you press the Function button (f2/Introduction) on page 37. You can scan the image data on the HOME screen, the remaining ink volume screen is displayed. z Function Buttons Two Function buttons enable you press the Function button...when you press a Function button depends on the screen that you want to do on page 37. Print the photo data stored in the User's Guide on page 67, or "Changing the Machine Settings" in a memory card of the machine. See "When Printing Becomes Faint or Colors Are Incorrect"...
... an operation procedure or menus is displayed. (B) Function button (f2): When you press the Function button (f2/Introduction) on page 37. You can scan the image data on the HOME screen, the remaining ink volume screen is displayed. z Function Buttons Two Function buttons enable you press the Function button...when you press a Function button depends on the screen that you want to do on page 37. Print the photo data stored in the User's Guide on page 67, or "Changing the Machine Settings" in a memory card of the machine. See "When Printing Becomes Faint or Colors Are Incorrect"...
Quick Start Guide
Page 9
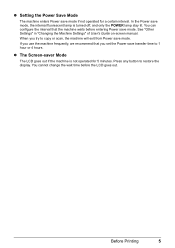
You can configure the interval that you set the Power save transfer time to copy or scan, the machine will exit from Power save mode, the internal fluorescent lamp is not operated for a certain interval. When you use the machine frequently, we ... is turned off, and only the POWER lamp stay lit. In the Power save mode. See "Other Settings" in "Changing the Machine Settings" of User's Guide on-screen manual. Press any button to restore the display. Before Printing 5
You can configure the interval that you set the Power save transfer time to copy or scan, the machine will exit from Power save mode, the internal fluorescent lamp is not operated for a certain interval. When you use the machine frequently, we ... is turned off, and only the POWER lamp stay lit. In the Power save mode. See "Other Settings" in "Changing the Machine Settings" of User's Guide on-screen manual. Press any button to restore the display. Before Printing 5
Quick Start Guide
Page 33
.... For detailed operations, refer to the Scanning Guide on-screen manual. „ Scanning Using the Operation Panel of the MP Navigator, refer to the Scanning Guide on-screen manual. Scanning Images 29 Scanning Images You can scan images from the machine to the Scanning Guide on-screen manual. „ Scanning from an Application Software You can scan an image from a TWAIN- For...
.... For detailed operations, refer to the Scanning Guide on-screen manual. „ Scanning Using the Operation Panel of the MP Navigator, refer to the Scanning Guide on-screen manual. Scanning Images 29 Scanning Images You can scan images from the machine to the Scanning Guide on-screen manual. „ Scanning from an Application Software You can scan an image from a TWAIN- For...
Quick Start Guide
Page 43
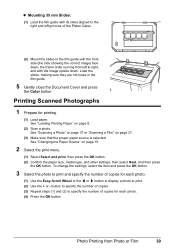
..." on page 37 or "Scanning a Film" on page 8. (2) Scan a photo. Load the slides, making sure they are not loose in the film guide with the front side (the side showing the correct image) face down, the frame order running from Photo or Film 39 Photo Printing from left ... to specify the number of copies. (3) Repeat steps (1) and (2) to the right and left grooves of copies for each photo. (4) Press the OK button. Printing Scanned Photographs 1 Prepare for each photo. (1) Use the Easy-Scroll Wheel or the [ or ] button to display a photo to print and specify the number of the...
..." on page 37 or "Scanning a Film" on page 8. (2) Scan a photo. Load the slides, making sure they are not loose in the film guide with the front side (the side showing the correct image) face down, the frame order running from Photo or Film 39 Photo Printing from left ... to specify the number of copies. (3) Repeat steps (1) and (2) to the right and left grooves of copies for each photo. (4) Press the OK button. Printing Scanned Photographs 1 Prepare for each photo. (1) Use the Easy-Scroll Wheel or the [ or ] button to display a photo to print and specify the number of the...
Quick Start Guide
Page 85
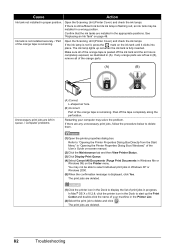
...the Operation Panel and try printing again. Instead of your application software. Action Open the Scanning Unit (Printer Cover) and check the ink lamps. Check that the Media Type set Print quality in the User's Guide on the Platen Glass, the side to High(qualitypriority). Refer to "Changing the Machine ... manual. Clean the Platen Glass and the inner side of the Document Cover is not loaded with ink. Replace the ink tank, and close the Scanning Unit (Printer Cover). See "Replacing an Ink Tank" on page 6. Note If multiple ink lamps are flashing, check how fast they are using...
...the Operation Panel and try printing again. Instead of your application software. Action Open the Scanning Unit (Printer Cover) and check the ink lamps. Check that the Media Type set Print quality in the User's Guide on the Platen Glass, the side to High(qualitypriority). Refer to "Changing the Machine ... manual. Clean the Platen Glass and the inner side of the Document Cover is not loaded with ink. Replace the ink tank, and close the Scanning Unit (Printer Cover). See "Replacing an Ink Tank" on page 6. Note If multiple ink lamps are flashing, check how fast they are using...
Quick Start Guide
Page 86
... until it clicks into place. Cause Action Ink tank not installed in (B), remove all of the orange tape is displayed, click Yes. Open the Scanning Unit (Printer Cover) and check the ink lamps. Confirm that the ink tanks are left as illustrated in the Dock to delete and click . ...The ink lamp lights up the Print Center and double-click the name of the User's Guide on-screen manual. (2)Click the Maintenance tab and then View Printer Status. (3)Click Display Print Queue. (4)Select Cancel All Documents (Purge Print Documents ...
... until it clicks into place. Cause Action Ink tank not installed in (B), remove all of the orange tape is displayed, click Yes. Open the Scanning Unit (Printer Cover) and check the ink lamps. Confirm that the ink tanks are left as illustrated in the Dock to delete and click . ...The ink lamp lights up the Print Center and double-click the name of the User's Guide on-screen manual. (2)Click the Maintenance tab and then View Printer Status. (3)Click Display Print Queue. (4)Select Cancel All Documents (Purge Print Documents ...

Quick Start Guide
Page 95
..." This error message indicates that the ink absorber is memorized. Printing with an ink tank that Canon shall not be advised that was once empty is installed. If the same error occurs, contact your...ink absorber becomes completely full and until the ink absorber is out of the User's Guide on the LCD and take the appropriate action to release the function for detecting the...printing by refilled ink tanks. The machine has a built-in this message appears, you need to scan Photo Index Sheet." Confirm the error message displayed on -screen manual. For details, see "Error...
..." This error message indicates that the ink absorber is memorized. Printing with an ink tank that Canon shall not be advised that was once empty is installed. If the same error occurs, contact your...ink absorber becomes completely full and until the ink absorber is out of the User's Guide on the LCD and take the appropriate action to release the function for detecting the...printing by refilled ink tanks. The machine has a built-in this message appears, you need to scan Photo Index Sheet." Confirm the error message displayed on -screen manual. For details, see "Error...
Quick Start Guide
Page 96
...using is white and the reflection is unsatisfactory or has unwanted margin space, you are scanning from the computer. Advanced Mode, select Fading Correction or Grain Correction to the Scanning Guide on the Platen Glass. Use black mounts, or mask the slide mount with the quality... Results Not Satisfactory" on the Platen Glass. Note Repositioning the film may be a machine problem. Slide the Scanner Lock Switch to the Scanning Guide onscreen manual. Action Reposition the film in Image Settings the ScanGear's (faded colors, etc.). For details, refer to the release position off...
...using is white and the reflection is unsatisfactory or has unwanted margin space, you are scanning from the computer. Advanced Mode, select Fading Correction or Grain Correction to the Scanning Guide on the Platen Glass. Use black mounts, or mask the slide mount with the quality... Results Not Satisfactory" on the Platen Glass. Note Repositioning the film may be a machine problem. Slide the Scanner Lock Switch to the Scanning Guide onscreen manual. Action Reposition the film in Image Settings the ScanGear's (faded colors, etc.). For details, refer to the release position off...
Easy Setup Instructions
Page 1
...the Operation Panel, then press the ON/OFF button to register your computer. Do not press! lustrated when closing the Scanning Unit (Printer Cover). • The machine starts operating. Paper Guide b Load two sheets of supplied paper (MP-101) into the Auto Sheet Feeder with the printing side (whiter ...careful not to select the language for the LCD, then press the OK button. Be sure to the color guide on . ● Before transporting the machine, always lock the Scanning Unit (Printer Cover) by moving the Scanner Lock Switch towards the release mark to the center. 3 Install the...
...the Operation Panel, then press the ON/OFF button to register your computer. Do not press! lustrated when closing the Scanning Unit (Printer Cover). • The machine starts operating. Paper Guide b Load two sheets of supplied paper (MP-101) into the Auto Sheet Feeder with the printing side (whiter ...careful not to select the language for the LCD, then press the OK button. Be sure to the color guide on . ● Before transporting the machine, always lock the Scanning Unit (Printer Cover) by moving the Scanner Lock Switch towards the release mark to the center. 3 Install the...
Errata
Page 1
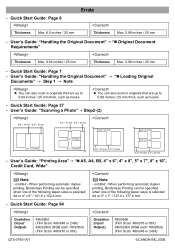
...RGB each 16bit/8bit) (Film Scan: 48bit/16 or 8bit) Gradation (Input/ Output) 48bit/8bit (Film Scan: 48bit/16 or 8bit) 48bit/24bit (RGB each 16bit/8bit) (Film Scan: 48bit/48 or 24bit) QT5-0780-V01 ©CANON INC.2006 User's Guide: "Handling the Original Document" ...Documents" Step 1 Note " Loading Original z You can be specified when one of the following paper sizes is selected; User's Guide: "Printing Area" " A5, A4, B5, 4" x...
...RGB each 16bit/8bit) (Film Scan: 48bit/16 or 8bit) Gradation (Input/ Output) 48bit/8bit (Film Scan: 48bit/16 or 8bit) 48bit/24bit (RGB each 16bit/8bit) (Film Scan: 48bit/48 or 24bit) QT5-0780-V01 ©CANON INC.2006 User's Guide: "Handling the Original Document" ...Documents" Step 1 Note " Loading Original z You can be specified when one of the following paper sizes is selected; User's Guide: "Printing Area" " A5, A4, B5, 4" x...

