Quick Start Guide
Page 4
.... Trademarks z Microsoft and Windows are trademarks of computer and other office equipment. z Macintosh and Mac are subject to your Canon PIXMA MP810 Photo All-in the U.S. and are uniform among participating nations. Specifications are trademarks of Microsoft Corporation in which business can participate...xD-Picture Card is a trademark of SD Association. Copyright This manual is an open system in the U.S. One Canon Plaza Lake Success, NY 11042 Bluetooth ID: B02954 Under the copyright laws, this manual thoroughly in this product meets the ENERGY STAR guidelines for 5 ...
.... Trademarks z Microsoft and Windows are trademarks of computer and other office equipment. z Macintosh and Mac are subject to your Canon PIXMA MP810 Photo All-in the U.S. and are uniform among participating nations. Specifications are trademarks of Microsoft Corporation in which business can participate...xD-Picture Card is a trademark of SD Association. Copyright This manual is an open system in the U.S. One Canon Plaza Lake Success, NY 11042 Bluetooth ID: B02954 Under the copyright laws, this manual thoroughly in this product meets the ENERGY STAR guidelines for 5 ...
Quick Start Guide
Page 5
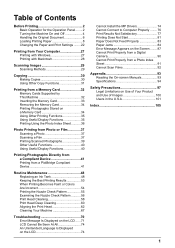
... Cannot Print Properly from a Digital Camera 90 Cannot Print Properly from a Photo Index Sheet 91 Cannot Scan Films 92 Appendix 93 Reading the On-screen Manuals 93 Specifications 94 Safety Precautions 97 Legal Limitations on Use of Your Product and Use of Images 100 Users in the U.S.A 101 Index 105 1
... Cannot Print Properly from a Digital Camera 90 Cannot Print Properly from a Photo Index Sheet 91 Cannot Scan Films 92 Appendix 93 Reading the On-screen Manuals 93 Specifications 94 Safety Precautions 97 Legal Limitations on Use of Your Product and Use of Images 100 Users in the U.S.A 101 Index 105 1
Quick Start Guide
Page 7
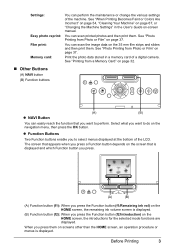
... are displayed. The screen that appears when you press a Function button depends on the screen that you press the Function button (f2/Introduction) on -screen manual. Before Printing 3 See "Printing from a Memory Card" on page 37. See "Photo Printing from Photo or Film" on screens other than the HOME screen, an...
... are displayed. The screen that appears when you press a Function button depends on the screen that you press the Function button (f2/Introduction) on -screen manual. Before Printing 3 See "Printing from a Memory Card" on page 37. See "Photo Printing from Photo or Film" on screens other than the HOME screen, an...
Quick Start Guide
Page 9
See "Other Settings" in "Changing the Machine Settings" of User's Guide on-screen manual. You cannot change the wait time before entering Power save mode. z The Screen-saver Mode The LCD goes out if the machine is turned off, ...
See "Other Settings" in "Changing the Machine Settings" of User's Guide on-screen manual. You cannot change the wait time before entering Power save mode. z The Screen-saver Mode The LCD goes out if the machine is turned off, ...

Quick Start Guide
Page 13
... Refer to "Printing on Stickers (Sticker Print)" in "Using Other Useful Printing Functions" of paper, the printed side may not be able to purchase some Canon genuine papers depending on your computer. *3 Feeding this case, load paper one sheet at a time. *5 SG-201 only *6 You can damage the machine... Easy-Photo Print provided with a Model Number is fed in. You may become marked when it is Canon specialty media. In this paper from a Mobile Phone" in the User's Guide on -screen manual. z To specify the page size and media type when printing photos saved on mobile phones, refer to...
... Refer to "Printing on Stickers (Sticker Print)" in "Using Other Useful Printing Functions" of paper, the printed side may not be able to purchase some Canon genuine papers depending on your computer. *3 Feeding this case, load paper one sheet at a time. *5 SG-201 only *6 You can damage the machine... Easy-Photo Print provided with a Model Number is fed in. You may become marked when it is Canon specialty media. In this paper from a Mobile Phone" in the User's Guide on -screen manual. z To specify the page size and media type when printing photos saved on mobile phones, refer to...
Quick Start Guide
Page 16
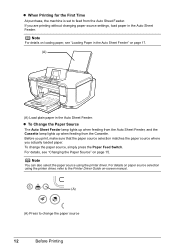
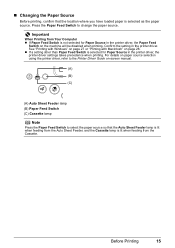
If you actually loaded paper. Note For details on loading paper, see "Changing the Paper Source" on -screen manual. (A) (A) Press to change the paper source, simply press the Paper Feed Switch. For details, see "Loading Paper in the Auto Sheet Feeder" on page 17. (A) (A) ...
If you actually loaded paper. Note For details on loading paper, see "Changing the Paper Source" on -screen manual. (A) (A) Press to change the paper source, simply press the Paper Feed Switch. For details, see "Loading Paper in the Auto Sheet Feeder" on page 17. (A) (A) ...
Quick Start Guide
Page 17
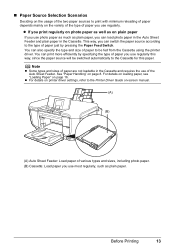
... on printer driver settings, refer to the Printer Driver Guide on plain paper If you print regularly on photo paper as well as on -screen manual. (A) (B) (A) Auto Sheet Feeder: Load paper of paper just by specifying the type of paper to the Cassette for this paper. This way, you can also...
... on printer driver settings, refer to the Printer Driver Guide on plain paper If you print regularly on photo paper as well as on -screen manual. (A) (B) (A) Auto Sheet Feeder: Load paper of paper just by specifying the type of paper to the Cassette for this paper. This way, you can also...
Quick Start Guide
Page 18
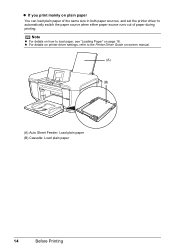
z For details on printer driver settings, refer to the Printer Driver Guide on plain paper You can load plain paper of paper during printing. z If you print mainly on -screen manual. (A) (B) (A) Auto Sheet Feeder: Load plain paper (B) Cassette: Load plain paper 14 Before Printing Note z For details on how to automatically switch the paper source when either paper source runs out of the same size in both paper sources, and set the printer driver to load paper, see "Loading Paper" on page 16.
z For details on printer driver settings, refer to the Printer Driver Guide on plain paper You can load plain paper of paper during printing. z If you print mainly on -screen manual. (A) (B) (A) Auto Sheet Feeder: Load plain paper (B) Cassette: Load plain paper 14 Before Printing Note z For details on how to automatically switch the paper source when either paper source runs out of the same size in both paper sources, and set the printer driver to load paper, see "Loading Paper" on page 16.
Quick Start Guide
Page 19
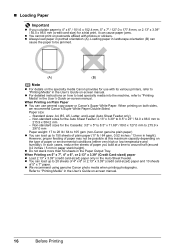
Before Printing 15 Confirm the setting in the printer driver. See "Printing with Windows" on page 27 or "Printing with Macintosh" on -screen manual. (A) (B) (C) (A) Auto Sheet Feeder lamp (B) Paper Feed Switch (C) Cassette lamp Note Press the Paper Feed Switch to select the paper source so that the location where ...
Before Printing 15 Confirm the setting in the printer driver. See "Printing with Windows" on page 27 or "Printing with Macintosh" on -screen manual. (A) (B) (C) (A) Auto Sheet Feeder lamp (B) Paper Feed Switch (C) Cassette lamp Note Press the Paper Feed Switch to select the paper source so that the location where ...
Quick Start Guide
Page 20
... x 3.39" to 8.5" x 23" / 54.0 x 86.0 mm to around half (around 0.2 inches / 5 mm in paper stack height). When Printing on -screen manual. Standard sizes: A4, B5, A5, Letter, and Legal (Auto Sheet Feeder only) - z For detailed instructions on how to load specialty media into the machine, refer... the User's Guide on Plain Paper z You can cause paper jams. z You cannot print on -screen manual. When printing on the type of paper may not be jammed. (A) (B) Note z For details on the specialty media Canon provides for the Cassette: 3.5" x 5" to 8.5" x 11.69" / 89.0 x 127.0 mm to 215...
... x 3.39" to 8.5" x 23" / 54.0 x 86.0 mm to around half (around 0.2 inches / 5 mm in paper stack height). When Printing on -screen manual. Standard sizes: A4, B5, A5, Letter, and Legal (Auto Sheet Feeder only) - z For detailed instructions on how to load specialty media into the machine, refer... the User's Guide on Plain Paper z You can cause paper jams. z You cannot print on -screen manual. When printing on the type of paper may not be jammed. (A) (B) Note z For details on the specialty media Canon provides for the Cassette: 3.5" x 5" to 8.5" x 11.69" / 89.0 x 127.0 mm to 215...
Quick Start Guide
Page 21
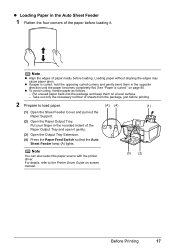
... on page 80. Take out only the necessary number of sheets from the package, just before printing. 2 Prepare to the Printer Driver Guide on-screen manual. (3) (2) Before Printing 17 Put your finger in the rounded indent of the Paper Output Tray and open it . Put unused paper back into the package...
... on page 80. Take out only the necessary number of sheets from the package, just before printing. 2 Prepare to the Printer Driver Guide on-screen manual. (3) (2) Before Printing 17 Put your finger in the rounded indent of the Paper Output Tray and open it . Put unused paper back into the package...
Quick Start Guide
Page 23
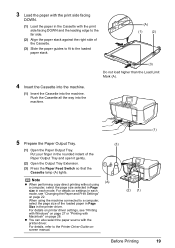
... paper in Page Size in the printer driver. Note z When performing copy direct printing without using the machine connected to the Printer Driver Guide onscreen manual. (3) (A) (2) (1) Before Printing (1) 19 Put your finger in each mode, see "Printing with Windows" on page 27 or "Printing with Macintosh" on page 22...
... paper in Page Size in the printer driver. Note z When performing copy direct printing without using the machine connected to the Printer Driver Guide onscreen manual. (3) (A) (2) (1) Before Printing (1) 19 Put your finger in each mode, see "Printing with Windows" on page 27 or "Printing with Macintosh" on page 22...
Quick Start Guide
Page 27
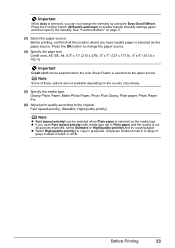
... selected as the paper source. Glossy Photo Paper, Matte Photo Paper, Photo Plus Glossy, Plain paper, Photo Paper Pro (6) Adjust print quality according to enable manual intensity settings again and then specify the intensity. Important While Auto is selected, you can not change the paper source. (4) Specify the page size. z If...
... selected as the paper source. Glossy Photo Paper, Matte Photo Paper, Photo Plus Glossy, Plain paper, Photo Paper Pro (6) Adjust print quality according to enable manual intensity settings again and then specify the intensity. Important While Auto is selected, you can not change the paper source. (4) Specify the page size. z If...
Quick Start Guide
Page 31
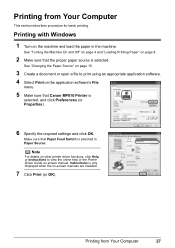
...Off" on page 4 and "Loading Printing Paper" on -screen manuals are installed. 7 Click Print (or OK). Instructions is only displayed when the on page 8. 2 Make sure that the proper paper source is selected. Make sure that Canon MP810 Printer is selected in the machine. Printing with Windows 1 Turn...Paper Source" on page 15. 3 Create a document or open a file to view the online help or the Printer Driver Guide on-screen manual. Note For details on other printer driver functions, click Help or Instructions to print using an appropriate application software. 4 Select Print on the ...
...Off" on page 4 and "Loading Printing Paper" on -screen manuals are installed. 7 Click Print (or OK). Instructions is only displayed when the on page 8. 2 Make sure that the proper paper source is selected. Make sure that Canon MP810 Printer is selected in the machine. Printing with Windows 1 Turn...Paper Source" on page 15. 3 Create a document or open a file to view the online help or the Printer Driver Guide on-screen manual. Note For details on other printer driver functions, click Help or Instructions to print using an appropriate application software. 4 Select Print on the ...

Quick Start Guide
Page 32
... paper in Paper Source. Note For details on other printer driver functions, click to print using an appropriate application software. 4 Select Page Setup on -screen manual. See "Changing the Paper Source" on page 15. 3 Create a document or open a file to view the Printer Driver Guide on the application software's .... 11 Click Print. 28 Printing from Your Computer See "Turning the Machine On and Off" on page 4 and "Loading Printing Paper" on -screen manual is not displayed even if is selected. If the on-screen manuals are not installed, the Printer Driver Guide on page 8. 2 Make sure that...
... paper in Paper Source. Note For details on other printer driver functions, click to print using an appropriate application software. 4 Select Page Setup on -screen manual. See "Changing the Paper Source" on page 15. 3 Create a document or open a file to view the Printer Driver Guide on the application software's .... 11 Click Print. 28 Printing from Your Computer See "Turning the Machine On and Off" on page 4 and "Loading Printing Paper" on -screen manual is not displayed even if is selected. If the on-screen manuals are not installed, the Printer Driver Guide on page 8. 2 Make sure that...
Quick Start Guide
Page 33
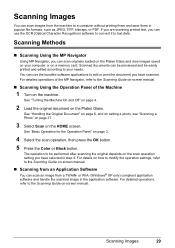
... and view images saved on your needs. You can use the OCR (Optical Character Recognition) software to convert it to the Scanning Guide on-screen manual. „ Scanning Using the Operation Panel of the MP Navigator, refer to text data. See "Turning the Machine On and Off" on page ...a TWAIN- See "Handling the Original Document" on page 6, and on setting a photo, see "Scanning a Photo" on page 37. 3 Select Scan on -screen manual. „ Scanning from an Application Software You can scan an image from the machine to a computer without printing them and save them in the application...
... and view images saved on your needs. You can use the OCR (Optical Character Recognition) software to convert it to the Scanning Guide on-screen manual. „ Scanning Using the Operation Panel of the MP Navigator, refer to text data. See "Turning the Machine On and Off" on page ...a TWAIN- See "Handling the Original Document" on page 6, and on setting a photo, see "Scanning a Photo" on page 37. 3 Select Scan on -screen manual. „ Scanning from an Application Software You can scan an image from the machine to a computer without printing them and save them in the application...
Quick Start Guide
Page 46
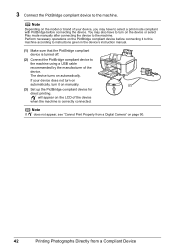
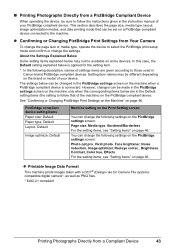
... on page 90. 42 Printing Photographs Directly from a Compliant Device If your device, you may also have to instructions given in the device's instruction manual. (1) Make sure that the PictBridge compliant device is correctly connected. will appear on the LCD of the device when the machine is turned off. ... If does not appear, see "Cannot Print Properly from a Digital Camera" on automatically. Perform necessary operations on the device or select Play mode manually after connecting the device to the machine. 3 Connect the PictBridge compliant device to the machine.
... on page 90. 42 Printing Photographs Directly from a Compliant Device If your device, you may also have to instructions given in the device's instruction manual. (1) Make sure that the PictBridge compliant device is correctly connected. will appear on the LCD of the device when the machine is turned off. ... If does not appear, see "Cannot Print Properly from a Digital Camera" on automatically. Perform necessary operations on the device or select Play mode manually after connecting the device to the machine. 3 Connect the PictBridge compliant device to the machine.
Quick Start Guide
Page 47
... and confirm or change the following description, names of settings items are in the Default setting items (the setting to follow the instructions given in Canon-brand PictBridge compliant devices. PictBridge compliant device setting items Paper size: Default Paper type: Default Layout: Default Image optimize: Default Machine setting on the Print..., be made in the PictBridge settings screen on the machine only when the corresponding items below are given according to those used in the instruction manual of your device. However, changes can be available on some devices.
... and confirm or change the following description, names of settings items are in the Default setting items (the setting to follow the instructions given in Canon-brand PictBridge compliant devices. PictBridge compliant device setting items Paper size: Default Paper type: Default Layout: Default Image optimize: Default Machine setting on the Print..., be made in the PictBridge settings screen on the machine only when the corresponding items below are given according to those used in the instruction manual of your device. However, changes can be available on some devices.
Quick Start Guide
Page 49
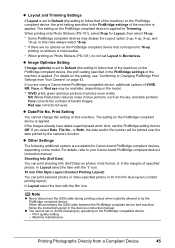
... Changing PictBridge Print Settings from a Compliant Device 45 NR (Noise Reduction) reduces noise in the device's instruction manual. The setting on the PictBridge compatible device. - If the images already have dates superimposed when shot, set ... given in blue portions, such as the sky, and dark portions. If you are available for Canon-brand PictBridge-compliant devices, depending on the PictBridge compliant device is applied. The setting on the model...Your Camera" on this PictBridge setting item to your Canon-brand PictBridge compliant device's instruction manual.
... Changing PictBridge Print Settings from a Compliant Device 45 NR (Noise Reduction) reduces noise in the device's instruction manual. The setting on the PictBridge compatible device. - If the images already have dates superimposed when shot, set ... given in blue portions, such as the sky, and dark portions. If you are available for Canon-brand PictBridge-compliant devices, depending on the PictBridge compliant device is applied. The setting on the model...Your Camera" on this PictBridge setting item to your Canon-brand PictBridge compliant device's instruction manual.
Quick Start Guide
Page 66
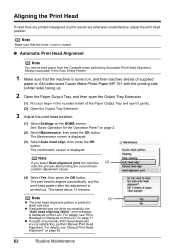
... is closed. „ Automatic Print Head Alignment Note You cannot feed paper from the Cassette when performing Automatic Print Head Alignment. For details, see "Manual Print Head Alignment" on the HOME screen. The confirmation screen is displayed. (3) Select Auto head align, then press the OK button. Note If you...and blue. For details, see "Error Message Is Displayed on the LCD" on , and then load two sheets of supplied paper or A4/Letter-sized Canon Matte Photo Paper MP-101 with the printing side (whiter side) facing up. 2 Open the Paper Output Tray, and then open it gently. (2) ...
... is closed. „ Automatic Print Head Alignment Note You cannot feed paper from the Cassette when performing Automatic Print Head Alignment. For details, see "Manual Print Head Alignment" on the HOME screen. The confirmation screen is displayed. (3) Select Auto head align, then press the OK button. Note If you...and blue. For details, see "Error Message Is Displayed on the LCD" on , and then load two sheets of supplied paper or A4/Letter-sized Canon Matte Photo Paper MP-101 with the printing side (whiter side) facing up. 2 Open the Paper Output Tray, and then open it gently. (2) ...


