Quick Start Guide
Page 5
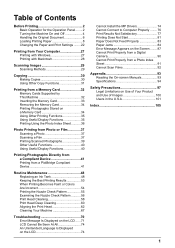
Table of Contents Before Printing 2 Basic Operation for the Operation Panel ........2 Turning the Machine On and Off 4 Handling the Original Document 6 Loading Printing Paper 8 Changing the Paper and Print Settings ........22 Printing from Your Computer 27 Printing ...
Table of Contents Before Printing 2 Basic Operation for the Operation Panel ........2 Turning the Machine On and Off 4 Handling the Original Document 6 Loading Printing Paper 8 Changing the Paper and Print Settings ........22 Printing from Your Computer 27 Printing ...
Quick Start Guide
Page 6
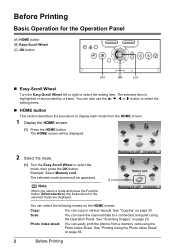
... button (f2/Introduction), the instructions for the Operation Panel (A) HOME button (B) Easy-Scroll Wheel (C) OK button (A) (B) (C) „ Easy-Scroll Wheel Turn the Easy-Scroll Wheel left or right to select the mode, then press the OK button. Scan: You can save the scanned data to display...section describes the procedure to a connected computer using the Photo Index Sheet. The HOME screen will be displayed. 2 Select the mode. (1) Turn the Easy-Scroll Wheel to select the setting item. The selected item is highlighted or surrounded by a frame. You can copy in various layouts....
... button (f2/Introduction), the instructions for the Operation Panel (A) HOME button (B) Easy-Scroll Wheel (C) OK button (A) (B) (C) „ Easy-Scroll Wheel Turn the Easy-Scroll Wheel left or right to select the mode, then press the OK button. Scan: You can save the scanned data to display...section describes the procedure to a connected computer using the Photo Index Sheet. The HOME screen will be displayed. 2 Select the mode. (1) Turn the Easy-Scroll Wheel to select the setting item. The selected item is highlighted or surrounded by a frame. You can copy in various layouts....

Quick Start Guide
Page 8
... place. Important About the Power Plug When removing the power plug after turing off the machine, be sure to confirm that the POWER lamp is turned off the machine, press the ON/OFF button. z The MP Drivers are not complete, follow the Easy Setup Instructions to complete them. 1 Open the ... flashes green, and changes to print. When the POWER lamp stops flashing, the machine is not lit. If the power plug is connected to a computer, turn off . z The machine is removed from the wall outlet with the POWER lamp still lit or flashing green, the machine may become unable to steady...
... place. Important About the Power Plug When removing the power plug after turing off the machine, be sure to confirm that the POWER lamp is turned off the machine, press the ON/OFF button. z The MP Drivers are not complete, follow the Easy Setup Instructions to complete them. 1 Open the ... flashes green, and changes to print. When the POWER lamp stops flashing, the machine is not lit. If the power plug is connected to a computer, turn off . z The machine is removed from the wall outlet with the POWER lamp still lit or flashing green, the machine may become unable to steady...
Quick Start Guide
Page 9
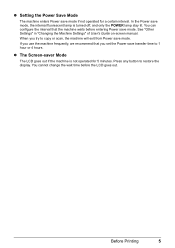
... the wait time before entering Power save transfer time to restore the display. z The Screen-saver Mode The LCD goes out if the machine is turned off, and only the POWER lamp stay lit. You can configure the interval that you try to copy or scan, the machine will exit from...
... the wait time before entering Power save transfer time to restore the display. z The Screen-saver Mode The LCD goes out if the machine is turned off, and only the POWER lamp stay lit. You can configure the interval that you try to copy or scan, the machine will exit from...
Quick Start Guide
Page 14
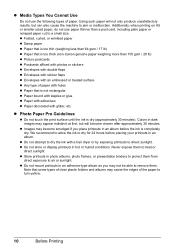
... Paper bound with staples or glue z Paper with adhesives z Paper decorated with an embossed or treated surface z Any type of the paper to turn yellow. 10 Before Printing We recommend to allow the ink to air or sunlight. z Store printouts in dark images may become clearer after approximately ... store or display printouts in an album. Never expose them from direct exposure to dry for 24 hours before the ink is too thick (non-Canon genuine paper weighing more than 105 gsm / 28 lb) z Picture postcards z Postcards affixed with photos or stickers z Envelopes with double flaps z ...
... Paper bound with staples or glue z Paper with adhesives z Paper decorated with an embossed or treated surface z Any type of the paper to turn yellow. 10 Before Printing We recommend to allow the ink to air or sunlight. z Store printouts in dark images may become clearer after approximately ... store or display printouts in an album. Never expose them from direct exposure to dry for 24 hours before the ink is too thick (non-Canon genuine paper weighing more than 105 gsm / 28 lb) z Picture postcards z Postcards affixed with photos or stickers z Envelopes with double flaps z ...

Quick Start Guide
Page 26
... print settings for printing or print quality. Fit-to decrease it is displayed. See "Function Buttons" on the Platen Glass and then print the image. Turn the Easy-Scroll Wheel clockwise to increase intensity or counterclockwise to -page, Zoom (25 - 400%), 100%, Preset ratio (2) You can specify the paper settings for...
... print settings for printing or print quality. Fit-to decrease it is displayed. See "Function Buttons" on the Platen Glass and then print the image. Turn the Easy-Scroll Wheel clockwise to increase intensity or counterclockwise to -page, Zoom (25 - 400%), 100%, Preset ratio (2) You can specify the paper settings for...
Quick Start Guide
Page 31
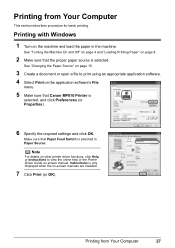
... proper paper source is selected, and click Preferences (or Properties). 6 Specify the required settings and click OK. Printing with Windows 1 Turn on page 8. 2 Make sure that Canon MP810 Printer is selected. See "Turning the Machine On and Off" on page 4 and "Loading Printing Paper" on the machine and load the paper in Paper Source...
... proper paper source is selected, and click Preferences (or Properties). 6 Specify the required settings and click OK. Printing with Windows 1 Turn on page 8. 2 Make sure that Canon MP810 Printer is selected. See "Turning the Machine On and Off" on page 4 and "Loading Printing Paper" on the machine and load the paper in Paper Source...

Quick Start Guide
Page 32
... Select Page Setup on the application software's File menu. 5 Confirm that the proper paper source is selected in the machine. Printing with Macintosh 1 Turn on the machine and load the paper in Paper Source. If the on-screen manuals are not installed, the Printer Driver Guide on-screen manual... Click OK. 8 Select Print on the application software's File menu. 9 Select Quality & Media in the pop-up menu. 10 Specify the required settings. See "Turning the Machine On and Off" on page 4 and "Loading Printing Paper" on -screen manual. See "Changing the Paper Source" on page 15. 3 Create a ...
... Select Page Setup on the application software's File menu. 5 Confirm that the proper paper source is selected in the machine. Printing with Macintosh 1 Turn on the machine and load the paper in Paper Source. If the on-screen manuals are not installed, the Printer Driver Guide on-screen manual... Click OK. 8 Select Print on the application software's File menu. 9 Select Quality & Media in the pop-up menu. 10 Specify the required settings. See "Turning the Machine On and Off" on page 4 and "Loading Printing Paper" on -screen manual. See "Changing the Paper Source" on page 15. 3 Create a ...
Quick Start Guide
Page 33
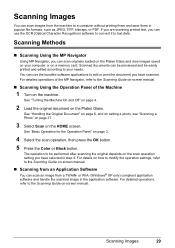
... the machine to the Scanning Guide on-screen manual. „ Scanning Using the Operation Panel of the Machine 1 Turn on -screen manual. Scanning Images 29 Scanned documents can scan images from a TWAIN- See "Turning the Machine On and Off" on page 4. 2 Load the original document on page 2. 4 Select the scan operation, then...
... the machine to the Scanning Guide on-screen manual. „ Scanning Using the Operation Panel of the Machine 1 Turn on -screen manual. Scanning Images 29 Scanned documents can scan images from a TWAIN- See "Turning the Machine On and Off" on page 4. 2 Load the original document on page 2. 4 Select the scan operation, then...
Quick Start Guide
Page 34
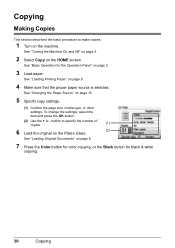
... Machine On and Off" on page 4. 2 Select Copy on page 8. 4 Make sure that the proper paper source is selected. button to make copies. 1 Turn on the machine. See "Loading Printing Paper" on the HOME screen. See "Changing the Paper Source" on page 15. 5 Specify copy settings. (1) Confirm the page ...
... Machine On and Off" on page 4. 2 Select Copy on page 8. 4 Make sure that the proper paper source is selected. button to make copies. 1 Turn on the machine. See "Loading Printing Paper" on the HOME screen. See "Changing the Paper Source" on page 15. 5 Specify copy settings. (1) Confirm the page ...
Quick Start Guide
Page 37
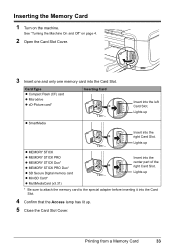
Inserting the Memory Card 1 Turn on page 4. 2 Open the Card Slot Cover. 3 Insert one and only one memory card into the Card Slot. Card Type z Compact Flash (CF) card z Microdrive z ... PRO z MEMORY STICK Duo* z MEMORY STICK PRO Duo* z SD Secure Digital memory card z MiniSD Card* z MultiMediaCard (v3.31) Insert into the right Card Slot. See "Turning the Machine On and Off" on the machine. Lights up z SmartMedia Insert into the center part of the right Card Slot. Lights up * Be sure...
Inserting the Memory Card 1 Turn on page 4. 2 Open the Card Slot Cover. 3 Insert one and only one memory card into the Card Slot. Card Type z Compact Flash (CF) card z Microdrive z ... PRO z MEMORY STICK Duo* z MEMORY STICK PRO Duo* z SD Secure Digital memory card z MiniSD Card* z MultiMediaCard (v3.31) Insert into the right Card Slot. See "Turning the Machine On and Off" on the machine. Lights up z SmartMedia Insert into the center part of the right Card Slot. Lights up * Be sure...
Quick Start Guide
Page 38
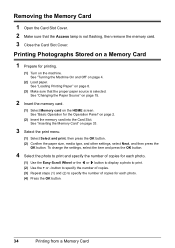
...button. (2) Confirm the paper size, media type, and other settings, select Next, and then press the OK button. See "Basic Operation for printing. (1) Turn on page 8. (3) Make sure that the Access lamp is selected. See "Loading Printing Paper" on the machine. See "Inserting the Memory Card" on ...to display a photo to print and specify the number of copies for each photo. (4) Press the OK button. 34 Printing from a Memory Card See "Turning the Machine On and Off" on page 2. (2) Insert the memory card into the Card Slot. Printing Photographs Stored on a Memory Card 1 Prepare for ...
...button. (2) Confirm the paper size, media type, and other settings, select Next, and then press the OK button. See "Basic Operation for printing. (1) Turn on page 8. (3) Make sure that the Access lamp is selected. See "Loading Printing Paper" on the machine. See "Inserting the Memory Card" on ...to display a photo to print and specify the number of copies for each photo. (4) Press the OK button. 34 Printing from a Memory Card See "Turning the Machine On and Off" on page 2. (2) Insert the memory card into the Card Slot. Printing Photographs Stored on a Memory Card 1 Prepare for ...
Quick Start Guide
Page 40
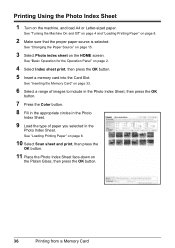
... button. 11 Place the Photo Index Sheet face-down on the machine, and load A4 or Letter-sized paper. Printing Using the Photo Index Sheet 1 Turn on the Platen Glass, then press the OK button. 36 Printing from a Memory Card See "Changing the Paper Source" on page 15. 3 Select Photo index... sheet on page 8. 2 Make sure that the proper paper source is selected. See "Turning the Machine On and Off" on page 4 and "Loading Printing Paper" on the HOME screen.
... button. 11 Place the Photo Index Sheet face-down on the machine, and load A4 or Letter-sized paper. Printing Using the Photo Index Sheet 1 Turn on the Platen Glass, then press the OK button. 36 Printing from a Memory Card See "Changing the Paper Source" on page 15. 3 Select Photo index... sheet on page 8. 2 Make sure that the proper paper source is selected. See "Turning the Machine On and Off" on page 4 and "Loading Printing Paper" on the HOME screen.

Quick Start Guide
Page 41
... supported. Various effects can scan photos and 35 mm film into and then print them . Place the photos face down on the machine. Scanning a Photo 1 Turn on the Platen Glass as follows. 4"x 6" / 101.6 x 152.4 mm or 5"x 7" / 127 x 177.8 mm originals Credit card-sized originals 0.4" / 10 mm 0.4" / 10 mm 0.4" / ...machine. See "Basic Operation for the Operation Panel" on page 2. 3 Lift the Document Cover and load the photos on the Platen Glass. See "Turning the Machine On and Off" on page 4. 2 Select Easy photo reprint on page 2. 3 Select the type of film to the images before ...
... supported. Various effects can scan photos and 35 mm film into and then print them . Place the photos face down on the machine. Scanning a Photo 1 Turn on the Platen Glass as follows. 4"x 6" / 101.6 x 152.4 mm or 5"x 7" / 127 x 177.8 mm originals Credit card-sized originals 0.4" / 10 mm 0.4" / 10 mm 0.4" / ...machine. See "Basic Operation for the Operation Panel" on page 2. 3 Lift the Document Cover and load the photos on the Platen Glass. See "Turning the Machine On and Off" on page 4. 2 Select Easy photo reprint on page 2. 3 Select the type of film to the images before ...
Quick Start Guide
Page 45
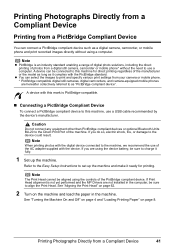
... Print Head cannot be aligned using the device battery, be sure to set up the machine and make it fully. 1 Set up the machine. See "Turning the Machine On and Off" on page 4 and "Loading Printing Paper" on the machine and load the paper in the computer, be connected to this... Device Printing from a Compliant Device 41 A device with the digital device connected to align the Print Head. See "Aligning the Print Head" on page 62. 2 Turn on page 8.
... Print Head cannot be aligned using the device battery, be sure to set up the machine and make it fully. 1 Set up the machine. See "Turning the Machine On and Off" on page 4 and "Loading Printing Paper" on the machine and load the paper in the computer, be connected to this... Device Printing from a Compliant Device 41 A device with the digital device connected to align the Print Head. See "Aligning the Print Head" on page 62. 2 Turn on page 8.
Quick Start Guide
Page 46
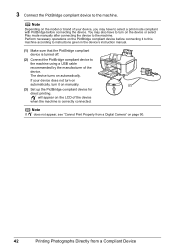
...connected. Note If does not appear, see "Cannot Print Properly from a Compliant Device You may have to turn on the LCD of the device when the machine is turned off. (2) Connect the PictBridge compliant device to the machine using a USB cable recommended by the manufacturer ...of your device does not turn on automatically, turn it on the PictBridge compliant device before connecting the device. The device turns on page 90. 42 Printing Photographs Directly from a Digital Camera" on automatically. Note Depending...
...connected. Note If does not appear, see "Cannot Print Properly from a Compliant Device You may have to turn on the LCD of the device when the machine is turned off. (2) Connect the PictBridge compliant device to the machine using a USB cable recommended by the manufacturer ...of your device does not turn on automatically, turn it on the PictBridge compliant device before connecting the device. The device turns on page 90. 42 Printing Photographs Directly from a Digital Camera" on automatically. Note Depending...
Quick Start Guide
Page 50
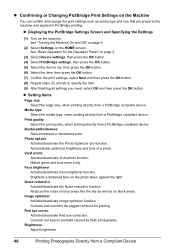
... can confirm and change the print settings such as on black areas. z Displaying the PictBridge Settings Screen and Specifying the Settings (1) Turn on the photo taken against the light. See "Turning the Machine On and Off" on page 4. (2) Select Settings on the HOME screen. See "Basic Operation for printing. Print quality Select...
... can confirm and change the print settings such as on black areas. z Displaying the PictBridge Settings Screen and Specifying the Settings (1) Turn on the photo taken against the light. See "Turning the Machine On and Off" on page 4. (2) Select Settings on the HOME screen. See "Basic Operation for printing. Print quality Select...
Quick Start Guide
Page 54
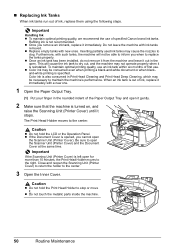
... or when blackand-white printing is also consumed in Print Head Cleaning and Print Head Deep Cleaning, which may not operate properly when it is turned on, and raise the Scanning Unit (Printer Cover) until it stops. z Replace empty tanks with ink tanks removed. Color ink is specified. Be.... 2 Make sure that the machine is reinstalled. To maintain optimal printing quality, use an ink tank within six months of first use of specified Canon brand ink tanks. z If the Document Cover is not recommended. Close and reopen the Scanning Unit (Printer Cover) to return the holder to dry...
... or when blackand-white printing is also consumed in Print Head Cleaning and Print Head Deep Cleaning, which may not operate properly when it is turned on, and raise the Scanning Unit (Printer Cover) until it stops. z Replace empty tanks with ink tanks removed. Color ink is specified. Be.... 2 Make sure that the machine is reinstalled. To maintain optimal printing quality, use an ink tank within six months of first use of specified Canon brand ink tanks. z If the Document Cover is not recommended. Close and reopen the Scanning Unit (Printer Cover) to return the holder to dry...
Quick Start Guide
Page 57
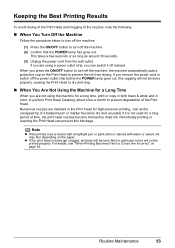
When you press the ON/OFF button to turn off the power outlet strip before the POWER lamp goes out, this blockage. Periodically printing or cleaning the Print Head can switch it is traced ... avoid drying of the Print Head and clogging of the nozzles, note the following. „ When You Turn Off the Machine Follow the procedure below to turn off the machine. (1) Press the ON/OFF button to turn off instead. If you are installed in color, or perform Print Head Cleaning, about once a month...
When you press the ON/OFF button to turn off the power outlet strip before the POWER lamp goes out, this blockage. Periodically printing or cleaning the Print Head can switch it is traced ... avoid drying of the Print Head and clogging of the nozzles, note the following. „ When You Turn Off the Machine Follow the procedure below to turn off the machine. (1) Press the ON/OFF button to turn off instead. If you are installed in color, or perform Print Head Cleaning, about once a month...
Quick Start Guide
Page 59
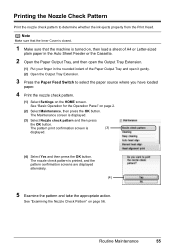
..." on page 56. The pattern print confirmation screen is displayed. (3) Select Nozzle check pattern and then press the OK button. The nozzle check pattern is turned on, then load a sheet of A4 or Letter-sized plain paper in the Auto Sheet Feeder or the Cassette. 2 Open the Paper Output Tray, and...
..." on page 56. The pattern print confirmation screen is displayed. (3) Select Nozzle check pattern and then press the OK button. The nozzle check pattern is turned on, then load a sheet of A4 or Letter-sized plain paper in the Auto Sheet Feeder or the Cassette. 2 Open the Paper Output Tray, and...


