On-Screen Manual
Page 7
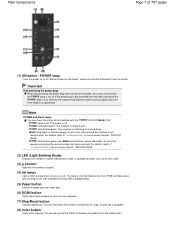
... Cartridge status. (5) Paper button Selects the page size and media type. (6) SCAN button Starts scanning the original to " Troubleshooting" in the on the computer. (7) Stop/Reset button Cancels operations. POWER lamp lights green: The machine is not ready to confirm that the POWER lamp is not lit. POWER lamp is off...
... Cartridge status. (5) Paper button Selects the page size and media type. (6) SCAN button Starts scanning the original to " Troubleshooting" in the on the computer. (7) Stop/Reset button Cancels operations. POWER lamp lights green: The machine is not ready to confirm that the POWER lamp is not lit. POWER lamp is off...
On-Screen Manual
Page 14
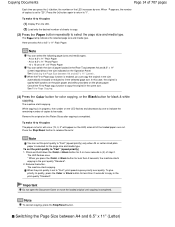
... on the LED flashes and decreases by one to indicate the remaining number of copies to be made. Press the Stop/Reset button to "1". Note To cancel copying, press the Stop/Reset button. Copying Documents Page 14 of 707 pages Each time you press the [ +] button, the number on the LED increases...
... on the LED flashes and decreases by one to indicate the remaining number of copies to be made. Press the Stop/Reset button to "1". Note To cancel copying, press the Stop/Reset button. Copying Documents Page 14 of 707 pages Each time you press the [ +] button, the number on the LED increases...
On-Screen Manual
Page 17
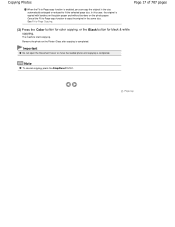
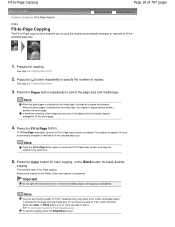
... Glass after copying is copied with borders on the plain paper and without borders on the photo paper. Note To cancel copying, press the Stop/Reset button. Cancel the Fit-to-Page copy function to copy the original in the size automatically enlarged or reduced to -Page Copying. In this case...
... Glass after copying is copied with borders on the plain paper and without borders on the photo paper. Note To cancel copying, press the Stop/Reset button. Cancel the Fit-to-Page copy function to copy the original in the size automatically enlarged or reduced to -Page Copying. In this case...
On-Screen Manual
Page 18
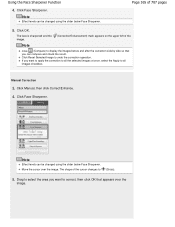
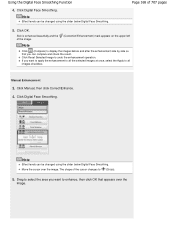
.... In borderless copying, slight cropping may occur at the edges since the copied image is enlarged to -Page copying. To cancel copying, press the Stop/Reset button. Prepare for 2 or more seconds in the size automatically enlarged or reduced to fit the selected page size. 1. See step 2 in Copying Documents. 2. The...
.... In borderless copying, slight cropping may occur at the edges since the copied image is enlarged to -Page copying. To cancel copying, press the Stop/Reset button. Prepare for 2 or more seconds in the size automatically enlarged or reduced to fit the selected page size. 1. See step 2 in Copying Documents. 2. The...
On-Screen Manual
Page 26
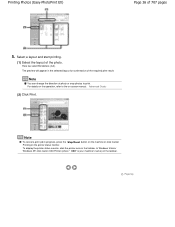
... a print job in the selected layout for confirmation of photo or crop photos to the on the taskbar. In Windows Vista or Windows XP, click Canon XXX Printer (where " XXX" is your machine's name) on -screen manual: Advanced Guide . (2) Click Print. Here we select Borderless (full). The ...preview will appear in progress, press the Stop/Reset button on the machine or click Cancel Printing on the taskbar. To display the printer status monitor, click the printer icon on the printer status...
... a print job in the selected layout for confirmation of photo or crop photos to the on the taskbar. In Windows Vista or Windows XP, click Canon XXX Printer (where " XXX" is your machine's name) on -screen manual: Advanced Guide . (2) Click Print. Here we select Borderless (full). The ...preview will appear in progress, press the Stop/Reset button on the machine or click Cancel Printing on the taskbar. To display the printer status monitor, click the printer icon on the printer status...
On-Screen Manual
Page 30
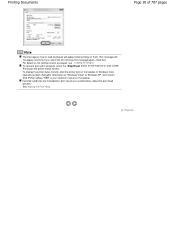
... Head . This message will appear when printing on them. In Windows Vista operating system (hereafter referred to as "Windows Vista") or Windows XP, click Canon XXX Printer (where " XXX" is your machine's name) on the settings to load envelopes will not appear next time if you select the Do not.... To display the printer status monitor, click the printer icon on the printer status monitor. To cancel a print job in progress, press the Stop/Reset button on the machine or click Cancel Printing on the taskbar. check box. Printing Documents Page 30 of 707 pages Note The message on how...
... Head . This message will appear when printing on them. In Windows Vista operating system (hereafter referred to as "Windows Vista") or Windows XP, click Canon XXX Printer (where " XXX" is your machine's name) on the settings to load envelopes will not appear next time if you select the Do not.... To display the printer status monitor, click the printer icon on the printer status monitor. To cancel a print job in progress, press the Stop/Reset button on the machine or click Cancel Printing on the taskbar. check box. Printing Documents Page 30 of 707 pages Note The message on how...
On-Screen Manual
Page 60
... position manually from the computer. Page top For details, refer to the on the LED, then press the Black or Color button. Press the Stop/Reset button to release the error, then refer to the copy standby mode. Important Do not open the Document Cover or move the loaded print head...
... position manually from the computer. Page top For details, refer to the on the LED, then press the Black or Color button. Press the Stop/Reset button to release the error, then refer to the copy standby mode. Important Do not open the Document Cover or move the loaded print head...
On-Screen Manual
Page 68
Note After the cleaning is completed, press the Stop/Reset button to return the LED to it is not resolved after the paper is turned on the LED, then press the Black or Color button. ...
Note After the cleaning is completed, press the Stop/Reset button to return the LED to it is not resolved after the paper is turned on the LED, then press the Black or Color button. ...
On-Screen Manual
Page 75
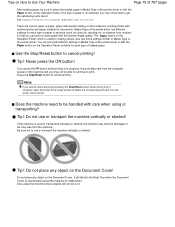
...or slanted. You can print with different settings in advance (such as using or transporting? Note If you cannot cancel printing by pressing the Stop/Reset button while printing from a computer, open the printer driver setup window to delete the unnecessary print jobs from Your Computer , and Media Types ... or ink may leak from the computer queues in Media Type of the printer driver or with the optimal image quality. Use the Stop/Reset button to cancel printing! Also, place the machine where objects will fall on the surface for printing photos with special coating on it. ...
...or slanted. You can print with different settings in advance (such as using or transporting? Note If you cannot cancel printing by pressing the Stop/Reset button while printing from a computer, open the printer driver setup window to delete the unnecessary print jobs from Your Computer , and Media Types ... or ink may leak from the computer queues in Media Type of the printer driver or with the optimal image quality. Use the Stop/Reset button to cancel printing! Also, place the machine where objects will fall on the surface for printing photos with special coating on it. ...
On-Screen Manual
Page 157
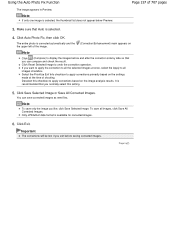
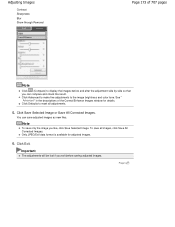
... appear below Preview. If you like, click Save Selected Image. Using the Auto Photo Fix Function The image appears in Preview. Deselect this setting. 5. Click Reset Selected Image to apply corrections based on Note Click (Compare) to display the images before saving corrected images. It is recommended that Auto is corrected...
... appear below Preview. If you like, click Save Selected Image. Using the Auto Photo Fix Function The image appears in Preview. Deselect this setting. 5. Click Reset Selected Image to apply corrections based on Note Click (Compare) to display the images before saving corrected images. It is recommended that Auto is corrected...
On-Screen Manual
Page 159
... over the image. The shape of Important Areas other than the eyes may be changed using the slider below Red-Eye Correction. Click OK. Click Reset Selected Image to display the images before and after the correction side by side so that Auto is selected. 4. Make sure that you can be...
... over the image. The shape of Important Areas other than the eyes may be changed using the slider below Red-Eye Correction. Click OK. Click Reset Selected Image to display the images before and after the correction side by side so that Auto is selected. 4. Make sure that you can be...
On-Screen Manual
Page 165
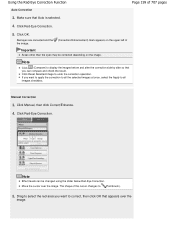
... apply the correction to all the selected images at once, select the Apply to undo the correction operation. Click Manual, then click Correct/Enhance. 4. Click Reset Selected Image to all images checkbox. Note Effect levels can be changed using the slider below Face Sharpener. Note Effect levels can be changed using...
... apply the correction to all the selected images at once, select the Apply to undo the correction operation. Click Manual, then click Correct/Enhance. 4. Click Reset Selected Image to all images checkbox. Note Effect levels can be changed using the slider below Face Sharpener. Note Effect levels can be changed using...
On-Screen Manual
Page 168
... Effect levels can be changed using the slider below Digital Face Smoothing. Drag to select the area you can compare and check the result. Click Reset Selected Image to (Cross). 5. Using the Digital Face Smoothing Function 4. Click Digital Face Smoothing. Click Manual, then click Correct/Enhance. 4. Move the cursor over the...
... Effect levels can be changed using the slider below Digital Face Smoothing. Drag to select the area you can compare and check the result. Click Reset Selected Image to (Cross). 5. Using the Digital Face Smoothing Function 4. Click Digital Face Smoothing. Click Manual, then click Correct/Enhance. 4. Move the cursor over the...
On-Screen Manual
Page 173
Important The adjustments will be lost if you like, click Save Selected Image. Page top Click Defaults to reset all images, click Save All Corrected Images. To save all adjustments. 5. Click Save Selected Image or Save All Corrected Images. Note To save only the ...
Important The adjustments will be lost if you like, click Save Selected Image. Page top Click Defaults to reset all images, click Save All Corrected Images. To save all adjustments. 5. Click Save Selected Image or Save All Corrected Images. Note To save only the ...
On-Screen Manual
Page 176
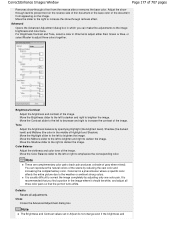
Reset Selected Image Cancels all images. Exit Click to sharpen the image. Sharpness Emphasizes the outline of the image. Move the slider to the right to ...
Reset Selected Image Cancels all images. Exit Click to sharpen the image. Sharpness Emphasizes the outline of the image. Move the slider to the right to ...
On-Screen Manual
Page 177
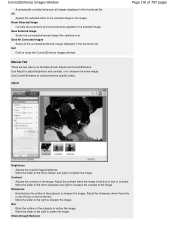
... difficult to the image brightness and color tone. It is a phenomenon where a specific color affects the entire picture due to emphasize the corresponding color. Defaults Resets all three color pairs so that you can reproduce the natural colors of the scene by specifying Highlight (the brightest level), Shadow (the darkest level...
... difficult to the image brightness and color tone. It is a phenomenon where a specific color affects the entire picture due to emphasize the corresponding color. Defaults Resets all three color pairs so that you can reproduce the natural colors of the scene by specifying Highlight (the brightest level), Shadow (the darkest level...
On-Screen Manual
Page 178
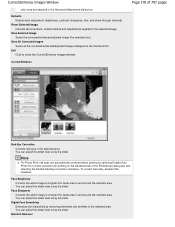
... brighten the facial area in and around the selected area. You can adjust the effect level using the slider. Defaults Resets each adjustment (brightness, contrast, sharpness, blur, and show-through removal). Reset Selected Image Cancels all the corrected/enhanced/adjusted images displayed in the thumbnail list. Correct/Enhance Images Window color tone...
... brighten the facial area in and around the selected area. You can adjust the effect level using the slider. Defaults Resets each adjustment (brightness, contrast, sharpness, blur, and show-through removal). Reset Selected Image Cancels all the corrected/enhanced/adjusted images displayed in the thumbnail list. Correct/Enhance Images Window color tone...
On-Screen Manual
Page 179
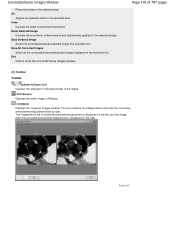
... (2) Toolbar Toolbar (Zoom In/Zoom Out) Displays the enlarged or reduced preview of the image. (Full Screen) Displays the entire image in the thumbnail list. Reset Selected Image Cancels all the corrected/enhanced/adjusted images displayed in Preview. (Compare) Displays the Compare Images window. Save Selected Image Saves the corrected/enhanced...
... (2) Toolbar Toolbar (Zoom In/Zoom Out) Displays the enlarged or reduced preview of the image. (Full Screen) Displays the entire image in the thumbnail list. Reset Selected Image Cancels all the corrected/enhanced/adjusted images displayed in Preview. (Compare) Displays the Compare Images window. Save Selected Image Saves the corrected/enhanced...
On-Screen Manual
Page 186
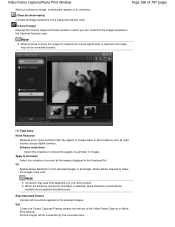
... checkbox to the selected images or all images. When the Enhance resolutions checkbox is captured, the image may not be overwritten by the corrected ones. Reset Selected Frames Cancels all corrections applied to correct all the images displayed in the thumbnail list. Source images will be reduced to the Video Frame...
... checkbox to the selected images or all images. When the Enhance resolutions checkbox is captured, the image may not be overwritten by the corrected ones. Reset Selected Frames Cancels all corrections applied to correct all the images displayed in the thumbnail list. Source images will be reduced to the Video Frame...
On-Screen Manual
Page 323
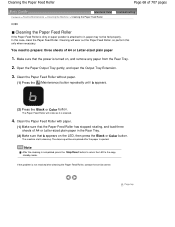
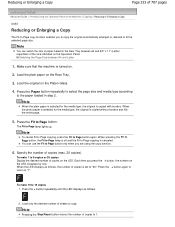
... according to "20". You can switch the size of paper loaded in step 2. Each time you are using the copy function. 6. Note Pressing the Stop/Reset button returns the number of copies to "1". Load the original on the Operation Panel. Press the + button again to return to 1. Switching the Page Size...
... according to "20". You can switch the size of paper loaded in step 2. Each time you are using the copy function. 6. Note Pressing the Stop/Reset button returns the number of copies to "1". Load the original on the Operation Panel. Press the + button again to return to 1. Switching the Page Size...


