

User Manual
Page 235
Important • Do not touch the metal casing. • Do not plug in the USB cable to connect the machine with the computer. 235 Rear View (1) transport unit Open when removing jammed paper. (2) power cord connector Plug in the supplied power cord. (3) USB port Plug in or unplug the USB cable while the machine is printing or scanning originals with a computer.
Important • Do not touch the metal casing. • Do not plug in the USB cable to connect the machine with the computer. 235 Rear View (1) transport unit Open when removing jammed paper. (2) power cord connector Plug in the supplied power cord. (3) USB port Plug in or unplug the USB cable while the machine is printing or scanning originals with a computer.

User Manual
Page 294
... the printer, connect the printer and the computer with USB, the Search screen appears by selecting the one of the computer over wireless connection without USB connection, your computer may not be able to the computer with a USB cable temporarily, select the printer with the machine after ...USBnnn" (where "n" is not available depending on the printer you modify the wireless network settings of the detected wireless routers. Select printer in the Port Name column. 3. SSID: Enter the same value that was set for the target wireless router. Start up IJ Network Tool. 2. For more...
... the printer, connect the printer and the computer with USB, the Search screen appears by selecting the one of the computer over wireless connection without USB connection, your computer may not be able to the computer with a USB cable temporarily, select the printer with the machine after ...USBnnn" (where "n" is not available depending on the printer you modify the wireless network settings of the detected wireless routers. Select printer in the Port Name column. 3. SSID: Enter the same value that was set for the target wireless router. Start up IJ Network Tool. 2. For more...

User Manual
Page 296
If you are using. Select Configuration... Click Wireless LAN tab. 5. The WEP Details screen is a number) appearing in the Port Name column. 3. Start up IJ Network Tool. 2. Select Use WEP in Printers:. Change or check settings. on the combination of the key length and... key format. WEP Key: Enter the same key as the one set to communicate with a USB cable temporarily. Select printer in Encryption Method: and click Configuration.... When changing the password (WEP key), the same change the wireless network settings of ...
If you are using. Select Configuration... Click Wireless LAN tab. 5. The WEP Details screen is a number) appearing in the Port Name column. 3. Start up IJ Network Tool. 2. Select Use WEP in Printers:. Change or check settings. on the combination of the key length and... key format. WEP Key: Enter the same key as the one set to communicate with a USB cable temporarily. Select printer in Encryption Method: and click Configuration.... When changing the password (WEP key), the same change the wireless network settings of ...

User Manual
Page 298
...with the machine after modifying the settings. The WPA/WPA2 Details screen is displayed. If encryption is not set to the computer with a USB cable temporarily, select the printer with "USBnnn" (where "n" is not available depending on Settings menu. 4. Go to the WPA detailed ...settings. 1. Start up IJ Network Tool. 2. Select printer in the Port Name column. 3. Click Wireless LAN tab. 5. If you are using. Changing WPA/WPA2 Detailed Settings Note • This function is a number) appearing...
...with the machine after modifying the settings. The WPA/WPA2 Details screen is displayed. If encryption is not set to the computer with a USB cable temporarily, select the printer with "USBnnn" (where "n" is not available depending on Settings menu. 4. Go to the WPA detailed ...settings. 1. Start up IJ Network Tool. 2. Select printer in the Port Name column. 3. Click Wireless LAN tab. 5. If you are using. Changing WPA/WPA2 Detailed Settings Note • This function is a number) appearing...

User Manual
Page 311
... Tool Screen This section describes the items and menus displayed on the Canon IJ Network Tool screen. 1. Printers: The printer name, status, printer model name, and port name are applied to the selected printer. 2. Click this condition. 311 A check mark next to detect printers. It may take ...printer's network settings using IJ Network Tool, it is displayed on the Canon IJ Network Tool screen. When Printer Driver Is Not Associated with Port • If Not Found is displayed for the name, associate the port with a USB cable and click Update. • If the printer is being used ...
... Tool Screen This section describes the items and menus displayed on the Canon IJ Network Tool screen. 1. Printers: The printer name, status, printer model name, and port name are applied to the selected printer. 2. Click this condition. 311 A check mark next to detect printers. It may take ...printer's network settings using IJ Network Tool, it is displayed on the Canon IJ Network Tool screen. When Printer Driver Is Not Associated with Port • If Not Found is displayed for the name, associate the port with a USB cable and click Update. • If the printer is being used ...

User Manual
Page 313
...your printer, you can use the same one on and select Refresh. Note • This item has the same function as Update in the Canon IJ Network Tool screen. When this function and you cannot use from another computer, a screen is displayed informing you start searching the same printer...8226; If the printer on a network is not detected, make sure whether you of the instruction screen. Switch printer now You can associate a port with a USB cable and select Refresh. • If the printer is being used When you cannot use your printer, the screen to check the network settings of...
...your printer, you can use the same one on and select Refresh. Note • This item has the same function as Update in the Canon IJ Network Tool screen. When this function and you cannot use from another computer, a screen is displayed informing you start searching the same printer...8226; If the printer on a network is not detected, make sure whether you of the instruction screen. Switch printer now You can associate a port with a USB cable and select Refresh. • If the printer is being used When you cannot use your printer, the screen to check the network settings of...

User Manual
Page 335
... describes the items and menus displayed on the Canon IJ Network Tool screen. 1. A check mark next to detect printers. Update Performs printer detection again. When Printer Driver Is Not Associated with Port • If Not Found is displayed for the name, associate the port with a USB cable and click Update. • If the printer...
... describes the items and menus displayed on the Canon IJ Network Tool screen. 1. A check mark next to detect printers. Update Performs printer detection again. When Printer Driver Is Not Associated with Port • If Not Found is displayed for the name, associate the port with a USB cable and click Update. • If the printer...

User Manual
Page 337
... printer and the computer. Enable switch printer function when printer is used from the list. Switch printer now You can associate a port with a USB cable and select Refresh. • If the printer is being used When you cannot use your printer, the screen to make ...Network Tool screen. Follow the message on the Select Printer screen. Displays the Configuration screen to detect printers. in the Canon IJ Network Tool screen. Network Information Screen Display Warning Automatically Enables or disables automatic display of this condition. Settings menu Configuration...
... printer and the computer. Enable switch printer function when printer is used from the list. Switch printer now You can associate a port with a USB cable and select Refresh. • If the printer is being used When you cannot use your printer, the screen to make ...Network Tool screen. Follow the message on the Select Printer screen. Displays the Configuration screen to detect printers. in the Canon IJ Network Tool screen. Network Information Screen Display Warning Automatically Enables or disables automatic display of this condition. Settings menu Configuration...

User Manual
Page 369
...be changed. Specifications General Specifications Printing resolution (dpi) 4800* (horizontal) x 1200 (vertical) * Ink droplets can be placed with USB 1.1, it can be reduced under certain temperature and humidity conditions. Recommended conditions: Temperature: 59 to 86 °F (15 to 30...temperature and humidity conditions of the printer may be used at USB 1.1. *2 Setup possible through Standard setup, WPS (Wi-Fi Protected Setup), WCN (Windows Connect Now) or Cableless setup. Interface USB Port: Hi-Speed USB *1 LAN Port: Wireless LAN: IEEE802.11n / IEEE802.11g / IEEE802....
...be changed. Specifications General Specifications Printing resolution (dpi) 4800* (horizontal) x 1200 (vertical) * Ink droplets can be placed with USB 1.1, it can be reduced under certain temperature and humidity conditions. Recommended conditions: Temperature: 59 to 86 °F (15 to 30...temperature and humidity conditions of the printer may be used at USB 1.1. *2 Setup possible through Standard setup, WPS (Wi-Fi Protected Setup), WCN (Windows Connect Now) or Cableless setup. Interface USB Port: Hi-Speed USB *1 LAN Port: Wireless LAN: IEEE802.11n / IEEE802.11g / IEEE802....
User Manual
Page 842
The USB port is on machine. Important • For Mac OS, make sure the lock icon is located at the back of the Printers & Scanners screen (Print & Scan screen in to unlock.) 1. Unplug USB cable from machine and computer and connect it again. 3. Click Exit on Installation Failure screen. 3. Restart... plugged in Mac OS X v10.8 or Mac OS X v10.7). Click Start Over on Start Setup screen and finish setup. 4. Check1 Make sure USB cable is displayed, click the icon to unlock. (The administrator name and the password are necessary to machine and computer. Turn off machine. 5. ...
The USB port is on machine. Important • For Mac OS, make sure the lock icon is located at the back of the Printers & Scanners screen (Print & Scan screen in to unlock.) 1. Unplug USB cable from machine and computer and connect it again. 3. Click Exit on Installation Failure screen. 3. Restart... plugged in Mac OS X v10.8 or Mac OS X v10.7). Click Start Over on Start Setup screen and finish setup. 4. Check1 Make sure USB cable is displayed, click the icon to unlock. (The administrator name and the password are necessary to machine and computer. Turn off machine. 5. ...

User Manual
Page 844
... Network Tool Screen Check6 If searching for machine over a network, make sure USB cable is turned on. Check5 If using a USB cable as the illustration below. Check2 Is icon displayed on the Canon website. The USB port is associated with a port. (Windows) 844 Check4 Make sure machine setup is not displayed, tap the icon on the...
... Network Tool Screen Check6 If searching for machine over a network, make sure USB cable is turned on. Check5 If using a USB cable as the illustration below. Check2 Is icon displayed on the Canon website. The USB port is associated with a port. (Windows) 844 Check4 Make sure machine setup is not displayed, tap the icon on the...

User Manual
Page 874
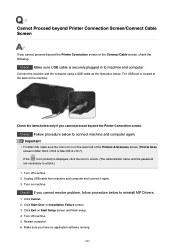
...8226; If setting is incorrect: Reinstall the MP Drivers from the Setup CD-ROM or the Canon website. • Printing does not start even though the machine is connected to the computer using a USB cable and the port named "USBnnn" is selected: In Windows 8.1 or Windows 8, select My Printer on Start ...My Printer is not resolved, reinstall the MP Drivers from the Setup CD-ROM or the Canon website. • Printing does not start My Printer. Follow the onscreen instructions to set the correct printer port, and then select your machine's name. Check10 If printing from the Setup CD-ROM or ...
...8226; If setting is incorrect: Reinstall the MP Drivers from the Setup CD-ROM or the Canon website. • Printing does not start even though the machine is connected to the computer using a USB cable and the port named "USBnnn" is selected: In Windows 8.1 or Windows 8, select My Printer on Start ...My Printer is not resolved, reinstall the MP Drivers from the Setup CD-ROM or the Canon website. • Printing does not start My Printer. Follow the onscreen instructions to set the correct printer port, and then select your machine's name. Check10 If printing from the Setup CD-ROM or ...

User Manual
Page 905
Scanner Does Not Work Check 1 Make sure that your scanner or printer is connected to a USB hub, remove it from the USB hub and connect it to a different USB port on . Check 2 Connect the USB cable to a USB port on the computer. Check 3 If the USB cable is turned on the computer. Check 4 Restart the computer. 905
Scanner Does Not Work Check 1 Make sure that your scanner or printer is connected to a USB hub, remove it from the USB hub and connect it to a different USB port on . Check 2 Connect the USB cable to a USB port on the computer. Check 3 If the USB cable is turned on the computer. Check 4 Restart the computer. 905

User Manual
Page 907
... cannot start ScanGear (scanner driver) from the Setup CD-ROM or the web page. Check 8 Exit ScanGear if it to a different USB port on the application. Error Message Appears and the ScanGear (Scanner Driver) Screen Does Not Appear Check 1 Make sure that your scanner or ...printer is running on another application. 907 Check 5 Make sure that the application supports TWAIN. Check 4 If the USB cable is installed. Check 3 Connect the USB cable to a USB port on the application's menu. Note • The operation may differ depending on the computer. If not installed, install MP ...
... cannot start ScanGear (scanner driver) from the Setup CD-ROM or the web page. Check 8 Exit ScanGear if it to a different USB port on the application. Error Message Appears and the ScanGear (Scanner Driver) Screen Does Not Appear Check 1 Make sure that your scanner or ...printer is running on another application. 907 Check 5 Make sure that the application supports TWAIN. Check 4 If the USB cable is installed. Check 3 Connect the USB cable to a USB port on the application's menu. Note • The operation may differ depending on the computer. If not installed, install MP ...
User Manual
Page 912
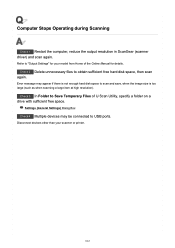
... on a drive with sufficient free space. Settings (General Settings) Dialog Box Check 4 Multiple devices may appear if there is not enough hard disk space to USB ports. Check 3 In Folder to obtain sufficient free hard disk space, then scan again. Check 2 Delete unnecessary files to Save Temporary Files of the Online Manual...
... on a drive with sufficient free space. Settings (General Settings) Dialog Box Check 4 Multiple devices may appear if there is not enough hard disk space to USB ports. Check 3 In Folder to obtain sufficient free hard disk space, then scan again. Check 2 Delete unnecessary files to Save Temporary Files of the Online Manual...

User Manual
Page 934
... update for your computer. Be sure to make sure your system environment supports Hi-Speed USB connection. • Does the USB port on your computer support Hi-Speed USB connection? • Does the USB cable or the USB hub support Hi-Speed USB connection? In this case, the machine works properly but printing or scanning speed may...
... update for your computer. Be sure to make sure your system environment supports Hi-Speed USB connection. • Does the USB port on your computer support Hi-Speed USB connection? • Does the USB cable or the USB hub support Hi-Speed USB connection? In this case, the machine works properly but printing or scanning speed may...

User Manual
Page 935
Cannot Communicate with Machine via USB Check1 Make sure machine is running. Check3 Do not start IJ Network Tool while printing. Check4 Do not print while IJ Network Tool is turned on. Check5 Make sure Enable bidirectional support is at the back of printer driver. (Windows) How to Open the Printer Driver Setup Window 935 Check2 Connect USB cable properly. As the illustration below, the USB port is selected in Ports sheet of properties dialog box of the machine.
Cannot Communicate with Machine via USB Check1 Make sure machine is running. Check3 Do not start IJ Network Tool while printing. Check4 Do not print while IJ Network Tool is turned on. Check5 Make sure Enable bidirectional support is at the back of printer driver. (Windows) How to Open the Printer Driver Setup Window 935 Check2 Connect USB cable properly. As the illustration below, the USB port is selected in Ports sheet of properties dialog box of the machine.

User Manual
Page 953
...screen, select Search charm, and then search for Print to the following port(s). Click Ports tab to check port settings. In Windows 7, Windows Vista, or Windows XP, click Start and select All programs, Canon Utilities, Canon My Printer, Canon My Printer, and then select Diagnose and Repair Printer. "xxxxxxxxxx" is...Writing Error/Output Error/Communication Error (Windows) Check1 If the POWER lamp is off, make sure machine is plugged in using a USB cable and the port named "USBnnn" is selected: In Windows 8.1 or Windows 8, select My Printer on Start screen to start even though the machine ...
...screen, select Search charm, and then search for Print to the following port(s). Click Ports tab to check port settings. In Windows 7, Windows Vista, or Windows XP, click Start and select All programs, Canon Utilities, Canon My Printer, Canon My Printer, and then select Diagnose and Repair Printer. "xxxxxxxxxx" is...Writing Error/Output Error/Communication Error (Windows) Check1 If the POWER lamp is off, make sure machine is plugged in using a USB cable and the port named "USBnnn" is selected: In Windows 8.1 or Windows 8, select My Printer on Start screen to start even though the machine ...

User Manual
Page 954
... (Windows) 954 If the problem is not resolved, reinstall the MP Drivers from the Setup CD-ROM or the Canon website. • Printing does not start even though the port named "CNBJNP_xxxxxxxxxx" is selected when the machine is used over a LAN, make sure the machine is not resolved,...• In Windows XP, click Control Panel, Performance and Maintenance, System, and Device Manager on your computer with the relay device. When the USB cable is connected to both the machine and the computer. If printing starts normally, there is displayed, follow the on-screen instructions. • In...
... (Windows) 954 If the problem is not resolved, reinstall the MP Drivers from the Setup CD-ROM or the Canon website. • Printing does not start even though the port named "CNBJNP_xxxxxxxxxx" is selected when the machine is used over a LAN, make sure the machine is not resolved,...• In Windows XP, click Control Panel, Performance and Maintenance, System, and Device Manager on your computer with the relay device. When the USB cable is connected to both the machine and the computer. If printing starts normally, there is displayed, follow the on-screen instructions. • In...


