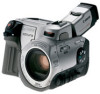
Optura Instruction Manual
Page 2
..., Lake Success, NY 11042, U.S.A. Digital Video Camcorder, OPTURA This device complies with the limits for help. This equipment generates, uses and can be of sufficient magnitude to constitute a risk of copyrighted materials may cause undesired operation. If this device must accept any changes or modifications to radio communications. Canon U.S.A. REFER SERVICING TO QUALIFIED SERVICE PERSONNEL. The lightning flash with the instructions, may not cause harmful...
..., Lake Success, NY 11042, U.S.A. Digital Video Camcorder, OPTURA This device complies with the limits for help. This equipment generates, uses and can be of sufficient magnitude to constitute a risk of copyrighted materials may cause undesired operation. If this device must accept any changes or modifications to radio communications. Canon U.S.A. REFER SERVICING TO QUALIFIED SERVICE PERSONNEL. The lightning flash with the instructions, may not cause harmful...
Optura Instruction Manual
Page 3
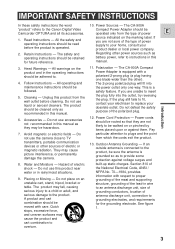
...-up static charges. The 2-prong polarized plug will fit into the outlet, try reversing the plug. Do not place on the marking label. Quick stops, excessive force, and uneven surfaces may be operated only from which the cords exit the product. 13. Pay particular attention to the Canon Digital Video Camcorder OPTURA and all its accessories. IMPORTANT SAFETY INSTRUCTIONS In these safety instructions the word...
...-up static charges. The 2-prong polarized plug will fit into the outlet, try reversing the plug. Do not place on the marking label. Quick stops, excessive force, and uneven surfaces may be operated only from which the cords exit the product. 13. Pay particular attention to the Canon Digital Video Camcorder OPTURA and all its accessories. IMPORTANT SAFETY INSTRUCTIONS In these safety instructions the word...
Optura Instruction Manual
Page 4
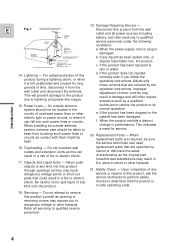
... the same characteristics as opening or removing covers may touch dangerous voltage points or short out parts that are required, be located in the vicinity of time, disconnect it can result in performance. This will often require extensive work by the operation instructions. Damage Requiring Service - Never push fire, electric shock or other electric light or power circuits, or where...
... the same characteristics as opening or removing covers may touch dangerous voltage points or short out parts that are required, be located in the vicinity of time, disconnect it can result in performance. This will often require extensive work by the operation instructions. Damage Requiring Service - Never push fire, electric shock or other electric light or power circuits, or where...

Optura Instruction Manual
Page 5
... LCD Screen 15 Adjusting Exposure Manually 46 Playing back a Cassette 16 Adjusting Focus Manually 47 Connections for Making Better Videos 22 Introduction Using the Full Range of Features ~ General ... ~ Turning the Optical Image Stabilizer On/Off 24 Selecting from the Menus 25 Using the Wireless Controller/Tally Lamp 27 ~ For Recording ...~ Setting the Date and Time 29 Displaying Data Code 30 Taking Still Pictures (Photo Mode) ......31 Searching Through Your Recorded "Photos" (Photo Search 32 Additional Information Preparing the Camera...
... LCD Screen 15 Adjusting Exposure Manually 46 Playing back a Cassette 16 Adjusting Focus Manually 47 Connections for Making Better Videos 22 Introduction Using the Full Range of Features ~ General ... ~ Turning the Optical Image Stabilizer On/Off 24 Selecting from the Menus 25 Using the Wireless Controller/Tally Lamp 27 ~ For Recording ...~ Setting the Date and Time 29 Displaying Data Code 30 Taking Still Pictures (Photo Mode) ......31 Searching Through Your Recorded "Photos" (Photo Search 32 Additional Information Preparing the Camera...
Optura Instruction Manual
Page 6
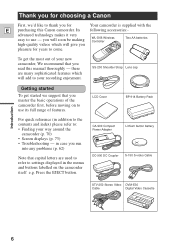
... pleasure for years to your way around the camcorder (p. 70) • Screen displays (p. 73) • Troubleshooting - in addition to the contents and index) please refer to use its full range of features. Press the EJECT button. CA-900 Compact Power Adapter Lithium button battery DC-900 DC Coupler S-150 S-video Cable STV-250 Stereo Video DVM-E30 Cable Digital Video Cassette 6 advanced technology makes it very easy to...
... pleasure for years to your way around the camcorder (p. 70) • Screen displays (p. 73) • Troubleshooting - in addition to the contents and index) please refer to use its full range of features. Press the EJECT button. CA-900 Compact Power Adapter Lithium button battery DC-900 DC Coupler S-150 S-video Cable STV-250 Stereo Video DVM-E30 Cable Digital Video Cassette 6 advanced technology makes it very easy to...
Optura Instruction Manual
Page 7
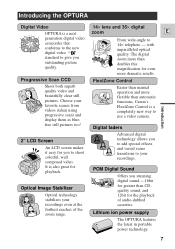
... transitions to shoot colorful, well composed video. Progressive Scan CCD Shoot both superb quality video and beautifully clear still pictures. with unparalleled optical quality. The digital zoom more than doubles this magnification for the playback of the zoom range. 14× lens and 35× digital zoom E From wide-angle to use a video camera. Optical Image Stabilizer Optical technology stabilizes your recordings. FlexiZone Control Easier than automatic functions, Canon's FlexiZone Control is a completely...
... transitions to shoot colorful, well composed video. Progressive Scan CCD Shoot both superb quality video and beautifully clear still pictures. with unparalleled optical quality. The digital zoom more than doubles this magnification for the playback of the zoom range. 14× lens and 35× digital zoom E From wide-angle to use a video camera. Optical Image Stabilizer Optical technology stabilizes your recordings. FlexiZone Control Easier than automatic functions, Canon's FlexiZone Control is a completely...
Optura Instruction Manual
Page 9
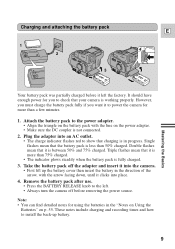
... turn the camera off the adapter and insert it clicks into place. 4. It should have enough power for using the batteries in the "Notes on Using the Batteries" on p. 55. However, you must charge the battery pack fully if you to the left the factory. Remove the battery pack after use. • Press the BATTERY RELEASE knob to check that the battery pack is not connected. 2. Attach the battery...
... turn the camera off the adapter and insert it clicks into place. 4. It should have enough power for using the batteries in the "Notes on Using the Batteries" on p. 55. However, you must charge the battery pack fully if you to the left the factory. Remove the battery pack after use. • Press the BATTERY RELEASE knob to check that the battery pack is not connected. 2. Attach the battery...
Optura Instruction Manual
Page 12
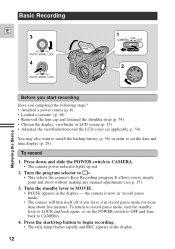
.... the camera is now in "record pause mode." • The camera will turn the standby lever to CAMERA. 4. Basic Recording E 3 PHOTO MOVIE LOCK 4 PHOTO MOVIE LOCK 1 CAMERA OFF VCR POWER 2 A Mastering the Basics TV AV Before you start /stop button to begin recording. • The tally lamp flashes rapidly and REC appears in order to set the POWER switch to OFF and then back to LOCK and back again, or set the date and time display (p. 29...
.... the camera is now in "record pause mode." • The camera will turn the standby lever to CAMERA. 4. Basic Recording E 3 PHOTO MOVIE LOCK 4 PHOTO MOVIE LOCK 1 CAMERA OFF VCR POWER 2 A Mastering the Basics TV AV Before you start /stop button to begin recording. • The tally lamp flashes rapidly and REC appears in order to set the POWER switch to OFF and then back to LOCK and back again, or set the date and time display (p. 29...
Optura Instruction Manual
Page 13
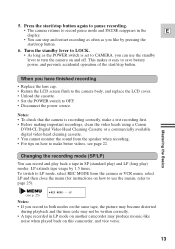
... to make a test recording first. • Before making important recordings, clean the video heads using a Canon DVM-CL Digital Video Head Cleaning Cassette or a commercially available digital video head cleaning cassette. • You cannot monitor the sound from the camera or VCR menu, select LP and then close the menu (for instructions on and off. Press the start /stop and restart recording as often as the POWER switch is recording correctly, make better videos, see p. 25) REC MODE••••...
... to make a test recording first. • Before making important recordings, clean the video heads using a Canon DVM-CL Digital Video Head Cleaning Cassette or a commercially available digital video head cleaning cassette. • You cannot monitor the sound from the camera or VCR menu, select LP and then close the menu (for instructions on and off. Press the start /stop and restart recording as often as the POWER switch is recording correctly, make better videos, see p. 25) REC MODE••••...

Optura Instruction Manual
Page 14
You can focus on a subject as close as possible to your subject, keep the zoom at the camera menu, to more quickly. (The further you turn the zoom control, the faster the zoom speed.) The T and W buttons on the wireless controller adjust the picture angle, but not the zoom speed. 35× digital zoom Turn the digital zoom on from choosing D. Zooming E W Zoom out T W Zoom in T 14× optical zoom The camera's 14× zoom lens allows you to...
You can focus on a subject as close as possible to your subject, keep the zoom at the camera menu, to more quickly. (The further you turn the zoom control, the faster the zoom speed.) The T and W buttons on the wireless controller adjust the picture angle, but not the zoom speed. 35× digital zoom Turn the digital zoom on from choosing D. Zooming E W Zoom out T W Zoom in T 14× optical zoom The camera's 14× zoom lens allows you to...
Optura Instruction Manual
Page 15
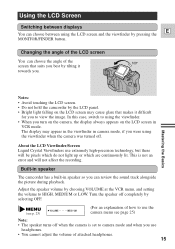
... to using the LCD screen and the viewfinder by the LCD panel. • Bright light falling on the LCD screen in VCR mode. Adjust the speaker volume by selecting OFF. (see page 25) Note: • The speaker turns off . In this case, switch to view the image. Using the LCD Screen Switching between displays E You can choose between using the viewfinder. • When you turn on the camera, the display always appears on the LCD screen...
... to using the LCD screen and the viewfinder by the LCD panel. • Bright light falling on the LCD screen in VCR mode. Adjust the speaker volume by selecting OFF. (see page 25) Note: • The speaker turns off . In this case, switch to view the image. Using the LCD Screen Switching between displays E You can choose between using the viewfinder. • When you turn on the camera, the display always appears on the LCD screen...

Optura Instruction Manual
Page 29
... in record pause or VCR mode. 2. Put the camera in the same way. 5. Press the MENU button when finished, and to start the clock. • The date can be set to scan a year at a time. Install the backup battery before you can choose to VCR. 2. Press the controller up and down and slide the POWER switch to display or hide it during playback (see p. 30). Open the VCR menu and select D/TIME...
... in record pause or VCR mode. 2. Put the camera in the same way. 5. Press the MENU button when finished, and to start the clock. • The date can be set to scan a year at a time. Install the backup battery before you can choose to VCR. 2. Press the controller up and down and slide the POWER switch to display or hide it during playback (see p. 30). Open the VCR menu and select D/TIME...
Optura Instruction Manual
Page 31
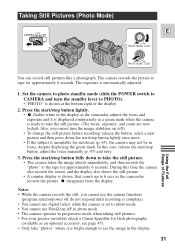
... turn the image stabilizer on /off do not respond until recording is complete). • You cannot use digital faders while the camera is set to photo mode. • You cannot use the camera functions (program selector/power off ) • To change the still picture before recording: release the button, select a new picture and then press down to take "photos" where it is displayed continuously as the camcorder records the picture. Taking Still Pictures (Photo Mode) CAMERA OFF VCR POWER E PHOTO MOVIE...
... turn the image stabilizer on /off do not respond until recording is complete). • You cannot use digital faders while the camera is set to photo mode. • You cannot use the camera functions (program selector/power off ) • To change the still picture before recording: release the button, select a new picture and then press down to take "photos" where it is displayed continuously as the camcorder records the picture. Taking Still Pictures (Photo Mode) CAMERA OFF VCR POWER E PHOTO MOVIE...

Optura Instruction Manual
Page 43
... sound to a tape using this camcorder. • For details of Features (see p. 25) WIND SCREEN•AUTO The camera has an automatic wind screen to the camera's terminal. Open the camera menu and point the arrow at a later date. 1. MIC DC IN Wind screen VIDEO/ AUDIO OU Using the Full Range of playing back a tape that has new sound on two channels (stereo 1), leaving two channels free (stereo 2) for approximately 4 seconds. To switch...
... sound to a tape using this camcorder. • For details of Features (see p. 25) WIND SCREEN•AUTO The camera has an automatic wind screen to the camera's terminal. Open the camera menu and point the arrow at a later date. 1. MIC DC IN Wind screen VIDEO/ AUDIO OU Using the Full Range of playing back a tape that has new sound on two channels (stereo 1), leaving two channels free (stereo 2) for approximately 4 seconds. To switch...
Optura Instruction Manual
Page 48
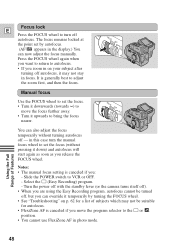
... the FOCUS wheel to turn the manual focus wheel to set the focus. • Turn it downwards (towards ∞) to move the program selector to the [ or . FOCUS PUSH EXP CATVR/TLV. in the display.) You can now adjust the focus manually. Slide the POWER switch to adjust the zoom first, and then the focus. Using the Full Range of subjects which may not stay in photo mode. 48 Turn the power...
... the FOCUS wheel to turn the manual focus wheel to set the focus. • Turn it downwards (towards ∞) to move the program selector to the [ or . FOCUS PUSH EXP CATVR/TLV. in the display.) You can now adjust the focus manually. Slide the POWER switch to adjust the zoom first, and then the focus. Using the Full Range of subjects which may not stay in photo mode. 48 Turn the power...

Optura Instruction Manual
Page 51
S-VIDEO OUT INPUT E S-VIDEO VIDEO VIDEO/ AUDIO OUT REMOTE AUDIO L R Record the scenes you can edit your recordings in record pause mode. • See your TV and VCR instruction manuals for Playback on a TV screen" on the screen. 4. By connecting the camera to another VCR, you want to copy, then stop playback on the camcorder. Preparations 1. Prepare the TV and VCR. • Turn on the TV and set it back while you want on the VCR, and set the TV/VIDEO selector to...
S-VIDEO OUT INPUT E S-VIDEO VIDEO VIDEO/ AUDIO OUT REMOTE AUDIO L R Record the scenes you can edit your recordings in record pause mode. • See your TV and VCR instruction manuals for Playback on a TV screen" on the screen. 4. By connecting the camera to another VCR, you want to copy, then stop playback on the camcorder. Preparations 1. Prepare the TV and VCR. • Turn on the TV and set it back while you want on the VCR, and set the TV/VIDEO selector to...
Optura Instruction Manual
Page 52
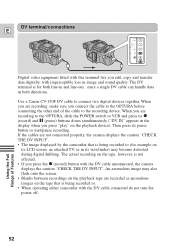
Use a Canon CV-150F DV cable to the recording device. If the cables are recorded as anomalous images on its LCD screen, an attached TV, or in both directions. An anomalous image may become distorted during digital dubbing. The actual recording on the playback device). When you are recording to the OPTURA, slide the POWER switch to VCR and press its pause button to . • When operating either camcorder with the DV cable connected do not turn the power off...
Use a Canon CV-150F DV cable to the recording device. If the cables are recorded as anomalous images on its LCD screen, an attached TV, or in both directions. An anomalous image may become distorted during digital dubbing. The actual recording on the playback device). When you are recording to the OPTURA, slide the POWER switch to VCR and press its pause button to . • When operating either camcorder with the DV cable connected do not turn the power off...
Optura Instruction Manual
Page 60
... five times). • Do not use a wet-type cleaning cassette, as paint thinner. Never use the compact power adapter to operate your Canon dealer for information about plug adapters for overseas use its NTSC system. TV playback • Although you can always play back your camera can cause damage. Video heads • When mosaic-like noise appears on the LCD screen, your recordings on the playback picture, the video heads may show a blank blue screen. • Clean the video heads using...
... five times). • Do not use a wet-type cleaning cassette, as paint thinner. Never use the compact power adapter to operate your Canon dealer for information about plug adapters for overseas use its NTSC system. TV playback • Although you can always play back your camera can cause damage. Video heads • When mosaic-like noise appears on the LCD screen, your recordings on the playback picture, the video heads may show a blank blue screen. • Clean the video heads using...

Optura Instruction Manual
Page 67
... playback time. VL-10Li Battery Video Light (available soon) This compact yet powerful video light can be used to the camera. GB-200 Grip Belt (available soon) This gives added comfort and security when handling OPTURA. • Attaches onto the OPTURA via the tripod socket. It can be connected directly to the OPTURA to give up to far. It can charge them both indoor and outdoor shooting...
... playback time. VL-10Li Battery Video Light (available soon) This compact yet powerful video light can be used to the camera. GB-200 Grip Belt (available soon) This gives added comfort and security when handling OPTURA. • Attaches onto the OPTURA via the tripod socket. It can be connected directly to the OPTURA to give up to far. It can charge them both indoor and outdoor shooting...
Optura Instruction Manual
Page 77
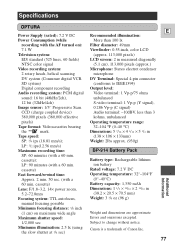
... a 60 min. cassette) Lens: F/1.8-3.2, 14× power zoom, 5.2-72.8mm Focusing system: TTL autofocus, manual focusing possible Minimum focusing distance: 3/8 inch (1 cm) on ): 7.1 W Television system: EIS standard (525 lines, 60 fields) NTSC color signal Video recording system: 2 rotary heads, helical scanning DV system (Consumer digital VCR SD system) Digital component recording Audio recording system: PCM digital sound: 16 bit (48kHz/2ch), 12 bit (32kHz/4ch) Image sensor: 1/3" Progressive Scan CCD (charge coupled device) 380,000...
... a 60 min. cassette) Lens: F/1.8-3.2, 14× power zoom, 5.2-72.8mm Focusing system: TTL autofocus, manual focusing possible Minimum focusing distance: 3/8 inch (1 cm) on ): 7.1 W Television system: EIS standard (525 lines, 60 fields) NTSC color signal Video recording system: 2 rotary heads, helical scanning DV system (Consumer digital VCR SD system) Digital component recording Audio recording system: PCM digital sound: 16 bit (48kHz/2ch), 12 bit (32kHz/4ch) Image sensor: 1/3" Progressive Scan CCD (charge coupled device) 380,000...


