ZoomBrowser EX 6.5 for Windows Instruction Manual
Page 4
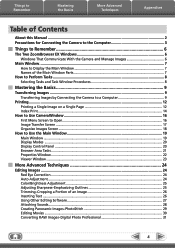
... to Open...16 Image Transfer Screen...17 Organize Images Screen...18 How to Use the Main Window 19 Main Window...19 Display Modes ...20 Display Control Panel...20 Browser Area Tasks...21 Properties Window...22 Viewer Window...23 More Advanced Techniques 24 Editing Images...24 Red Eye Correction...24 Auto Adjustment...24...
... to Open...16 Image Transfer Screen...17 Organize Images Screen...18 How to Use the Main Window 19 Main Window...19 Display Modes ...20 Display Control Panel...20 Browser Area Tasks...21 Properties Window...22 Viewer Window...23 More Advanced Techniques 24 Editing Images...24 Red Eye Correction...24 Auto Adjustment...24...
ZoomBrowser EX 6.5 for Windows Instruction Manual
Page 20
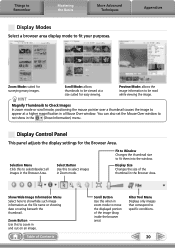
... image information as the file name or shooting date or rating beneath the thumbnail. You can also set the Mouse Over window to specific conditions. 20 Display Size Changes the size of Contents Scroll Button Use this to fit them into the window. Selection Menu Click this when in zoom mode...
... image information as the file name or shooting date or rating beneath the thumbnail. You can also set the Mouse Over window to specific conditions. 20 Display Size Changes the size of Contents Scroll Button Use this to fit them into the window. Selection Menu Click this when in zoom mode...
ZoomBrowser EX 6.5 for Windows Instruction Manual
Page 30
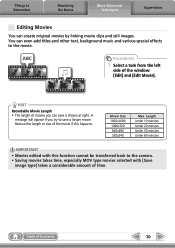
... happens. Movie Size 1920x1080 1280x720 640x480 320x240 Max. You can create original movies by linking movie clips and still images. Length Under 10 minutes Under 20 minutes Under 30 minutes Under 60 minutes IMPORTANT • Movies edited with [Save image type] takes a considerable amount of movies you try to save is...
... happens. Movie Size 1920x1080 1280x720 640x480 320x240 Max. You can create original movies by linking movie clips and still images. Length Under 10 minutes Under 20 minutes Under 30 minutes Under 60 minutes IMPORTANT • Movies edited with [Save image type] takes a considerable amount of movies you try to save is...
DV Messenger Ver 1.0 Instruction Manual
Page 20
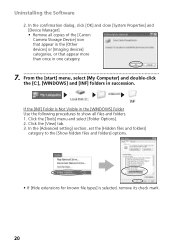
... folders] options. • If [Hide extensions for known file types] is selected, remove its check mark. 20 In the [Advanced setting] section, set the [Hidden files and folders] category to show all copies of the [Canon Camera Storage Device] icon that appear in the [Other devices] or [Imaging devices] categories, or that...
... folders] options. • If [Hide extensions for known file types] is selected, remove its check mark. 20 In the [Advanced setting] section, set the [Hidden files and folders] category to show all copies of the [Canon Camera Storage Device] icon that appear in the [Other devices] or [Imaging devices] categories, or that...
OPTURA Xi Instruction Manual
Page 4
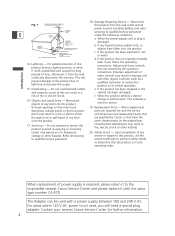
...spill liquid of any voltage or other hazards. b. even if you will prevent damage to the product due to the responsible nearest Canon Service Center and please replace it from the wall outlet and all servicing service or repairs to qualified service personnel E GROUND CLAMP ...under the following conditions: a. When replacement dangerous voltage points or short out parts parts are covered by Canon or that Be careful not to dangerous 20. Do not attempt to service this product from the wall outlet and disconnect the antenna. When the power-supply ...
...spill liquid of any voltage or other hazards. b. even if you will prevent damage to the product due to the responsible nearest Canon Service Center and please replace it from the wall outlet and all servicing service or repairs to qualified service personnel E GROUND CLAMP ...under the following conditions: a. When replacement dangerous voltage points or short out parts parts are covered by Canon or that Be careful not to dangerous 20. Do not attempt to service this product from the wall outlet and disconnect the antenna. When the power-supply ...

OPTURA Xi Instruction Manual
Page 6
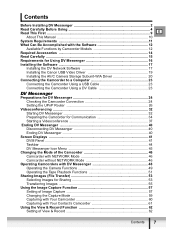
... Guide ...5 Thank You for Choosing a Canon 9 Introducing the OPTURA Xi 10 Components Guide ...11 Mastering the Basics Introduction Preparations Using a Household Power Source 15 Attaching and Charging the Battery Pack 16 Installing the Backup Battery 19 Preparing the Camcorder 20 Loading a Cassette ...22 Using the Wireless... Range of Features General Menus and Settings ...43 Changing the Remote Sensor Mode 51 Customizing the Camcorder 52 Using the Custom Key 53 Other Camcorder Settings 54 Recording Changing the Recording Mode (SP/LP 56 Recording Still Images on the Tape ...
... Guide ...5 Thank You for Choosing a Canon 9 Introducing the OPTURA Xi 10 Components Guide ...11 Mastering the Basics Introduction Preparations Using a Household Power Source 15 Attaching and Charging the Battery Pack 16 Installing the Backup Battery 19 Preparing the Camcorder 20 Loading a Cassette ...22 Using the Wireless... Range of Features General Menus and Settings ...43 Changing the Remote Sensor Mode 51 Customizing the Camcorder 52 Using the Custom Key 53 Other Camcorder Settings 54 Recording Changing the Recording Mode (SP/LP 56 Recording Still Images on the Tape ...

OPTURA Xi Instruction Manual
Page 12
... protect cover (p. 161) Zoom lever (p. 30) Advanced accessory shoe (p. 78) Accessory Shoe Cover (p. 21) Viewfinder (p. 20) PHOTO button (p. 57, 113) POWER indicator Start/stop button (p. 28, 113) POWER switch (p. 8) CAMERA OFF PLAY(VCR) NETWORK* (phones) terminal (p. 39, 77) Built-in speaker (p. ...
... protect cover (p. 161) Zoom lever (p. 30) Advanced accessory shoe (p. 78) Accessory Shoe Cover (p. 21) Viewfinder (p. 20) PHOTO button (p. 57, 113) POWER indicator Start/stop button (p. 28, 113) POWER switch (p. 8) CAMERA OFF PLAY(VCR) NETWORK* (phones) terminal (p. 39, 77) Built-in speaker (p. ...
OPTURA Xi Instruction Manual
Page 20
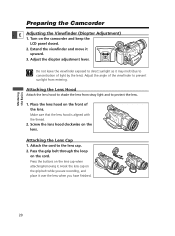
Mastering the Basics Preparing the Camcorder E Adjusting the Viewfinder (Diopter Adjustment) 1. Do not leave the viewfinder exposed to direct sunlight as it over the lens when you have finished. 20 Place the lens hood on the grip belt while you are recording, and place it may melt (due to the lens cap...1. Make sure that the lens hood is aligned with the thread. 2. Screw the lens hood clockwise on the cord. Press the buttons on the camcorder and keep the LCD panel closed. 2. Turn on the lens cap when attaching/removing it upward. 3. Attaching the Lens Hood Attach the lens hood ...
Mastering the Basics Preparing the Camcorder E Adjusting the Viewfinder (Diopter Adjustment) 1. Do not leave the viewfinder exposed to direct sunlight as it over the lens when you have finished. 20 Place the lens hood on the grip belt while you are recording, and place it may melt (due to the lens cap...1. Make sure that the lens hood is aligned with the thread. 2. Screw the lens hood clockwise on the cord. Press the buttons on the camcorder and keep the LCD panel closed. 2. Turn on the lens cap when attaching/removing it upward. 3. Attaching the Lens Hood Attach the lens hood ...

OPTURA Xi Instruction Manual
Page 26
... ❍ Once you have set the time zone to open the menu. 26 Press the MENU button to the one of your destination, and the camcorder automatically adjusts the clock. ❍ Days per month and leap years will be automatically adjusted. Mastering the Basics 16 E 19... 20 18 17 15 21 1 2 24 4 3 6 7 9 10 5 8 23 14 22 12 11 13 14 15 16 17 18 19 20 21 22 23 24 1 2 3 4 5 6 7 8 9 10 11 12 13 No. Time zone LONDON PARIS CAIRO MOSCOW DUBAI...
... ❍ Once you have set the time zone to open the menu. 26 Press the MENU button to the one of your destination, and the camcorder automatically adjusts the clock. ❍ Days per month and leap years will be automatically adjusted. Mastering the Basics 16 E 19... 20 18 17 15 21 1 2 24 4 3 6 7 9 10 5 8 23 14 22 12 11 13 14 15 16 17 18 19 20 21 22 23 24 1 2 3 4 5 6 7 8 9 10 11 12 13 No. Time zone LONDON PARIS CAIRO MOSCOW DUBAI...

OPTURA Xi Instruction Manual
Page 29
...cap. 4. This has no longer than 10 seconds may be difficult to protect tape and video heads. Recordings shorter than 10 seconds. ❍ The camcorder will shut off . ❍ For extra recording time, see Changing the Recording Mode ( 56). ❍ About the LCD and viewfinder screen: ...camcorder off after 5 minutes when left in record pause mode to edit later. When recording outdoors or through a window, do not leave LCD screen, viewfinder or lens exposed to direct sunlight as it may occasionally misfire or appear as black or green dots. " AUTO POWER OFF" appears 20...
...cap. 4. This has no longer than 10 seconds may be difficult to protect tape and video heads. Recordings shorter than 10 seconds. ❍ The camcorder will shut off . ❍ For extra recording time, see Changing the Recording Mode ( 56). ❍ About the LCD and viewfinder screen: ...camcorder off after 5 minutes when left in record pause mode to edit later. When recording outdoors or through a window, do not leave LCD screen, viewfinder or lens exposed to direct sunlight as it may occasionally misfire or appear as black or green dots. " AUTO POWER OFF" appears 20...

OPTURA Xi Instruction Manual
Page 113
...it for a moment while the camcorder is focusing. • Focus can record still images with the camcorder, from devices connected via the DV terminal or AV terminal ( 116). Set the camcorder to a computer regularly. Using a Memory Card 113 " AUTO POWER OFF" appears 20 seconds before shutoff. A white... focusing frame appears in the center of the screen. The camcorder will focus on the memory card to CARD CAMERA mode...
...it for a moment while the camcorder is focusing. • Focus can record still images with the camcorder, from devices connected via the DV terminal or AV terminal ( 116). Set the camcorder to a computer regularly. Using a Memory Card 113 " AUTO POWER OFF" appears 20 seconds before shutoff. A white... focusing frame appears in the center of the screen. The camcorder will focus on the memory card to CARD CAMERA mode...

OPTURA Xi Instruction Manual
Page 123
...card access indicator is set to allow recording. ❍ Do not load/unload a cassette during recording. ❍ Make sure to insert a memory card with the camcorder. To use the self-timer ( 74), press the press the start /stop button. (self-timer) button before step 2 and Using a Memory Card 123 Set... the still images and movies on the memory card to a computer regularly. ❍ We recommend a file size of 1 MB (352 × 288: approx. 20 sec., 176 × 144: approx. 60 sec.) if you are using a SD Memory Card, make sure that the protect switch is flashing. Press the start...
...card access indicator is set to allow recording. ❍ Do not load/unload a cassette during recording. ❍ Make sure to insert a memory card with the camcorder. To use the self-timer ( 74), press the press the start /stop button. (self-timer) button before step 2 and Using a Memory Card 123 Set... the still images and movies on the memory card to a computer regularly. ❍ We recommend a file size of 1 MB (352 × 288: approx. 20 sec., 176 × 144: approx. 60 sec.) if you are using a SD Memory Card, make sure that the protect switch is flashing. Press the start...

OPTURA Xi Instruction Manual
Page 165
...not Autofocus does not work on the TV Set the selector to VIDEO. Adjust the volume with 20 the diopter adjustment lever. Camcorder will not appear on the screen. Adjust the viewfinder with 20 the diopter adjustment lever. Video heads are not set, or the backup time, or replace ...the backup the screen. Recording Problem Cause Solution Image will not appear Camcorder is not set to Set the camcorder to play back Stop playback/dubbing. ...
...not Autofocus does not work on the TV Set the selector to VIDEO. Adjust the volume with 20 the diopter adjustment lever. Camcorder will not appear on the screen. Adjust the viewfinder with 20 the diopter adjustment lever. Video heads are not set, or the backup time, or replace ...the backup the screen. Recording Problem Cause Solution Image will not appear Camcorder is not set to Set the camcorder to play back Stop playback/dubbing. ...

OPTURA Xi Instruction Manual
Page 167
System Diagram (Availability differs from area to area) E WS-20 Wrist Strap WD-H46 Wideconverter SS-600 Shoulder Strap TL-H46 Teleconverter FS-H46U Filter Set WL-D81 Wireless MiniDV Controller Video Cassette CG-580 ... Card MultiMediaCard PC Card Adapter USB Reader/Writer IFC-300PCU USB Cable Computer Additional Information SC-1000 Soft Carrying Case SC-A50 Soft Carrying Case Canon printers with direct print function/ PictBridge-compliant printers 167
System Diagram (Availability differs from area to area) E WS-20 Wrist Strap WD-H46 Wideconverter SS-600 Shoulder Strap TL-H46 Teleconverter FS-H46U Filter Set WL-D81 Wireless MiniDV Controller Video Cassette CG-580 ... Card MultiMediaCard PC Card Adapter USB Reader/Writer IFC-300PCU USB Cable Computer Additional Information SC-1000 Soft Carrying Case SC-A50 Soft Carrying Case Canon printers with direct print function/ PictBridge-compliant printers 167
OPTURA Xi Instruction Manual
Page 170
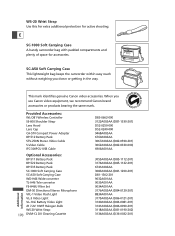
...-50 Directional Stereo Microphone VFL-1 Video Flash Light VL-3 Video Light VL-10Li Battery Video Light JR 7.2V 10WF Halogen Bulb WS-20 Wrist Strap 170 DVM-CL DV Cleaning Cassette D83-0662-000 3122A002AA (D81-1330-201) D52-0250-000 D52-0240-000 9468A002AA 6760A002AA...Additional Information SORY CA UINE VIDE O ACCES This mark identifies genuine Canon video accessories. SC-A50 Soft Carrying Case This lightweight bag keeps the camcorder within easy reach without weighing you use Canon video equipment, we recommend Canon-brand accessories or products bearing the same mark. When you down or...
...-50 Directional Stereo Microphone VFL-1 Video Flash Light VL-3 Video Light VL-10Li Battery Video Light JR 7.2V 10WF Halogen Bulb WS-20 Wrist Strap 170 DVM-CL DV Cleaning Cassette D83-0662-000 3122A002AA (D81-1330-201) D52-0250-000 D52-0240-000 9468A002AA 6760A002AA...Additional Information SORY CA UINE VIDE O ACCES This mark identifies genuine Canon video accessories. SC-A50 Soft Carrying Case This lightweight bag keeps the camcorder within easy reach without weighing you use Canon video equipment, we recommend Canon-brand accessories or products bearing the same mark. When you down or...
OPTURA Xi Instruction Manual
Page 171
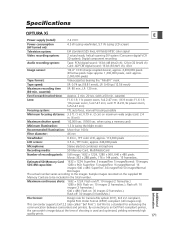
...: 1/2,000 sec. (1/500 sec. By connecting to the images. Fast forward/rewind time: Approx. 2 min. 20 sec. (with a 60 min. Sample images recorded on : 30 images (2 frames/sec.); Specifications OPTURA Xi E Power supply (rated): 7.4 V DC Power consumption (AF turned on): 4.5 W (using viewfinder), 5.7 W...shooting is a standard for Camera File system (DCF), Exif 2.2 compliant, Digital Print Order Format (DPOF) compliant (still images only) This camcorder supports Exif 2.2 (also called "Exif Print"). Estimated SD Memory Card 1632 × 1224: Superfine: 3 images/Fine: 5 images/Normal:...
...: 1/2,000 sec. (1/500 sec. By connecting to the images. Fast forward/rewind time: Approx. 2 min. 20 sec. (with a 60 min. Sample images recorded on : 30 images (2 frames/sec.); Specifications OPTURA Xi E Power supply (rated): 7.4 V DC Power consumption (AF turned on): 4.5 W (using viewfinder), 5.7 W...shooting is a standard for Camera File system (DCF), Exif 2.2 compliant, Digital Print Order Format (DPOF) compliant (still images only) This camcorder supports Exif 2.2 (also called "Exif Print"). Estimated SD Memory Card 1632 × 1224: Superfine: 3 images/Fine: 5 images/Normal:...

OPTURA Xi Instruction Manual
Page 173
Index 112bit audio 107 16:9 wide screen 54 6-second auto date 93 A Abroad, using the camcorder . . . 163 Accessories 9, 168 Advanced accessory shoe . . 21, 78-81 AF assist lamp 60 Analog line-in 98 Analog-digital converter 101 Aperture 88 Aperture-Priority (... 138 G Grip belt 21 H Headphones 39, 77 I Image quality 110 Image stabilizer 73 Index screen 126 L LCD mirror mode 33 LCD screen 32 Lens cap 20 LP mode 56 M Magnifying the image 91 Maintenance 160 Manual focus 82 173 Additional Information TV 40 Connections -
Index 112bit audio 107 16:9 wide screen 54 6-second auto date 93 A Abroad, using the camcorder . . . 163 Accessories 9, 168 Advanced accessory shoe . . 21, 78-81 AF assist lamp 60 Analog line-in 98 Analog-digital converter 101 Aperture 88 Aperture-Priority (... 138 G Grip belt 21 H Headphones 39, 77 I Image quality 110 Image stabilizer 73 Index screen 126 L LCD mirror mode 33 LCD screen 32 Lens cap 20 LP mode 56 M Magnifying the image 91 Maintenance 160 Manual focus 82 173 Additional Information TV 40 Connections -

OPTURA Xi Instruction Manual
Page 174
... Tripod 36 Troubleshooting 164 TV Screen 40, 153 U USB terminal 139 V Video heads 161 Video ID-1 system 40 Video light 78, 79 Videocassettes 22 Viewfinder 20, 161 W White balance 89 Wide screen 54 Wind screen 77 Wireless controller 14, 24, 51 Z Zebra Pattern 85 Zero set memory 95 Zooming 30
... Tripod 36 Troubleshooting 164 TV Screen 40, 153 U USB terminal 139 V Video heads 161 Video ID-1 system 40 Video light 78, 79 Videocassettes 22 Viewfinder 20, 161 W White balance 89 Wide screen 54 Wind screen 77 Wireless controller 14, 24, 51 Z Zebra Pattern 85 Zero set memory 95 Zooming 30

DIGITAL VIDEO SOLUTION DISK Ver.8 Software Instruction Manual
Page 20
Select [Specify a location:] and click [Browse]. 20 Installing the Software 7. Select [Search for the best driver for your device [Recommended].] and click [Next]. 8.
Select [Specify a location:] and click [Browse]. 20 Installing the Software 7. Select [Search for the best driver for your device [Recommended].] and click [Next]. 8.
DV NETWORK SOLUTION DISK Ver.2 Software Instruction Manual
Page 7
...Installing the DV Network Software 17 Installing the Canon USB Video Driver 19 Installing the AV/C Camera Storage Subunit-WIA Driver 20 Connecting the Camcorder to a Computer 23 Connecting the Camcorder Using a USB Cable 23 Connecting the Camcorder Using a DV Cable 23 DV Messenger ...Preparations for DV Messenger 24 Checking the Camcorder Connection 24 Setting the UPnP Router 26...
...Installing the DV Network Software 17 Installing the Canon USB Video Driver 19 Installing the AV/C Camera Storage Subunit-WIA Driver 20 Connecting the Camcorder to a Computer 23 Connecting the Camcorder Using a USB Cable 23 Connecting the Camcorder Using a DV Cable 23 DV Messenger ...Preparations for DV Messenger 24 Checking the Camcorder Connection 24 Setting the UPnP Router 26...


