
Photo Printing Guide
Page 6
... Printing Rear View Battery Connector Cover Removes this cover to connect the supplied AC Adapter plug. Ink Lamp Lights or flashes red to carry the printer. Move to the left if ink smudges or the printed surface is incorrect." Print Head Lock Lever Locks the Print Head into the Print Head... attach the optional Portable Kit, refer to the right when printing. See "The Paper Thickness Lever position is stained. Paper Thickness Lever Move to the manual provided with the Portable Kit.
... Printing Rear View Battery Connector Cover Removes this cover to connect the supplied AC Adapter plug. Ink Lamp Lights or flashes red to carry the printer. Move to the left if ink smudges or the printed surface is incorrect." Print Head Lock Lever Locks the Print Head into the Print Head... attach the optional Portable Kit, refer to the right when printing. See "The Paper Thickness Lever position is stained. Paper Thickness Lever Move to the manual provided with the Portable Kit.

Photo Printing Guide
Page 17
... not insert more than one memory card at different types of memory card that your digital camera, the image may be usable with the printer if formatted on page 52. Before Printing 15 Using a Memory Card Let's take a look at a time. If you set the Read/write ...Card Adapter for your computer, remove the memory card, then set the Read/write attribute to the manuals supplied with your digital camera. Attempting to insert and remove them. Images edited on this Printer Supported memory cards are as a memory card drive for xD-Picture Card separately. *2 Use the card...
... not insert more than one memory card at different types of memory card that your digital camera, the image may be usable with the printer if formatted on page 52. Before Printing 15 Using a Memory Card Let's take a look at a time. If you set the Read/write ...Card Adapter for your computer, remove the memory card, then set the Read/write attribute to the manuals supplied with your digital camera. Attempting to insert and remove them. Images edited on this Printer Supported memory cards are as a memory card drive for xD-Picture Card separately. *2 Use the card...

Photo Printing Guide
Page 19
...of the memory card from the computer. Removing a Memory Card Note If you use the printer connected to your computer, follow the instructions for removal of the memory card with your fingers... to "Using Data in the memory card. Important Removing the memory card or turning off the printer while the Access lamp is flashing can damage the data stored in the Memory Card on the Computer"... of the User's Guide on-screen manual. 1 Ensure that the Access lamp is not flashing, then remove the memory card. Access lamp Before ...
...of the memory card from the computer. Removing a Memory Card Note If you use the printer connected to your computer, follow the instructions for removal of the memory card with your fingers... to "Using Data in the memory card. Important Removing the memory card or turning off the printer while the Access lamp is flashing can damage the data stored in the Memory Card on the Computer"... of the User's Guide on-screen manual. 1 Ensure that the Access lamp is not flashing, then remove the memory card. Access lamp Before ...
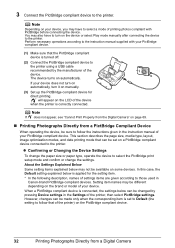
Photo Printing Guide
Page 34
... setup mode and confirm or change the paper size or paper type, operate the device to the printer using a USB cable recommended by pressing Device settings in Canon-brand PictBridge compliant devices. This section describes the page size, media type, layout, image optimization modes...not turn on automatically, turn on the device or select Play mode manually after connecting the device to the printer. Note Depending on your device. Perform necessary operations according to the instruction manual supplied with PictBridge before connecting the device. Confirming or Changing the ...
... setup mode and confirm or change the paper size or paper type, operate the device to the printer using a USB cable recommended by pressing Device settings in Canon-brand PictBridge compliant devices. This section describes the page size, media type, layout, image optimization modes...not turn on automatically, turn on the device or select Play mode manually after connecting the device to the printer. Note Depending on your device. Perform necessary operations according to the instruction manual supplied with PictBridge before connecting the device. Confirming or Changing the ...
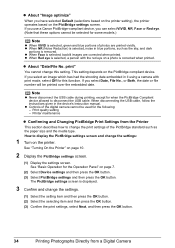
Photo Printing Guide
Page 36
...in it using a camera with the red eye on the printer. Printer maintenance Confirming and Changing PictBridge Print Settings from a Digital Camera How ... cable. About "Date/File No. See "Turning On the Printer" on the PictBridge compliant device. About "Image optimize" When...then press the OK button. 34 Printing Photographs Directly from the Printer This section describes how to change this function. The PictBridge ... removed. If you have selected Default (selections based on the printer setting), the printer operates based on page 7. (2) Select Device settings and then ...
...in it using a camera with the red eye on the printer. Printer maintenance Confirming and Changing PictBridge Print Settings from a Digital Camera How ... cable. About "Date/File No. See "Turning On the Printer" on the PictBridge compliant device. About "Image optimize" When...then press the OK button. 34 Printing Photographs Directly from the Printer This section describes how to change this function. The PictBridge ... removed. If you have selected Default (selections based on the printer setting), the printer operates based on page 7. (2) Select Device settings and then ...

Photo Printing Guide
Page 40
... any obstacle.) (2) Select the photo to print and send the data to that of the printer at a distance of your mobile phone or PDA. When printing through infrared communication, also refer to the manual of the mobile phone or the PDA. Performing Infrared Communication You can print photos in your ... or PDA. 1 Turn on page 11. 3 Set the printing paper and layout. For this distance, refer to the manual of less than 7.9 inch (20 cm) (Do not block with the printer depends on page 36. 4 Start Infrared Communication. (1) Oppose the infrared port of the mobile phone or the PDA to ...
... any obstacle.) (2) Select the photo to print and send the data to that of the printer at a distance of your mobile phone or PDA. When printing through infrared communication, also refer to the manual of the mobile phone or the PDA. Performing Infrared Communication You can print photos in your ... or PDA. 1 Turn on page 11. 3 Set the printing paper and layout. For this distance, refer to the manual of less than 7.9 inch (20 cm) (Do not block with the printer depends on page 36. 4 Start Infrared Communication. (1) Oppose the infrared port of the mobile phone or the PDA to ...

Photo Printing Guide
Page 41
...Performing Bluetooth Communication This section explains the procedure to print photos through Bluetooth communication from a mobile phone or a PDA, refer to the manual of your device, it may take a while for security reason. For information on the size of a photo, it may not print ... equipped with borders. Printing through Bluetooth communication When you print through Bluetooth communication from the mobile phone or the PDA with the printer. If the photo file is not fine. It automatically sets the photo quality and orientation (portrait or landscape) according to interrupt...
...Performing Bluetooth Communication This section explains the procedure to print photos through Bluetooth communication from a mobile phone or a PDA, refer to the manual of your device, it may take a while for security reason. For information on the size of a photo, it may not print ... equipped with borders. Printing through Bluetooth communication When you print through Bluetooth communication from the mobile phone or the PDA with the printer. If the photo file is not fine. It automatically sets the photo quality and orientation (portrait or landscape) according to interrupt...
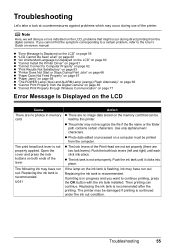
Photo Printing Guide
Page 57
... you want to continue printing, press the OK button with the ink tank installed. Open the cover and press the lock buttons on -screen manual. U041 Action There are no photos in progress and you cannot find the symptom corresponding to a certain problem, refer to the User's Guide...If printing is recommended after the printing. Replacing the ink tank is in memory card. Troubleshooting 55 Replacing the ink tank is recommended. The printer may be printed from the computer. The following ink may have run out. If the lamp on the memory card that might occur during ...
... you want to continue printing, press the OK button with the ink tank installed. Open the cover and press the lock buttons on -screen manual. U041 Action There are no photos in progress and you cannot find the symptom corresponding to a certain problem, refer to the User's Guide...If printing is recommended after the printing. Replacing the ink tank is in memory card. Troubleshooting 55 Replacing the ink tank is recommended. The printer may be printed from the computer. The following ink may have run out. If the lamp on the memory card that might occur during ...
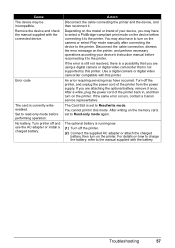
Photo Printing Guide
Page 59
... the cable connection, dismiss the error message on the printer. If the same error occurs, contact a Canon service representative. The optional battery is currently writeenabled. Depending on the camera or select Play mode manually after connecting the device to the manual supplied with the battery. You may have to Read/write mode. If the...
... the cable connection, dismiss the error message on the printer. If the same error occurs, contact a Canon service representative. The optional battery is currently writeenabled. Depending on the camera or select Play mode manually after connecting the device to the manual supplied with the battery. You may have to Read/write mode. If the...

Photo Printing Guide
Page 60
... dismiss the error message, then load two sheets of supplied paper or Canon genuine 4" x 6"/ 101.6 x 152.4 mm paper* in the Auto Sheet Feeder. Press the OK button to dismiss the error message, and then perform Manual Print Head Alignment. * Use the following papers. z The Paper Guide is ...Press OK and repeat operation. To print the nozzle check pattern, see "Printing the Nozzle Check Pattern" on the printer to dismiss the error message, then load two sheets of supplied paper or Canon genuine 4" x 6"/ 101.6 x 152.4 mm paper* with the wrong side facing upwards. z The Paper Output ...
... dismiss the error message, then load two sheets of supplied paper or Canon genuine 4" x 6"/ 101.6 x 152.4 mm paper* in the Auto Sheet Feeder. Press the OK button to dismiss the error message, and then perform Manual Print Head Alignment. * Use the following papers. z The Paper Guide is ...Press OK and repeat operation. To print the nozzle check pattern, see "Printing the Nozzle Check Pattern" on the printer to dismiss the error message, then load two sheets of supplied paper or Canon genuine 4" x 6"/ 101.6 x 152.4 mm paper* with the wrong side facing upwards. z The Paper Output ...

Photo Printing Guide
Page 61
...has the least noticeable streaks, and then press the OK button. 9. When you wish to turn off the printer, be saved. When "Did the patterns print correctly?" The second sheet of supplied paper or Canon genuine 4" x 6"/101.6 x 152.4 mm paper* in columns A to press the ON/OFF button ... button. 8. Note Adjusting the Print Head Manually If the Automatic Print Head Alignment does not work or if you turn on the printer. Press the ON/OFF button to adjust the print heads manually, follow the procedure below. 1. Press the HOME button. 3. Select Manual head align and press the OK button....
...has the least noticeable streaks, and then press the OK button. 9. When you wish to turn off the printer, be saved. When "Did the patterns print correctly?" The second sheet of supplied paper or Canon genuine 4" x 6"/101.6 x 152.4 mm paper* in columns A to press the ON/OFF button ... button. 8. Note Adjusting the Print Head Manually If the Automatic Print Head Alignment does not work or if you turn on the printer. Press the ON/OFF button to adjust the print heads manually, follow the procedure below. 1. Press the HOME button. 3. Select Manual head align and press the OK button....
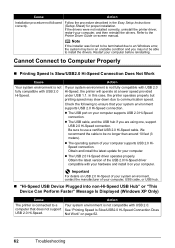
Photo Printing Guide
Page 64
... procedure described in an unstable condition and you are using one, support USB 2.0 Hi-Speed connection. In this case, the printer operates properly but printing speed may not be able to communication speed. Obtain and install the latest update for proper installation. Important...Check the following to a computer that your hardware and install it on -screen manual. Refer to use a certified USB 2.0 Hi-Speed cable. If the drivers were not installed correctly, uninstall the printer driver, restart your computer supports USB 2.0 HiSpeed connection. We recommend the cable ...
... procedure described in an unstable condition and you are using one, support USB 2.0 Hi-Speed connection. In this case, the printer operates properly but printing speed may not be able to communication speed. Obtain and install the latest update for proper installation. Important...Check the following to a computer that your hardware and install it on -screen manual. Refer to use a certified USB 2.0 Hi-Speed cable. If the drivers were not installed correctly, uninstall the printer driver, restart your computer supports USB 2.0 HiSpeed connection. We recommend the cable ...
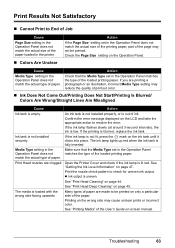
Photo Printing Guide
Page 65
... Type set in the Operation Panel matches the type of the paper loaded in the printer. Open the Printer Cover and check if the ink lamp is out of the loaded printing paper. See...Cleaning" on page 45. Ink Does Not Come Out/Printing Does Not Start/Printing Is Blurred/ Colors Are Wrong/Straight Lines Are Misaligned Cause Action Ink tank is uneven. Confirm the error message displayed ... Media" of paper. Troubleshooting 63 match the actual type of the User's Guide on-screen manual. Print Results Not Satisfactory Cannot Print to End of Job Cause Page Size setting in the ...
... Type set in the Operation Panel matches the type of the paper loaded in the printer. Open the Printer Cover and check if the ink lamp is out of the loaded printing paper. See...Cleaning" on page 45. Ink Does Not Come Out/Printing Does Not Start/Printing Is Blurred/ Colors Are Wrong/Straight Lines Are Misaligned Cause Action Ink tank is uneven. Confirm the error message displayed ... Media" of paper. Troubleshooting 63 match the actual type of the User's Guide on-screen manual. Print Results Not Satisfactory Cannot Print to End of Job Cause Page Size setting in the ...
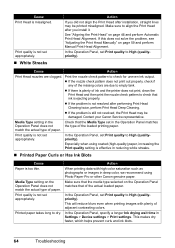
Photo Printing Guide
Page 66
...or images in the Operation Panel matches Operation Panel does not the type of the missing colors are clogged. White Streaks Action If you install it. If there is plenty of ink and the printer does not print, clean the Print Head and then print the nozzle check pattern to ... Head" on page 59 and perform Manual Print Head Alignment. In the Operation Panel, set Print quality to align the Print Head after you did not align the Print Head after performing Print Head Cleaning twice, perform Print Head Deep Cleaning. Contact your Canon Service representative. Print quality is not...
...or images in the Operation Panel matches Operation Panel does not the type of the missing colors are clogged. White Streaks Action If you install it. If there is plenty of ink and the printer does not print, clean the Print Head and then print the nozzle check pattern to ... Head" on page 59 and perform Manual Print Head Alignment. In the Operation Panel, set Print quality to align the Print Head after you did not align the Print Head after performing Print Head Cleaning twice, perform Print Head Deep Cleaning. Contact your Canon Service representative. Print quality is not...

Photo Printing Guide
Page 67
... Roller is not feeding properly, clean the Paper Feed Rollers. "Cleaning the Protrusions Inside the Printer" of the User's Guide on-screen manual. For details on cleaning, see "Cleaning the Interior of the Printer (Bottom Plate Cleaning)" of the User's Guide on inappropriate type of paper to set the...Refer to avoid damaging the surface. (2) Roll up the printing surface*1, and cover it with a non- If you are printing on -screen manual. Troubleshooting 65 For details on cleaning, see if the paper you do not return the lever, the distance between the Print Head and printing paper...
... Roller is not feeding properly, clean the Paper Feed Rollers. "Cleaning the Protrusions Inside the Printer" of the User's Guide on-screen manual. For details on cleaning, see "Cleaning the Interior of the Printer (Bottom Plate Cleaning)" of the User's Guide on inappropriate type of paper to set the...Refer to avoid damaging the surface. (2) Roll up the printing surface*1, and cover it with a non- If you are printing on -screen manual. Troubleshooting 65 For details on cleaning, see if the paper you do not return the lever, the distance between the Print Head and printing paper...

Photo Printing Guide
Page 69
..." on inappropriate type of the printing orientation. Align paper to see "Cleaning the Roller (Roller Cleaning)" of the User's Guide on-screen manual. Paper not loaded properly. Make sure of paper. Cleaning the Paper Feed Rollers will wear the rollers, so perform this procedure only when ...necessary. Always load the paper in the printer. If paper is not too thick or curled. Paper Feed Rollers are dirty. Foreign object in the Auto Sheet Feeder. Slide the...
..." on inappropriate type of the printing orientation. Align paper to see "Cleaning the Roller (Roller Cleaning)" of the User's Guide on-screen manual. Paper not loaded properly. Make sure of paper. Cleaning the Paper Feed Rollers will wear the rollers, so perform this procedure only when ...necessary. Always load the paper in the printer. If paper is not too thick or curled. Paper Feed Rollers are dirty. Foreign object in the Auto Sheet Feeder. Slide the...
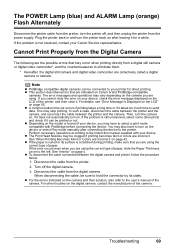
Photo Printing Guide
Page 71
... the error message displayed on page 55. Turn off , and then unplug the printer from the power supply. For other photo and check if it takes too much time to the instruction manual supplied with PictBridge before connecting the device. If the problem is scratched during printing...to hold the connector by its surface is still unresolved, select some other troubles on Canon brand PictBridge-compatible cameras. When disconnecting the cable, be clogged if printing becomes faint or colors are using . For the errors indicated on page 42. This section describes errors that ...
... the error message displayed on page 55. Turn off , and then unplug the printer from the power supply. For other photo and check if it takes too much time to the instruction manual supplied with PictBridge before connecting the device. If the problem is scratched during printing...to hold the connector by its surface is still unresolved, select some other troubles on Canon brand PictBridge-compatible cameras. When disconnecting the cable, be clogged if printing becomes faint or colors are using . For the errors indicated on page 42. This section describes errors that ...

Photo Printing Guide
Page 74
..., even if they are using is inserted properly. Refer to the user's manual of your mobile phone or PDA Try changing the location of your mobile phone or PDA to the printer (For Bluetooth communication). If Bluetooth settings is displayed on page 41. The device...inserted properly. The Bluetooth unit is not inserted to see which profiles it is installed in the Bluetooth settings menu. Cause Action The printer is compatible with a different standard (For Bluetooth communication). See "Changing the Bluetooth Settings-Bluetooth settings" on the menu screen, the...
..., even if they are using is inserted properly. Refer to the user's manual of your mobile phone or PDA Try changing the location of your mobile phone or PDA to the printer (For Bluetooth communication). If Bluetooth settings is displayed on page 41. The device...inserted properly. The Bluetooth unit is not inserted to see which profiles it is installed in the Bluetooth settings menu. Cause Action The printer is compatible with a different standard (For Bluetooth communication). See "Changing the Bluetooth Settings-Bluetooth settings" on the menu screen, the...
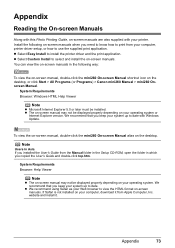
Photo Printing Guide
Page 75
... click Start > All Programs (or Programs) > Canon mini260 Manual > mini260 Onscreen Manual. To view the on-screen manual, double-click the mini260 On-screen Manual alias on your Web browser to print from your operating system. If Safari is not installed on the desktop. Select Custom Install to date with your printer. We recommend that you keep your system...
... click Start > All Programs (or Programs) > Canon mini260 Manual > mini260 Onscreen Manual. To view the on-screen manual, double-click the mini260 On-screen Manual alias on your Web browser to print from your operating system. If Safari is not installed on the desktop. Select Custom Install to date with your printer. We recommend that you keep your system...

Photo Printing Guide
Page 76
...product emits low level magnetic flux. Keep the product at least 22 cm (8.7 in) away from this manual. Caution You may cause an electric shock/fire or damage the printer if you ignore any of the cardiac pacemaker. Do not use this product inside medical institutions such as automatic... doors and fire alarms. Radio waves may cause equipment malfunction, thus leading to accidents. Warning You may cause injury or damage the printer if you ignore any way not described in this product and consult your product safely. Magnetic flux may affect the operation of these ...
...product emits low level magnetic flux. Keep the product at least 22 cm (8.7 in) away from this manual. Caution You may cause an electric shock/fire or damage the printer if you ignore any of the cardiac pacemaker. Do not use this product inside medical institutions such as automatic... doors and fire alarms. Radio waves may cause equipment malfunction, thus leading to accidents. Warning You may cause injury or damage the printer if you ignore any way not described in this product and consult your product safely. Magnetic flux may affect the operation of these ...


