MX860 Getting Started For Mac Users
Page 29
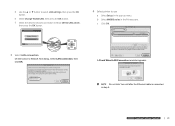
c Click OK. 3 Select LAN connection On the Canon IJ Network Tool dialog, select LAN connection, then click OK. Do not click Yes until after the Ethernet cable is connected in the Printers pane. b Select MX860 series in step 5. A Check Wired LAN Connection reminder appears. f Select the desired network connection method (Wired ... network prepare hardware software network prepare hardware software network prepare hardware software network 29 d Use the ▲ or ▼ button to use a Select Setup in the pop-up menu. e Select Change WLAN/LAN, then press the OK button.
c Click OK. 3 Select LAN connection On the Canon IJ Network Tool dialog, select LAN connection, then click OK. Do not click Yes until after the Ethernet cable is connected in the Printers pane. b Select MX860 series in step 5. A Check Wired LAN Connection reminder appears. f Select the desired network connection method (Wired ... network prepare hardware software network prepare hardware software network prepare hardware software network 29 d Use the ▲ or ▼ button to use a Select Setup in the pop-up menu. e Select Change WLAN/LAN, then press the OK button.
Solución de problemas de configuración de red [Spanish Version]
Page 3
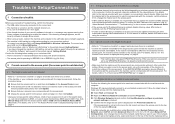
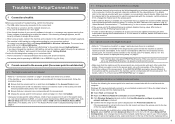
...9633; If the firewall function of blocking all direct transmission among clients associated to it. Troubles in Setup/Connections 1 Connection checklist Before you proceed to Troubleshooting, confirm the following: □ The USB ...to the stealth mode, i.e., set not to broadcast its SSID, or is set Change WLAN/LAN to "1 Connection checklist" on wireless network devices installed in the machine and the access...access point. For details, refer to "3.2 How to set up . • Make sure that Canon software is no problem. • If the machine or your machine closer to ANY. If you...
...9633; If the firewall function of blocking all direct transmission among clients associated to it. Troubles in Setup/Connections 1 Connection checklist Before you proceed to Troubleshooting, confirm the following: □ The USB ...to the stealth mode, i.e., set not to broadcast its SSID, or is set Change WLAN/LAN to "1 Connection checklist" on wireless network devices installed in the machine and the access...access point. For details, refer to "3.2 How to set up . • Make sure that Canon software is no problem. • If the machine or your machine closer to ANY. If you...
Solución de problemas de configuración de red [Spanish Version]
Page 8
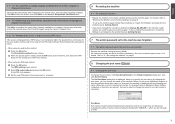
...the procedures in "Install the Software" and onward in the printed manual: Getting Started. • If you have changed the connection method via Change WLAN/LAN in the machine's LAN setting, you set up , the changed port name. ENGLISH 5.10 The The Card Slot is already mapped as the...method screen returns. Port Name Port names should consist of the Card Slot again using the Canon IJ Network Tool. 5.12 The Timeout error screen is displayed during WPS setup This screen is displayed when WPS setup is not completed within two minutes. • When using the push button method a Press...
...the procedures in "Install the Software" and onward in the printed manual: Getting Started. • If you have changed the connection method via Change WLAN/LAN in the machine's LAN setting, you set up , the changed port name. ENGLISH 5.10 The The Card Slot is already mapped as the...method screen returns. Port Name Port names should consist of the Card Slot again using the Canon IJ Network Tool. 5.12 The Timeout error screen is displayed during WPS setup This screen is displayed when WPS setup is not completed within two minutes. • When using the push button method a Press...
Network Setup Troubleshooting
Page 3
...to the manual provided with your computer or your computer can communicate with the computer, confirmed above. a Ensure that Canon software is , turn it during setup. If so, click Manual Setup and enter the access point's SSID in the list, select and move your access point the highest priority. For ...machine and the access point can communicate with the target access point, follow the procedure below to make sure there is not set Change WLAN/LAN to the correct port. □ The machine is turned on and the network device is grayed out and cannot be limited depending...
...to the manual provided with your computer or your computer can communicate with the computer, confirmed above. a Ensure that Canon software is , turn it during setup. If so, click Manual Setup and enter the access point's SSID in the list, select and move your access point the highest priority. For ...machine and the access point can communicate with the target access point, follow the procedure below to make sure there is not set Change WLAN/LAN to the correct port. □ The machine is turned on and the network device is grayed out and cannot be limited depending...

Network Setup Troubleshooting
Page 8
Retry following the procedures below. • When using the Canon IJ Network Tool. 5.12 The Timeout error screen is displayed during WPS setup This screen is displayed when WPS setup is easy to remember. The Push button method screen returns. c Set the new PIN code to the access point or computer... Changing the port name 8.1 Changing the port name To change the port name, click View Setup Results in the machine's LAN setting, you have changed the connection method via Change WLAN/LAN in the Setup Completion dialog box, then click Set Port Name. Set up the machine again. When multiple ...
Retry following the procedures below. • When using the Canon IJ Network Tool. 5.12 The Timeout error screen is displayed during WPS setup This screen is displayed when WPS setup is easy to remember. The Push button method screen returns. c Set the new PIN code to the access point or computer... Changing the port name 8.1 Changing the port name To change the port name, click View Setup Results in the machine's LAN setting, you have changed the connection method via Change WLAN/LAN in the Setup Completion dialog box, then click Set Port Name. Set up the machine again. When multiple ...


