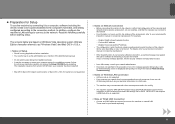
Getting Started
Page 19
... Ad-hoc mode is not supported. • If you connect to a network that Canon software is attempting to a wired LAN. The installation resumes from where it to a computer, software including the drivers needs to be purchased separately. 17 In addition, configure the machine's LAN settings to connect...The machine may communicate with other access points used in the vicinity. • The machine supports WPS (Wi-Fi Protected Setup) and WCN (Windows Connect Now) in the procedure or an error message appears during setup, refer to the network. For example, − Disable Stealth (closed ...
... Ad-hoc mode is not supported. • If you connect to a network that Canon software is attempting to a wired LAN. The installation resumes from where it to a computer, software including the drivers needs to be purchased separately. 17 In addition, configure the machine's LAN settings to connect...The machine may communicate with other access points used in the vicinity. • The machine supports WPS (Wi-Fi Protected Setup) and WCN (Windows Connect Now) in the procedure or an error message appears during setup, refer to the network. For example, − Disable Stealth (closed ...
Solución de problemas de configuración de red [Spanish Version]
Page 6
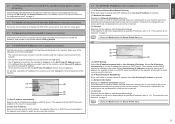
Make sure of the following IP address is selected. (C) Network Information Displays the Network Information window. This requires that the DHCP function is enabled on the router. Click this button to confirm network settings when your access point or your machine ... over the network. This button is enabled when an access point was not detected or could not be created is displayed during setup Uninstall the drivers, then setup the machine again following the procedures in "Install the Software" and onward in which you are using the machine. (B) IP Address/Subnet Mask...
Make sure of the following IP address is selected. (C) Network Information Displays the Network Information window. This requires that the DHCP function is enabled on the router. Click this button to confirm network settings when your access point or your machine ... over the network. This button is enabled when an access point was not detected or could not be created is displayed during setup Uninstall the drivers, then setup the machine again following the procedures in "Install the Software" and onward in which you are using the machine. (B) IP Address/Subnet Mask...

Solución de problemas de configuración de red [Spanish Version]
Page 10
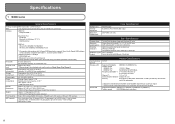
...25%-400% (1% unit) Scan Specifications Scanner driver TWAIN/WIA (Windows Vista and Windows XP only) Maximum scanning size Scanning resolution ...Platen Glass: A4/Letter/8.5'' x 11.7' (216 x 297 mm) ADF: A4/Letter/8.5'' x 14.0' (216 x 356 mm) Optical resolution (horizontal vertical) max: 2400 dpi x 4800 dpi Interpolated resolution max: 19200 dpi x 19200 dpi Gradation (Input/ Gray: 16 bit/8 bit Output) Color... Plus Glossy II. ENGLISH Specifications 1 MX860 series General Specifications Printing resolution 9600 (...
...25%-400% (1% unit) Scan Specifications Scanner driver TWAIN/WIA (Windows Vista and Windows XP only) Maximum scanning size Scanning resolution ...Platen Glass: A4/Letter/8.5'' x 11.7' (216 x 297 mm) ADF: A4/Letter/8.5'' x 14.0' (216 x 356 mm) Optical resolution (horizontal vertical) max: 2400 dpi x 4800 dpi Interpolated resolution max: 19200 dpi x 19200 dpi Gradation (Input/ Gray: 16 bit/8 bit Output) Color... Plus Glossy II. ENGLISH Specifications 1 MX860 series General Specifications Printing resolution 9600 (...
Network Setup Troubleshooting
Page 6
... Started. 5.6 The Set Printer IP Address screen is displayed during setup The following screen is selected. (C) Network Information Displays the Network Information window. This requires that the DHCP function is enabled on the router or access point. (B) Use next IP address Select to manually specify an IP... an access point was detected on page 1. 5.4 The Another access point with the same SSID exists is displayed during setup Uninstall the drivers, then setup the machine again following IP address. If the machine is still not be detected with the specified settings. This button is...
... Started. 5.6 The Set Printer IP Address screen is displayed during setup The following screen is selected. (C) Network Information Displays the Network Information window. This requires that the DHCP function is enabled on the router or access point. (B) Use next IP address Select to manually specify an IP... an access point was detected on page 1. 5.4 The Another access point with the same SSID exists is displayed during setup Uninstall the drivers, then setup the machine again following IP address. If the machine is still not be detected with the specified settings. This button is...
Network Setup Troubleshooting
Page 10
...unit) Scan Specifications Scanner driver TWAIN/WIA (Windows Vista and Windows XP only) Maximum ...scanning size Scanning resolution Platen Glass: A4/Letter/8.5'' x 11.7' (216 x 297 mm) ADF: A4/Letter/8.5'' x 14.0' (216 x 356 mm) Optical resolution (horizontal vertical) max: 2400 dpi x 4800 dpi Interpolated resolution max: 19200 dpi x 19200 dpi Gradation (Input/ Gray: 16 bit/8 bit Output) Color... Paper Support and Paper Output Tray retracted. Specifications 1 MX860 series General Specifications Printing resolution 9600 (horizontal)* x 2400...
...unit) Scan Specifications Scanner driver TWAIN/WIA (Windows Vista and Windows XP only) Maximum ...scanning size Scanning resolution Platen Glass: A4/Letter/8.5'' x 11.7' (216 x 297 mm) ADF: A4/Letter/8.5'' x 14.0' (216 x 356 mm) Optical resolution (horizontal vertical) max: 2400 dpi x 4800 dpi Interpolated resolution max: 19200 dpi x 19200 dpi Gradation (Input/ Gray: 16 bit/8 bit Output) Color... Paper Support and Paper Output Tray retracted. Specifications 1 MX860 series General Specifications Printing resolution 9600 (horizontal)* x 2400...
Network Guide
Page 2
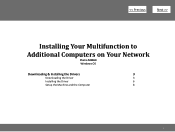
> Installing Your Multifunction to Additional Computers on Your Network Pixma MX860 Windows OS Downloading & Installing the Drivers 3 Downloading the Driver 3 Installing the Driver 6 Setup the Machine and the Computer 8 2
> Installing Your Multifunction to Additional Computers on Your Network Pixma MX860 Windows OS Downloading & Installing the Drivers 3 Downloading the Driver 3 Installing the Driver 6 Setup the Machine and the Computer 8 2
Network Guide
Page 6
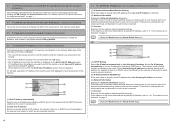
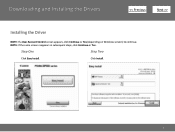
Downloading and Installing the Drivers > Installing the Driver NOTE: If a User Account Control screen appears, click Continue or Yes (depending on Windows version) to continue. NOTE: If the same screen reappears in subsequent steps, click Continue or Yes. Click Install. 6 Step One Step Two Click Easy Install.
Downloading and Installing the Drivers > Installing the Driver NOTE: If a User Account Control screen appears, click Continue or Yes (depending on Windows version) to continue. NOTE: If the same screen reappears in subsequent steps, click Continue or Yes. Click Install. 6 Step One Step Two Click Easy Install.
Network Guide
Page 9
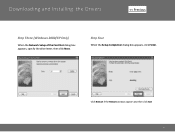
Click Restart if the Restart window appears and then click Exit 9 Downloading and Installing the Drivers > Step Three (Windows 2000/XP Only) When the Network Setup of the Card Slot dialog box appears, specify the drive letter, then click Next. Step Four When the Setup Completion dialog box appears, click Finish.
Click Restart if the Restart window appears and then click Exit 9 Downloading and Installing the Drivers > Step Three (Windows 2000/XP Only) When the Network Setup of the Card Slot dialog box appears, specify the drive letter, then click Next. Step Four When the Setup Completion dialog box appears, click Finish.
Network Key Guide
Page 6
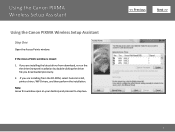
Using the Canon PIXMA Wireless Setup Assistant Using the Canon PIXMA Wireless Setup Assistant Step One Open the Access Points window. If you downloaded previously. 2. If you are installing from download, re-run the the driver/network installation by double-clicking the driver file you are installing the latest driver from the CD-ROM, select Custom Install, printer driver / MP Drivers, and then perform the installation. Note: Leave this window open on your desktop and proceed to step two. > 6 If the Access Points window is closed: 1.
Using the Canon PIXMA Wireless Setup Assistant Using the Canon PIXMA Wireless Setup Assistant Step One Open the Access Points window. If you downloaded previously. 2. If you are installing from download, re-run the the driver/network installation by double-clicking the driver file you are installing the latest driver from the CD-ROM, select Custom Install, printer driver / MP Drivers, and then perform the installation. Note: Leave this window open on your desktop and proceed to step two. > 6 If the Access Points window is closed: 1.


