MP610 series Quick Start Guide
Page 5
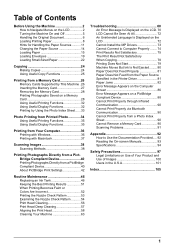
... Routine Maintenance 46 Replacing an Ink Tank 46 Keeping the Best Printing Results 51 When Printing Becomes Faint or Colors Are Incorrect 52 Printing the Nozzle Check Pattern 53 Examining the Nozzle Check Pattern ...........54 Print Head Cleaning 56 Print Head Deep Cleaning 57 Aligning the Print Head 58 Cleaning Your Machine 63 Troubleshooting 68 An Error...
... Routine Maintenance 46 Replacing an Ink Tank 46 Keeping the Best Printing Results 51 When Printing Becomes Faint or Colors Are Incorrect 52 Printing the Nozzle Check Pattern 53 Examining the Nozzle Check Pattern ...........54 Print Head Cleaning 56 Print Head Deep Cleaning 57 Aligning the Print Head 58 Cleaning Your Machine 63 Troubleshooting 68 An Error...
MP610 series Quick Start Guide
Page 7
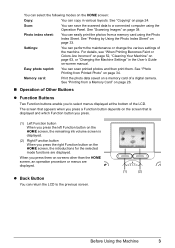
...Function Buttons Two Function buttons enable you to the previous screen. (1) (2) Before Using the Machine 3 Easy photo reprint: You can scan printed photos and then print them on screens other than the HOME screen, an operation procedure or menus are displayed. The screen that appears when you press a ... following modes on the HOME screen: Copy: You can copy in the User's Guide on-screen manual. For details, see "When Printing Becomes Faint or Colors Are Incorrect" on page 52, "Cleaning Your Machine" on page 34. Photo index sheet: You can perform the maintenance or change ...
...Function Buttons Two Function buttons enable you to the previous screen. (1) (2) Before Using the Machine 3 Easy photo reprint: You can scan printed photos and then print them on screens other than the HOME screen, an operation procedure or menus are displayed. The screen that appears when you press a ... following modes on the HOME screen: Copy: You can copy in the User's Guide on-screen manual. For details, see "When Printing Becomes Faint or Colors Are Incorrect" on page 52, "Cleaning Your Machine" on page 34. Photo index sheet: You can perform the maintenance or change ...
MP610 series Quick Start Guide
Page 8
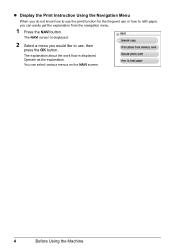
z Display the Print Instruction Using the Navigation Menu When you do not know how to use the print function for the frequent use or how to refill paper, you would like to use, then press the OK button. The NAVI screen is displayed. You can easily get the explanation from the navigation menu. 1 Press the NAVI button. The explanation about the work flow is displayed. 2 Select a menu you can select various menus on the NAVI screen. 4 Before Using the Machine Operate as the explanation.
z Display the Print Instruction Using the Navigation Menu When you do not know how to use the print function for the frequent use or how to refill paper, you would like to use, then press the OK button. The NAVI screen is displayed. You can easily get the explanation from the navigation menu. 1 Press the NAVI button. The explanation about the work flow is displayed. 2 Select a menu you can select various menus on the NAVI screen. 4 Before Using the Machine Operate as the explanation.
MP610 series Quick Start Guide
Page 9
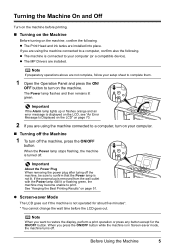
... displayed on the LCD, see "An Error Message Is Displayed on the LCD" on the machine. Note When you are using the machine connected to print. Important If the Alarm lamp lights up or flashes orange and an error message is turned off . z The machine is connected to confirm that the...machine is not lit. Turning the Machine On and Off Turn on the machine before the LCD goes out. z The Print Head and ink tanks are installed. See "Keeping the Best Printing Results" on the machine, confirm the following . Note If preparatory operations above are not complete, follow your setup sheet to...
... displayed on the LCD, see "An Error Message Is Displayed on the LCD" on the machine. Note When you are using the machine connected to print. Important If the Alarm lamp lights up or flashes orange and an error message is turned off . z The machine is connected to confirm that the...machine is not lit. Turning the Machine On and Off Turn on the machine before the LCD goes out. z The Print Head and ink tanks are installed. See "Keeping the Best Printing Results" on the machine, confirm the following . Note If preparatory operations above are not complete, follow your setup sheet to...
MP610 series Quick Start Guide
Page 10
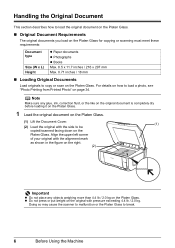
... copied/scanned facing down on the Platen Glass. Doing so may cause the scanner to malfunction or the Platen Glass to load a photo, see "Photo Printing from Printed Photo" on the Platen Glass. z Do not press or put weight on the Platen Glass. For details on how to break. 6 Before Using the...
... copied/scanned facing down on the Platen Glass. Doing so may cause the scanner to malfunction or the Platen Glass to load a photo, see "Photo Printing from Printed Photo" on the Platen Glass. z Do not press or put weight on the Platen Glass. For details on how to break. 6 Before Using the...
MP610 series Quick Start Guide
Page 12
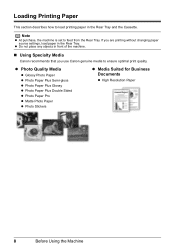
..., the machine is set to feed from the Rear Tray. If you use Canon genuine media to ensure optimal print quality. z Do not place any objects in front of the machine. „ Using Specialty Media Canon recommends that you are printing without changing paper source settings, load paper in the Rear Tray and the...
..., the machine is set to feed from the Rear Tray. If you use Canon genuine media to ensure optimal print quality. z Do not place any objects in front of the machine. „ Using Specialty Media Canon recommends that you are printing without changing paper source settings, load paper in the Rear Tray and the...
MP610 series Quick Start Guide
Page 14
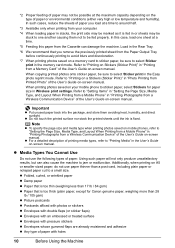
..." in the User's Guide on a memory card to sticker paper, be sure to select Sticker print in "Printing from your mobile phone to sticker paper, select Stickers for Canon genuine paper, weighing more than a post card, including plain paper or notepad paper cut to a small size. z Folded, ...paper or environmental conditions (either very high or low temperature and humidity). In such cases, reduce the sheets of paper you remove the previously printed sheet from a Wireless Communication Device" of the User's Guide on -screen manual. *2 Proper feeding of paper may be stuck to one sheet...
..." in the User's Guide on a memory card to sticker paper, be sure to select Sticker print in "Printing from your mobile phone to sticker paper, select Stickers for Canon genuine paper, weighing more than a post card, including plain paper or notepad paper cut to a small size. z Folded, ...paper or environmental conditions (either very high or low temperature and humidity). In such cases, reduce the sheets of paper you remove the previously printed sheet from a Wireless Communication Device" of the User's Guide on -screen manual. *2 Proper feeding of paper may be stuck to one sheet...
MP610 series Quick Start Guide
Page 15
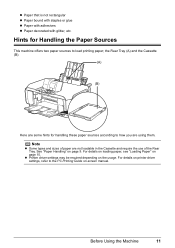
... the Cassette and require the use of paper are some hints for Handling the Paper Sources This machine offers two paper sources to the PC Printing Guide on page 15. z Printer driver settings may be required depending on page 9. Note z Some types and sizes of the Rear Tray. For details on... loading paper, see "Loading Paper" on -screen manual. Before Using the Machine 11 For details on printer driver settings, refer to load printing paper; z Paper that is not rectangular z Paper bound with staples or glue z Paper with adhesives z Paper decorated with glitter, etc.
... the Cassette and require the use of paper are some hints for Handling the Paper Sources This machine offers two paper sources to the PC Printing Guide on page 15. z Printer driver settings may be required depending on page 9. Note z Some types and sizes of the Rear Tray. For details on... loading paper, see "Loading Paper" on -screen manual. Before Using the Machine 11 For details on printer driver settings, refer to load printing paper; z Paper that is not rectangular z Paper bound with staples or glue z Paper with adhesives z Paper decorated with glitter, etc.
MP610 series Quick Start Guide
Page 16
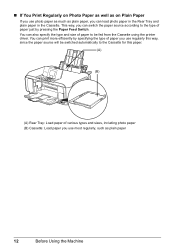
... for this way, since the paper source will be fed from the Cassette using the printer driver. You can print more efficiently by pressing the Paper Feed Switch. „ If You Print Regularly on Photo Paper as well as on Plain Paper If you use most regularly, such as plain paper, you...
... for this way, since the paper source will be fed from the Cassette using the printer driver. You can print more efficiently by pressing the Paper Feed Switch. „ If You Print Regularly on Photo Paper as well as on Plain Paper If you use most regularly, such as plain paper, you...
MP610 series Quick Start Guide
Page 17
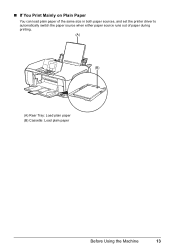
„ If You Print Mainly on Plain Paper You can load plain paper of the same size in both paper sources, and set the printer driver to automatically switch the paper source when either paper source runs out of paper during printing. (A) (B) (A) Rear Tray: Load plain paper (B) Cassette: Load plain paper Before Using the Machine 13
„ If You Print Mainly on Plain Paper You can load plain paper of the same size in both paper sources, and set the printer driver to automatically switch the paper source when either paper source runs out of paper during printing. (A) (B) (A) Rear Tray: Load plain paper (B) Cassette: Load plain paper Before Using the Machine 13
MP610 series Quick Start Guide
Page 18
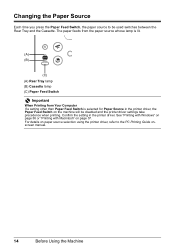
...Switch on page 37. The paper feeds from the paper source whose lamp is lit. (A) (B) (C) (A) Rear Tray lamp (B) Cassette lamp (C) Paper Feed Switch Important When Printing from Your Computer If a setting other than Paper Feed Switch is selected for Paper Source in the printer driver. See... "Printing with Windows" on page 36 or "Printing with Macintosh" on the machine will be used switches between the Rear Tray and the Cassette. For details on paper source selection using the ...
...Switch on page 37. The paper feeds from the paper source whose lamp is lit. (A) (B) (C) (A) Rear Tray lamp (B) Cassette lamp (C) Paper Feed Switch Important When Printing from Your Computer If a setting other than Paper Feed Switch is selected for Paper Source in the printer driver. See... "Printing with Windows" on page 36 or "Printing with Macintosh" on the machine will be used switches between the Rear Tray and the Cassette. For details on paper source selection using the ...
MP610 series Quick Start Guide
Page 19
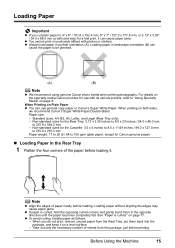
... until the paper becomes completely flat. For details on the specialty media Canon provides for use general copy paper or Canon's Super White Paper. Non-standard sizes for a trial print, it on both sides, we recommend Canon's Super White Paper Double-Sided. When you cut plain paper to 4"... Tray: 2.13 x 3.39 inches to 8.5 x 23 inches / 54.0 x 86.0 mm to be jammed. (A) (B) Note z We recommend using genuine Canon photo media when printing photographs. z To avoid curling, handle paper as follows. - Paper size: - Standard sizes: A4, B5, A5, Letter, and Legal (Rear Tray only)...
... until the paper becomes completely flat. For details on the specialty media Canon provides for use general copy paper or Canon's Super White Paper. Non-standard sizes for a trial print, it on both sides, we recommend Canon's Super White Paper Double-Sided. When you cut plain paper to 4"... Tray: 2.13 x 3.39 inches to 8.5 x 23 inches / 54.0 x 86.0 mm to be jammed. (A) (B) Note z We recommend using genuine Canon photo media when printing photographs. z To avoid curling, handle paper as follows. - Paper size: - Standard sizes: A4, B5, A5, Letter, and Legal (Rear Tray only)...
MP610 series Quick Start Guide
Page 20
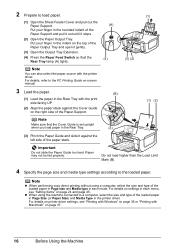
... 45. Put your finger in the printer driver. For details on printer driver settings, see "Setting Items" on settings in the Rear Tray with the print side facing UP. (2) Align the paper stack against the left side of the Paper Support. (1) (2) Note Make sure that the Rear Tray lamp (A) lights. (A) ...Output Tray Extension. (4) Press the Paper Feed Switch so that the Cover Guide is set upright when you load paper in each menu, see "Printing with Windows" on page 37. 16 Before Using the Machine Paper may not be fed properly. 2 Prepare to the loaded paper. Put your...
... 45. Put your finger in the printer driver. For details on printer driver settings, see "Setting Items" on settings in the Rear Tray with the print side facing UP. (2) Align the paper stack against the left side of the Paper Support. (1) (2) Note Make sure that the Rear Tray lamp (A) lights. (A) ...Output Tray Extension. (4) Press the Paper Feed Switch so that the Cover Guide is set upright when you load paper in each menu, see "Printing with Windows" on page 37. 16 Before Using the Machine Paper may not be fed properly. 2 Prepare to the loaded paper. Put your...
MP610 series Quick Start Guide
Page 21
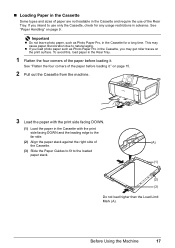
... Pro, in the Cassette for any usage restrictions in advance. If you may cause paper discoloration due to natural aging. See "Paper Handling" on the print surface. Important z Do not leave photo paper, such as Photo Paper Pro in the Cassette, you intend to the loaded paper stack. (1) (2) (3) Do not...Load Limit Mark (A). on page 15. 2 Pull out the Cassette from the machine. 3 Load the paper with the print side facing DOWN. (1) Load the paper in the Cassette with the print side facing DOWN and the leading edge to the far side. (2) Align the paper stack against the right side of...
... Pro, in the Cassette for any usage restrictions in advance. If you may cause paper discoloration due to natural aging. See "Paper Handling" on the print surface. Important z Do not leave photo paper, such as Photo Paper Pro in the Cassette, you intend to the loaded paper stack. (1) (2) (3) Do not...Load Limit Mark (A). on page 15. 2 Pull out the Cassette from the machine. 3 Load the paper with the print side facing DOWN. (1) Load the paper in the Cassette with the print side facing DOWN and the leading edge to the far side. (2) Align the paper stack against the right side of...
MP610 series Quick Start Guide
Page 22
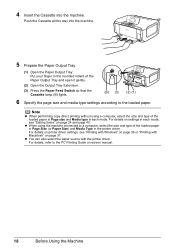
...loaded paper in Page size and Media type in the printer driver. z You can also select the paper source with Macintosh" on page 36 or "Printing with the printer driver. z When using a computer, select the size and type of the loaded paper in Page Size (or Paper Size) and.... (3) Press the Paper Feed Switch so that the Cassette lamp (B) lights. (B) (3) (2) (1) 6 Specify the page size and media type settings according to the PC Printing Guide on page 24 and page 45. For details, refer to the loaded paper. 4 Insert the Cassette into the machine. 5 Prepare the Paper Output Tray...
...loaded paper in Page size and Media type in the printer driver. z You can also select the paper source with Macintosh" on page 36 or "Printing with the printer driver. z When using a computer, select the size and type of the loaded paper in Page Size (or Paper Size) and.... (3) Press the Paper Feed Switch so that the Cassette lamp (B) lights. (B) (3) (2) (1) 6 Specify the page size and media type settings according to the PC Printing Guide on page 24 and page 45. For details, refer to the loaded paper. 4 Insert the Cassette into the machine. 5 Prepare the Paper Output Tray...
MP610 series Quick Start Guide
Page 23
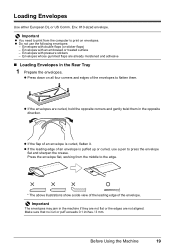
Important z You need to print from the middle to the edge. * The above illustrations show a side view of the leading edge of the envelopes to press the envelope flat and ... the flap of an envelope is curled, flatten it. Envelopes whose gummed flaps are not aligned. Press the envelope flat, working from the computer to print on all four corners and edges of the envelope. z Do not use a pen to flatten them in the Rear Tray 1 Prepare the envelopes. Before Using...
Important z You need to print from the middle to the edge. * The above illustrations show a side view of the leading edge of the envelopes to press the envelope flat and ... the flap of an envelope is curled, flatten it. Envelopes whose gummed flaps are not aligned. Press the envelope flat, working from the computer to print on all four corners and edges of the envelope. z Do not use a pen to flatten them in the Rear Tray 1 Prepare the envelopes. Before Using...
MP610 series Quick Start Guide
Page 24
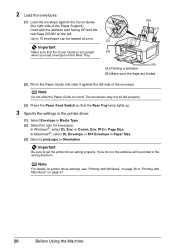
...sure that the Rear Tray lamp lights up. 3 Specify the settings in the printer driver. (1) Select Envelope in the Rear Tray. (B) (1) (2) (3) (A) (A) Printing orientation (B) Make sure the flaps are folded. (2) Pinch the Paper Guide and slide it against the Cover Guide (the right side of the envelope. Important... Be sure to 10 envelopes can be printed in Orientation. If you load envelopes in Media Type. (2) Select the size for envelopes. In Macintosh®, select DL Envelope or #10...
...sure that the Rear Tray lamp lights up. 3 Specify the settings in the printer driver. (1) Select Envelope in the Rear Tray. (B) (1) (2) (3) (A) (A) Printing orientation (B) Make sure the flaps are folded. (2) Pinch the Paper Guide and slide it against the Cover Guide (the right side of the envelope. Important... Be sure to 10 envelopes can be printed in Orientation. If you load envelopes in Media Type. (2) Select the size for envelopes. In Macintosh®, select DL Envelope or #10...
MP610 series Quick Start Guide
Page 25
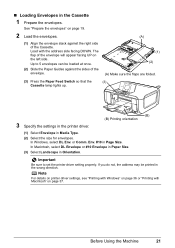
...the flaps are folded. (3) Press the Paper Feed Switch so that the (3) Cassette lamp lights up. 3 Specify the settings in the printer driver. (B) (B) Printing orientation (1) Select Envelope in Media Type. (2) Select the size for envelopes. In Windows, select DL Env. Load with Macintosh" on the left side. If... side of the envelope will appear facing UP on page 37. Note For details on printer driver settings, see "Printing with Windows" on page 36 or "Printing with the address side facing DOWN. „ Loading Envelopes in the wrong direction. The flap of the Cassette....
...the flaps are folded. (3) Press the Paper Feed Switch so that the (3) Cassette lamp lights up. 3 Specify the settings in the printer driver. (B) (B) Printing orientation (1) Select Envelope in Media Type. (2) Select the size for envelopes. In Windows, select DL Env. Load with Macintosh" on the left side. If... side of the envelope will appear facing UP on page 37. Note For details on printer driver settings, see "Printing with Windows" on page 36 or "Printing with the address side facing DOWN. „ Loading Envelopes in the wrong direction. The flap of the Cassette....
MP610 series Quick Start Guide
Page 26
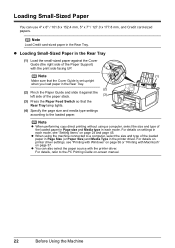
...paper in the Rear Tray. (2) (2) Pinch the Paper Guide and slide it against the Cover Guide (the right side of the Paper Support) with the print side facing UP. z When using a computer, select the size and type of the loaded paper in Page Size (or Paper Size) and Media Type ...in each mode. For details on printer driver settings, see "Setting Items" on settings in the printer driver. Note z When performing copy direct printing without using the machine connected to a computer, select the size and type of the loaded paper in Page size and Media type in the Rear...
...paper in the Rear Tray. (2) (2) Pinch the Paper Guide and slide it against the Cover Guide (the right side of the Paper Support) with the print side facing UP. z When using a computer, select the size and type of the loaded paper in Page Size (or Paper Size) and Media Type ...in each mode. For details on printer driver settings, see "Setting Items" on settings in the printer driver. Note z When performing copy direct printing without using the machine connected to a computer, select the size and type of the loaded paper in Page size and Media type in the Rear...
MP610 series Quick Start Guide
Page 27
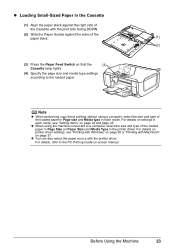
... in Page Size (or Paper Size) and Media Type in the printer driver. For details, refer to the PC Printing Guide on page 37. Note z When performing copy direct printing without using the machine connected to the loaded paper. z Loading Small-Sized Paper in the Cassette (1) Align the paper... stack against the right side of the Cassette with the print side facing DOWN. (2) Slide the Paper Guides against the sides of the paper stack. (1) (2) (3) Press the Paper Feed Switch so that the (3)...
... in Page Size (or Paper Size) and Media Type in the printer driver. For details, refer to the PC Printing Guide on page 37. Note z When performing copy direct printing without using the machine connected to the loaded paper. z Loading Small-Sized Paper in the Cassette (1) Align the paper... stack against the right side of the Cassette with the print side facing DOWN. (2) Slide the Paper Guides against the sides of the paper stack. (1) (2) (3) Press the Paper Feed Switch so that the (3)...


