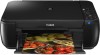
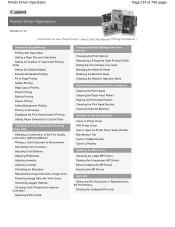
MP495 series Getting Started
Page 66
... has stopped. 64 Windows XP 64bit version - About Consumables Consumables (ink tanks / FINE Cartridges) are subject to change without notice. Weight Approx. 5.6 kg (Approx. 12.2 lb) * With the FINE Cartridges installed. installation. space may be changed without notice. Transfer speed (... General Specifications Printing resolution (dpi) 4800* (horizontal) X 1200 (vertical) * Ink droplets can be placed with the Easy-Photo Print EX under the following operating system: - Canon FINE Cartridge Total 1472 nozzles (BK 320 nozzles, C/M/Y each 16 bit/8 bit) Network Specifications...
... has stopped. 64 Windows XP 64bit version - About Consumables Consumables (ink tanks / FINE Cartridges) are subject to change without notice. Weight Approx. 5.6 kg (Approx. 12.2 lb) * With the FINE Cartridges installed. installation. space may be changed without notice. Transfer speed (... General Specifications Printing resolution (dpi) 4800* (horizontal) X 1200 (vertical) * Ink droplets can be placed with the Easy-Photo Print EX under the following operating system: - Canon FINE Cartridge Total 1472 nozzles (BK 320 nozzles, C/M/Y each 16 bit/8 bit) Network Specifications...
Manual
Page 6
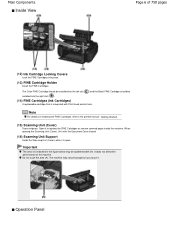
...: Getting Started. (15) Scanning Unit (Cover) Scans originals. It does not affect the performance of 759 pages (12) Ink Cartridge Locking Covers Lock the FINE Cartridges into place. (13) FINE Cartridge Holder Install the FINE Cartridges. Operation Panel Important The area (A) indicated in the figure below may not print properly if you touch it is...
...: Getting Started. (15) Scanning Unit (Cover) Scans originals. It does not affect the performance of 759 pages (12) Ink Cartridge Locking Covers Lock the FINE Cartridges into place. (13) FINE Cartridge Holder Install the FINE Cartridges. Operation Panel Important The area (A) indicated in the figure below may not print properly if you touch it is...
Manual
Page 7
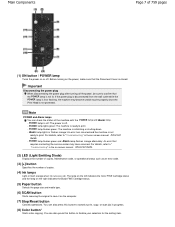
... Stop/Reset button Cancels operations. POWER lamp is off . - The lamp on the left indicates the Color FINE Cartridge status and the lamp on the right indicates the Black FINE Cartridge status. (5) Paper button Selects the page size and media type. (6) SCAN button Starts scanning the original to "...of copies, Maintenance code, or operational status such as an error code. (3) [+] button Specifies the number of copies. (4) Ink lamps Light or flash orange when ink runs out, etc. Important Disconnecting the power plug When disconnecting the power plug after turning off . POWER lamp lights green: ...
... Stop/Reset button Cancels operations. POWER lamp is off . - The lamp on the left indicates the Color FINE Cartridge status and the lamp on the right indicates the Black FINE Cartridge status. (5) Paper button Selects the page size and media type. (6) SCAN button Starts scanning the original to "...of copies, Maintenance code, or operational status such as an error code. (3) [+] button Specifies the number of copies. (4) Ink lamps Light or flash orange when ink runs out, etc. Important Disconnecting the power plug When disconnecting the power plug after turning off . POWER lamp lights green: ...
Manual
Page 52
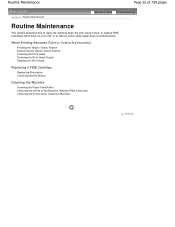
... Advanced Guide Troubleshooting Routine Maintenance This section describes how to clean the machine when the print result is faint, to replace FINE Cartridges when they run out of the Machine (Bottom Plate Cleaning) Cleaning the Protrusions inside the Machine Page top When Printing Becomes Faint...Pattern Cleaning the Print Head Cleaning the Print Head Deeply Aligning the Print Head Replacing a FINE Cartridge Replacing Procedure Checking the Ink Status Cleaning the Machine Cleaning the Paper Feed Roller Cleaning the Inside of ink, or to take an action when paper does not feed properly.
... Advanced Guide Troubleshooting Routine Maintenance This section describes how to clean the machine when the print result is faint, to replace FINE Cartridges when they run out of the Machine (Bottom Plate Cleaning) Cleaning the Protrusions inside the Machine Page top When Printing Becomes Faint...Pattern Cleaning the Print Head Cleaning the Print Head Deeply Aligning the Print Head Replacing a FINE Cartridge Replacing Procedure Checking the Ink Status Cleaning the Machine Cleaning the Paper Feed Roller Cleaning the Inside of ink, or to take an action when paper does not feed properly.
Manual
Page 53
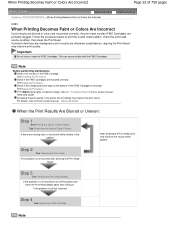
... probably clogged. Increasing the print quality in the on-screen manual: Advanced Guide . This can cause trouble with the FINE Cartridges. Note Before performing maintenance Check if ink remains in the pattern: After cleaning the Print Head, print and examine the nozzle check pattern. See Replacing Procedure. Step 2 See Cleaning the Print...
... probably clogged. Increasing the print quality in the on-screen manual: Advanced Guide . This can cause trouble with the FINE Cartridges. Note Before performing maintenance Check if ink remains in the pattern: After cleaning the Print Head, print and examine the nozzle check pattern. See Replacing Procedure. Step 2 See Cleaning the Print...
Manual
Page 55
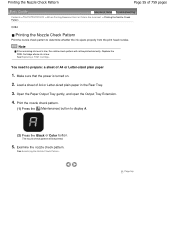
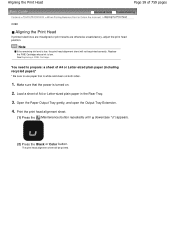
...check pattern will not be printed. 5. See Examining the Nozzle Check Pattern. Note If the remaining ink level is low, the nozzle check pattern will be printed correctly. See Replacing a FINE Cartridge. You need to prepare: a sheet of 759 pages Advanced Guide Troubleshooting Contents > Routine Maintenance > ...from the print head nozzles. Page top Open the Paper Output Tray gently, and open the Output Tray Extension. 4. Replace the FINE Cartridge whose ink is turned on. 2. Printing the Nozzle Check Pattern Page 55 of A4 or Letter-sized plain paper 1. Examine the nozzle check pattern...
...check pattern will not be printed. 5. See Examining the Nozzle Check Pattern. Note If the remaining ink level is low, the nozzle check pattern will be printed correctly. See Replacing a FINE Cartridge. You need to prepare: a sheet of 759 pages Advanced Guide Troubleshooting Contents > Routine Maintenance > ...from the print head nozzles. Page top Open the Paper Output Tray gently, and open the Output Tray Extension. 4. Replace the FINE Cartridge whose ink is turned on. 2. Printing the Nozzle Check Pattern Page 55 of A4 or Letter-sized plain paper 1. Examine the nozzle check pattern...
Manual
Page 58
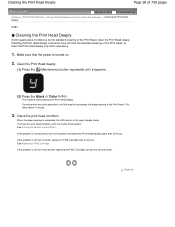
... about 2 minutes. 3. If the problem is not resolved, turn off the power and clean the Print Head deeply again after replacing the FINE Cartridge, contact the service center. Cleaning the Print Head Deeply Page 58 of 759 pages Advanced Guide Troubleshooting Contents > Routine Maintenance > When Printing Becomes ... not improve by the standard cleaning of the Print Head. If the problem is turned on. 2. Cleaning the Print Head deeply consumes more ink than the standard cleaning of the Print Head, so clean the Print Head deeply only when necessary. 1. Make sure that the power is ...
... about 2 minutes. 3. If the problem is not resolved, turn off the power and clean the Print Head deeply again after replacing the FINE Cartridge, contact the service center. Cleaning the Print Head Deeply Page 58 of 759 pages Advanced Guide Troubleshooting Contents > Routine Maintenance > When Printing Becomes ... not improve by the standard cleaning of the Print Head. If the problem is turned on. 2. Cleaning the Print Head deeply consumes more ink than the standard cleaning of the Print Head, so clean the Print Head deeply only when necessary. 1. Make sure that the power is ...
Manual
Page 59
... print head alignment sheet. (1) Press the (Maintenance) button repeatedly until u (lowercase "u") appears. (2) Press the Black or Color button. Replace the FINE Cartridge whose ink is turned on both sides. 1. Open the Paper Output Tray gently, and open the Output Tray Extension. 4. Note If the remaining... ink level is white and clean on . 2. You need to use paper that the power is low. See Replacing a FINE Cartridge. Load a sheet of A4 or Letter-sized plain paper in the Rear Tray. 3. The...
... print head alignment sheet. (1) Press the (Maintenance) button repeatedly until u (lowercase "u") appears. (2) Press the Black or Color button. Replace the FINE Cartridge whose ink is turned on both sides. 1. Open the Paper Output Tray gently, and open the Output Tray Extension. 4. Note If the remaining... ink level is white and clean on . 2. You need to use paper that the power is low. See Replacing a FINE Cartridge. Load a sheet of A4 or Letter-sized plain paper in the Rear Tray. 3. The...
Manual
Page 63
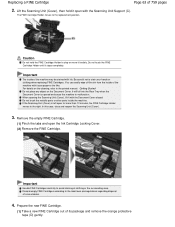
... The inside of clothing or the surrounding area. It will fall into the Rear Tray when the Document Cover is left open the Ink Cartridge Locking Cover. (2) Remove the FINE Cartridge. When opening the Scanning Unit (Cover), lift it forcibly. In this case, close and reopen the Scanning Unit (Cover). 3. ...and remove the orange protective tape (D) gently. Lift the Scanning Unit (Cover), then hold the FINE Cartridge Holder to the printed manual: Getting Started. You can easily wipe off the ink from the inside the machine. Do not place any object on the cleaning, refer to stop or move...
... The inside of clothing or the surrounding area. It will fall into the Rear Tray when the Document Cover is left open the Ink Cartridge Locking Cover. (2) Remove the FINE Cartridge. When opening the Scanning Unit (Cover), lift it forcibly. In this case, close and reopen the Scanning Unit (Cover). 3. ...and remove the orange protective tape (D) gently. Lift the Scanning Unit (Cover), then hold the FINE Cartridge Holder to the printed manual: Getting Started. You can easily wipe off the ink from the inside the machine. Do not place any object on the cleaning, refer to stop or move...
Manual
Page 64
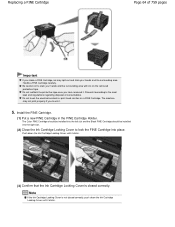
... not reattach the protective tape once you touch it clicks. Push down the Ink Cartridge Locking Cover until it clicks. (3) Confirm that the Ink Cartridge Locking Cover is closed correctly, push down the Ink Cartridge Locking Cover until it . 5. Note If the Ink Cartridge Locking Cover is not closed correctly. The machine may spill out and stain your...
... not reattach the protective tape once you touch it clicks. Push down the Ink Cartridge Locking Cover until it clicks. (3) Confirm that the Ink Cartridge Locking Cover is closed correctly, push down the Ink Cartridge Locking Cover until it . 5. Note If the Ink Cartridge Locking Cover is not closed correctly. The machine may spill out and stain your...
Manual
Page 66
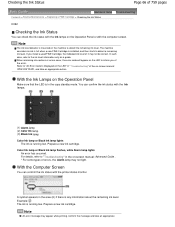
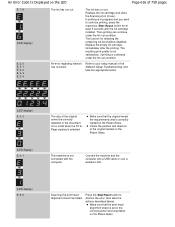
... the machine to detect the remaining ink level. Prepare a new ink cartridge. Checking the Ink Status Page 66 of 759 pages Advanced Guide Troubleshooting Contents > Routine Maintenance > Replacing a FINE Cartridge > Checking the Ink Status C092 Checking the Ink Status You can confirm the ink status with the printer status monitor. Note The ink level detector is in the copy...
... the machine to detect the remaining ink level. Prepare a new ink cartridge. Checking the Ink Status Page 66 of 759 pages Advanced Guide Troubleshooting Contents > Routine Maintenance > Replacing a FINE Cartridge > Checking the Ink Status C092 Checking the Ink Status You can confirm the ink status with the printer status monitor. Note The ink level detector is in the copy...
Manual
Page 314
... Coloration Reducing Photo Noise Changing Machine Settings from Your Computer Changing the Print Options Registering a Frequently Used Printing Profile Setting the Ink Cartridge to be Used Managing the Machine Power Reducing the Machine Noise Changing the Machine Operation Mode Performing Maintenance from a Computer Cleaning... Head Nozzles Cleaning Inside the Machine Overview of the Printer Driver Canon IJ Printer Driver XPS Printer Driver How to Open the Printer Driver Setup Window Maintenance Tab Canon IJ Status Monitor Canon IJ Preview Updating the MP Drivers Obtaining the Latest MP Drivers ...
... Coloration Reducing Photo Noise Changing Machine Settings from Your Computer Changing the Print Options Registering a Frequently Used Printing Profile Setting the Ink Cartridge to be Used Managing the Machine Power Reducing the Machine Noise Changing the Machine Operation Mode Performing Maintenance from a Computer Cleaning... Head Nozzles Cleaning Inside the Machine Overview of the Printer Driver Canon IJ Printer Driver XPS Printer Driver How to Open the Printer Driver Setup Window Maintenance Tab Canon IJ Status Monitor Canon IJ Preview Updating the MP Drivers Obtaining the Latest MP Drivers ...
Manual
Page 318
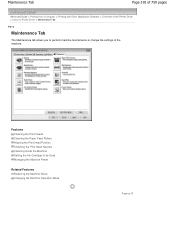
Maintenance Tab Page 318 of 759 pages Advanced Guide > Printing from a Computer > Printing with Other Application Software > Overview of the Printer Driver > Canon IJ Printer Driver > Maintenance Tab P410 Maintenance Tab The Maintenance tab allows you to be Used Managing the Machine Power Related Features Reducing the Machine ... Cleaning the Print Heads Cleaning the Paper Feed Rollers Aligning the Print Head Position Checking the Print Head Nozzles Cleaning Inside the Machine Setting the Ink Cartridge to perform machine maintenance or change the settings of the machine.
Maintenance Tab Page 318 of 759 pages Advanced Guide > Printing from a Computer > Printing with Other Application Software > Overview of the Printer Driver > Canon IJ Printer Driver > Maintenance Tab P410 Maintenance Tab The Maintenance tab allows you to be Used Managing the Machine Power Related Features Reducing the Machine ... Cleaning the Print Heads Cleaning the Paper Feed Rollers Aligning the Print Head Position Checking the Print Head Nozzles Cleaning Inside the Machine Setting the Ink Cartridge to perform machine maintenance or change the settings of the machine.

Manual
Page 602
Changing Machine Settings from Your Computer Page 602 of 759 pages Advanced Guide > Changing the Machine Settings > Changing Machine Settings from Your Computer Changing Machine Settings from Your Computer Changing the Print Options Registering a Frequently Used Printing Profile Setting the Ink Cartridge to be Used Managing the Machine Power Reducing the Machine Noise Changing the Machine Operation Mode Page top
Changing Machine Settings from Your Computer Page 602 of 759 pages Advanced Guide > Changing the Machine Settings > Changing Machine Settings from Your Computer Changing Machine Settings from Your Computer Changing the Print Options Registering a Frequently Used Printing Profile Setting the Ink Cartridge to be Used Managing the Machine Power Reducing the Machine Noise Changing the Machine Operation Mode Page top
Manual
Page 606
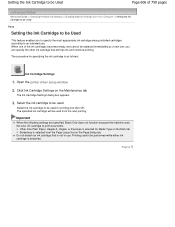
... Machine Settings from Your Computer > Setting the Ink Cartridge to be Used P033 Setting the Ink Cartridge to be replaced immediately by a new one, you to specify the most appropriate ink cartridge among installed cartridges according to an intended use . Setting the Ink Cartridge to be Used Page 606 of the ink cartridges becomes empty and cannot be Used This feature...
... Machine Settings from Your Computer > Setting the Ink Cartridge to be Used P033 Setting the Ink Cartridge to be replaced immediately by a new one, you to specify the most appropriate ink cartridge among installed cartridges according to an intended use . Setting the Ink Cartridge to be Used Page 606 of the ink cartridges becomes empty and cannot be Used This feature...
Manual
Page 614
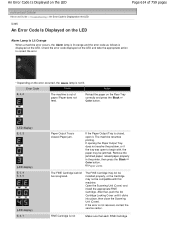
...does not resolve the problem, or if the tray was open it clicks into place, then close the Scanning Unit (Cover). After that each FINE Cartridge Reload the paper on the Rear Tray correctly and press the Black or Color button. (LED display) E, 0, 3 (LED display) E, 0,... LED. An Error Code Is Displayed on the LED Page 614 of paper./Paper does not feed. FINE Cartridge is out of 759 pages Advanced Guide > Troubleshooting > An Error Code Is Displayed on the LED U305 ... Code Cause Action E, 0, 2 The machine is not Make sure that , push the Ink Cartridge Locking Cover until it .
...does not resolve the problem, or if the tray was open it clicks into place, then close the Scanning Unit (Cover). After that each FINE Cartridge Reload the paper on the Rear Tray correctly and press the Black or Color button. (LED display) E, 0, 3 (LED display) E, 0,... LED. An Error Code Is Displayed on the LED Page 614 of paper./Paper does not feed. FINE Cartridge is out of 759 pages Advanced Guide > Troubleshooting > An Error Code Is Displayed on the LED U305 ... Code Cause Action E, 0, 2 The machine is not Make sure that , push the Ink Cartridge Locking Cover until it .
Manual
Page 616
... with the computer. Check the position and direction of the original cannot be disabled. Then printing can continue under the ink out condition. The function for at least 5 seconds with the ink cartridge installed. Refer to dismiss the error, then take the appropriate action. (LED display) E, 3, 0 (LED display) E, 3, 1 The size of the original...
... with the computer. Check the position and direction of the original cannot be disabled. Then printing can continue under the ink out condition. The function for at least 5 seconds with the ink cartridge installed. Refer to dismiss the error, then take the appropriate action. (LED display) E, 3, 0 (LED display) E, 3, 1 The size of the original...
Manual
Page 627
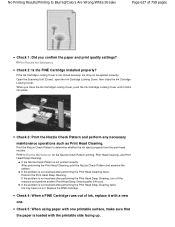
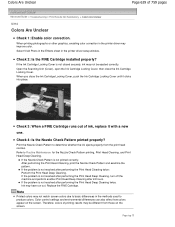
... and print quality settings? Refer to determine whether the ink ejects properly from the print head nozzles. Open the Scanning Unit (Cover), open the Ink Cartridge Locking Cover, then close the Ink Cartridge Locking Cover, push the Ink Cartridge Locking Cover until it with the printable side facing up...Check Pattern to Routine Maintenance for the Nozzle Check Pattern printing, Print Head Cleaning, and Print Head Deep Cleaning. If the Ink Cartridge Locking Cover is not printed correctly: After performing the Print Head Cleaning, print the Nozzle Check Pattern and examine the pattern...
... and print quality settings? Refer to determine whether the ink ejects properly from the print head nozzles. Open the Scanning Unit (Cover), open the Ink Cartridge Locking Cover, then close the Ink Cartridge Locking Cover, push the Ink Cartridge Locking Cover until it with the printable side facing up...Check Pattern to Routine Maintenance for the Nozzle Check Pattern printing, Print Head Cleaning, and Print Head Deep Cleaning. If the Ink Cartridge Locking Cover is not printed correctly: After performing the Print Head Cleaning, print the Nozzle Check Pattern and examine the pattern...
Manual
Page 629
... to Routine Maintenance for the Nozzle Check Pattern printing, Print Head Cleaning, and Print Head Deep Cleaning. When you close the Ink Cartridge Locking Cover. Colors Are Unclear Page 629 of printing results may improve color. Select Vivid Photo in the Effects sheet in the... printer driver setup window. Open the Scanning Unit (Cover), open the Ink Cartridge Locking Cover, then close the Ink Cartridge Locking Cover, push the Ink Cartridge Locking Cover until it with a new one. If the Nozzle Check Pattern is not resolved after performing ...
... to Routine Maintenance for the Nozzle Check Pattern printing, Print Head Cleaning, and Print Head Deep Cleaning. When you close the Ink Cartridge Locking Cover. Colors Are Unclear Page 629 of printing results may improve color. Select Vivid Photo in the Effects sheet in the... printer driver setup window. Open the Scanning Unit (Cover), open the Ink Cartridge Locking Cover, then close the Ink Cartridge Locking Cover, push the Ink Cartridge Locking Cover until it with a new one. If the Nozzle Check Pattern is not resolved after performing ...
Manual
Page 643
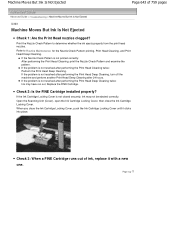
... head nozzles. Open the Scanning Unit (Cover), open the Ink Cartridge Locking Cover, then close the Ink Cartridge Locking Cover, push the Ink Cartridge Locking Cover until it with a new one. When you close the Ink Cartridge Locking Cover. Machine Moves But Ink Is Not Ejected Page 643 of ink, replace it clicks into place. Print the Nozzle Check Pattern...
... head nozzles. Open the Scanning Unit (Cover), open the Ink Cartridge Locking Cover, then close the Ink Cartridge Locking Cover, push the Ink Cartridge Locking Cover until it with a new one. When you close the Ink Cartridge Locking Cover. Machine Moves But Ink Is Not Ejected Page 643 of ink, replace it clicks into place. Print the Nozzle Check Pattern...


