Manual
Page 4
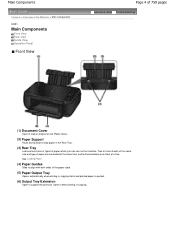
... of paper which you can be loaded at the same time, and fed automatically one sheet at a time. See Loading Paper . (4) Paper Guides Slide to align with both sides of the paper stack. (5) Paper Output Tray Opens automatically when printing or copying starts and printed paper is ejected. (6) Output Tray Extension...
... of paper which you can be loaded at the same time, and fed automatically one sheet at a time. See Loading Paper . (4) Paper Guides Slide to align with both sides of the paper stack. (5) Paper Output Tray Opens automatically when printing or copying starts and printed paper is ejected. (6) Output Tray Extension...
Manual
Page 10
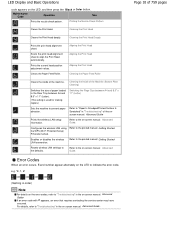
...Started. e.g. Cleaning the Print Head Cleans the Print Head deeply. Prints the wireless LAN setup information. Aligning the Print Head Aligning the Print Head Aligning the Print Head Cleaning the Paper Feed Roller Cleans the inside of 759 pages Enables or disables the wireless... LAN connection. Maintenance Code Operation See Prints the nozzle check pattern. Cleaning the Print Head Deeply Prints the print head alignment sheet. Refer to the on -screen manual: Advanced Guide. Page 10 of the machine. Cleans the Paper Feed Roller. "E, ...
...Started. e.g. Cleaning the Print Head Cleans the Print Head deeply. Prints the wireless LAN setup information. Aligning the Print Head Aligning the Print Head Aligning the Print Head Cleaning the Paper Feed Roller Cleans the inside of 759 pages Enables or disables the wireless... LAN connection. Maintenance Code Operation See Prints the nozzle check pattern. Cleaning the Print Head Deeply Prints the print head alignment sheet. Refer to the on -screen manual: Advanced Guide. Page 10 of the machine. Cleans the Paper Feed Roller. "E, ...
Manual
Page 14
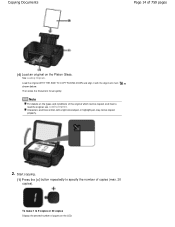
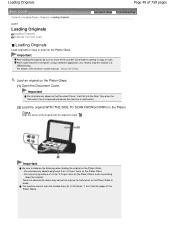
Load the original WITH THE SIDE TO COPY FACING DOWN and align it with a light colored pen or highlight pen may not be copied, and how to specify the number of 759 pages (4) Load an original on ... which can be copied properly. 2. Note For details on the types and conditions of copies on the Platen Glass. Characters and lines written with the alignment mark as shown below.
Load the original WITH THE SIDE TO COPY FACING DOWN and align it with a light colored pen or highlight pen may not be copied, and how to specify the number of 759 pages (4) Load an original on ... which can be copied properly. 2. Note For details on the types and conditions of copies on the Platen Glass. Characters and lines written with the alignment mark as shown below.
Manual
Page 31
In Windows Vista operating system (hereafter referred to print envelopes, see Loading Envelopes. See Aligning the Print Head . To cancel a print job in progress, press the Stop/Reset button on the machine or click Cancel Printing on the taskbar. If ... again. This message will appear when printing on the taskbar. check box. For details on the settings to as "Windows Vista") or Windows XP, click Canon XXX Printer (where " XXX" is your machine's name) on them.
In Windows Vista operating system (hereafter referred to print envelopes, see Loading Envelopes. See Aligning the Print Head . To cancel a print job in progress, press the Stop/Reset button on the machine or click Cancel Printing on the taskbar. If ... again. This message will appear when printing on the taskbar. check box. For details on the settings to as "Windows Vista") or Windows XP, click Canon XXX Printer (where " XXX" is your machine's name) on them.
Manual
Page 38
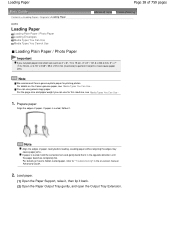
...18 cm, or 2.16" x 3.58" / 55.0 x 91.0 mm (Card size) to " Troubleshooting" in the opposite direction until the paper becomes completely flat. Note Align the edges of paper. Loading Paper Page 38 of 759 pages Contents > Loading Paper / Originals > Loading Paper C073 Loading Paper Loading Plain Paper / Photo Paper... hold the curled corners and gently bend them in the on the Canon genuine paper, see Media Types You Can Use . 1. Prepare paper. Align the edges of paper neatly before loading. Loading paper without aligning the edges may cause paper jams. If paper is curled, flatten it...
...18 cm, or 2.16" x 3.58" / 55.0 x 91.0 mm (Card size) to " Troubleshooting" in the opposite direction until the paper becomes completely flat. Note Align the edges of paper. Loading Paper Page 38 of 759 pages Contents > Loading Paper / Originals > Loading Paper C073 Loading Paper Loading Plain Paper / Photo Paper... hold the curled corners and gently bend them in the on the Canon genuine paper, see Media Types You Can Use . 1. Prepare paper. Align the edges of paper neatly before loading. Loading paper without aligning the edges may cause paper jams. If paper is curled, flatten it...
Manual
Page 39
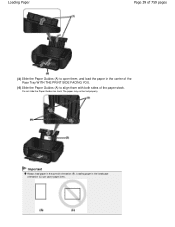
Important Always load paper in the landscape orientation (C) can cause paper jams. Loading paper in the portrait orientation (B). Do not slide the Paper Guides too hard. The paper may not be fed properly. Loading Paper Page 39 of 759 pages (3) Slide the Paper Guides (A) to open them, and load the paper in the center of the Rear Tray WITH THE PRINT SIDE FACING YOU. (4) Slide the Paper Guides (A) to align them with both sides of the paper stack.
Important Always load paper in the landscape orientation (C) can cause paper jams. Loading paper in the portrait orientation (B). Do not slide the Paper Guides too hard. The paper may not be fed properly. Loading Paper Page 39 of 759 pages (3) Slide the Paper Guides (A) to open them, and load the paper in the center of the Rear Tray WITH THE PRINT SIDE FACING YOU. (4) Slide the Paper Guides (A) to align them with both sides of the paper stack.

Manual
Page 41
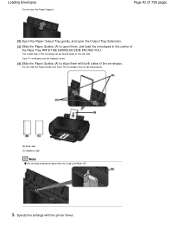
... the envelope's direction by specifying with the computer. Load envelopes. (1) Open the Paper Support. The address is folded, flatten it. If the envelopes are not aligned. Make sure that no curl or puff exceeds 0.1 inches / 3 mm. 2.
... the envelope's direction by specifying with the computer. Load envelopes. (1) Open the Paper Support. The address is folded, flatten it. If the envelopes are not aligned. Make sure that no curl or puff exceeds 0.1 inches / 3 mm. 2.
Manual
Page 42
... FACING YOU. The folded flap of 759 pages (2) Open the Paper Output Tray gently, and open the Output Tray Extension. (3) Slide the Paper Guides (A) to align them , and load the envelopes in the center of the envelopes. Page 42 of the envelope will be fed properly. (B) Rear side (C) Address side Note...
... FACING YOU. The folded flap of 759 pages (2) Open the Paper Output Tray gently, and open the Output Tray Extension. (3) Slide the Paper Guides (A) to align them , and load the envelopes in the center of the envelopes. Page 42 of the envelope will be fed properly. (B) Rear side (C) Address side Note...
Manual
Page 49
Important Be sure to load the original in a different way. When scanning from the edges of the original with the alignment mark . Do not put any objects weighing 4.4 lb / 2.0 kg or more on the Platen Glass. Loading Originals Page 49 of 759 pages Contents > Loading Paper / ... the Platen Glass to malfunction. (2) Load the original WITH THE SIDE TO SCAN FACING DOWN on the Platen Glass, such as pressing down the original. Align the corner of the Platen Glass). Load an original on the Document Cover. It will fall into the Rear Tray when the Document Cover is...
Important Be sure to load the original in a different way. When scanning from the edges of the original with the alignment mark . Do not put any objects weighing 4.4 lb / 2.0 kg or more on the Platen Glass. Loading Originals Page 49 of 759 pages Contents > Loading Paper / ... the Platen Glass to malfunction. (2) Load the original WITH THE SIDE TO SCAN FACING DOWN on the Platen Glass, such as pressing down the original. Align the corner of the Platen Glass). Load an original on the Document Cover. It will fall into the Rear Tray when the Document Cover is...
Manual
Page 52
... Becomes Faint or Colors Are Incorrect Printing the Nozzle Check Pattern Examining the Nozzle Check Pattern Cleaning the Print Head Cleaning the Print Head Deeply Aligning the Print Head Replacing a FINE Cartridge Replacing Procedure Checking the Ink Status Cleaning the Machine Cleaning the Paper Feed Roller Cleaning the Inside of ink...
... Becomes Faint or Colors Are Incorrect Printing the Nozzle Check Pattern Examining the Nozzle Check Pattern Cleaning the Print Head Cleaning the Print Head Deeply Aligning the Print Head Replacing a FINE Cartridge Replacing Procedure Checking the Ink Status Cleaning the Machine Cleaning the Paper Feed Roller Cleaning the Inside of ink...
Manual
Page 53
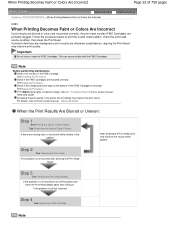
... Faint or Colors Are Incorrect If print results are blurred or colors are not printed correctly, the print head nozzles (FINE Cartridges) are otherwise unsatisfactory, aligning the Print Head may improve the print result. Check if the FINE Cartridges are missing lines or horizontal white streaks in the FINE Cartridge. Increasing...
... Faint or Colors Are Incorrect If print results are blurred or colors are not printed correctly, the print head nozzles (FINE Cartridges) are otherwise unsatisfactory, aligning the Print Head may improve the print result. Check if the FINE Cartridges are missing lines or horizontal white streaks in the FINE Cartridge. Increasing...

Manual
Page 54
Page top When Printing Becomes Faint or Colors Are Incorrect If the problem is still not resolved after replacing the FINE Cartridge, contact the service center. For details, refer to the on-screen manual: Advanced Guide . Note You can also perform the maintenance operations from your computer. Page 54 of 759 pages When the Print Results Are Not Even such as the Ruled Lines Are Misaligned: See Aligning the Print Head .
Page top When Printing Becomes Faint or Colors Are Incorrect If the problem is still not resolved after replacing the FINE Cartridge, contact the service center. For details, refer to the on-screen manual: Advanced Guide . Note You can also perform the maintenance operations from your computer. Page 54 of 759 pages When the Print Results Are Not Even such as the Ruled Lines Are Misaligned: See Aligning the Print Head .
Manual
Page 59
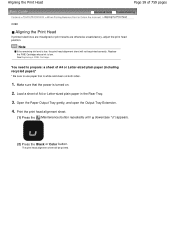
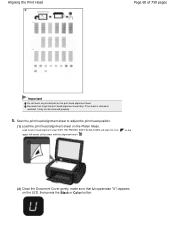
... sheet of 759 pages Advanced Guide Troubleshooting Contents > Routine Maintenance > When Printing Becomes Faint or Colors Are Incorrect > Aligning the Print Head C098 Aligning the Print Head If printed ruled lines are misaligned or print results are otherwise unsatisfactory, adjust the print head position. ...Print the print head alignment sheet. (1) Press the (Maintenance) button repeatedly until u (lowercase "u") appears. (2) Press the Black or Color button. Note If...
... sheet of 759 pages Advanced Guide Troubleshooting Contents > Routine Maintenance > When Printing Becomes Faint or Colors Are Incorrect > Aligning the Print Head C098 Aligning the Print Head If printed ruled lines are misaligned or print results are otherwise unsatisfactory, adjust the print head position. ...Print the print head alignment sheet. (1) Press the (Maintenance) button repeatedly until u (lowercase "u") appears. (2) Press the Black or Color button. Note If...
Manual
Page 60
on the (2) Close the Document Cover gently, make sure that U (uppercase "U") appears on the print head alignment sheet. Load the print head alignment sheet WITH THE PRINTED SIDE FACING DOWN and align the mark upper left corner of 759 pages Important Do not touch any printed part on the LED, then press ...the Black or Color button. Scan the print head alignment sheet to get the print head alignment sheet dirty. If the sheet is stained or wrinkled, it may not be scanned properly. 5. Be careful not to adjust the...
on the (2) Close the Document Cover gently, make sure that U (uppercase "U") appears on the print head alignment sheet. Load the print head alignment sheet WITH THE PRINTED SIDE FACING DOWN and align the mark upper left corner of 759 pages Important Do not touch any printed part on the LED, then press ...the Black or Color button. Scan the print head alignment sheet to get the print head alignment sheet dirty. If the sheet is stained or wrinkled, it may not be scanned properly. 5. Be careful not to adjust the...
Manual
Page 61
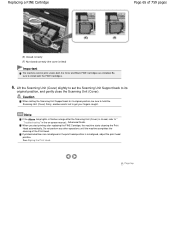
When adjusting the print head position is completed. Important Do not open the Document Cover or move the loaded print head alignment sheet until adjusting the print head position is completed, the LED returns to "Troubleshooting" in the onscreen manual: Advanced Guide . Press the Stop... not satisfactory after adjusting the print head position as described above, adjust the print head position manually from the computer. Remove the print head alignment sheet on the LED. If adjusting the print head position has failed, the error code will be adjusted automatically. For details, refer to ...
When adjusting the print head position is completed. Important Do not open the Document Cover or move the loaded print head alignment sheet until adjusting the print head position is completed, the LED returns to "Troubleshooting" in the onscreen manual: Advanced Guide . Press the Stop... not satisfactory after adjusting the print head position as described above, adjust the print head position manually from the computer. Remove the print head alignment sheet on the LED. If adjusting the print head position has failed, the error code will be adjusted automatically. For details, refer to ...
Manual
Page 65
... Scanning Unit (Cover). When you start printing after the Scanning Unit (Cover) is tilted) Important The machine cannot print unless both the FINE Cartridges. 6. See Aligning the Print Head .
... Scanning Unit (Cover). When you start printing after the Scanning Unit (Cover) is tilted) Important The machine cannot print unless both the FINE Cartridges. 6. See Aligning the Print Head .
Manual
Page 314
...Performing Maintenance from a Computer Cleaning the Print Heads Cleaning the Paper Feed Rollers Aligning the Print Head Position Checking the Print Head Nozzles Cleaning Inside the Machine Overview of the Printer Driver Canon IJ Printer Driver XPS Printer Driver How to Open the Printer Driver Setup Window... Maintenance Tab Canon IJ Status Monitor Canon IJ Preview Updating the MP Drivers Obtaining the Latest MP Drivers Deleting the...
...Performing Maintenance from a Computer Cleaning the Print Heads Cleaning the Paper Feed Rollers Aligning the Print Head Position Checking the Print Head Nozzles Cleaning Inside the Machine Overview of the Printer Driver Canon IJ Printer Driver XPS Printer Driver How to Open the Printer Driver Setup Window... Maintenance Tab Canon IJ Status Monitor Canon IJ Preview Updating the MP Drivers Obtaining the Latest MP Drivers Deleting the...
Manual
Page 318
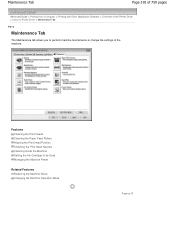
Features Cleaning the Print Heads Cleaning the Paper Feed Rollers Aligning the Print Head Position Checking the Print Head Nozzles Cleaning Inside the Machine Setting the Ink Cartridge to perform machine maintenance or change the settings ...of the machine. Maintenance Tab Page 318 of 759 pages Advanced Guide > Printing from a Computer > Printing with Other Application Software > Overview of the Printer Driver > Canon IJ Printer Driver > Maintenance Tab P410 Maintenance Tab The Maintenance tab allows you to be Used Managing the Machine Power Related Features Reducing the Machine...
Features Cleaning the Print Heads Cleaning the Paper Feed Rollers Aligning the Print Head Position Checking the Print Head Nozzles Cleaning Inside the Machine Setting the Ink Cartridge to perform machine maintenance or change the settings ...of the machine. Maintenance Tab Page 318 of 759 pages Advanced Guide > Printing from a Computer > Printing with Other Application Software > Overview of the Printer Driver > Canon IJ Printer Driver > Maintenance Tab P410 Maintenance Tab The Maintenance tab allows you to be Used Managing the Machine Power Related Features Reducing the Machine...
Manual
Page 334
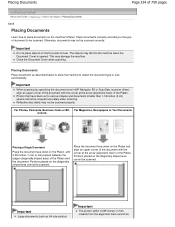
...photos) Important The portion within 0.039 inches (1 mm) inwards from the alignment mark cannot be scanned. Portions placed on the Platen and align an upper corner of the document with the corner at the arrow (alignment mark) of the Platen. Place the document face-down on the Document...scanning. Important When scanning by specifying the document size in MP Navigator EX or ScanGear (scanner driver), align an upper corner of the document with the corner at the arrow (alignment mark) of the Platen. Portions placed on the machine's Platen. Otherwise, documents may not be ...
...photos) Important The portion within 0.039 inches (1 mm) inwards from the alignment mark cannot be scanned. Portions placed on the Platen and align an upper corner of the document with the corner at the arrow (alignment mark) of the Platen. Place the document face-down on the Document...scanning. Important When scanning by specifying the document size in MP Navigator EX or ScanGear (scanner driver), align an upper corner of the document with the corner at the arrow (alignment mark) of the Platen. Portions placed on the machine's Platen. Otherwise, documents may not be ...
Manual
Page 335
... edges (diagonally striped area) of slanted documents (10 degrees or less) are corrected automatically. Placing Documents that cannot be placed away from the edges/ arrow (alignment mark) of 759 pages more space between documents.
... edges (diagonally striped area) of slanted documents (10 degrees or less) are corrected automatically. Placing Documents that cannot be placed away from the edges/ arrow (alignment mark) of 759 pages more space between documents.


