LV-X2 Brochure
Page 1
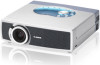
... q Mouse Control Cable (PS/2, Serial, and Mac) q Lens Cap q Dust Cover q Warranty Card q User's Manual Optional Projector Lenses for the LV-7555 Ultra Wide Angle Lens LV-IL01 Lens: f=22.33 mm, F2.5 Projected Image Size: 70" to 120" Throw Distance: 3.7 to 6.4 ft...LV-CL08 For the LV-S3 q Replacement Lamp LV-LP20 q Component Video Cable LV-CA32 q Ceiling Mount Adapter LV-CL09 For the LV-X2 q Replacement Lamp LV-LP15 q Remote Control with Mouse and Laser Functions LV-RC01 q Mouse Cable for PS/2 LV-CA25 q Mouse Control Cable for Serial LV-CA26 q Mouse Control Cable for clearer projection. Canon...
... q Mouse Control Cable (PS/2, Serial, and Mac) q Lens Cap q Dust Cover q Warranty Card q User's Manual Optional Projector Lenses for the LV-7555 Ultra Wide Angle Lens LV-IL01 Lens: f=22.33 mm, F2.5 Projected Image Size: 70" to 120" Throw Distance: 3.7 to 6.4 ft...LV-CL08 For the LV-S3 q Replacement Lamp LV-LP20 q Component Video Cable LV-CA32 q Ceiling Mount Adapter LV-CL09 For the LV-X2 q Replacement Lamp LV-LP15 q Remote Control with Mouse and Laser Functions LV-RC01 q Mouse Cable for PS/2 LV-CA25 q Mouse Control Cable for Serial LV-CA26 q Mouse Control Cable for clearer projection. Canon...
LV-X2 Brochure
Page 2
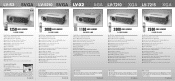
... (DVI-VGA) q Mouse Control Cable (USB) q Lens Cap q Soft Carrying Case q Warranty Card q User's Manual Kit Contents q Projector q Wireless Remote Control (AA Batteries Included) q Power Cable q VGA Computer Cable q Lens Cap q Soft Carrying Case q Warranty Card q User's Manual 2000 ANSI LUMENS 6.4 LBS (2.9 KG) Specifications q Native XGA Resolution (1024 x 768) q 2000 ANSI Lumens (85...
... (DVI-VGA) q Mouse Control Cable (USB) q Lens Cap q Soft Carrying Case q Warranty Card q User's Manual Kit Contents q Projector q Wireless Remote Control (AA Batteries Included) q Power Cable q VGA Computer Cable q Lens Cap q Soft Carrying Case q Warranty Card q User's Manual 2000 ANSI LUMENS 6.4 LBS (2.9 KG) Specifications q Native XGA Resolution (1024 x 768) q 2000 ANSI Lumens (85...
Owners Manual
Page 2
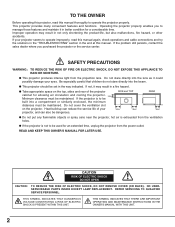
... TO QUALIFIED SERVICE PERSONNEL. TO THE OWNER Before operating this projector, read this manual thoroughly to operate the projector properly. If your projector seems to be built into the beam. G Take appropriate space on the projector. CAUTION RISK OF ELECTRIC SHOCK DO NOT OPEN CAUTION : ... enclosed, the minimum distances must be used for allowing air circulation and cooling the projector. 20cm Minimum clearance must be dangerous. If the projector is to operate improperly, read this manual again, check operations and cable connections and try the solutions in the "TROUBLESHOOTING" ...
... TO QUALIFIED SERVICE PERSONNEL. TO THE OWNER Before operating this projector, read this manual thoroughly to operate the projector properly. If your projector seems to be built into the beam. G Take appropriate space on the projector. CAUTION RISK OF ELECTRIC SHOCK DO NOT OPEN CAUTION : ... enclosed, the minimum distances must be used for allowing air circulation and cooling the projector. 20cm Minimum clearance must be dangerous. If the projector is to operate improperly, read this manual again, check operations and cable connections and try the solutions in the "TROUBLESHOOTING" ...
Owners Manual
Page 5
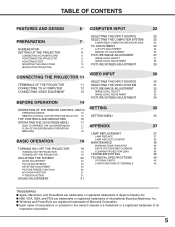
... 6 COMPUTER INPUT 22 PREPARATION NOMENCHTOR SETTING-UP THE PROJECTOR CONNECTING AC POWER CORD POSITIONING THE PROJECTOR ADJUSTABLE FEET MOUNTING THE LENS COVER MOVING THE PROJECTOR SELECTING THE INPUT SOURCE 22 7 SELECTING THE COMPUTER SYSTEM COMPATIBLE COMPUTER SPECIFICATIONS 22 23 PC ADJUSTMENT 24 7 AUTO PC ADJUSTMENT 24 8 MANUAL PC ADJUSTMENT 25 8 PICTURE IMAGE ADJUSTMENT 27...
... 6 COMPUTER INPUT 22 PREPARATION NOMENCHTOR SETTING-UP THE PROJECTOR CONNECTING AC POWER CORD POSITIONING THE PROJECTOR ADJUSTABLE FEET MOUNTING THE LENS COVER MOVING THE PROJECTOR SELECTING THE INPUT SOURCE 22 7 SELECTING THE COMPUTER SYSTEM COMPATIBLE COMPUTER SPECIFICATIONS 22 23 PC ADJUSTMENT 24 7 AUTO PC ADJUSTMENT 24 8 MANUAL PC ADJUSTMENT 25 8 PICTURE IMAGE ADJUSTMENT 27...
Owners Manual
Page 6
... a wide range of frequency and other settings unnecessary. When resolution of almost all computer output signals allowing quick. Making manual adjustment of video and computer input signals including; This projector is shipped with the most advanced technology for Computer) A Digital Zoom function lets you enlarge a sect of the image to 16 times...
... a wide range of frequency and other settings unnecessary. When resolution of almost all computer output signals allowing quick. Making manual adjustment of video and computer input signals including; This projector is shipped with the most advanced technology for Computer) A Digital Zoom function lets you enlarge a sect of the image to 16 times...
Owners Manual
Page 22
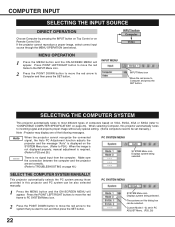
... tunes to incoming signal and projects proper image without any special setting. (Some computers need to be set manually.) Note : Projector may display one of computers based on VGA, SVGA, XGA or SXGA (refer to TROUBLESHOOTING on page 40.) PC SYSTEM MENU SYSTEM Menu icon Displays ... DOWN button to move the red arrow to the system that you want to Computer and then press the SET button. SELECT THE COMPUTER SYSTEM MANUALLY This projector automatically selects the PC system among those provided in PC ADJUST Menu. (P25, 26) 22 Press the POINT LEFT/RIGHT buttons to move the...
... tunes to incoming signal and projects proper image without any special setting. (Some computers need to be set manually.) Note : Projector may display one of computers based on VGA, SVGA, XGA or SXGA (refer to TROUBLESHOOTING on page 40.) PC SYSTEM MENU SYSTEM Menu icon Displays ... DOWN button to move the red arrow to the system that you want to Computer and then press the SET button. SELECT THE COMPUTER SYSTEM MANUALLY This projector automatically selects the PC system among those provided in PC ADJUST Menu. (P25, 26) 22 Press the POINT LEFT/RIGHT buttons to move the...
Owners Manual
Page 24
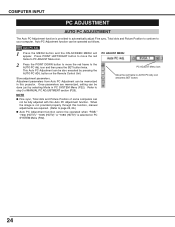
... PC Adj. Auto PC Adjustment function can be operated when "RGB," "720p (HDTV)," "1035i (HDTV)" or "1080i (HDTV)" is not provided properly through this projector. Press POINT LEFT/RIGHT button to move the red frame to PC ADJUST Menu icon. 2 Press the POINT DOWN button to move the red frame... PC Adjustment can be memorized in PC SYSTEM Menu (P22). This Auto PC Adjustment can be also executed by selecting Mode in this function, manual adjustments are memorized, setting can be fully adjusted with this Auto PC Adjustment function. PC ADJUST MENU PC ADJUST Menu icon Move the red frame...
... PC Adj. Auto PC Adjustment function can be operated when "RGB," "720p (HDTV)," "1035i (HDTV)" or "1080i (HDTV)" is not provided properly through this projector. Press POINT LEFT/RIGHT button to move the red frame to PC ADJUST Menu icon. 2 Press the POINT DOWN button to move the red frame... PC Adjustment can be memorized in PC SYSTEM Menu (P22). This Auto PC Adjustment can be also executed by selecting Mode in this function, manual adjustments are memorized, setting can be fully adjusted with this Auto PC Adjustment function. PC ADJUST MENU PC ADJUST Menu icon Move the red frame...
Owners Manual
Page 25
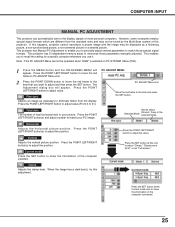
...match your picture. Clamp Adjusts the clamp level. Current mode Press the SET button at this projector. This projector has Manual PC Adjustment to enable you to precisely adjust several parameters to match those parameters manually adjusted. Press the POINT LEFT/RIGHT button to adjust value.(From 0 to 31.) PC ...) of most personal computers. Horizontal Adjusts the horizontal picture position. Press the POINT LEFT/RIGHT button(s) to adjust the position. COMPUTER INPUT MANUAL PC ADJUSTMENT This projector can automatically tune to the display signals of the selected Mode.
...match your picture. Clamp Adjusts the clamp level. Current mode Press the SET button at this projector. This projector has Manual PC Adjustment to enable you to precisely adjust several parameters to match those parameters manually adjusted. Press the POINT LEFT/RIGHT button to adjust value.(From 0 to 31.) PC ...) of most personal computers. Horizontal Adjusts the horizontal picture position. Press the POINT LEFT/RIGHT button(s) to adjust the position. COMPUTER INPUT MANUAL PC ADJUSTMENT This projector can automatically tune to the display signals of the selected Mode.
Owners Manual
Page 29
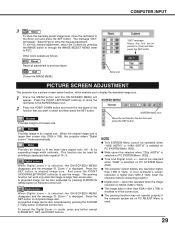
...1035i (HDTV)" or "1080i (HDTV)" is larger than 1280 X 1024, lower the resolution before connecting projector. G Digital zoom - cannot be used . 29 COMPUTER INPUT 3 Store To store the manually preset image level, move the red frame to the SCREEN Menu icon. Quit Closes the IMAGE MENU..... "OK?" To cancel the Digital Zoom +/- G True and Digital zoom +/- G This projector cannot display any button except D.ZOOM W/T, SET, and POINT buttons. message Move the red arrow pointer to store the manual adjustment. Select [Yes] to [Yes] and then press the SET button. This function can...
...1035i (HDTV)" or "1080i (HDTV)" is larger than 1280 X 1024, lower the resolution before connecting projector. G Digital zoom - cannot be used . 29 COMPUTER INPUT 3 Store To store the manually preset image level, move the red frame to the SCREEN Menu icon. Quit Closes the IMAGE MENU..... "OK?" To cancel the Digital Zoom +/- G True and Digital zoom +/- G This projector cannot display any button except D.ZOOM W/T, SET, and POINT buttons. message Move the red arrow pointer to store the manual adjustment. Select [Yes] to [Yes] and then press the SET button. This function can...
Owners Manual
Page 31
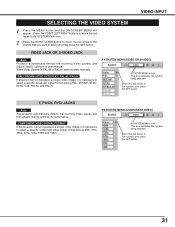
... SYSTEM 1 Press the MENU button and the ON-SCREEN MENU will appear. PAL / SECAM / NTSC / NTSC4.43 / PAL-M / PAL-N If projector cannot reproduce a proper video image, it is necessary to select a specific component video signal format among PAL, SECAM, NTSC, NTSC 4.43, PAL-M, and... is necessary to optimize its performance. AV SYSTEM MENU (COMPONENT VIDEO) COMPONENT VIDEO SIGNAL FORMAT If the projector cannot reproduce a proper video image, it is PAL-M or PAL-N, select system manually. Move the red arrow to optimize its performance. Y, Pb/Cb, Pr/Cr JACKS Auto The...
... SYSTEM 1 Press the MENU button and the ON-SCREEN MENU will appear. PAL / SECAM / NTSC / NTSC4.43 / PAL-M / PAL-N If projector cannot reproduce a proper video image, it is necessary to select a specific component video signal format among PAL, SECAM, NTSC, NTSC 4.43, PAL-M, and... is necessary to optimize its performance. AV SYSTEM MENU (COMPONENT VIDEO) COMPONENT VIDEO SIGNAL FORMAT If the projector cannot reproduce a proper video image, it is PAL-M or PAL-N, select system manually. Move the red arrow to optimize its performance. Y, Pb/Cb, Pr/Cr JACKS Auto The...
Owners Manual
Page 34
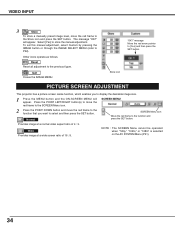
... at a wide screen ratio of 4 : 3. Select [Yes] to P32). To set this manual adjustment, select Custom by pressing the IMAGE button or through the IMAGE SELECT MENU (refer to store the manual adjustment. message Move the red arrow pointer to the Store icon and press the SET button... appear. Quit Closes the IMAGE MENU. Store icon PICTURE SCREEN ADJUSTMENT This projector has a picture screen resize function, which enables you want to select and then press the SET button. VIDEO INPUT 3 Store To store a manually preset image level, move the red frame to [Yes] and then press...
... at a wide screen ratio of 4 : 3. Select [Yes] to P32). To set this manual adjustment, select Custom by pressing the IMAGE button or through the IMAGE SELECT MENU (refer to store the manual adjustment. message Move the red arrow pointer to the Store icon and press the SET button... appear. Quit Closes the IMAGE MENU. Store icon PICTURE SCREEN ADJUSTMENT This projector has a picture screen resize function, which enables you want to select and then press the SET button. VIDEO INPUT 3 Store To store a manually preset image level, move the red frame to [Yes] and then press...
Owners Manual
Page 38
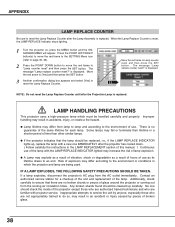
...Yes] and then press the SET button. 3 Another confirmation dialog box appears and select [Yes] to reset the Lamp Replace Counter after the projector has cooled down. ( Follow carefully the instructions in a shorter period of broken glass. 38 There is replaced. G A Lamp may differ according...LAMP REPLACE INDICATOR lighted may increase the risk of this manual. ) Continuous use . Additionally, check carefully to do so, may fail or terminate their lifetime in the LAMP REPLACEMENT section of lamp explosion. G If the projector indicates that the lamp should check the inside of the ...
...Yes] and then press the SET button. 3 Another confirmation dialog box appears and select [Yes] to reset the Lamp Replace Counter after the projector has cooled down. ( Follow carefully the instructions in a shorter period of broken glass. 38 There is replaced. G A Lamp may differ according...LAMP REPLACE INDICATOR lighted may increase the risk of this manual. ) Continuous use . Additionally, check carefully to do so, may fail or terminate their lifetime in the LAMP REPLACEMENT section of lamp explosion. G If the projector indicates that the lamp should check the inside of the ...
Owners Manual
Page 42
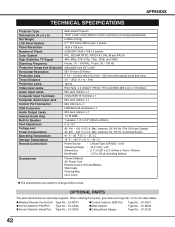
...(CR2025 / 3.0V) : 16.4' (5m) / ±30˚ : 2.1" x 0.28" x 5.3" (54mm x 7mm x 135mm) : 1.27oz (36 g) (including battery) Accessories Owner's Manual AC Power Cord Remote Control Unit and Battery VGA Cable Carrying Bag Lens Cover G The specifications are optionally supplied. G Wireless Remote Control Unit Type No... G Control Cable for ADB Port G MAC Adapter G Ceiling Mount Hanger Type No.: LV-CA27 Type No.: LV-AD02 Type No.: LV-CL06 42 APPENDIX TECHNICAL SPECIFICATIONS Projector Type Dimensions (W x H x D) Net Weight LCD Panel System Panel Resolution Number of it to the sales dealer....
...(CR2025 / 3.0V) : 16.4' (5m) / ±30˚ : 2.1" x 0.28" x 5.3" (54mm x 7mm x 135mm) : 1.27oz (36 g) (including battery) Accessories Owner's Manual AC Power Cord Remote Control Unit and Battery VGA Cable Carrying Bag Lens Cover G The specifications are optionally supplied. G Wireless Remote Control Unit Type No... G Control Cable for ADB Port G MAC Adapter G Ceiling Mount Hanger Type No.: LV-CA27 Type No.: LV-AD02 Type No.: LV-CL06 42 APPENDIX TECHNICAL SPECIFICATIONS Projector Type Dimensions (W x H x D) Net Weight LCD Panel System Panel Resolution Number of it to the sales dealer....


