Full Line - Projectors Brochure
Page 1
....) RS-CL05 (29.92 in.) For LV-X5 Replacement Lamp LV-LP25 Ceiling Mount Adapter LV-CL10 Component Video Adapter Cable LV-CA32 TRIPLE P Triple P Program Canon's Projector Protection Program, also known as security for products purchased and utilized in the event that provides a loaner projector of new product warranty • Canon Customer Support Center toll free hotline: 1-800-828-4040 • Customer Service Hours: 8 a.m. Manuel Ávila Camacho No. 138...
....) RS-CL05 (29.92 in.) For LV-X5 Replacement Lamp LV-LP25 Ceiling Mount Adapter LV-CL10 Component Video Adapter Cable LV-CA32 TRIPLE P Triple P Program Canon's Projector Protection Program, also known as security for products purchased and utilized in the event that provides a loaner projector of new product warranty • Canon Customer Support Center toll free hotline: 1-800-828-4040 • Customer Service Hours: 8 a.m. Manuel Ávila Camacho No. 138...
Full Line - Projectors Brochure
Page 2
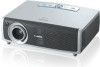
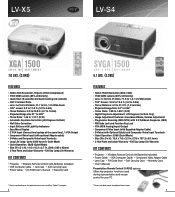
... x 96mm) • 3 Year Parts and Labor Warranty -120 Day Lamp Life Warranty KIT CONTENTS • Projector • Wireless Remote Control (AA Batteries Included) • Computer Cable (DVI-VGA) • Component Video Adapter Cable • Mouse Control Cable (USB) • Lens Cap • Soft Carrying Case • Power Cable • Warranty Card • User's Manual * Please see back cover for optional accessories, "Triple P" program and other information. 2 GENUINE CANON OPTICS Nearly 70 years...
... x 96mm) • 3 Year Parts and Labor Warranty -120 Day Lamp Life Warranty KIT CONTENTS • Projector • Wireless Remote Control (AA Batteries Included) • Computer Cable (DVI-VGA) • Component Video Adapter Cable • Mouse Control Cable (USB) • Lens Cap • Soft Carrying Case • Power Cable • Warranty Card • User's Manual * Please see back cover for optional accessories, "Triple P" program and other information. 2 GENUINE CANON OPTICS Nearly 70 years...
Full Line - Projectors Brochure
Page 3
... Input Terminals: 5BNC, Component, S-Video, Composite • Quiet Operation: 35 dB (Quiet Mode) • Size (W x D x H) : 12.6 x 18.3 x 6.6 in. (319 x 465.2 x 168mm) • 3 Year Parts and Labor Warranty -120 Day Lamp Life Warranty KIT CONTENTS • Projector • Power Cable • VGA Computer Cable • MAC/VGA Adapter • Wireless/Wired Remote Control (AA Batteries Included) • Wired Remote Cable • Mouse Control Cable (PS/2, Serial, and Mac) • Lens Cap • Dust Cover • Warranty Card • User's Manual...
... Input Terminals: 5BNC, Component, S-Video, Composite • Quiet Operation: 35 dB (Quiet Mode) • Size (W x D x H) : 12.6 x 18.3 x 6.6 in. (319 x 465.2 x 168mm) • 3 Year Parts and Labor Warranty -120 Day Lamp Life Warranty KIT CONTENTS • Projector • Power Cable • VGA Computer Cable • MAC/VGA Adapter • Wireless/Wired Remote Control (AA Batteries Included) • Wired Remote Cable • Mouse Control Cable (PS/2, Serial, and Mac) • Lens Cap • Dust Cover • Warranty Card • User's Manual...
Full Line - Projectors Brochure
Page 5
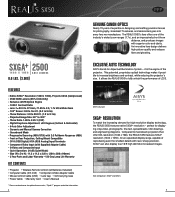
... Color Correction • Input Buttons with Light-Up Indicators • Easy Menu Display • 2 VGA Input (Connect two laptops at the same time), 1 VGA Output • Component Video Input (with optional Adapter cable) • S-Video and Composite Video Input Terminals • Long Life Lamp: Up to 4000 hours in Quiet Mode • Quiet Operation: 28dB (Quiet Mode) • Size (W x D x H): 11.6 x 10.2 x 3.7 in. (294 x 260 x 93mm) • 3 Year Parts and Labor Warranty -120 Day Lamp Life Warranty KIT CONTENTS • Projector • Wireless Remote Control...
... Color Correction • Input Buttons with Light-Up Indicators • Easy Menu Display • 2 VGA Input (Connect two laptops at the same time), 1 VGA Output • Component Video Input (with optional Adapter cable) • S-Video and Composite Video Input Terminals • Long Life Lamp: Up to 4000 hours in Quiet Mode • Quiet Operation: 28dB (Quiet Mode) • Size (W x D x H): 11.6 x 10.2 x 3.7 in. (294 x 260 x 93mm) • 3 Year Parts and Labor Warranty -120 Day Lamp Life Warranty KIT CONTENTS • Projector • Wireless Remote Control...
Full Line - Projectors Brochure
Page 6
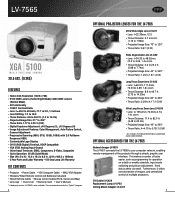
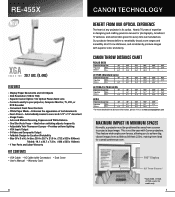
..., allowing you to achieve big, vibrant images from a screen to project a large image. RE-455X CANON TECHNOLOGY XGA 1 0 2 4 X 7 6 8 20.7 LBS. (9.4KG) FEATURES • Display Paper Documents and 3-D Objects • XGA Resolution (1024 x 768) • Superior Canon Optics: 12x Optical Power Zoom Lens • Connects easily to cover an 8-1/2" x 11" document • Image Freeze • Auto and Manual Focusing, Exposure and White Balance • One Shot Auto Focus - Distance Tele 4.6' 40" 100" 200" 300...
..., allowing you to achieve big, vibrant images from a screen to project a large image. RE-455X CANON TECHNOLOGY XGA 1 0 2 4 X 7 6 8 20.7 LBS. (9.4KG) FEATURES • Display Paper Documents and 3-D Objects • XGA Resolution (1024 x 768) • Superior Canon Optics: 12x Optical Power Zoom Lens • Connects easily to cover an 8-1/2" x 11" document • Image Freeze • Auto and Manual Focusing, Exposure and White Balance • One Shot Auto Focus - Distance Tele 4.6' 40" 100" 200" 300...

Owners Manual
Page 3
... 25 Auto PC Adjustment 26 Manual PC Adjustment 27 Image Level Selection 29 Image Level Adjustment 30 Screen Size Adjustment 31 Video Input 32 Input Source Selection 32 Video System Selection 33 Image Level Selection 34 Image Level Adjustment 35 Screen Size Adjustment 37 Setting 38 Setting 38 Maintenance and Cleaning 45 Warning Indicator 45 Cleaning the Air Filters 46 Cleaning the Projection Lens 47 Cleaning the Projector Cabinet 47 Attaching the Lens Cover 47 Lamp Replacement 48 Lamp Replace Counter 49 Appendix 50 Troubleshooting 50 Menu Tree...
... 25 Auto PC Adjustment 26 Manual PC Adjustment 27 Image Level Selection 29 Image Level Adjustment 30 Screen Size Adjustment 31 Video Input 32 Input Source Selection 32 Video System Selection 33 Image Level Selection 34 Image Level Adjustment 35 Screen Size Adjustment 37 Setting 38 Setting 38 Maintenance and Cleaning 45 Warning Indicator 45 Cleaning the Air Filters 46 Cleaning the Projection Lens 47 Cleaning the Projector Cabinet 47 Attaching the Lens Cover 47 Lamp Replacement 48 Lamp Replace Counter 49 Appendix 50 Troubleshooting 50 Menu Tree...

Owners Manual
Page 4
... Computer/Data Processing Equipment, ANSI/NFPA 75. NO USER-SERVICEABLE PARTS INSIDE EXCEPT LAMP REPLACEMENT. Be especially careful that children do not stare directly into a compartment or similarly enclosed, the minimum distances must be maintained. If the projector is exhausted from the power outlet. To the Owner Before operating this projector, read this manual again, check operations and cable connections and try the solutions in the "Troubleshooting" section...
... Computer/Data Processing Equipment, ANSI/NFPA 75. NO USER-SERVICEABLE PARTS INSIDE EXCEPT LAMP REPLACEMENT. Be especially careful that children do not stare directly into a compartment or similarly enclosed, the minimum distances must be maintained. If the projector is exhausted from the power outlet. To the Owner Before operating this projector, read this manual again, check operations and cable connections and try the solutions in the "Troubleshooting" section...

Owners Manual
Page 6
... projector on the projector. Installing the Projector in an unsuitable transport case. Safety Instructions Air Circulation Openings in the cabinet are provided to cool down to project an image. Air Intake Vent 6 Exhaust Vent (Hot air exhaust) Moving the Projector When moving the projector, replace the Lens Cover and retract Adjustable Feet to prevent damage to protect an appliance from overheating, and these openings must not be blocked or covered...
... projector on the projector. Installing the Projector in an unsuitable transport case. Safety Instructions Air Circulation Openings in the cabinet are provided to cool down to project an image. Air Intake Vent 6 Exhaust Vent (Hot air exhaust) Moving the Projector When moving the projector, replace the Lens Cover and retract Adjustable Feet to prevent damage to protect an appliance from overheating, and these openings must not be blocked or covered...

Owners Manual
Page 10
... green while the projector is under operation. (p17, 18, 54) w LAMP REPLACE indicator Turn yellow when the life of the projection lamp draws to an end. (p48, 54) e WARNING indicator Emit red light when the projector is in the On-Screen Menu. mode. (p31) Point ed7 8 ( VOL + / - ) button Select an item or adjust the value in the abnormal condition. It turns red when the projector is also used as VOL +/- This indicator also flashes red when the internal projector temperature...
... green while the projector is under operation. (p17, 18, 54) w LAMP REPLACE indicator Turn yellow when the life of the projection lamp draws to an end. (p48, 54) e WARNING indicator Emit red light when the projector is in the On-Screen Menu. mode. (p31) Point ed7 8 ( VOL + / - ) button Select an item or adjust the value in the abnormal condition. It turns red when the projector is also used as VOL +/- This indicator also flashes red when the internal projector temperature...

Owners Manual
Page 11
... also used to its optimum setting. (p26) o MUTE button Mute the sound. (p23) !0 P-TIMER button Operate the P-timer function. (p23) !1 NO SHOW button Temporarily turn off the image on or off. (p17, 18) w VIDEO button Select the VIDEO input. (p32) e COMPUTER button Select the COMPUTER input source. (p24, 32) r MENU button Open or close the On-Screen Menu. (p20) t KEYSTONE button Correct the keystone distortion. (p22, 38) y D.ZOOM ed buttons Select the Digital zoom +/- Maximum operating range for changing the remote control unit code. mode. (p31...
... also used to its optimum setting. (p26) o MUTE button Mute the sound. (p23) !0 P-TIMER button Operate the P-timer function. (p23) !1 NO SHOW button Temporarily turn off the image on or off. (p17, 18) w VIDEO button Select the VIDEO input. (p32) e COMPUTER button Select the COMPUTER input source. (p24, 32) r MENU button Open or close the On-Screen Menu. (p20) t KEYSTONE button Correct the keystone distortion. (p22, 38) y D.ZOOM ed buttons Select the Digital zoom +/- Maximum operating range for changing the remote control unit code. mode. (p31...
Owners Manual
Page 17
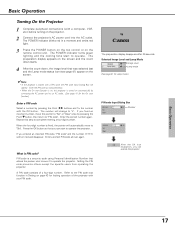
... locked with a PIN code, the PIN code Input Dialog Box will automatically move the pointer to "Set" or "Clear" once by pressing the Point 7 8 buttons and fix the number with the OK button. The POWER indicator turns green lighting and the cooling fans start to operate. Press the OK button so that you can start to operate the projector. Selected Image Level and Lamp Mode Image Level Lamp mode (See page 41 for locking operation of a four-digit number. The preparation display...
... locked with a PIN code, the PIN code Input Dialog Box will automatically move the pointer to "Set" or "Clear" once by pressing the Point 7 8 buttons and fix the number with the OK button. The POWER indicator turns green lighting and the cooling fans start to operate. Press the OK button so that you can start to operate the projector. Selected Image Level and Lamp Mode Image Level Lamp mode (See page 41 for locking operation of a four-digit number. The preparation display...

Owners Manual
Page 21
...(Green), and Custom. (p29) Screen Menu Used to adjust size of image. [Normal / True / Wide / Digital zoom +/-] (p31) Setting Menu Used to change settings of the projector or reset lamp replace counter. (p38-44) Basic Operation Input Menu Used to select input source either Computer or Video. (p24) PC Adjust Menu Used to adjust parameters to match with input signal format. (p26-28) Image Adjust Menu Used to adjust computer image. [Contrast / Brightness / Color temp. / White balance (R/G/B) / Gamma] (p30) Sound Menu Used to adjust volume or mute sound. (p23) For video source Input Menu...
...(Green), and Custom. (p29) Screen Menu Used to adjust size of image. [Normal / True / Wide / Digital zoom +/-] (p31) Setting Menu Used to change settings of the projector or reset lamp replace counter. (p38-44) Basic Operation Input Menu Used to select input source either Computer or Video. (p24) PC Adjust Menu Used to adjust parameters to match with input signal format. (p26-28) Image Adjust Menu Used to adjust computer image. [Contrast / Brightness / Color temp. / White balance (R/G/B) / Gamma] (p30) Sound Menu Used to adjust volume or mute sound. (p23) For video source Input Menu...

Owners Manual
Page 22
... width with Point e button. INPUT COMPUTER VIDEO POWER MENU VOL- Basic Operation Keystone Adjustment If a projected picture has keystone distortion, correct the image with the keystone adjustment. 1 Press KEYSTONE button on the remote control unit or select Keystone on the Setting menu (p38) to normal, press the NO SHOW button again or press any other button. The arrow of image, and press Point d button to reduce the upper part of direction being displayed, the adjustment will be canceled...
... width with Point e button. INPUT COMPUTER VIDEO POWER MENU VOL- Basic Operation Keystone Adjustment If a projected picture has keystone distortion, correct the image with the keystone adjustment. 1 Press KEYSTONE button on the remote control unit or select Keystone on the Setting menu (p38) to normal, press the NO SHOW button again or press any other button. The arrow of image, and press Point d button to reduce the upper part of direction being displayed, the adjustment will be canceled...

Owners Manual
Page 23
... count time (00 : 00 ~ 59 : 59). Dialog box display is changed to "On" and the sound is cut off the sound. Basic Operation 23 Press the MUTE button to turn down the volume. button VOL + button KEYSTONE IMAGE NO SHOW D.ZOOM FREEZE AUTO PC P-TIMER MUTE Sound Menu MUTE button Sound Menu icon indicate approximate level of volume. To stop the P-Timer, press the P-TIMER button. The volume dialog box appears on the remote control unit...
... count time (00 : 00 ~ 59 : 59). Dialog box display is changed to "On" and the sound is cut off the sound. Basic Operation 23 Press the MUTE button to turn down the volume. button VOL + button KEYSTONE IMAGE NO SHOW D.ZOOM FREEZE AUTO PC P-TIMER MUTE Sound Menu MUTE button Sound Menu icon indicate approximate level of volume. To stop the P-Timer, press the P-TIMER button. The volume dialog box appears on the remote control unit...

Owners Manual
Page 29
... image in the Image Level Adjustment (p30). The level being selected. This mode assists to set and then press the OK button. INPUT COMPUTER VIDEO POWER MENU VOL- High Contrast Picture adjustment improved in reproduction of the halftones. This adjustment is mainly effective on a green colored board, not truly effective on this projector. VOL+ Remote Control Unit Computer Input KEYSTONE IMAGE NO SHOW D.ZOOM FREEZE AUTO PC P-TIMER MUTE IMAGE button IMAGE button Standard High Contrast Blackboard(Green) Custom Image Select Menu Image Select Menu...
... image in the Image Level Adjustment (p30). The level being selected. This mode assists to set and then press the OK button. INPUT COMPUTER VIDEO POWER MENU VOL- High Contrast Picture adjustment improved in reproduction of the halftones. This adjustment is mainly effective on a green colored board, not truly effective on this projector. VOL+ Remote Control Unit Computer Input KEYSTONE IMAGE NO SHOW D.ZOOM FREEZE AUTO PC P-TIMER MUTE IMAGE button IMAGE button Standard High Contrast Blackboard(Green) Custom Image Select Menu Image Select Menu...

Owners Manual
Page 34
VOL+ Remote Control Unit KEYSTONE IMAGE NO SHOW D.ZOOM FREEZE AUTO PC P-TIMER MUTE IMAGE button IMAGE button Standard Cinema Blackboard(Green) Custom Standard Normal picture level preset on this projector. Blackboard(Green) Picture level suitable for the image projected on a black colored board. Image Select Menu Image Select Menu icon Move the red frame pointer to enhance the image projected on a blackboard This mode assists to a level and press the OK button. This is mainly effective on a green colored board...
VOL+ Remote Control Unit KEYSTONE IMAGE NO SHOW D.ZOOM FREEZE AUTO PC P-TIMER MUTE IMAGE button IMAGE button Standard Cinema Blackboard(Green) Custom Standard Normal picture level preset on this projector. Blackboard(Green) Picture level suitable for the image projected on a black colored board. Image Select Menu Image Select Menu icon Move the red frame pointer to enhance the image projected on a blackboard This mode assists to a level and press the OK button. This is mainly effective on a green colored board...

Owners Manual
Page 41
... count-down time with Point 7 8 buttons. On start function does not operate properly. Lamp mode This function allows you to the timer with the Point ed buttons and set time will be turned on if the input signal is reconnected or any button on the top control or remote control unit is blinking red during this box appears. If the projector is quiet. 41 Press the Point 7 8 button to switch On / Off...
... count-down time with Point 7 8 buttons. On start function does not operate properly. Lamp mode This function allows you to the timer with the Point ed buttons and set time will be turned on if the input signal is reconnected or any button on the top control or remote control unit is blinking red during this box appears. If the projector is quiet. 41 Press the Point 7 8 button to switch On / Off...

Owners Manual
Page 48
.... Lamp Cover Screw Lamp Screw Handle Screw ORDER REPLACEMENT LAMP Replacement lamp can be ordered through your projector : ● Replacement Lamp Type No. : LV-S4 LV-LP23 ( 610 317 7038 ) 48 Replace the lamp cover and tighten the screw. 5 Connect the AC power cord to an end, the LAMP REPLACE indicator emits yellow light. of your dealer. Maintenance and Cleaning Lamp Replacement When the life of the projection lamp of this indicator emits yellow light, replace the lamp with a lamp of the same type. Top Control POWER VOL - The inside of the projection lamp...
.... Lamp Cover Screw Lamp Screw Handle Screw ORDER REPLACEMENT LAMP Replacement lamp can be ordered through your projector : ● Replacement Lamp Type No. : LV-S4 LV-LP23 ( 610 317 7038 ) 48 Replace the lamp cover and tighten the screw. 5 Connect the AC power cord to an end, the LAMP REPLACE indicator emits yellow light. of your dealer. Maintenance and Cleaning Lamp Replacement When the life of the projection lamp of this indicator emits yellow light, replace the lamp with a lamp of the same type. Top Control POWER VOL - The inside of the projection lamp...

Owners Manual
Page 50
... need to change the setting for the projector in "Connecting to a Computer" and "Connecting to see if it does not project an image, restart the computer. Press the Mute button. (See page 23.) 50 Problem: No power Image is turned off and wait until condensation evaporates. - No image Image is Top/Bottom reversed. Check the Ceiling / Rear item. (See "Setting" on . - Adjust the audio source. - See if the POWER indicator emits red light. - Wait...
... need to change the setting for the projector in "Connecting to a Computer" and "Connecting to see if it does not project an image, restart the computer. Press the Mute button. (See page 23.) 50 Problem: No power Image is turned off and wait until condensation evaporates. - No image Image is Top/Bottom reversed. Check the Ceiling / Rear item. (See "Setting" on . - Adjust the audio source. - See if the POWER indicator emits red light. - Wait...

Owners Manual
Page 54
... lamp is turned off ✽ When the life of the lamp. Check and clean the air filters. Indicators LAMP POWER WARNING REPLACE red/green red yellow Projector Condition The projector is OFF. (The AC power cord is unplugged.) ✽ The projector is preparing for projector condition. The projector detects an abnormal condition and cannot be turned on . Reset the Lamp replace counter after replacement of the projection lamp draws to turn on the projector, the WARNING indicator stops blinking. When the projector is cooled down enough and the temperature...
... lamp is turned off ✽ When the life of the lamp. Check and clean the air filters. Indicators LAMP POWER WARNING REPLACE red/green red yellow Projector Condition The projector is OFF. (The AC power cord is unplugged.) ✽ The projector is preparing for projector condition. The projector detects an abnormal condition and cannot be turned on . Reset the Lamp replace counter after replacement of the projection lamp draws to turn on the projector, the WARNING indicator stops blinking. When the projector is cooled down enough and the temperature...


