
LV-7575_inst_manual.pdf
Page 2
... a disaster. NO USER-SERVICEABLE PARTS INSIDE EXCEPT LAMP REPLACEMENT. Do not cover the ventilation slots on the top, sides and rear of the projector cabinet for a considerable time. IF THE PROJECTOR COMES IN CONTACT WITH OIL OR CHEMICALS, IT MAY BECOME DETERIORATED. TO THE OWNER Before operating this projector, read this manual again, check operations and cable connections and try the solutions in the "Troubleshooting" section in the...
... a disaster. NO USER-SERVICEABLE PARTS INSIDE EXCEPT LAMP REPLACEMENT. Do not cover the ventilation slots on the top, sides and rear of the projector cabinet for a considerable time. IF THE PROJECTOR COMES IN CONTACT WITH OIL OR CHEMICALS, IT MAY BECOME DETERIORATED. TO THE OWNER Before operating this projector, read this manual again, check operations and cable connections and try the solutions in the "Troubleshooting" section in the...
LV-7575_inst_manual.pdf
Page 5
... IMAGE ADJUSTMENTS 35 15 REMOTE CONTROL BATTERIES INSTALLATION 16 TOP CONTROLS AND INDICATORS 17 SETTING 38 ON-SCREEN MENU 18 HOW TO OPERATE ON-SCREEN MENU 18 SETTING MENU 38 FLOW OF ON-SCREEN MENU OPERATION 18 MENU BAR 19 APPENDIX 45 BASIC OPERATION TURNING ON/OFF PROJECTOR TURNING ON THE PROJECTOR TURNING OFF THE PROJECTOR ADJUSTING SCREEN ZOOM ADJUSTMENT FOCUS ADJUSTMENT LENS SHIFT ADJUSTMENT KEYSTONE CORRECTION PICTURE FREEZE FUNCTION NO SHOW FUNCTION P-TIMER FUNCTION SOUND ADJUSTMENT WIRELESS MOUSE 45 20 MAINTENANCE 46 WARNING TEMP. INDICATOR 46 20 AIR FILTERS...
... IMAGE ADJUSTMENTS 35 15 REMOTE CONTROL BATTERIES INSTALLATION 16 TOP CONTROLS AND INDICATORS 17 SETTING 38 ON-SCREEN MENU 18 HOW TO OPERATE ON-SCREEN MENU 18 SETTING MENU 38 FLOW OF ON-SCREEN MENU OPERATION 18 MENU BAR 19 APPENDIX 45 BASIC OPERATION TURNING ON/OFF PROJECTOR TURNING ON THE PROJECTOR TURNING OFF THE PROJECTOR ADJUSTING SCREEN ZOOM ADJUSTMENT FOCUS ADJUSTMENT LENS SHIFT ADJUSTMENT KEYSTONE CORRECTION PICTURE FREEZE FUNCTION NO SHOW FUNCTION P-TIMER FUNCTION SOUND ADJUSTMENT WIRELESS MOUSE 45 20 MAINTENANCE 46 WARNING TEMP. INDICATOR 46 20 AIR FILTERS...

LV-7575_inst_manual.pdf
Page 6
... the projected image allowing you to use the projector without locational constraints. ◆ Power Management Power management function is provided to almost all computer output signals quickly. The projection lamp is designed to carry and work anywhere you to make a smart presentation on again when the projector detects a signal or any operation button is over 1920 x 1080 dots. It is automatically turned on a projected screen. ◆ Wireless Mouse The supplied Remote Control Unit...
... the projected image allowing you to use the projector without locational constraints. ◆ Power Management Power management function is provided to almost all computer output signals quickly. The projection lamp is designed to carry and work anywhere you to make a smart presentation on again when the projector detects a signal or any operation button is over 1920 x 1080 dots. It is automatically turned on a projected screen. ◆ Wireless Mouse The supplied Remote Control Unit...

LV-7575_inst_manual.pdf
Page 7
.... This projector detects internal temperature and automatically controls operating power of the optional Network Imager. AIR INTAKE VENTS This projector is in fire hazard. Air blown from overheating. This area will become hot when the projector is equipped with the lens cap attached. BOTTOM OF CABINET LAMP COVER CARRYING HANDLE When attaching the Network Imager (optional) to the projector, remove the these parts. Refer to the user's manual of the cooling fans. ADJUSTABLE FEET...
.... This projector detects internal temperature and automatically controls operating power of the optional Network Imager. AIR INTAKE VENTS This projector is in fire hazard. Air blown from overheating. This area will become hot when the projector is equipped with the lens cap attached. BOTTOM OF CABINET LAMP COVER CARRYING HANDLE When attaching the Network Imager (optional) to the projector, remove the these parts. Refer to the user's manual of the cooling fans. ADJUSTABLE FEET...

LV-7575_inst_manual.pdf
Page 17
... a Lamp mode. (p.41) AUTO PC ADJ. BEFORE OPERATION TOP CONTROLS AND INDICATORS This projector has CONTROL BUTTONS (TOP CONTROLS) and INDICATORS on its end of the projector is turned on. INDICATOR Blinks red when the internal temperature of life. LAMP MODE INDICATOR Lights when the Lamp mode is also used to "Silent" mode. (p.41) WARNING TEMP. It is set to pan the image in the DIGITAL ZOOM +/- buttons. (p.23) FOCUS BUTTON Used to adjust focus. (p.22) OK BUTTON Used to open or close the On-Screen Menu. (p.18, 19) READY INDICATOR Lights green when the projector is...
... a Lamp mode. (p.41) AUTO PC ADJ. BEFORE OPERATION TOP CONTROLS AND INDICATORS This projector has CONTROL BUTTONS (TOP CONTROLS) and INDICATORS on its end of the projector is turned on. INDICATOR Blinks red when the internal temperature of life. LAMP MODE INDICATOR Lights when the Lamp mode is also used to "Silent" mode. (p.41) WARNING TEMP. It is set to pan the image in the DIGITAL ZOOM +/- buttons. (p.23) FOCUS BUTTON Used to adjust focus. (p.22) OK BUTTON Used to open or close the On-Screen Menu. (p.18, 19) READY INDICATOR Lights green when the projector is...

LV-7575_inst_manual.pdf
Page 19
.../Digital zoom +/-] (See page 30.) SETTING MENU Used to change settings of image to adjust the volume, switch the Builtin SP. On/Off, or mute the sound. (See page 23.) FOR VIDEO SOURCE Press the MENU button when connecting to the PC input source. GUIDE WINDOW Shows the selected item of selected video source. (See page 32.) IMAGE ADJUST MENU Used to select the system of On-Screen Menu. AV SYSTEM MENU Used to adjust the picture image. [Contrast/Brightness/ Color/Tint/Color management/ Auto picture control/Color temp./White balance...
.../Digital zoom +/-] (See page 30.) SETTING MENU Used to change settings of image to adjust the volume, switch the Builtin SP. On/Off, or mute the sound. (See page 23.) FOR VIDEO SOURCE Press the MENU button when connecting to the PC input source. GUIDE WINDOW Shows the selected item of selected video source. (See page 32.) IMAGE ADJUST MENU Used to select the system of On-Screen Menu. AV SYSTEM MENU Used to adjust the picture image. [Contrast/Brightness/ Color/Tint/Color management/ Auto picture control/Color temp./White balance...

LV-7575_inst_manual.pdf
Page 40
... READY indicator starts blinking. The countdown time can be set time with the POINT DOWN button and set between 1 and 30 minutes. Off The Power management function is left /right reversed. Simple menu When this function is "On," the value adjustment bar in the picture IMAGE ADJUSTMENT Menu is displayed on the top control or remote control unit is pressed. Menu position This function is used to adjust the position. Use the POINT...
... READY indicator starts blinking. The countdown time can be set time with the POINT DOWN button and set between 1 and 30 minutes. Off The Power management function is left /right reversed. Simple menu When this function is "On," the value adjustment bar in the picture IMAGE ADJUSTMENT Menu is displayed on the top control or remote control unit is pressed. Menu position This function is used to adjust the position. Use the POINT...

LV-7575_inst_manual.pdf
Page 44
Factory default This function returns all setting values except for operation. When replacing the projection lamp, reset the Lamp replacement counter with this box appears. Select [Yes], and the next box appears. Select [Yes] to the factory default settings. See page 49 for the User logo, Key lock, PIN code lock, Logo PIN code lock, and the Lamp counter to activate it. 44 Factory default Select Factory default and this function. Quit Exit the SETTING Menu. SETTING Lamp counter This function is used to reset the Lamp replacement counter.
Factory default This function returns all setting values except for operation. When replacing the projection lamp, reset the Lamp replacement counter with this box appears. Select [Yes], and the next box appears. Select [Yes] to the factory default settings. See page 49 for the User logo, Key lock, PIN code lock, Logo PIN code lock, and the Lamp counter to activate it. 44 Factory default Select Factory default and this function. Quit Exit the SETTING Menu. SETTING Lamp counter This function is used to reset the Lamp replacement counter.
LV-7575_inst_manual.pdf
Page 48
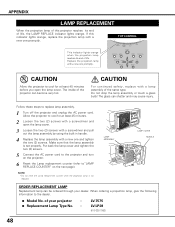
... you open the lamp cover. 3 Loosen the two (2) screws with a screwdriver and pull out the lamp assembly by using the built in handle. 4 Replace the lamp assembly with a new one promptly. Put back the lamp cover and tighten the two (2) screws. 5 Connect the AC power cord to the projector and turn on the projector. 6 Reset the Lamp replacement counter (refer to"LAMP REPLACE COUNTER" on the next page). APPENDIX LAMP REPLACEMENT When the projection lamp of this indicator lights orange, replace the projection lamp with a new...
... you open the lamp cover. 3 Loosen the two (2) screws with a screwdriver and pull out the lamp assembly by using the built in handle. 4 Replace the lamp assembly with a new one promptly. Put back the lamp cover and tighten the two (2) screws. 5 Connect the AC power cord to the projector and turn on the projector. 6 Reset the Lamp replacement counter (refer to"LAMP REPLACE COUNTER" on the next page). APPENDIX LAMP REPLACEMENT When the projection lamp of this indicator lights orange, replace the projection lamp with a new...

LV-7575_inst_manual.pdf
Page 49
... carefully the instructions in accidents, injury, or create a fire hazard. ● Lamp lifetime may differ from lamp to lamp and according to display the On-Screen Menu. If a lamp explodes, disconnect the projector's AC plug from the cooling air circulation holes. No one IMMEDIATELY after the projection lamp is reset, the LAMP REPLACE indicator stops lighting. 1 Turn the projector on and press the MENU button to the environment of use of this...
... carefully the instructions in accidents, injury, or create a fire hazard. ● Lamp lifetime may differ from lamp to lamp and according to display the On-Screen Menu. If a lamp explodes, disconnect the projector's AC plug from the cooling air circulation holes. No one IMMEDIATELY after the projection lamp is reset, the LAMP REPLACE indicator stops lighting. 1 Turn the projector on and press the MENU button to the environment of use of this...

LV-7575_inst_manual.pdf
Page 50
... READY indicator lights green again and the projector may be noticed with the projector. (When you reconnect the projector, be turned on pages 12-14. 2. APPENDIX TROUBLESHOOTING Before calling your computer or video equipment. ● Make sure the temperature is out of focus. Make sure that all power is switched on the projection lens. NOTE: Moving the projector from an audio input source. ● Adjust the audio source. ● Press the VOLUME (+) button...
... READY indicator lights green again and the projector may be noticed with the projector. (When you reconnect the projector, be turned on pages 12-14. 2. APPENDIX TROUBLESHOOTING Before calling your computer or video equipment. ● Make sure the temperature is out of focus. Make sure that all power is switched on the projection lens. NOTE: Moving the projector from an audio input source. ● Adjust the audio source. ● Press the VOLUME (+) button...

LV-7575_inst_manual.pdf
Page 56
Indicators LAMP WARNING REPLACE TEMP. Check and clean the air filters. • • • on • • • blinking • • • dim • • • off automatically and the Ready indicator goes out. ✽ When the projector is operating normally. NOTE: Specifications are subject to let you know the internal temperature of cables, these signals may not be properly viewed. INDICATORS AND PROJECTOR CONDITION Check the indicators for projector condition. orange red READY green LAMP red Projector Condition The...
Indicators LAMP WARNING REPLACE TEMP. Check and clean the air filters. • • • on • • • blinking • • • dim • • • off automatically and the Ready indicator goes out. ✽ When the projector is operating normally. NOTE: Specifications are subject to let you know the internal temperature of cables, these signals may not be properly viewed. INDICATORS AND PROJECTOR CONDITION Check the indicators for projector condition. orange red READY green LAMP red Projector Condition The...

LV-7575_inst_manual.pdf
Page 57
... service center for standby or the projection lamp is in the Power management mode. ✽ ✽ The temperature inside the projector is turned off . • • • on . When this indicator lights orange, replace the projection lamp with the POWER button.) The projection lamp reaches its end of life. The projector detects an abnormal condition and cannot be turned on the projector. APPENDIX Indicators LAMP REPLACE orange WARNING TEMP. Replace the lamp and then reset the Lamp replacement counter. red READY green ✽ LAMP Projector Condition red...
... service center for standby or the projection lamp is in the Power management mode. ✽ ✽ The temperature inside the projector is turned off . • • • on . When this indicator lights orange, replace the projection lamp with the POWER button.) The projection lamp reaches its end of life. The projector detects an abnormal condition and cannot be turned on the projector. APPENDIX Indicators LAMP REPLACE orange WARNING TEMP. Replace the lamp and then reset the Lamp replacement counter. red READY green ✽ LAMP Projector Condition red...

LV-7575_inst_manual.pdf
Page 58
...: 650±20nm) User's Manual (CD-ROM) Quick Start Guide AC Power Cord Wireless/Wired Remote Control Transmitter and Batteries VGA Cable USB Cable Control Cable for Serial Port Lens Cap Lens Replacement And Installation Manual PIN Code Label Warranty Card ● Specifications are subject to 400" 800 TV lines (HDTV) 318 watt type DVI Terminal (Digital) HDCP Compatible, HDB 15-pin Terminal (Analog), and Stereo Mini Type Jack (Audio) Input 2 Jacks BNC Type x 5 (G or VIDEO/Y, B or Cb...
...: 650±20nm) User's Manual (CD-ROM) Quick Start Guide AC Power Cord Wireless/Wired Remote Control Transmitter and Batteries VGA Cable USB Cable Control Cable for Serial Port Lens Cap Lens Replacement And Installation Manual PIN Code Label Warranty Card ● Specifications are subject to 400" 800 TV lines (HDTV) 318 watt type DVI Terminal (Digital) HDCP Compatible, HDB 15-pin Terminal (Analog), and Stereo Mini Type Jack (Audio) Input 2 Jacks BNC Type x 5 (G or VIDEO/Y, B or Cb...

LV-7575_inst_manual.pdf
Page 60
... Input RGB 1 RGB 2 DIGITAL 1 DIGITAL 2 VIDEO 1 VIDEO 2 RGB 3 VIDEO 3 VIDEO 4 VIDEO 5 Parameter 11 12 31 32 21 22 13 23 24 25 60 It may cause injury. PJ LINK NOTICE This projector is verified conformance with other optional lens. To the sales and service engineers: Referring to the lens when setting up the projector. After installing the lens, attach the lens cap to the attached lens replacement and installation manual, replace or install...
... Input RGB 1 RGB 2 DIGITAL 1 DIGITAL 2 VIDEO 1 VIDEO 2 RGB 3 VIDEO 3 VIDEO 4 VIDEO 5 Parameter 11 12 31 32 21 22 13 23 24 25 60 It may cause injury. PJ LINK NOTICE This projector is verified conformance with other optional lens. To the sales and service engineers: Referring to the lens when setting up the projector. After installing the lens, attach the lens cap to the attached lens replacement and installation manual, replace or install...

LV-7575 EXPAND SERIAL COMMAND FUNCTIONAL SPECIFICATIONS
Page 11
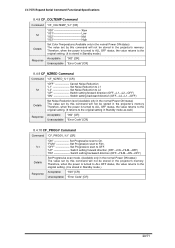
... of Color Set value of Tint Set value of Sharpness Set value of Gamma Set Red value of White Balance Set Green value of White Balance Set Blue value of White Balance Set level of Color Temprature Set ON/OFF of Noise reduction Set mode of Progressive scan Set Image mode Set Store/Reset of values in Image Adjustment Set level of Auto Picture Control Set area to store current values of Color Management Set area to load values of Color Management 5.2 PC Adjust Control Command...
... of Color Set value of Tint Set value of Sharpness Set value of Gamma Set Red value of White Balance Set Green value of White Balance Set Blue value of White Balance Set level of Color Temprature Set ON/OFF of Noise reduction Set mode of Progressive scan Set Image mode Set Store/Reset of values in Image Adjustment Set level of Auto Picture Control Set area to store current values of Color Management Set area to load values of Color Management 5.2 PC Adjust Control Command...
LV-7575 EXPAND SERIAL COMMAND FUNCTIONAL SPECIFICATIONS
Page 19
... 1 Details Set user controlled value of Gamma (Available only in the normal Power ON status) The value set by this command will not be stored in the projector's memory. RED %1 "G" --------- Directly specify value of Color selected in %1 of White Balance (Available only in the normal Power ON status) The value set by this command will not be stored in the projector's memory. LV-7575 Expand Serial Command Functional Specifications 8.4.5 CF_SHARP Command Command "CF_SHARP_...
... 1 Details Set user controlled value of Gamma (Available only in the normal Power ON status) The value set by this command will not be stored in the projector's memory. RED %1 "G" --------- Directly specify value of Color selected in %1 of White Balance (Available only in the normal Power ON status) The value set by this command will not be stored in the projector's memory. LV-7575 Expand Serial Command Functional Specifications 8.4.5 CF_SHARP Command Command "CF_SHARP_...
LV-7575 EXPAND SERIAL COMMAND FUNCTIONAL SPECIFICATIONS
Page 20
...] Unacceptable "Error Code" [CR] 8.4.10 CF_PROGV Command Command "CF_PROGV_%1" [CR] "ON Set Progressive scan to On. LV-7575 Expand Serial Command Functional Specifications 8.4.8 CF_COLTEMP Command Command "CF_COLTEMP_%1" [CR] %1 Details Response "000 Xlow "001 Low "002 Mid "003 High Set Color Temperature (Available only in the normal Power ON status) The value set by this command will not be stored in the projector's memory. Therefore, when the power is turned to ALL OFF status, the...
...] Unacceptable "Error Code" [CR] 8.4.10 CF_PROGV Command Command "CF_PROGV_%1" [CR] "ON Set Progressive scan to On. LV-7575 Expand Serial Command Functional Specifications 8.4.8 CF_COLTEMP Command Command "CF_COLTEMP_%1" [CR] %1 Details Response "000 Xlow "001 Low "002 Mid "003 High Set Color Temperature (Available only in the normal Power ON status) The value set by this command will not be stored in the projector's memory. Therefore, when the power is turned to ALL OFF status, the...

LV-7575 EXPAND SERIAL COMMAND FUNCTIONAL SPECIFICATIONS
Page 27
...8594; YPBPR → VIDEO order Input 3 "VIDEO Select Video input "S-VIDEO Select S-Video input "YPBPR Select Y,Pb/Cb,Pr/Cr input "UP" ------- Input1→Input2→Input3→Input1→ - - - LV-7575 Expand Serial Command Functional Specifications 8.6 Input Control Command 8.6.1 CF_INPUT Command Command "CF_INPUT_%1" [CR] "1 Select Input 1 (not switching Source) "2 Select Input 2 (not switching Source) "3 Select Input 3 (not switching Source) "4 Select Input 4 (Network viewer) %1 "UP Increment Input No. Details Select Input (Available only in...
...8594; YPBPR → VIDEO order Input 3 "VIDEO Select Video input "S-VIDEO Select S-Video input "YPBPR Select Y,Pb/Cb,Pr/Cr input "UP" ------- Input1→Input2→Input3→Input1→ - - - LV-7575 Expand Serial Command Functional Specifications 8.6 Input Control Command 8.6.1 CF_INPUT Command Command "CF_INPUT_%1" [CR] "1 Select Input 1 (not switching Source) "2 Select Input 2 (not switching Source) "3 Select Input 3 (not switching Source) "4 Select Input 4 (Network viewer) %1 "UP Increment Input No. Details Select Input (Available only in...

LV-7575 EXPAND SERIAL COMMAND FUNCTIONAL SPECIFICATIONS
Page 57
... entered, therefore PJ is set to lamp failure 57/71 Acceptable "000_%1" [CR] Response %1 "ON PJ/USB are locked "OFF PJ/USB are not locked. LV-7575 Expand Serial Command Functional Specifications 9.11.15 CR_SECURITY Command Command "CR_ SECURITY" [CR] Details Get ON/OFF setting status of Security on the menu Unacceptable "Error Code" [CR] 9.12 Other Status Read Commands 9.12.1 CR_STATUS Command COMMAND "CR_STATUS" [CR] Detail Get operating status of PIN code lock Acceptable "000_%1" [CR...
... entered, therefore PJ is set to lamp failure 57/71 Acceptable "000_%1" [CR] Response %1 "ON PJ/USB are locked "OFF PJ/USB are not locked. LV-7575 Expand Serial Command Functional Specifications 9.11.15 CR_SECURITY Command Command "CR_ SECURITY" [CR] Details Get ON/OFF setting status of Security on the menu Unacceptable "Error Code" [CR] 9.12 Other Status Read Commands 9.12.1 CR_STATUS Command COMMAND "CR_STATUS" [CR] Detail Get operating status of PIN code lock Acceptable "000_%1" [CR...


