LV-7545 Brochure
Page 2
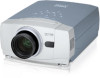
... Zoom Lens LV-IL02 • Long Focus Zoom Lens LV-IL03 • PR-200S Presentation Assistant • DVI Cable LV-CA29 • Ceiling Mount Adapter LV-CL07 Nomenclature Top Control Panel Projection Lens Infrared Remote Receiver Adjustable Feet and Feet Lock Latches Reset Button VGA Terminal (RGB Input Analog) USB Port Audio Input Jack Video Input 2 Jack Y Video Input 2 Jack Cb/Pb Video Input 3 Jack Y Video Input 3 Jack Cb/Pb Video Input 3 Jack Cr/Pr Warning Temp Indicator Lamp Replace Indicator Menu Button Bright Button Lens Shift Button DVI Terminal (RGB Input Digital) Audio Input...
... Zoom Lens LV-IL02 • Long Focus Zoom Lens LV-IL03 • PR-200S Presentation Assistant • DVI Cable LV-CA29 • Ceiling Mount Adapter LV-CL07 Nomenclature Top Control Panel Projection Lens Infrared Remote Receiver Adjustable Feet and Feet Lock Latches Reset Button VGA Terminal (RGB Input Analog) USB Port Audio Input Jack Video Input 2 Jack Y Video Input 2 Jack Cb/Pb Video Input 3 Jack Y Video Input 3 Jack Cb/Pb Video Input 3 Jack Cr/Pr Warning Temp Indicator Lamp Replace Indicator Menu Button Bright Button Lens Shift Button DVI Terminal (RGB Input Digital) Audio Input...
Owners Manual
Page 2
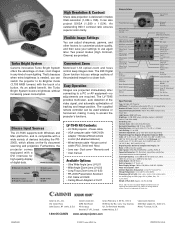
... 1 minute / LASER POINTER INDICATOR lights red to be built into the lens as the laser pointer function from the power outlet. q Remote Control Unit, supplied to this projector, emits the laser beam as possible. q This projector should be maintained. NO USERSERVICEABLE PARTS INSIDE EXCEPT LAMP REPLACEMENT. TO THE OWNER Before operating this projector, read this manual again, check operations and cable connections and try the solutions in the "Trouble-shooting" section of...
... 1 minute / LASER POINTER INDICATOR lights red to be built into the lens as the laser pointer function from the power outlet. q Remote Control Unit, supplied to this projector, emits the laser beam as possible. q This projector should be maintained. NO USERSERVICEABLE PARTS INSIDE EXCEPT LAMP REPLACEMENT. TO THE OWNER Before operating this projector, read this manual again, check operations and cable connections and try the solutions in the "Trouble-shooting" section of...
Owners Manual
Page 3
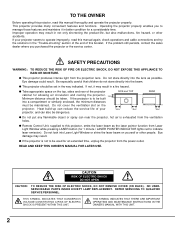
... of power source indicated on the marking label. This projector should never be operated only from the type of the instructions given here and retain them for service. Never spill liquid of time, unplug it . If you to dangerous voltage or other materials, and the bottom opening or removing covers may cause hazards. Do not overload wall outlets and extension cords as...
... of power source indicated on the marking label. This projector should never be operated only from the type of the instructions given here and retain them for service. Never spill liquid of time, unplug it . If you to dangerous voltage or other materials, and the bottom opening or removing covers may cause hazards. Do not overload wall outlets and extension cords as...
Owners Manual
Page 5
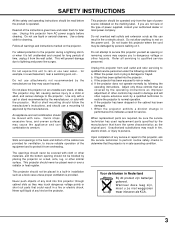
... SELECTING INPUT SOURCE 30 TERMINALS OF PROJECTOR 11 SELECTING VIDEO SYSTEM 31 CONNECTING TO COMPUTER 12 PICTURE IMAGE ADJUSTMENT 32 CONNECTING TO VIDEO EQUIPMENT 13 IMAGE LEVEL SELECT 32 IMAGE LEVEL ADJUSTMENT 33 PICTURE SCREEN ADJUSTMENT 34 BEFORE OPERATION 14 OPERATION OF REMOTE CONTROL 14 SETTING 35 LASER POINTER FUNCTION 14 REMOTE CONTROL BATTERIES INSTALLATION 15 SETTING MENU 35 TOP CONTROLS AND INDICATORS 16 OPERATING ON-SCREEN MENU 17 HOW TO OPERATE ON-SCREEN MENU 17 APPENDIX 37 FLOW OF ON-SCREEN MENU OPERATION 17 MENU BAR 18 OPERATING WIRELESS...
... SELECTING INPUT SOURCE 30 TERMINALS OF PROJECTOR 11 SELECTING VIDEO SYSTEM 31 CONNECTING TO COMPUTER 12 PICTURE IMAGE ADJUSTMENT 32 CONNECTING TO VIDEO EQUIPMENT 13 IMAGE LEVEL SELECT 32 IMAGE LEVEL ADJUSTMENT 33 PICTURE SCREEN ADJUSTMENT 34 BEFORE OPERATION 14 OPERATION OF REMOTE CONTROL 14 SETTING 35 LASER POINTER FUNCTION 14 REMOTE CONTROL BATTERIES INSTALLATION 15 SETTING MENU 35 TOP CONTROLS AND INDICATORS 16 OPERATING ON-SCREEN MENU 17 HOW TO OPERATE ON-SCREEN MENU 17 APPENDIX 37 FLOW OF ON-SCREEN MENU OPERATION 17 MENU BAR 18 OPERATING WIRELESS...

Owners Manual
Page 6
... dots resolution for Computer) Digital Zoom function adjusts the image size to produce undistorted images. x One-Touch Auto PC Adjustment Incoming computer video signals are recognized and the best adjustment is automatically set by digitally altering projection to approx. 1/4 ~ 49 times of frequency and other settings. x Motor-driven Lens Shift The projection lens can be connected. x Digital Zoom (for computer input and 800 horizontal TV lines. Projection Lamp is automatically turned on a projected screen. This function helps you to turn Projection Lamp off when a projector...
... dots resolution for Computer) Digital Zoom function adjusts the image size to produce undistorted images. x One-Touch Auto PC Adjustment Incoming computer video signals are recognized and the best adjustment is automatically set by digitally altering projection to approx. 1/4 ~ 49 times of frequency and other settings. x Motor-driven Lens Shift The projection lens can be connected. x Digital Zoom (for computer input and 800 horizontal TV lines. Projection Lamp is automatically turned on a projected screen. This function helps you to turn Projection Lamp off when a projector...

Owners Manual
Page 7
... BOTTOM OF CABINET ADJUSTABLE FEET AND FEET LOCK LATCHES AIR INTAKE VENTS This projector is used. q Keep side clear of any flammable object near these vents. PREPARATION NAME OF EACH PART OF PROJECTOR FRONT OF CABINET TOP CONTROLS AND INDICATORS PROJECTION LENS AIR INTAKE VENT LENS COVER SPEAKERS INFRARED REMOTE RECEIVER BACK OF CABINET EXHAUST VENT POWER CORD CONNECTOR INFRARED REMOTE RECEIVER HOT AIR EXHAUSTED ! When using or installing projector, following to ensure...
... BOTTOM OF CABINET ADJUSTABLE FEET AND FEET LOCK LATCHES AIR INTAKE VENTS This projector is used. q Keep side clear of any flammable object near these vents. PREPARATION NAME OF EACH PART OF PROJECTOR FRONT OF CABINET TOP CONTROLS AND INDICATORS PROJECTION LENS AIR INTAKE VENT LENS COVER SPEAKERS INFRARED REMOTE RECEIVER BACK OF CABINET EXHAUST VENT POWER CORD CONNECTOR INFRARED REMOTE RECEIVER HOT AIR EXHAUSTED ! When using or installing projector, following to ensure...
Owners Manual
Page 12
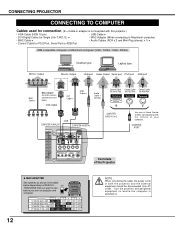
...When connecting the cable, the power cords of your computer. CONTROL PORT 12 x MAC ADAPTER Set switches as shown in the table below . Turn the projector and peripheral equipment on before you turn on RESOLU- VGA Cable DVI Cable ✽ USB Cable ✽ Audio Cable ✽ (stereo) Control Cable for Serial Port Terminal Control Cable for PS/2 Port Terminal Control Cable for ADB Port Terminal USB COMPUTER IN ANALOG COMPUTER IN DIGITAL COMPUTER AUDIO IN 1 or 2 INPUT 1 RGB ANALOG RGB DIGITAL R/C JACK AUDIO 1 RESET CONTROL PORT AUDIO 2 G B R H/V V VIDEO/Y Cb...
...When connecting the cable, the power cords of your computer. CONTROL PORT 12 x MAC ADAPTER Set switches as shown in the table below . Turn the projector and peripheral equipment on before you turn on RESOLU- VGA Cable DVI Cable ✽ USB Cable ✽ Audio Cable ✽ (stereo) Control Cable for Serial Port Terminal Control Cable for PS/2 Port Terminal Control Cable for ADB Port Terminal USB COMPUTER IN ANALOG COMPUTER IN DIGITAL COMPUTER AUDIO IN 1 or 2 INPUT 1 RGB ANALOG RGB DIGITAL R/C JACK AUDIO 1 RESET CONTROL PORT AUDIO 2 G B R H/V V VIDEO/Y Cb...
Owners Manual
Page 14
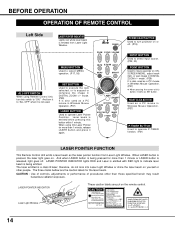
... Wireless Mouse Operation. (P37) P-TIMER BUTTON Used to expand or compress the image in DIGITAL ZOOM +/- When using Remote Control Unit, turn projector on the remote control. RIGHT CLICK BUTTON Used as the laser pointer function from Laser Light Window. The laser emitted is emitted while pressing this button, it again. CAUTION : Use of controls, adjustments or performance of this button within 1 minute. Laser Light Window 14 LASER LENS SHIFT KEYSTONE NO SHOW FREEZE AUTO PC ADJ. LASER POINTER INDICATOR lights RED...
... Wireless Mouse Operation. (P37) P-TIMER BUTTON Used to expand or compress the image in DIGITAL ZOOM +/- When using Remote Control Unit, turn projector on the remote control. RIGHT CLICK BUTTON Used as the laser pointer function from Laser Light Window. The laser emitted is emitted while pressing this button, it again. CAUTION : Use of controls, adjustments or performance of this button within 1 minute. Laser Light Window 14 LASER LENS SHIFT KEYSTONE NO SHOW FREEZE AUTO PC ADJ. LASER POINTER INDICATOR lights RED...
Owners Manual
Page 15
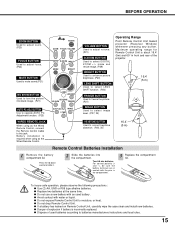
... used battery. Battery installation is required when using as the Wired Remote Control. q If a battery has leaked on Remote Control Unit, carefully wipe the case clean and install new batteries. mode and resize image. (P29) BRIGHT BUTTON Used to enhance picture brightness. (P20) LENS SHIFT BUTTON Used to operate AUTO PC Adjustment function. (P23) POWER ZOOM FOCUS VOLUME MUTE D.ZOOM INPUT MENU BRIGHT LASER LENS SHIFT KEYSTONE NO SHOW FREEZE AUTO PC ADJ. KEYSTONE BUTTON Used to turn the picture into the compartment. Two AA size...
... used battery. Battery installation is required when using as the Wired Remote Control. q If a battery has leaked on Remote Control Unit, carefully wipe the case clean and install new batteries. mode and resize image. (P29) BRIGHT BUTTON Used to enhance picture brightness. (P20) LENS SHIFT BUTTON Used to operate AUTO PC Adjustment function. (P23) POWER ZOOM FOCUS VOLUME MUTE D.ZOOM INPUT MENU BRIGHT LASER LENS SHIFT KEYSTONE NO SHOW FREEZE AUTO PC ADJ. KEYSTONE BUTTON Used to turn the picture into the compartment. Two AA size...
Owners Manual
Page 16
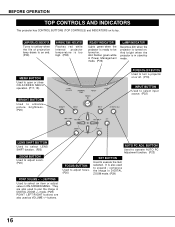
... function. (P23) FOCUS BUTTON Used to adjust focus. (P20) SET BUTTON Used to an end. (P39) WARNING TEMP. BEFORE OPERATION TOP CONTROLS AND INDICATORS This projector has CONTROL BUTTONS (TOP CONTROLS) and INDICATORS on . LAMP REPLACE INDICATOR Turns to yellow when the life of projection lamp draws to execute the item selected. AUTO PC ADJ. INDICATOR Flashes red while internal projector temperature is too high. (P38) READY INDICATOR Lights green when the projector is also used as VOLUME +/- buttons. It is ready to expand / compress the image in DIGITAL ZOOM mode. (P29) 16...
... function. (P23) FOCUS BUTTON Used to adjust focus. (P20) SET BUTTON Used to an end. (P39) WARNING TEMP. BEFORE OPERATION TOP CONTROLS AND INDICATORS This projector has CONTROL BUTTONS (TOP CONTROLS) and INDICATORS on . LAMP REPLACE INDICATOR Turns to yellow when the life of projection lamp draws to execute the item selected. AUTO PC ADJ. INDICATOR Flashes red while internal projector temperature is too high. (P38) READY INDICATOR Lights green when the projector is also used as VOLUME +/- buttons. It is ready to expand / compress the image in DIGITAL ZOOM mode. (P29) 16...

Owners Manual
Page 18
... MENU Used to select input source (Input 1, Input 2 or Input 3). (Refer to P30) IMAGE SELECT MENU Used to change settings of ONSCREEN MENU. Standard, High contrast and Custom. (Refer to P27) SCREEN MENU Used to adjust size of image. [Normal / True / Wide / Digital zoom +/-] (Refer to P29) SETTING MENU Used to select image level among ; GUIDE WINDOW Shows selected item of projector or reset Lamp Replace Counter. (Refer to P35-37) INPUT MENU Used to select input source (Input 1, Input 2 or Input 3). (Refer to P22) PC ADJUST MENU Used to adjust parameters to match with input signal...
... MENU Used to select input source (Input 1, Input 2 or Input 3). (Refer to P30) IMAGE SELECT MENU Used to change settings of ONSCREEN MENU. Standard, High contrast and Custom. (Refer to P27) SCREEN MENU Used to adjust size of image. [Normal / True / Wide / Digital zoom +/-] (Refer to P29) SETTING MENU Used to select image level among ; GUIDE WINDOW Shows selected item of projector or reset Lamp Replace Counter. (Refer to P35-37) INPUT MENU Used to select input source (Input 1, Input 2 or Input 3). (Refer to P22) PC ADJUST MENU Used to adjust parameters to match with input signal...
Owners Manual
Page 19
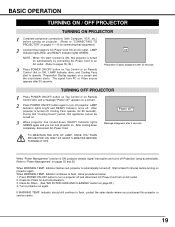
... OFF. When "Power Management" function is turned off ? When WARNING TEMP. Turn a projector on a screen and the count-down starts. LAMP Indicator dims, and Cooling Fans start " function is ON, this projector is automatically turned off ?" TURNING OFF PROJECTOR 1 Press POWER ON-OFF button on Top Control or on . During this "Cooling Down" period, this projector or service center. 19 Message disappears after 30 seconds. Indicator flashes red, projector is turned on automatically by connecting AC Power Cord to an...
... OFF. When "Power Management" function is turned off ? When WARNING TEMP. Turn a projector on a screen and the count-down starts. LAMP Indicator dims, and Cooling Fans start " function is ON, this projector is automatically turned off ?" TURNING OFF PROJECTOR 1 Press POWER ON-OFF button on Top Control or on . During this "Cooling Down" period, this projector or service center. 19 Message disappears after 30 seconds. Indicator flashes red, projector is turned on automatically by connecting AC Power Cord to an...
Owners Manual
Page 23
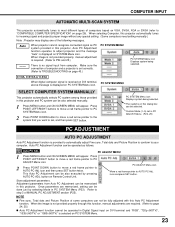
... the connection of computer and a projector is provided to automatically adjust Fine sync, Total dots and Picture Position to conform to your computer. PC SYSTEM Menu icon Displays system being selected. icon and then press SET button twice. Adjustment parameters from computer. When selecting Computer, this projector automatically tunes to incoming signal and projects proper image without any special setting. (Some computers need setting manually.) Note : Projector may display one...
... the connection of computer and a projector is provided to automatically adjust Fine sync, Total dots and Picture Position to conform to your computer. PC SYSTEM Menu icon Displays system being selected. icon and then press SET button twice. Adjustment parameters from computer. When selecting Computer, this projector automatically tunes to incoming signal and projects proper image without any special setting. (Some computers need setting manually.) Note : Projector may display one...
Owners Manual
Page 29
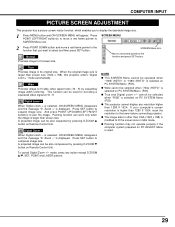
... Remote Control Unit. NOTE q This SCREEN Menu cannot be selected when "RGB" is modified to the lower before connecting projector. If your computer's screen resolution is used for providing a squeezed video signal at 16 : 9. q The image data in other than 1280 X 1024. Digital Zoom - q Wide cannot be also expanded by expanding image width uniformly. q True and Digital zoom +/- When Digital zoom - Press SET button to expand image size. True Provides image in initial mode. Digital zoom + When Digital zoom + is displayed...
... Remote Control Unit. NOTE q This SCREEN Menu cannot be selected when "RGB" is modified to the lower before connecting projector. If your computer's screen resolution is used for providing a squeezed video signal at 16 : 9. q The image data in other than 1280 X 1024. Digital Zoom - q Wide cannot be also expanded by expanding image width uniformly. q True and Digital zoom +/- When Digital zoom - Press SET button to expand image size. True Provides image in initial mode. Digital zoom + When Digital zoom + is displayed...
Owners Manual
Page 30
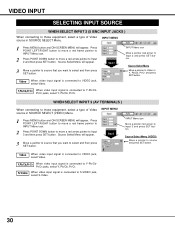
... Video INPUT MENU source in SOURCE SELECT (VIDEO) Menu. 1 Press MENU button and ON-SCREEN MENU will appear. Input 3 3 Move a pointer to source that you want to S-VIDEO jack, select S-Video. 30 Y,Pb/Cb,Pr/Cr When video input signal is connected to select and then press SET button. WHEN SELECT INPUT 3 (AV TERMINALS ) When connecting to Video or Y, Pb/Cb, Pr/Cr and press SET button. Input 2 INPUT Menu icon Move a pointer (red arrow) to VIDEO jack, select Video. Video When video input signal is connected...
... Video INPUT MENU source in SOURCE SELECT (VIDEO) Menu. 1 Press MENU button and ON-SCREEN MENU will appear. Input 3 3 Move a pointer to source that you want to S-VIDEO jack, select S-Video. 30 Y,Pb/Cb,Pr/Cr When video input signal is connected to select and then press SET button. WHEN SELECT INPUT 3 (AV TERMINALS ) When connecting to Video or Y, Pb/Cb, Pr/Cr and press SET button. Input 2 INPUT Menu icon Move a pointer (red arrow) to VIDEO jack, select Video. Video When video input signal is connected...
Owners Manual
Page 36
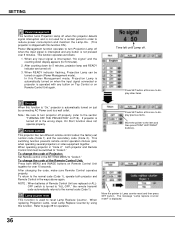
... Remote Control Unit together for operation. When replacing Projection Lamp, reset Lamp Replace Counter by connecting AC Power cord to the section "TURNING OFF THE PROJECTOR" on just by using this function. When READY indicator flashing, Projection Lamp can be switched to the item and then press POINT LEFT/RIGHT button(s). To change the code of Projector; is automatically turned on P19). To change the code of the Remote Control Unit; After changing the code, make sure Remote Control operates properly. In this icon to display...
... Remote Control Unit together for operation. When replacing Projection Lamp, reset Lamp Replace Counter by connecting AC Power cord to the section "TURNING OFF THE PROJECTOR" on just by using this function. When READY indicator flashing, Projection Lamp can be switched to the item and then press POINT LEFT/RIGHT button(s). To change the code of Projector; is automatically turned on P19). To change the code of the Remote Control Unit; After changing the code, make sure Remote Control operates properly. In this icon to display...
Owners Manual
Page 37
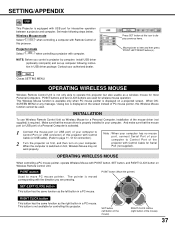
... connection.) 2 Turn the projector on first, and then turn on first, Wireless Mouse may not work properly. OPERATING WIRELESS MOUSE When controlling a PC mouse pointer, operate Wireless Mouse with POINT button, SET button, and RIGHT CLICK button on the screen instead of this Wireless Mouse function cannot be used for interactive operation between a projector and computer. RIGHT CLICK button This button has the same function as a wireless mouse for Serial Port (not supplied). Projector mode Select " " when controlling a projector with Remote Control...
... connection.) 2 Turn the projector on first, and then turn on first, Wireless Mouse may not work properly. OPERATING WIRELESS MOUSE When controlling a PC mouse pointer, operate Wireless Mouse with POINT button, SET button, and RIGHT CLICK button on the screen instead of this Wireless Mouse function cannot be used for interactive operation between a projector and computer. RIGHT CLICK button This button has the same function as a wireless mouse for Serial Port (not supplied). Projector mode Select " " when controlling a projector with Remote Control...
Owners Manual
Page 39
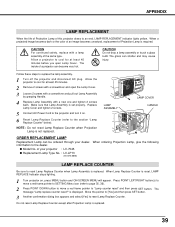
... open the Lamp Cover. 3 Loosen 2 screws with a screwdriver and pull out Lamp Assembly by grasping Handle. 4 Replace Lamp Assembly with a lamp assembly of Projection Lamp is required. Follow these steps to "Lamp counter reset" and then press SET button. Allow a projector to reset Lamp Replace Counter when Lamp Assembly is reset, LAMP REPLACE Indicator stops lighting. 1 Turn projector on . 6 Reset Lamp Replace Counter (refer to an end, LAMP REPLACEMENT indicator lights yellow. The message "Lamp replace counter reset?" APPENDIX LAMP REPLACEMENT When the life of Projection Lamp...
... open the Lamp Cover. 3 Loosen 2 screws with a screwdriver and pull out Lamp Assembly by grasping Handle. 4 Replace Lamp Assembly with a lamp assembly of Projection Lamp is required. Follow these steps to "Lamp counter reset" and then press SET button. Allow a projector to reset Lamp Replace Counter when Lamp Assembly is reset, LAMP REPLACE Indicator stops lighting. 1 Turn projector on . 6 Reset Lamp Replace Counter (refer to an end, LAMP REPLACEMENT indicator lights yellow. The message "Lamp replace counter reset?" APPENDIX LAMP REPLACEMENT When the life of Projection Lamp...
Owners Manual
Page 40
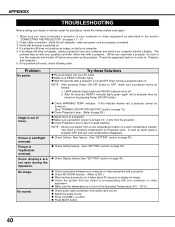
... "SETTING" section on in moisture condensation on Projection Lens. Image is Top/Bottom reversed. Picture is out of : Projector and computer.) 6. q Adjust the audio source. Power the equipment back on page 35.) q Check connection between your computer or video equipment as follows: 1. q Make sure a projection screen is corresponding with a projector. (When you have connected a projector to P21.) q When turning a projector on pages 11 ~ 13. 2. Verify that you power up the projector. Problem: No power. LAMP indicator lights...
... "SETTING" section on in moisture condensation on Projection Lens. Image is Top/Bottom reversed. Picture is out of : Projector and computer.) 6. q Adjust the audio source. Power the equipment back on page 35.) q Check connection between your computer or video equipment as follows: 1. q Make sure a projection screen is corresponding with a projector. (When you have connected a projector to P21.) q When turning a projector on pages 11 ~ 13. 2. Verify that you power up the projector. Problem: No power. LAMP indicator lights...
Owners Manual
Page 42
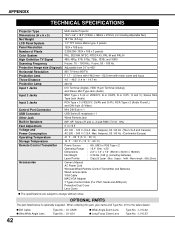
...650±20nm) Owner's Manual AC Power Cord Wireless/Wired Remote Control Transmitter and Batteries Wired remote cable VGA Cable MAC/VGA Adapter 3 Types Control Cable (For PS/2, Serial and ADB port) Protective Dust Cover Lens Cover q The specifications are subject to the sales dealer. of Pixels Color System High Definition TV Signal Scanning Frequency Projection Image size (Diagonal) Horizontal Resolution Projection Lens Throw Distance Projection Lamp Input 1 Jacks Input 2 Jacks Input 3 Jacks Control Port Connector USB Connector Other Jack Built-in Speakers Feet Adjustment Voltage and...
...650±20nm) Owner's Manual AC Power Cord Wireless/Wired Remote Control Transmitter and Batteries Wired remote cable VGA Cable MAC/VGA Adapter 3 Types Control Cable (For PS/2, Serial and ADB port) Protective Dust Cover Lens Cover q The specifications are subject to the sales dealer. of Pixels Color System High Definition TV Signal Scanning Frequency Projection Image size (Diagonal) Horizontal Resolution Projection Lens Throw Distance Projection Lamp Input 1 Jacks Input 2 Jacks Input 3 Jacks Control Port Connector USB Connector Other Jack Built-in Speakers Feet Adjustment Voltage and...

