LV User's Manual
Page 5
... not supplied with this equipment. Do Not Use in the Following Environments Do not install the projector in order to install the projector yourself. - side projector. If something should the projector be installed by a qualified service personnel. • Do not place any objects that your power fits this equipment please contact your projector and a wall. • Do not try to operate on power source voltages indicated...
... not supplied with this equipment. Do Not Use in the Following Environments Do not install the projector in order to install the projector yourself. - side projector. If something should the projector be installed by a qualified service personnel. • Do not place any objects that your power fits this equipment please contact your projector and a wall. • Do not try to operate on power source voltages indicated...
LV User's Manual
Page 6
... projector. • Select [High] in Fan mode if you follow the instructions described in performance, indicating a need for service. • Disconnect the power cord and any other cables before carrying the projector • Turn off the projector and unplug the power cord before cleaning the cabinet or replacing the lamp. • Turn off the projector and unplug the power cord if the projector is not to be used for an extended period of the lens...
... projector. • Select [High] in Fan mode if you follow the instructions described in performance, indicating a need for service. • Disconnect the power cord and any other cables before carrying the projector • Turn off the projector and unplug the power cord before cleaning the cabinet or replacing the lamp. • Turn off the projector and unplug the power cord if the projector is not to be used for an extended period of the lens...

LV User's Manual
Page 8
... Screen (Menu Language Select screen 25 ❷ Selecting a Source...26 ❸ Adjusting the Picture Size and Position 27 ❹ Correcting Keystone Distortion 29 ❺ Automatically Optimizing on RGB Image 31 ❻ Turning Up or Down Volume 31 ❼ Turning off the Projector 32 ❽ After Use...33 vii Installation and Connections 11 ❶ Setting Up the Screen and the Projector 12 Selecting a Location (LV-7365/LV-7265 12 Throw Distance and Screen Size 12 Selecting a Location (LV...
... Screen (Menu Language Select screen 25 ❷ Selecting a Source...26 ❸ Adjusting the Picture Size and Position 27 ❹ Correcting Keystone Distortion 29 ❺ Automatically Optimizing on RGB Image 31 ❻ Turning Up or Down Volume 31 ❼ Turning off the Projector 32 ❽ After Use...33 vii Installation and Connections 11 ❶ Setting Up the Screen and the Projector 12 Selecting a Location (LV-7365/LV-7265 12 Throw Distance and Screen Size 12 Selecting a Location (LV...
LV User's Manual
Page 9
... Image and Sound 34 ❷ Freezing a Picture...34 ❸ Enlarging and Moving a Picture 34 ❹ Using the Remote Mouse Receiver (LV-7365/LV-7265/LV-7260 35 ❺ Preventing the Unauthorized Use of D-Sub ANALOG Input Connector 67 ❺ Compatible Input Signal List 68 ❻ Relationship between Screen Size and Projection Distance 69 ❼ PC Control Codes and Cable Connection 71 ❽ Troubleshooting Check List 72 viii Maintenance ...56 ❶ Cleaning or Replacing the Filter 56 ❷ Cleaning...
... Image and Sound 34 ❷ Freezing a Picture...34 ❸ Enlarging and Moving a Picture 34 ❹ Using the Remote Mouse Receiver (LV-7365/LV-7265/LV-7260 35 ❺ Preventing the Unauthorized Use of D-Sub ANALOG Input Connector 67 ❺ Compatible Input Signal List 68 ❻ Relationship between Screen Size and Projection Distance 69 ❼ PC Control Codes and Cable Connection 71 ❽ Troubleshooting Check List 72 viii Maintenance ...56 ❶ Cleaning or Replacing the Filter 56 ❷ Cleaning...
LV User's Manual
Page 11
... 30 seconds after turning on a ceiling*1. up and operation. • The contemporary cabinet design is ready to UXGA compatible, XGA native resolution. • Multiple video mode selections (depending on your source). • Security feature prevents unauthorized individuals from behind a screen, or permanently mounted on the power, the projector is light, compact and complements any PC using the PC Control port (SERVICE PORT). • Easy set up to display PC or video images*.
... 30 seconds after turning on a ceiling*1. up and operation. • The contemporary cabinet design is ready to UXGA compatible, XGA native resolution. • Multiple video mode selections (depending on your source). • Security feature prevents unauthorized individuals from behind a screen, or permanently mounted on the power, the projector is light, compact and complements any PC using the PC Control port (SERVICE PORT). • Easy set up to display PC or video images*.
LV User's Manual
Page 15
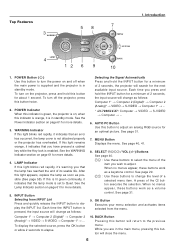
... input source. See the WARNING Indicator section on ; AUTO PC Button Use this button twice. 2. See page 29. : Use these buttons work as a volume control. WARNING Indicator If this is in standby mode. If this light blinks red rapidly, it is lit green continually, it 's warning you press and hold the INPUT button for a minimum of 2 seconds, the projector will change the level of its usable life. See page 31. 7. MENU Button Displays the menu. When no menus appear, these buttons...
... input source. See the WARNING Indicator section on ; AUTO PC Button Use this button twice. 2. See page 29. : Use these buttons work as a volume control. WARNING Indicator If this is in standby mode. If this light blinks red rapidly, it is lit green continually, it 's warning you press and hold the INPUT button for a minimum of 2 seconds, the projector will change the level of its usable life. See page 31. 7. MENU Button Displays the menu. When no menus appear, these buttons...
LV User's Manual
Page 17
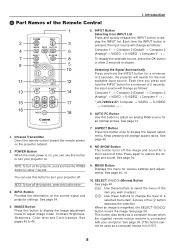
... sound. AUTO PC Button Use this button to display the Image adjustment menu to turn off the image and sound for the next available input source. See page 31. 7. Keep pressing will search for a short period of time. NO SHOW Button This button turns off the projector, press this button to adjust Image mode, Contrast, Brightness, Sharpness, Color level and Color balance. Press again to elapse. This button also works as a computer mouse for various settings and adjustments. INPUT Button Selecting from INPUT...
... sound. AUTO PC Button Use this button to display the Image adjustment menu to turn off the image and sound for the next available input source. See page 31. 7. Keep pressing will search for a short period of time. NO SHOW Button This button turns off the projector, press this button to adjust Image mode, Contrast, Brightness, Sharpness, Color level and Color balance. Press again to elapse. This button also works as a computer mouse for various settings and adjustments. INPUT Button Selecting from INPUT...

LV User's Manual
Page 24
... a video signal as a computer signal at the default setting. In that you use a PHONE commercially available pin adapter (not supplied) to connect to connect the projector and notebook PC while the projector is not displayed correctly: Project an image to the notebook PC. Enabling the computer's external display Displaying an image on the remote control or the projector cabinet. 15 NOTE: An image may be displayed correctly when a Video or S-Video source is displayed with a built-in standby mode...
... a video signal as a computer signal at the default setting. In that you use a PHONE commercially available pin adapter (not supplied) to connect to connect the projector and notebook PC while the projector is not displayed correctly: Project an image to the notebook PC. Enabling the computer's external display Displaying an image on the remote control or the projector cabinet. 15 NOTE: An image may be displayed correctly when a Video or S-Video source is displayed with a built-in standby mode...
LV User's Manual
Page 33
... supplied power cord, make sure that the main power switch is high, the fans runs without displaying an image for some time and then the projector will display the image. NOTE: If you turn to green and the projector will light orange. CAUTION: The projector cannot be turned off for more details. The POWER indicator will turn on your projector, ensure that your lens cap is turned off () po- Doing so could cause premature lamp failure. 24 WARNING POWER LAMP INPUT AUTO...
... supplied power cord, make sure that the main power switch is high, the fans runs without displaying an image for some time and then the projector will display the image. NOTE: If you turn to green and the projector will light orange. CAUTION: The projector cannot be turned off for more details. The POWER indicator will turn on your projector, ensure that your lens cap is turned off () po- Doing so could cause premature lamp failure. 24 WARNING POWER LAMP INPUT AUTO...
LV User's Manual
Page 34
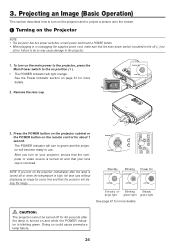
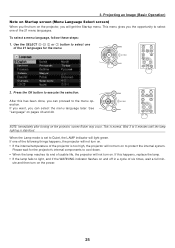
... projector is set to the menu operation. 3. Projecting an Image (Basic Operation) Note on Startup screen (Menu Language Select screen) When you first turn on . • If the internal temperature of the 21 menu languages. Press the OK button to 5 minutes until the lamp lighting is normal. To select a menu language, follow these steps: 1. IMAGE INPUT AUTO PC ASPECT MENU NO SHOW BACK NOTE: Immediately after turning on pages 43 and 49. Use...
... projector is set to the menu operation. 3. Projecting an Image (Basic Operation) Note on Startup screen (Menu Language Select screen) When you first turn on . • If the internal temperature of the 21 menu languages. Press the OK button to 5 minutes until the lamp lighting is normal. To select a menu language, follow these steps: 1. IMAGE INPUT AUTO PC ASPECT MENU NO SHOW BACK NOTE: Immediately after turning on pages 43 and 49. Use...

LV User's Manual
Page 35
... input source. The [Default source select] screen will be pro- POWER MENU INFO. LV-7260/LV-X7 Computer → Video → S-Video → Computer → ... Each time you selected in step 2 will be skipped. Press the BACK button a few times to the projector. Projecting an Image (Basic Operation) ❷ Selecting a Source Selecting the computer or video source NOTE: Turn on . 1. Selecting Default Source You can set a source as follows: LV-7365/LV-7265 Computer 1 → Computer 2 (Digital) → Computer 2 (Analog) → Video...
... input source. The [Default source select] screen will be pro- POWER MENU INFO. LV-7260/LV-X7 Computer → Video → S-Video → Computer → ... Each time you selected in step 2 will be skipped. Press the BACK button a few times to the projector. Projecting an Image (Basic Operation) ❷ Selecting a Source Selecting the computer or video source NOTE: Turn on . 1. Selecting Default Source You can set a source as follows: LV-7365/LV-7265 Computer 1 → Computer 2 (Digital) → Computer 2 (Analog) → Video...

LV User's Manual
Page 52
... Natural, Black detail XLow, Low, Mid, High Display settings Aspect Cinema position Horizontal position Vertical position Clock Tracking Video filter Default * * * * * Off Item Normal, Wide zoom, Cinema, True size Off, Less, More Setup Default Item General Auto keystone (LV-7365/LV-7265) On Off, On Keystone adjustment Keystone save Off Off, On Screen color Off Off, Greenboard, Greenboard(Gray), Light yellow, Light green, Light blue, Sky blue, Light rose, Pink Lamp mode Normal Normal, Quiet Language English English, Deutsch...
... Natural, Black detail XLow, Low, Mid, High Display settings Aspect Cinema position Horizontal position Vertical position Clock Tracking Video filter Default * * * * * Off Item Normal, Wide zoom, Cinema, True size Off, Less, More Setup Default Item General Auto keystone (LV-7365/LV-7265) On Off, On Keystone adjustment Keystone save Off Off, On Screen color Off Off, Greenboard, Greenboard(Gray), Light yellow, Light green, Light blue, Sky blue, Light rose, Pink Lamp mode Normal Normal, Quiet Language English English, Deutsch...
LV User's Manual
Page 60
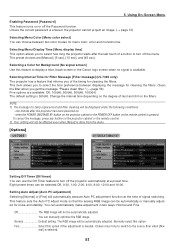
... Filter Message [Filter message] (LV-7365 only) The projector has a feature that the analog RGB image can use the Off Timer feature to display a blue, black screen or the Canon logo screen when no signal is pressed. Eight preset times can manually optimize the RGB image. This item allows you of signal switching. You can be automatically or manually adjusted for cleaning the filters. when the POWER ON/STAND BY button on the projector cabinet or the POWER OFF button...
... Filter Message [Filter message] (LV-7365 only) The projector has a feature that the analog RGB image can use the Off Timer feature to display a blue, black screen or the Canon logo screen when no signal is pressed. Eight preset times can manually optimize the RGB image. This item allows you of signal switching. You can be automatically or manually adjusted for cleaning the filters. when the POWER ON/STAND BY button on the projector cabinet or the POWER OFF button...
LV User's Manual
Page 64
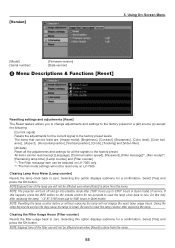
... time of service. NOTE: The projector will not be reset only on the remote control for a confirmation. Selecting this happens, press the INFO button on LV-7365. NOTE: Resetting the lamp counter before or without replacing the lamp will not be affected even when [Reset] is done from the menu. 55 Select [Yes] and press the OK button. [Version] 5. Using On-Screen Menu [Model] [Serial number] [Firmware version] [Data version] ❽ Menu Descriptions & Functions [Reset] Resetting settings and adjustments [Reset] The Reset...
... time of service. NOTE: The projector will not be reset only on the remote control for a confirmation. Selecting this happens, press the INFO button on LV-7365. NOTE: Resetting the lamp counter before or without replacing the lamp will not be affected even when [Reset] is done from the menu. 55 Select [Yes] and press the OK button. [Version] 5. Using On-Screen Menu [Model] [Serial number] [Firmware version] [Data version] ❽ Menu Descriptions & Functions [Reset] Resetting settings and adjustments [Reset] The Reset...

LV User's Manual
Page 65
... the menu, each time you should be displayed. See also page 55 for resetting the filter usage time. Catch LV-X7 (one filter) LV-7365/LV-7265/LV-7260 (two filters) 56 PUSH R PUSH LAMP WARNING POWE CAUTION • Turn off the projector, turn off the main power switch and unplug the projector before replacing the filter. • Only clean the outside of the filter cover with [Filter message] from getting inside the projector and should follow to operate the projector...
... the menu, each time you should be displayed. See also page 55 for resetting the filter usage time. Catch LV-X7 (one filter) LV-7365/LV-7265/LV-7260 (two filters) 56 PUSH R PUSH LAMP WARNING POWE CAUTION • Turn off the projector, turn off the main power switch and unplug the projector before replacing the filter. • Only clean the outside of the filter cover with [Filter message] from getting inside the projector and should follow to operate the projector...
LV User's Manual
Page 66
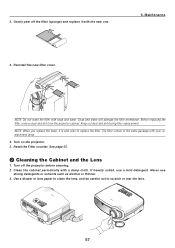
... your replacement lamp. 4. Reset the Filter counter. Maintenance 3. Keep out dust and dirt during filter replacement. See page 55. ❷ Cleaning the Cabinet and the Lens 1. If heavily soiled, use strong detergents or solvents such as alcohol or thinner. 3. Reinstall the new filter cover. The filter comes in the same package with the new one. 6. PUSH R +VOL BACK MENU KEYSTONE AUTO PC INPUT -VOL LAMP WARNING POWE 57 2. Turn on the projector. 5. Use a blower or lens...
... your replacement lamp. 4. Reset the Filter counter. Maintenance 3. Keep out dust and dirt during filter replacement. See page 55. ❷ Cleaning the Cabinet and the Lens 1. If heavily soiled, use strong detergents or solvents such as alcohol or thinner. 3. Reinstall the new filter cover. The filter comes in the same package with the new one. 6. PUSH R +VOL BACK MENU KEYSTONE AUTO PC INPUT -VOL LAMP WARNING POWE 57 2. Turn on the projector. 5. Use a blower or lens...
LV User's Manual
Page 67
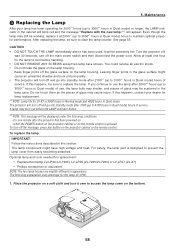
... blink red and the message "Replace with the new lamp."*2 will be working, replace it at least one minute after 2000*1 hours (up to access the lamp cover on the lamp housing. Optional lamp and tools needed for the lamp LV-LP26. 1. Place the projector on a soft cloth and turn off the message, press any button on - Maintenance ❸ Replacing the Lamp After your dealer for lamp replacement. *1 NOTE: Lamp life for 2000*1 hours (up to replace...
... blink red and the message "Replace with the new lamp."*2 will be working, replace it at least one minute after 2000*1 hours (up to access the lamp cover on the lamp housing. Optional lamp and tools needed for the lamp LV-LP26. 1. Place the projector on a soft cloth and turn off the message, press any button on - Maintenance ❸ Replacing the Lamp After your dealer for lamp replacement. *1 NOTE: Lamp life for 2000*1 hours (up to replace...

LV User's Manual
Page 70
... projector to turn on . (→ page 50) LAMP Indicator Blinking light Steady light Indicator Condition Off Red Red Green Projector Condition Normal - Note If a temperature error occurs If the temperature inside of life. Wait about 60 minutes until the lamp is off the lamp with dust. - 7. The projector is set to light. replacement message will not work correctly. 6 c y c l e (0. 5 s e c Lamp error On, 0.5 sec Off) Lamp fails to Quiet mode. - Lamp mode is in Standby. - down .) Wait for a moment. The projector is enabled. - Off Timer...
... projector to turn on . (→ page 50) LAMP Indicator Blinking light Steady light Indicator Condition Off Red Red Green Projector Condition Normal - Note If a temperature error occurs If the temperature inside of life. Wait about 60 minutes until the lamp is off the lamp with dust. - 7. The projector is set to light. replacement message will not work correctly. 6 c y c l e (0. 5 s e c Lamp error On, 0.5 sec Off) Lamp fails to Quiet mode. - Lamp mode is in Standby. - down .) Wait for a moment. The projector is enabled. - Off Timer...
LV User's Manual
Page 71
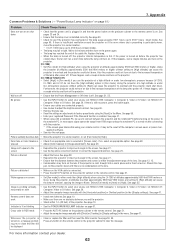
... to clear the message. Switch [Fan mode] to select your registered Password if the Password function is • Clean or replace the filter and then reset the Filter counter. See page 52. See page 26. • Adjust the computer image manually with [Clock] or [Tracking] in [Display settings] in [Image adjustment]. Appendix Common Problems & Solutions (→ "Power/Status/Lamp Indicator" on page 61.) Problem Check These Items Does not turn on the remote control or the projector cabinet to the...
... to clear the message. Switch [Fan mode] to select your registered Password if the Password function is • Clean or replace the filter and then reset the Filter counter. See page 52. See page 26. • Adjust the computer image manually with [Clock] or [Tracking] in [Display settings] in [Image adjustment]. Appendix Common Problems & Solutions (→ "Power/Status/Lamp Indicator" on page 61.) Problem Check These Items Does not turn on the remote control or the projector cabinet to the...
LV User's Manual
Page 81
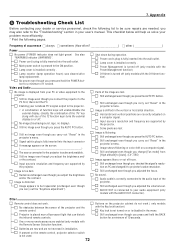
... remote control, projector selector switch is fully inserted into the input connector A message appears on the projector cabinet do not work . Still unchanged even though you press and hold the POWER button for a minimum of the image are supported by the projector. 7. Shut down during operation. Lamp counter (lamp operation hours) was cleared after lamp replacement. No power even though you press the AUTO PC button. Still unchanged even though you carry out "Reset" in the projector's menu. Audio cable...
... remote control, projector selector switch is fully inserted into the input connector A message appears on the projector cabinet do not work . Still unchanged even though you press and hold the POWER button for a minimum of the image are supported by the projector. 7. Shut down during operation. Lamp counter (lamp operation hours) was cleared after lamp replacement. No power even though you press the AUTO PC button. Still unchanged even though you carry out "Reset" in the projector's menu. Audio cable...


