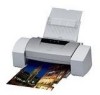
i9100 Quick Start Guide
Page 2
... and in any form, in whole or in part, without notice. Specifications are subject to be, nor should they are trademarks of their respective owners. No representation is a trademark of Canon Information System Research Australia. and other product and ...warranted, and they be understood to your Canon i9100 Photo Printer. All information regarding the accuracy thereof. and other countries. Canon i9100 Photo Printer Quick Start Guide Copyright This manual is a registered trademark of Canon Inc. As an ENERGY STAR partner, Canon U.S.A., Inc., has determined that it ...
... and in any form, in whole or in part, without notice. Specifications are subject to be, nor should they are trademarks of their respective owners. No representation is a trademark of Canon Information System Research Australia. and other product and ...warranted, and they be understood to your Canon i9100 Photo Printer. All information regarding the accuracy thereof. and other countries. Canon i9100 Photo Printer Quick Start Guide Copyright This manual is a registered trademark of Canon Inc. As an ENERGY STAR partner, Canon U.S.A., Inc., has determined that it ...
i9100 Quick Start Guide
Page 53
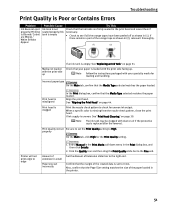
...be clogged with your paper is missing from the nozzle check pattern, clean the print head. Printer will not print edge to edge Amount of extension is replaced after the removal. If there remains a part of Extension slider bar to the Fine end. Print head is set the Print Quality setting... "Aligning the Print Head" on page 31. Troubleshooting Print Quality is Poor or Contains Errors Problem Ink does not eject properly/Printing is Blurred/ Colors are firmly seated in the print head and reseat them if necessary. • Check to see if all the orange tapes have been peeled off...
...be clogged with your paper is missing from the nozzle check pattern, clean the print head. Printer will not print edge to edge Amount of extension is replaced after the removal. If there remains a part of Extension slider bar to the Fine end. Print head is set the Print Quality setting... "Aligning the Print Head" on page 31. Troubleshooting Print Quality is Poor or Contains Errors Problem Ink does not eject properly/Printing is Blurred/ Colors are firmly seated in the print head and reseat them if necessary. • Check to see if all the orange tapes have been peeled off...
i9100 Quick Start Guide
Page 56
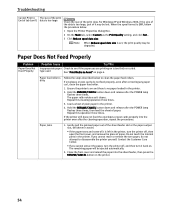
... button on and there is set, the print quality may be lost. Paper Jams 1. Do not touch the internal parts in the printer. 4. Close the front cover and reload the paper into the printer even after the POWER lamp flashes three times. type used See "Print Media to see if the paper you..., if the size of the data is too large Check the size of it back on is dirty Follow the steps described below . 1 Open the Printer Properties Dialog Box. 2 On the Main tab, select Custom as it cleans. Contact the Customer Care Center. • If you cannot reach or remove the...
... button on and there is set, the print quality may be lost. Paper Jams 1. Do not touch the internal parts in the printer. 4. Close the front cover and reload the paper into the printer even after the POWER lamp flashes three times. type used See "Print Media to see if the paper you..., if the size of the data is too large Check the size of it back on is dirty Follow the steps described below . 1 Open the Printer Properties Dialog Box. 2 On the Main tab, select Custom as it cleans. Contact the Customer Care Center. • If you cannot reach or remove the...
i9100 Quick Start Guide
Page 61
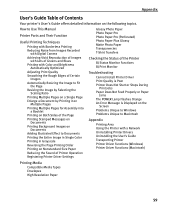
... detailed information on the Screen Problems Unique to Windows Problems Unique to Macintosh Appendix Printing Area Using the Printer with Color and Brightness Automatically Optimized Adjusting Print Quality Smoothing the Rough Edges of Certain Images Automatically Resizing the Image...Sides of the Page Printing Stamped Messages on Documents Printing Background Images on Documents Adding Illustrated Effect to Use This Manual Printer Parts and Their Function Useful Printing Techniques Printing with Borderless Printing Reducing Noise from Images Recorded with Digital Camera Achieving Vivid ...
... detailed information on the Screen Problems Unique to Windows Problems Unique to Macintosh Appendix Printing Area Using the Printer with Color and Brightness Automatically Optimized Adjusting Print Quality Smoothing the Rough Edges of Certain Images Automatically Resizing the Image...Sides of the Page Printing Stamped Messages on Documents Printing Background Images on Documents Adding Illustrated Effect to Use This Manual Printer Parts and Their Function Useful Printing Techniques Printing with Borderless Printing Reducing Noise from Images Recorded with Digital Camera Achieving Vivid ...

i9100 Quick Start Guide
Page 64
...near the printer. If you accidentally switch the printer on the ... components inside the printer. Periodically, unplug the printer and use a ...printer close to disassemble or modify the printer. Never plug the printer into a power socket that is bundled or knotted. or 3- If the printer...printer if you ignore any maintenance procedure not described in this guide. The printer contains high-voltage components. Maintaining the printer Working around the printer, immediately unplug the printer...the printer Always unplug the printer from the power supply when your printer safely....
...near the printer. If you accidentally switch the printer on the ... components inside the printer. Periodically, unplug the printer and use a ...printer close to disassemble or modify the printer. Never plug the printer into a power socket that is bundled or knotted. or 3- If the printer...printer if you ignore any maintenance procedure not described in this guide. The printer contains high-voltage components. Maintaining the printer Working around the printer, immediately unplug the printer...the printer Always unplug the printer from the power supply when your printer safely....
i9100 Quick Start Guide
Page 65
... or fingers in a location with an ambient temperature range of 5°C to 35°C (41°F to 95°F) and humidity of the printer. Never remove the plug by holding both sides. Do not use a power supply voltage other than that is unstable or subject to 90% (condensation ...free). If a child ingests any of fire or electric shocks, install the printer in the printer while it is kept clear at all times so you ignore any ink, consult a doctor immediately. The metal parts may leak out and stain clothing or the surrounding area. Never use an extension lead...
... or fingers in a location with an ambient temperature range of 5°C to 35°C (41°F to 95°F) and humidity of the printer. Never remove the plug by holding both sides. Do not use a power supply voltage other than that is unstable or subject to 90% (condensation ...free). If a child ingests any of fire or electric shocks, install the printer in the printer while it is kept clear at all times so you ignore any ink, consult a doctor immediately. The metal parts may leak out and stain clothing or the surrounding area. Never use an extension lead...
i9100 Quick Start Guide
Page 66
...interference that may cause harmful interference to stop operation of the equipment. Canon U.S.A., Inc. If this device must accept any changes or modifications to the equipment unless otherwise specified in Subpart B of Part 15 of the FCC Rules. However, there is subject to the... from a digital apparatus as set out in a particular installation. Appendix Regulatory Information Color Printer Model: K10210 (i9100) This device complies with the limits for a Class B digital device, pursuant to Part 15 of the FCC Rules. Cet appareil numérique respecte les limites de ...
...interference that may cause harmful interference to stop operation of the equipment. Canon U.S.A., Inc. If this device must accept any changes or modifications to the equipment unless otherwise specified in Subpart B of Part 15 of the FCC Rules. However, there is subject to the... from a digital apparatus as set out in a particular installation. Appendix Regulatory Information Color Printer Model: K10210 (i9100) This device complies with the limits for a Class B digital device, pursuant to Part 15 of the FCC Rules. Cet appareil numérique respecte les limites de ...
i9100 Quick Start Guide
Page 67
...one (1) year from misuse, abuse or failure to operate the Product as set forth below is given by Canon U.S.A., Inc. ("Canon USA") with respect to the new or refurbished Canon-brand printer or scanner (each a "Product") packaged with this limited warranty, when purchased and used in conjunction with...the Product is used in the United States only. Appendix Canon Printer and Scanner Limited Warranty --- (USA Only) The limited warranty set forth in the operating instructions. (b) Use of parts or supplies (other than those sold by Canon USA) that may be distributed with the Product are sold...
...one (1) year from misuse, abuse or failure to operate the Product as set forth below is given by Canon U.S.A., Inc. ("Canon USA") with respect to the new or refurbished Canon-brand printer or scanner (each a "Product") packaged with this limited warranty, when purchased and used in conjunction with...the Product is used in the United States only. Appendix Canon Printer and Scanner Limited Warranty --- (USA Only) The limited warranty set forth in the operating instructions. (b) Use of parts or supplies (other than those sold by Canon USA) that may be distributed with the Product are sold...
i9100 Quick Start Guide
Page 3
...; Print Head ‰ 6 Ink Tanks * Cables should be observed for purchasing a Canon Bubble Jet Printer. Trademark Notices • Canon® is a registered trademark of Microsoft Corporation in this publication may be observed for ...safe operation. All rights reserved. Always observe the instructions indicated by incorrect operation of this Quick Start Guide are in the User's Guide. Also read the Safety Precautions in the box. No part...
...; Print Head ‰ 6 Ink Tanks * Cables should be observed for purchasing a Canon Bubble Jet Printer. Trademark Notices • Canon® is a registered trademark of Microsoft Corporation in this publication may be observed for ...safe operation. All rights reserved. Always observe the instructions indicated by incorrect operation of this Quick Start Guide are in the User's Guide. Also read the Safety Precautions in the box. No part...

i9100 Quick Start Guide
Page 6
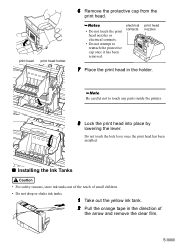
...outlet. „ Installing the Print Head ON 1 Plug the printer in. 2 Turn on the power cord. • Never use any power supply other than the standard power supply available in the country of purchase. Do not touch internal parts other than the lock lever. 4 Do not place heavy objects... on the printer. 3 Installing the Print Head • Never attempt to operate. Do NOT turn on the computer yet....
...outlet. „ Installing the Print Head ON 1 Plug the printer in. 2 Turn on the power cord. • Never use any power supply other than the standard power supply available in the country of purchase. Do not touch internal parts other than the lock lever. 4 Do not place heavy objects... on the printer. 3 Installing the Print Head • Never attempt to operate. Do NOT turn on the computer yet....
i9100 Quick Start Guide
Page 7
... the protective cap from the print head. • Do not touch the print head nozzles or electrical contacts. • Do not attempt to touch any parts inside the printer. 8 Lock the print head into place by lowering the lever.
... the protective cap from the print head. • Do not touch the print head nozzles or electrical contacts. • Do not attempt to touch any parts inside the printer. 8 Lock the print head into place by lowering the lever.
i9100 Quick Start Guide
Page 25
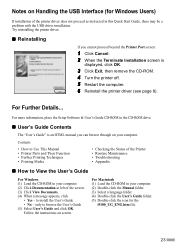
... Guide Contents The "User's Guide" is displayed, click OK. 3 Click Exit, then remove the CD-ROM. 4 Turn the printer off. 5 Restart the computer. 6 Reinstall the printer driver (see page 8). Notes on Handling the USB Interface (for the i9100_UG_ENG.htm file. 23 Contents • How to Use... This Manual • Printer Parts and Their Function • Further Printing Techniques • Printing Media • Checking the Status of the screen. (3) Click View Documents. (4) When...
... Guide Contents The "User's Guide" is displayed, click OK. 3 Click Exit, then remove the CD-ROM. 4 Turn the printer off. 5 Restart the computer. 6 Reinstall the printer driver (see page 8). Notes on Handling the USB Interface (for the i9100_UG_ENG.htm file. 23 Contents • How to Use... This Manual • Printer Parts and Their Function • Further Printing Techniques • Printing Media • Checking the Status of the screen. (3) Click View Documents. (4) When...
i9100 Easy Setup Instructions
Page 2
... select Control Panel, Printers and Other Hardware, then Printers and Faxes. Right-click the i9100 icon, then click Properties. c. Follow the on your Mac and your printer and insert the "i9100 Setup Software & User's Guide" CD-ROM. 8 Click Install. QA7-2669-V01 © 2003 Canon U.S.A., Inc. Canon is complete, click...owners. Click the Print Head Alignment icon. 3 Follow the on to Windows as a member of Canon Inc. Double-click the Utilities folder, then the Print Center icon. Part no. All other products and brand names are prompted to proceed with Step 7 Align the Print Head...
... select Control Panel, Printers and Other Hardware, then Printers and Faxes. Right-click the i9100 icon, then click Properties. c. Follow the on your Mac and your printer and insert the "i9100 Setup Software & User's Guide" CD-ROM. 8 Click Install. QA7-2669-V01 © 2003 Canon U.S.A., Inc. Canon is complete, click...owners. Click the Print Head Alignment icon. 3 Follow the on to Windows as a member of Canon Inc. Double-click the Utilities folder, then the Print Center icon. Part no. All other products and brand names are prompted to proceed with Step 7 Align the Print Head...


