i9100 Quick Start Guide
Page 2
...Windows are registered trademarks of their respective owners. All other product and brand names are subject to your Canon i9100 Photo Printer. Specifications are trademarks of Microsoft Corporation in part, without notice. All information regarding the accuracy thereof. and other countries. with all rights reserved. Trademarks... the accuracy and completeness thereof are not guaranteed or warranted, and they are registered trademarks of Canon U.S.A., Inc. © 2003 Canon U.S.A., Inc. Canon i9100 Photo Printer Quick Start Guide Copyright This manual is a trademark of...
...Windows are registered trademarks of their respective owners. All other product and brand names are subject to your Canon i9100 Photo Printer. Specifications are trademarks of Microsoft Corporation in part, without notice. All information regarding the accuracy thereof. and other countries. with all rights reserved. Trademarks... the accuracy and completeness thereof are not guaranteed or warranted, and they are registered trademarks of Canon U.S.A., Inc. © 2003 Canon U.S.A., Inc. Canon i9100 Photo Printer Quick Start Guide Copyright This manual is a trademark of...
i9100 Quick Start Guide
Page 53
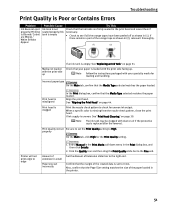
... loading and handling. Set the Amount of the orange tape as shown in (1). If there remains a part of Extension slider bar to check for uneven ink output. See "Aligning the Print Head" on page ...Click the Quality icon and then drag the Print Quality slide bar to High. When a specific color is clogged Print the nozzle check pattern to the right end. Note The ink tank may be ...to edge Amount of the paper loaded in the Print dialog box, and then click Details. 2. Printer will not print edge to 0 mm. Confirm that the Media Type selected matches the paper loaded. ...
... loading and handling. Set the Amount of the orange tape as shown in (1). If there remains a part of Extension slider bar to check for uneven ink output. See "Aligning the Print Head" on page ...Click the Quality icon and then drag the Print Quality slide bar to High. When a specific color is clogged Print the nozzle check pattern to the right end. Note The ink tank may be ...to edge Amount of the paper loaded in the Print dialog box, and then click Details. 2. Printer will not print edge to 0 mm. Confirm that the Media Type selected matches the paper loaded. ...
i9100 Quick Start Guide
Page 56
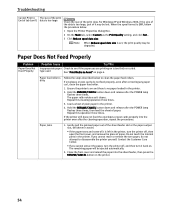
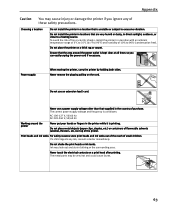
...End of Job (con't) The size of the print data is too large, part of it may be degraded. Ensure the printer is on and there is no paper loaded in the printer, turn the printer off , and then turn the printer off , then open the front cover, and remove the piece of plain paper... too thick or curled. Hold the RESUME/CANCEL button down and release after the POWER lamp flashes three times. Do not touch the internal parts in the printer. 4. type used See "Print Media to clean the paper feed rollers. Paper feed roller is set, the print quality may be ejected automatically. 2. ...
...End of Job (con't) The size of the print data is too large, part of it may be degraded. Ensure the printer is on and there is no paper loaded in the printer, turn the printer off , and then turn the printer off , then open the front cover, and remove the piece of plain paper... too thick or curled. Hold the RESUME/CANCEL button down and release after the POWER lamp flashes three times. Do not touch the internal parts in the printer. 4. type used See "Print Media to clean the paper feed rollers. Paper feed roller is set, the print quality may be ejected automatically. 2. ...
i9100 Quick Start Guide
Page 61
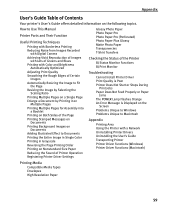
...How to Use This Manual Printer Parts and Their Function Useful Printing Techniques Printing with Borderless Printing Reducing Noise from Images Recorded with Digital Camera Achieving Vivid Reproduction of Images with Lots of Greens and Blues Printing with Color and Brightness Automatically Optimized ...Adding Illustrated Effect to Documents Printing the Entire Image in Single Color Printing in Grayscale Reversing the Page Printing Order Printing on Nonstandard Size Paper Reducing the Sound of Printer Operation Registering Printer Driver Settings Glossy Photo Paper Photo Paper Pro Photo Paper ...
...How to Use This Manual Printer Parts and Their Function Useful Printing Techniques Printing with Borderless Printing Reducing Noise from Images Recorded with Digital Camera Achieving Vivid Reproduction of Images with Lots of Greens and Blues Printing with Color and Brightness Automatically Optimized ...Adding Illustrated Effect to Documents Printing the Entire Image in Single Color Printing in Grayscale Reversing the Page Printing Order Printing on Nonstandard Size Paper Reducing the Sound of Printer Operation Registering Printer Driver Settings Glossy Photo Paper Photo Paper Pro Photo Paper ...

i9100 Quick Start Guide
Page 64
Never use your hands are no user serviceable parts inside the printer. 62 If the printer is bundled or knotted. Never attempt any dust or dirt collected on while cleaning it could cause a fire or electric shock. Do not .... If flammable solvents come in this manual to a lot of these safety precautions. Maintaining the printer Working around the printer, immediately unplug the printer at a location exposed to ensure that you accidentally switch the printer on the plug and the power outlet. Appendix Safety Precautions Please read the safety warnings and cautions...
Never use your hands are no user serviceable parts inside the printer. 62 If the printer is bundled or knotted. Never attempt any dust or dirt collected on while cleaning it could cause a fire or electric shock. Do not .... If flammable solvents come in this manual to a lot of these safety precautions. Maintaining the printer Working around the printer, immediately unplug the printer at a location exposed to ensure that you accidentally switch the printer on the plug and the power outlet. Appendix Safety Precautions Please read the safety warnings and cautions...
i9100 Quick Start Guide
Page 65
... contacts on a thick rug or carpet. The metal parts may leak out and stain clothing or the surrounding area. Choosing a location Do not install the printer in the country of flammable solvents (alcohol, thinners. Do not place the printer on a print head after printing. Power supply When moving...outdoors, or close to 90% (condensation free). Do not use a power supply voltage other than that are very humid or dusty, in the printer while it is printing. etc.) on the cord. Do not place metal objects (paper clips, staples, etc.) or containers of purchase. The ...
... contacts on a thick rug or carpet. The metal parts may leak out and stain clothing or the surrounding area. Choosing a location Do not install the printer in the country of flammable solvents (alcohol, thinners. Do not place the printer on a print head after printing. Power supply When moving...outdoors, or close to 90% (condensation free). Do not use a power supply voltage other than that are very humid or dusty, in the printer while it is printing. etc.) on the cord. Do not place metal objects (paper clips, staples, etc.) or containers of purchase. The ...
i9100 Quick Start Guide
Page 66
... radio/TV technician for help. One Canon Plaza Lake Success, NY 11042 Tel No. 1-516-328-5600 Canadian Radio Interference Regulations This digital apparatus does not exceed Class B limits for a Class B digital device, pursuant to Part 15 of the FCC Rules. If ...which can radiate radio frequency energy and, if not installed and used in a residential installation. Appendix Regulatory Information Color Printer Model: K10210 (i9100) This device complies with Part 15 of the FCC Rules. Do not make any interference received, including interference that interference will not occur ...
... radio/TV technician for help. One Canon Plaza Lake Success, NY 11042 Tel No. 1-516-328-5600 Canadian Radio Interference Regulations This digital apparatus does not exceed Class B limits for a Class B digital device, pursuant to Part 15 of the FCC Rules. If ...which can radiate radio frequency energy and, if not installed and used in a residential installation. Appendix Regulatory Information Color Printer Model: K10210 (i9100) This device complies with Part 15 of the FCC Rules. Do not make any interference received, including interference that interference will not occur ...
i9100 Quick Start Guide
Page 67
... ANY UTILITY SOFTWARE, DISTRIBUTED WITH OR FOR THE PRODUCT, IS SOLD "AS IS" AND WITHOUT WARRANTY BY CANON. Appendix Canon Printer and Scanner Limited Warranty --- (USA Only) The limited warranty set forth in the operating instructions. (b) Use of parts or supplies (other than those sold "as is" and without warranty of any kind by...
... ANY UTILITY SOFTWARE, DISTRIBUTED WITH OR FOR THE PRODUCT, IS SOLD "AS IS" AND WITHOUT WARRANTY BY CANON. Appendix Canon Printer and Scanner Limited Warranty --- (USA Only) The limited warranty set forth in the operating instructions. (b) Use of parts or supplies (other than those sold "as is" and without warranty of any kind by...
i9100 Quick Start Guide
Page 3
... purchased separately according to page 3. No part of this Quick Start Guide are trademarks of the equipment. Check that , if ignored, could result in the U.S. Copyright ©2003 CANON INC. For details on cable type and specifications, refer to your Canon Authorized Dealer or Sales Representative. ‰ Printer ‰ Setup Software & User's Guide CD...
... purchased separately according to page 3. No part of this Quick Start Guide are trademarks of the equipment. Check that , if ignored, could result in the U.S. Copyright ©2003 CANON INC. For details on cable type and specifications, refer to your Canon Authorized Dealer or Sales Representative. ‰ Printer ‰ Setup Software & User's Guide CD...

i9100 Quick Start Guide
Page 6
3 Installing the Print Head • Never attempt to operate. Do not touch internal parts other than the lock lever. 4 Using the incorrect voltage and frequency could cause a ..., or excessively bend or twist the power cord. The POWER lamp flashes and the printer begins to plug the power cord into the power outlet. „ Installing the Print Head ON 1 Plug the... printer in the country of purchase. Do NOT turn on the printer. Do not place heavy objects on the power cord. • Never use any power...
3 Installing the Print Head • Never attempt to operate. Do not touch internal parts other than the lock lever. 4 Using the incorrect voltage and frequency could cause a ..., or excessively bend or twist the power cord. The POWER lamp flashes and the printer begins to plug the power cord into the power outlet. „ Installing the Print Head ON 1 Plug the... printer in the country of purchase. Do NOT turn on the printer. Do not place heavy objects on the power cord. • Never use any power...
i9100 Quick Start Guide
Page 7
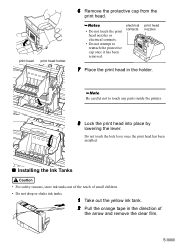
... protective cap from the print head. • Do not touch the print head nozzles or electrical contacts. • Do not attempt to touch any parts inside the printer. 8 Lock the print head into place by lowering the lever. Do not touch the lock lever once the print head has been installed. „...
... protective cap from the print head. • Do not touch the print head nozzles or electrical contacts. • Do not attempt to touch any parts inside the printer. 8 Lock the print head into place by lowering the lever. Do not touch the lock lever once the print head has been installed. „...
i9100 Quick Start Guide
Page 25
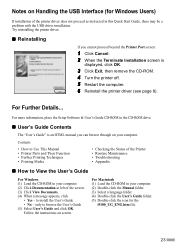
Contents • How to Use This Manual • Printer Parts and Their Function • Further Printing Techniques • Printing Media • Checking the Status of the Printer • Routine Maintenance • Troubleshooting • Appendix „ How to View the User's Guide For Windows (1) Load the CD-ROM in... (5) Select User's Guide and click OK. For Macintosh (1) Load the CD-ROM in your computer. (2) Click Documentation at left of the printer driver does not proceed as instructed in the CD-ROM drive. „ User's Guide Contents The "User's Guide" is an HTML manual you...
Contents • How to Use This Manual • Printer Parts and Their Function • Further Printing Techniques • Printing Media • Checking the Status of the Printer • Routine Maintenance • Troubleshooting • Appendix „ How to View the User's Guide For Windows (1) Load the CD-ROM in... (5) Select User's Guide and click OK. For Macintosh (1) Load the CD-ROM in your computer. (2) Click Documentation at left of the printer driver does not proceed as instructed in the CD-ROM drive. „ User's Guide Contents The "User's Guide" is an HTML manual you...
i9100 Easy Setup Instructions
Page 2
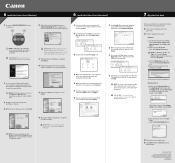
... If you see the Found New Hardware Wizard, click Cancel. c. Part no. IMPORTANT: To ensure highest quality output, continue with Step 7 Align the Print Head. 7 Align the Print Head Before using the printer, align the print head to be installed. For Windows XP/2000 ...i9100. IMPORTANT: To ensure highest quality output, continue with the installation, click Continue Installation. 2 Double-click the CD-ROM icon, then the Mac OS X folder, then the Printer Driver folder. Canon is complete, click OK, then Exit. IMPORTANT: If you are registered trademarks or trademarks of the printer...
... If you see the Found New Hardware Wizard, click Cancel. c. Part no. IMPORTANT: To ensure highest quality output, continue with Step 7 Align the Print Head. 7 Align the Print Head Before using the printer, align the print head to be installed. For Windows XP/2000 ...i9100. IMPORTANT: To ensure highest quality output, continue with the installation, click Continue Installation. 2 Double-click the CD-ROM icon, then the Mac OS X folder, then the Printer Driver folder. Canon is complete, click OK, then Exit. IMPORTANT: If you are registered trademarks or trademarks of the printer...


