HV30 Instruction Manual
Page 3
Do not use the camera close to TV transmitters, portable communication devices or other power sources such as battery power, refer to instructions in this manual. 11 Polarization - Hazard of antenna discharge unit, connection to be hazardous. 7 Avoid magnetic or electric... be routed so that they may cause picture interference, or permanently damage the camera. 8 Water and Moisture - If you are unable to the Canon HD Camcorder VIXIA HV30 A and all its accessories. 1 Read Instructions - Section 810 of the National Electrical Code, ANSI / NFPA No. 70-1984, provides information ...
Do not use the camera close to TV transmitters, portable communication devices or other power sources such as battery power, refer to instructions in this manual. 11 Polarization - Hazard of antenna discharge unit, connection to be hazardous. 7 Avoid magnetic or electric... be routed so that they may cause picture interference, or permanently damage the camera. 8 Water and Moisture - If you are unable to the Canon HD Camcorder VIXIA HV30 A and all its accessories. 1 Read Instructions - Section 810 of the National Electrical Code, ANSI / NFPA No. 70-1984, provides information ...

HV30 Instruction Manual
Page 4
PART H) 14 Lightning - Refer all power sources including battery, and refer servicing to qualified service personnel. 18 Damage Requiring Service - If the product does not operate normally even if you will need for further ... through openings as this product yourself as the original part. When replacement parts are required, be used , you follow the operating instructions. Contact your nearest Canon Service Center for service. 19 Replacement Parts - Do not attempt to spill liquid of other hazards. 20 Safety Check - b. d. The Adapter can result in a fire...
PART H) 14 Lightning - Refer all power sources including battery, and refer servicing to qualified service personnel. 18 Damage Requiring Service - If the product does not operate normally even if you will need for further ... through openings as this product yourself as the original part. When replacement parts are required, be used , you follow the operating instructions. Contact your nearest Canon Service Center for service. 19 Replacement Parts - Do not attempt to spill liquid of other hazards. 20 Safety Check - b. d. The Adapter can result in a fire...
HV30 Instruction Manual
Page 6
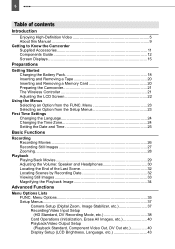
...: Speaker and Headphones 30 Locating the End of contents Introduction Enjoying High-Definition Video 5 About this Manual 9 Getting to Know the Camcorder Supplied Accessories 11 Components Guide 12 Screen Displays 15 Preparations Getting Started Charging the Battery Pack 18 Inserting and Removing a Tape 20 Inserting and Removing a Memory Card 20 Preparing the...
...: Speaker and Headphones 30 Locating the End of contents Introduction Enjoying High-Definition Video 5 About this Manual 9 Getting to Know the Camcorder Supplied Accessories 11 Components Guide 12 Screen Displays 15 Preparations Getting Started Charging the Battery Pack 18 Inserting and Removing a Tape 20 Inserting and Removing a Memory Card 20 Preparing the...
HV30 Instruction Manual
Page 9
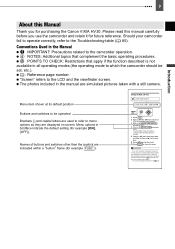
...) 1 Press FUNC.. 2 Select ( ) the icon and press ( ) to the camcorder operation. Names of the date will be lost. Please read this Manual Thank you for purchasing the Canon VIXIA HV30. NOTES: Additional topics that apply if the function described is not available in all operating ... menus. 3 Select ( ) [DATE/TIME SETUP] and press ( ). 4 Select ( ) [DATE/TIME] and press ( ). Menu options in lithium battery ( 93) and set , etc.). : Reference page number. POINTS TO CHECK: Restrictions that complement the basic operating procedures. to the Troubleshooting table ( 85). Should...
...) 1 Press FUNC.. 2 Select ( ) the icon and press ( ) to the camcorder operation. Names of the date will be lost. Please read this Manual Thank you for purchasing the Canon VIXIA HV30. NOTES: Additional topics that apply if the function described is not available in all operating ... menus. 3 Select ( ) [DATE/TIME SETUP] and press ( ). 4 Select ( ) [DATE/TIME] and press ( ). Menu options in lithium battery ( 93) and set , etc.). : Reference page number. POINTS TO CHECK: Restrictions that complement the basic operating procedures. to the Troubleshooting table ( 85). Should...
HV30 Instruction Manual
Page 11
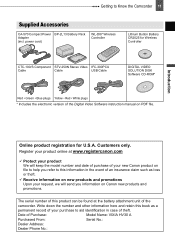
...product online at the battery attachment unit of the camcorder. Write down the number and other information here and retain this information in case of Purchase: Model Name: VIXIA HV30 A Purchased From: Serial No.: Dealer Address: Dealer Phone No.: Getting to Know the Camcorder 11 Getting to aid ... on file to help you refer to this book as a permanent record of your new Canon product on Canon new products and promotions. power cord) WL-D87 Wireless Controller Lithium Button Battery CR2025 for U.S.A. The serial number of this product can be found at www.registercanon.com...
...product online at the battery attachment unit of the camcorder. Write down the number and other information here and retain this information in case of Purchase: Model Name: VIXIA HV30 A Purchased From: Serial No.: Dealer Address: Dealer Phone No.: Getting to Know the Camcorder 11 Getting to aid ... on file to help you refer to this book as a permanent record of your new Canon product on Canon new products and promotions. power cord) WL-D87 Wireless Controller Lithium Button Battery CR2025 for U.S.A. The serial number of this product can be found at www.registercanon.com...

HV30 Instruction Manual
Page 13
...view Bottom view Getting to Know the Camcorder 13 LCD screen ( 22) Dioptric adjustment lever ( 21) Viewfinder ( 21) Terminal cover START/STOP button ( 26) switch ( 10) Power indicator ( 10) Joystick ( 10) FUNC. Introduction button ( 23, 35) RESET button ( 85) Serial number/Battery attachment unit ( 18) DC IN ...cover ( 20) Zoom lever ( 28) PHOTO button ( 27) Lock button switch ( 10) Advanced accessory shoe ( 59, 62) Tripod socket ( 27) BATTERY RELEASE switch ( 18) Strap mount Names of buttons and switches other than the joystick are indicated within a "button" frame (for example FUNC. ).
...view Bottom view Getting to Know the Camcorder 13 LCD screen ( 22) Dioptric adjustment lever ( 21) Viewfinder ( 21) Terminal cover START/STOP button ( 26) switch ( 10) Power indicator ( 10) Joystick ( 10) FUNC. Introduction button ( 23, 35) RESET button ( 85) Serial number/Battery attachment unit ( 18) DC IN ...cover ( 20) Zoom lever ( 28) PHOTO button ( 27) Lock button switch ( 10) Advanced accessory shoe ( 59, 62) Tripod socket ( 27) BATTERY RELEASE switch ( 18) Strap mount Names of buttons and switches other than the joystick are indicated within a "button" frame (for example FUNC. ).
HV30 Instruction Manual
Page 15
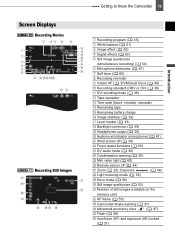
...Manual focus ( 49) Recording standard (HDV or DV) ( 38) DV recording mode ( 39) Tape operation Time code (hours : minutes : seconds) Remaining tape Remaining battery charge Image stabilizer ( 38) Level marker ( 43) Backlight correction ( 49) Headphones output ( 30) Audio level indicator (microphone) ( 61) Wind screen off ( 39...55) Drive mode ( 56) Still image quality/size ( 53) Number of still images available on the memory card AF frame ( 55) Camcorder shake warning ( 37) Advanced accessory shoe ( 97) Flash ( 59) Autofocus (AF) and exposure (AE) locked ( 27) Introduction
...Manual focus ( 49) Recording standard (HDV or DV) ( 38) DV recording mode ( 39) Tape operation Time code (hours : minutes : seconds) Remaining tape Remaining battery charge Image stabilizer ( 38) Level marker ( 43) Backlight correction ( 49) Headphones output ( 30) Audio level indicator (microphone) ( 61) Wind screen off ( 39...55) Drive mode ( 56) Still image quality/size ( 53) Number of still images available on the memory card AF frame ( 55) Camcorder shake warning ( 37) Advanced accessory shoe ( 97) Flash ( 59) Autofocus (AF) and exposure (AE) locked ( 27) Introduction

HV30 Instruction Manual
Page 16
..., the power may turn off without displaying " ". • Depending on the conditions under which the camcorder and the battery pack are too short. When the tape reaches its end, the display changes to " END". • When the time left is writing ... may not be indicated accurately. Remaining battery charge • When " " starts flashing in minutes. This is helpful to avoid scenes that appears on the videocassette's label (for example, 85 minutes). " " moves during recording. 16 Getting to Know the Camcorder Recording reminder The camcorder counts from 1 to 10 seconds when ...
..., the power may turn off without displaying " ". • Depending on the conditions under which the camcorder and the battery pack are too short. When the tape reaches its end, the display changes to " END". • When the time left is writing ... may not be indicated accurately. Remaining battery charge • When " " starts flashing in minutes. This is helpful to avoid scenes that appears on the videocassette's label (for example, 85 minutes). " " moves during recording. 16 Getting to Know the Camcorder Recording reminder The camcorder counts from 1 to 10 seconds when ...
HV30 Instruction Manual
Page 18
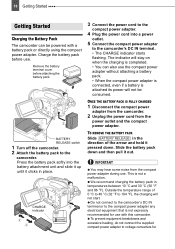
...connect the supplied compact power adapter to the camcorder's DC IN terminal. • The CHARGE indicator starts flashing. 18 Getting Started Preparations Getting Started Getting Started Charging the Battery Pack The camcorder can also use with a battery pack or directly using the compact power ...hear some noise from the power outlet and the compact power adapter. Charge the battery pack before attaching the battery pack BATTERY RELEASE switch 1 Turn off the camcorder. 2 Attach the battery pack to the compact power adapter any electrical equipment that is not expressly recommended ...
...connect the supplied compact power adapter to the camcorder's DC IN terminal. • The CHARGE indicator starts flashing. 18 Getting Started Preparations Getting Started Getting Started Charging the Battery Pack The camcorder can also use with a battery pack or directly using the compact power ...hear some noise from the power outlet and the compact power adapter. Charge the battery pack before attaching the battery pack BATTERY RELEASE switch 1 Turn off the camcorder. 2 Attach the battery pack to the compact power adapter any electrical equipment that is not expressly recommended ...

HV30 Instruction Manual
Page 19
...85 min. 195 min. 160 min. 155 min. 150 min. 340 min. * Approximate times for information on /off. U.S.A. Please call 1-800-8-BATTERY for recording with repeated operations such as start/stop, zooming, power on how to 3 times longer than 50% charged. Flashes approx. Preparations Charging,... in the table below are approximate and vary depending on : Battery fully charged. The charging time will decrease. In cold places, the effective usage time of the battery charge status. twice per second: Battery less than you think you might need. Flashes approx. Continuously ...
...85 min. 195 min. 160 min. 155 min. 150 min. 340 min. * Approximate times for information on /off. U.S.A. Please call 1-800-8-BATTERY for recording with repeated operations such as start/stop, zooming, power on how to 3 times longer than 50% charged. Flashes approx. Preparations Charging,... in the table below are approximate and vary depending on : Battery fully charged. The charging time will decrease. In cold places, the effective usage time of the battery charge status. twice per second: Battery less than you think you might need. Flashes approx. Continuously ...

HV30 Instruction Manual
Page 21
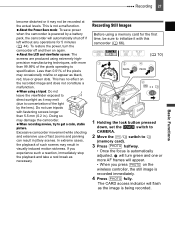
...) NOTES Proper operation cannot be guaranteed for all memory cards before using them with this camcorder for the first time ( 66). Otherwise, replace the battery. Memory cards have front and back sides that you press the buttons. The lens cover will open automatically. 2 Adjust the ...lever with your index finger, and the START/STOP button with the + side facing up. 3 Insert the battery holder. Using the Wireless Controller Preparations 1 Turn on the camcorder. If the wireless controller does not work properly when the remote sensor is not set to use the viewfinder ...
...) NOTES Proper operation cannot be guaranteed for all memory cards before using them with this camcorder for the first time ( 66). Otherwise, replace the battery. Memory cards have front and back sides that you press the buttons. The lens cover will open automatically. 2 Adjust the ...lever with your index finger, and the START/STOP button with the + side facing up. 3 Insert the battery holder. Using the Wireless Controller Preparations 1 Turn on the camcorder. If the wireless controller does not work properly when the remote sensor is not set to use the viewfinder ...

HV30 Instruction Manual
Page 22
... will shorten the effective usage time of the recording or the viewfinder screen. Hold DISP. NOTES This setting does not affect the brightness of the battery pack. 22 Getting Started Adjusting the LCD Screen Rotating the LCD Panel Open the LCD panel 90 degrees. LCD Backlight You can set the brightness...
... will shorten the effective usage time of the recording or the viewfinder screen. Hold DISP. NOTES This setting does not affect the brightness of the battery pack. 22 Getting Started Adjusting the LCD Screen Rotating the LCD Panel Open the LCD panel 90 degrees. LCD Backlight You can set the brightness...
HV30 Instruction Manual
Page 25
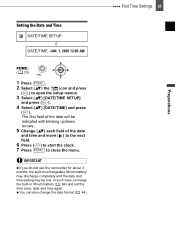
to start the clock. 7 Press FUNC. In such case, recharge the built-in rechargeable lithium battery may discharge completely and the date and time setting may be indicated with blinking up/down arrows. 5 Change ( ) each field of the date will be ... and press ( ) to open the setup menus. 3 Select ( ) [DATE/TIME SETUP] and press ( ). 4 Select ( ) [DATE/TIME] and press ( ). IMPORTANT If you do not use the camcorder for about 3 months, the built-in lithium battery ( 94) and set the time zone, date and time again.
to start the clock. 7 Press FUNC. In such case, recharge the built-in rechargeable lithium battery may discharge completely and the date and time setting may be indicated with blinking up/down arrows. 5 Change ( ) each field of the date will be ... and press ( ) to open the setup menus. 3 Select ( ) [DATE/TIME SETUP] and press ( ). 4 Select ( ) [DATE/TIME] and press ( ). IMPORTANT If you do not use the camcorder for about 3 months, the built-in lithium battery ( 94) and set the time zone, date and time again.
HV30 Instruction Manual
Page 26
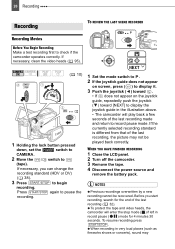
... mode for the end of the last recording, the picture may To protect the tape and video heads, the camcorder will enter the stop mode ( ) if left in the illustration above. • The camcorder will play back a few seconds of the last recording made and return to check if the..., search for 4 minutes 30 seconds. WHEN YOU HAVE FINISHED RECORDING 1 Close the LCD panel. 2 Turn off the camcorder. 3 Remove the tape. 4 Disconnect the power source and remove the battery pack. When recording in very loud places (such as fireworks shows or concerts), sound may not be recovered. Before you...
... mode for the end of the last recording, the picture may To protect the tape and video heads, the camcorder will enter the stop mode ( ) if left in the illustration above. • The camcorder will play back a few seconds of the last recording made and return to check if the..., search for 4 minutes 30 seconds. WHEN YOU HAVE FINISHED RECORDING 1 Close the LCD panel. 2 Turn off the camcorder. 3 Remove the tape. 4 Disconnect the power source and remove the battery pack. When recording in very loud places (such as fireworks shows or concerts), sound may not be recovered. Before you...
HV30 Instruction Manual
Page 27
... leave the viewfinder exposed to direct sunlight as black, red, blue or green dots. Excessive camcorder movement while shooting and extensive use tripods with fastening screws longer than 0.01% of the light by a battery pack, the camcorder will automatically shut off and then on again. In extreme cases, the playback of such scenes...
... leave the viewfinder exposed to direct sunlight as black, red, blue or green dots. Excessive camcorder movement while shooting and extensive use tripods with fastening screws longer than 0.01% of the light by a battery pack, the camcorder will automatically shut off and then on again. In extreme cases, the playback of such scenes...
HV30 Instruction Manual
Page 44
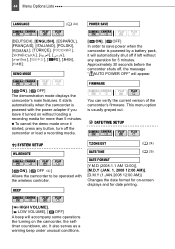
... features. Date/Time Setup DATE/TIME SETUP System Setup (Beep, etc.) SYSTEM SETUP WL.REMOTE [ ON], [ OFF ] Allows the camcorder to save power when the camcorder is powered by a battery pack, it started, press any operation for 5 minutes. BEEP T.ZONE/DST ( 24) DATE/TIME ( 25) DATE FORMAT [Y.M.D (2008.1.1 AM 12:00)], [M.D,Y (JAN. 1, 2008...
... features. Date/Time Setup DATE/TIME SETUP System Setup (Beep, etc.) SYSTEM SETUP WL.REMOTE [ ON], [ OFF ] Allows the camcorder to save power when the camcorder is powered by a battery pack, it started, press any operation for 5 minutes. BEEP T.ZONE/DST ( 24) DATE/TIME ( 25) DATE FORMAT [Y.M.D (2008.1.1 AM 12:00)], [M.D,Y (JAN. 1, 2008...

HV30 Instruction Manual
Page 85
... exhausted. the screen. Additional Information Troubleshooting If you have a problem with your dealer or a Canon Service Center if the problem persists. Power Source Problem Solution • Camcorder will not open . Replace or charge the battery pack. 18 • The camcorder switches off and then on and off. cover will not turn on the screen...
... exhausted. the screen. Additional Information Troubleshooting If you have a problem with your dealer or a Canon Service Center if the problem persists. Power Source Problem Solution • Camcorder will not open . Replace or charge the battery pack. 18 • The camcorder switches off and then on and off. cover will not turn on the screen...
HV30 Instruction Manual
Page 86
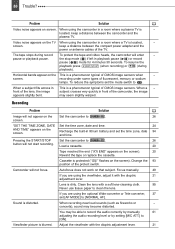
...). 20 Rewind the tape or replace the cassette. Viewfinder picture is a phenomenon typical of the TV. located, keep a distance between the camcorder and the plasma TV. Recording Problem Solution Image will not focus. Cassette is a phenomenon typical of fluorescent, mercury or sodium lamps. Clean ...the lens with the dioptric adjustment lever. 21 Video noise appears on the screen). the stop mode ( ) if left in lithium battery and set [AF MODE] to . 26 button will enter - recording under some types of CMOS image sensors. When a subject flits across in ...
...). 20 Rewind the tape or replace the cassette. Viewfinder picture is a phenomenon typical of the TV. located, keep a distance between the camcorder and the plasma TV. Recording Problem Solution Image will not focus. Cassette is a phenomenon typical of fluorescent, mercury or sodium lamps. Clean ...the lens with the dioptric adjustment lever. 21 Video noise appears on the screen). the stop mode ( ) if left in lithium battery and set [AF MODE] to . 26 button will enter - recording under some types of CMOS image sensors. When a subject flits across in ...

HV30 Instruction Manual
Page 89
...recording you tried to play back a tape recorded in a different television - This message 24 DATE AND TIME appears each time you turn the camcorder off . (Appears only if a DV cable is connected) The video input signal is no memory card in a different television system (PAL or... TAPE END Tape reached the end. PLAYBACK STD LOCKED Current camcorder settings do not match the HDV/DV standard of 40 INCOMPATIBLE VIDEO the video input signal. CARD FULL Memory card is protected. CHANGE THE BATTERY Battery pack is incompatible with - Replace the cassette or change the...
...recording you tried to play back a tape recorded in a different television - This message 24 DATE AND TIME appears each time you turn the camcorder off . (Appears only if a DV cable is connected) The video input signal is no memory card in a different television system (PAL or... TAPE END Tape reached the end. PLAYBACK STD LOCKED Current camcorder settings do not match the HDV/DV standard of 40 INCOMPATIBLE VIDEO the video input signal. CARD FULL Memory card is protected. CHANGE THE BATTERY Battery pack is incompatible with - Replace the cassette or change the...
HV30 Instruction Manual
Page 91
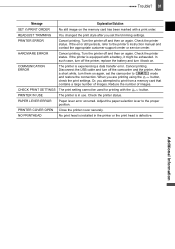
...Check the printer status. PRINTER COVER OPEN Close the printer cover securely. Additional Information Turn the printer off the printer, replace the battery and turn it might be used for printing with a print order. Check the printer status. Adjust the paper selection lever to the... printer's instruction manual and contact the appropriate customer support center or service center. Turn the printer off the camcorder and the printer. Cancel printing. Reduce the number of images. After a short while, turn off and then on again. PAPER...
...Check the printer status. PRINTER COVER OPEN Close the printer cover securely. Additional Information Turn the printer off the printer, replace the battery and turn it might be used for printing with a print order. Check the printer status. Adjust the paper selection lever to the... printer's instruction manual and contact the appropriate customer support center or service center. Turn the printer off the camcorder and the printer. Cancel printing. Reduce the number of images. After a short while, turn off and then on again. PAPER...


