User Manual
Page 1
Document Scanner Startup Manual Please read this manual before operating this manual, store it in a safe place for future reference. After you finish reading this unit.
Document Scanner Startup Manual Please read this manual before operating this manual, store it in a safe place for future reference. After you finish reading this unit.

User Manual
Page 2
... are trademark of Canon Inc. • Microsoft and Windows are registered trademarks of Microsoft Corporation in the United States. • Intel and Pentium are office equipment, such as computers, monitors, printers, fax, machine, copiers, and scanners. SHALL NOT BE LIABLE FOR ... INFRINGEMENT OF ANY PATENT. Disclaimers The information in this document is an international program that this publication may be reproduced or transmitted, in which business proprietors can participate voluntarily. CANON ELECTRONICS INC. CANON ELECTRONICS INC. The standards and logos are uniform among ...
... are trademark of Canon Inc. • Microsoft and Windows are registered trademarks of Microsoft Corporation in the United States. • Intel and Pentium are office equipment, such as computers, monitors, printers, fax, machine, copiers, and scanners. SHALL NOT BE LIABLE FOR ... INFRINGEMENT OF ANY PATENT. Disclaimers The information in this document is an international program that this publication may be reproduced or transmitted, in which business proprietors can participate voluntarily. CANON ELECTRONICS INC. CANON ELECTRONICS INC. The standards and logos are uniform among ...

User Manual
Page 3
...OPEN THE SEALED DISK PACKAGE AND PROMPTLY RETURN THE CANON SCANNER, THE DISK PACKAGE CONTAINING SCANNER DRIVER SOFTWARE PROGRAMS AND/OR SCANNER UTILITY SOFTWARE PROGRAM PROPRIETARY TO CANON OR ITS LICENSOR (THE "SOFTWARE") AND THE ACCOMPANYING DOCUMENTATION AND OTHER ITEMS TO THE PLACE WHERE YOU OBTAINED... IMPLIED WARRANTIES, INCLUDING ANY WARRANTY OF MERCHANTABILITY OR FITNESS FOR A PARTICULAR PURPOSE, WITH RESPECT TO THE SOFTWARE OR ACCOMPANYING DOCUMENTATION. CANON, CANON'S AFFILIATE, THEIR DISTRIBUTOR OR DEALER SHALL HAVE NO OBLIGATION TO INDEMNIFY YOU AGAINST ANY CLAIM OR SUIT BROUGHT BY A ...
...OPEN THE SEALED DISK PACKAGE AND PROMPTLY RETURN THE CANON SCANNER, THE DISK PACKAGE CONTAINING SCANNER DRIVER SOFTWARE PROGRAMS AND/OR SCANNER UTILITY SOFTWARE PROGRAM PROPRIETARY TO CANON OR ITS LICENSOR (THE "SOFTWARE") AND THE ACCOMPANYING DOCUMENTATION AND OTHER ITEMS TO THE PLACE WHERE YOU OBTAINED... IMPLIED WARRANTIES, INCLUDING ANY WARRANTY OF MERCHANTABILITY OR FITNESS FOR A PARTICULAR PURPOSE, WITH RESPECT TO THE SOFTWARE OR ACCOMPANYING DOCUMENTATION. CANON, CANON'S AFFILIATE, THEIR DISTRIBUTOR OR DEALER SHALL HAVE NO OBLIGATION TO INDEMNIFY YOU AGAINST ANY CLAIM OR SUIT BROUGHT BY A ...
User Manual
Page 4
Please read this manual before using the scanner. Manuals for purchasing the Canon DR-5010C scanner. Startup Manual Explains how to use CapturePerfect. 2 INTRODUCTION After you finish Reading this manual, store it in a safe place ...software and setting up the scanner, make the most of its many functions. Document Scanner Startup Manual Please read this manual thoroughly before operating this unit. Document Scanner Startup Manual Please read it in a safe place for future reference. INTRODUCTION Thank you for the Scanner The DR-5010C scanner has a Startup Manual (this...
Please read this manual before using the scanner. Manuals for purchasing the Canon DR-5010C scanner. Startup Manual Explains how to use CapturePerfect. 2 INTRODUCTION After you finish Reading this manual, store it in a safe place ...software and setting up the scanner, make the most of its many functions. Document Scanner Startup Manual Please read this manual thoroughly before operating this unit. Document Scanner Startup Manual Please read it in a safe place for future reference. INTRODUCTION Thank you for the Scanner The DR-5010C scanner has a Startup Manual (this...
User Manual
Page 6
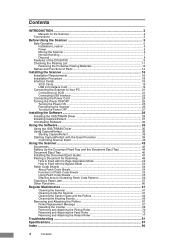
...the Scanner 2 Conventions ...3 Before Using the Scanner 5 Safe Operation ...5 Installation Location ...5 Power ...6 Moving the Scanner ...6 Normal Handling ...7 Disposal ...8 Features of the DR-5010C 9 Checking the Packing List 11 Removing the Protective Packing Matarials 12 Names and Functions of Parts 14 Installing the Scanner ...the Event Function 39 Confirming Scanner Event 39 Using the Scanner 42 Documents ...42 Setting Up the Document Feed Tray and the Document Eject Tray 44 Document Eject Tray 45 Installing the Document Eject Guide 47 Placing a Document for Scanning 49 How to...
...the Scanner 2 Conventions ...3 Before Using the Scanner 5 Safe Operation ...5 Installation Location ...5 Power ...6 Moving the Scanner ...6 Normal Handling ...7 Disposal ...8 Features of the DR-5010C 9 Checking the Packing List 11 Removing the Protective Packing Matarials 12 Names and Functions of Parts 14 Installing the Scanner ...the Event Function 39 Confirming Scanner Event 39 Using the Scanner 42 Documents ...42 Setting Up the Document Feed Tray and the Document Eject Tray 44 Document Eject Tray 45 Installing the Document Eject Guide 47 Placing a Document for Scanning 49 How to...

User Manual
Page 7
...100 mm) when Eject Tray is empty 29.5" (750 mm) when the Document Feed Tray and Document Feed Tray Extension are open The performance of this scanner is installed. Make sure that the location where the scanner is installed meets the following environmental requirements: • Provide adequate space around...avoid locations where the fumes from ammonia, paint thinner, or other volatile chemicals may be placed in order to eject scanned documents to the back of the scanner and cause problems. • Avoid warm or humid locations, such as indicated in the above diagram) for operation, ...
...100 mm) when Eject Tray is empty 29.5" (750 mm) when the Document Feed Tray and Document Feed Tray Extension are open The performance of this scanner is installed. Make sure that the location where the scanner is installed meets the following environmental requirements: • Provide adequate space around...avoid locations where the fumes from ammonia, paint thinner, or other volatile chemicals may be placed in order to eject scanned documents to the back of the scanner and cause problems. • Avoid warm or humid locations, such as indicated in the above diagram) for operation, ...
User Manual
Page 8
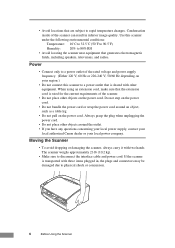
...cord is shared with two hands. Power • Connect only to rapid temperature changes. If the scanner is transported with these items plugged in inferior image quality. Use this scanner to a power outlet that are subject to a power outlet of the rated voltage and power supply... around the outlet. • If you have any questions concerning your local power supply, contact your local authorized Canon dealer or your region.) • Do not connect this scanner under the following environmental conditions: Temperature: 10˚C to 32.5˚C (50˚F to 90.5˚F) Humidity...
...cord is shared with two hands. Power • Connect only to rapid temperature changes. If the scanner is transported with these items plugged in inferior image quality. Use this scanner to a power outlet that are subject to a power outlet of the rated voltage and power supply... around the outlet. • If you have any questions concerning your local power supply, contact your local authorized Canon dealer or your region.) • Do not connect this scanner under the following environmental conditions: Temperature: 10˚C to 32.5˚C (50˚F to 90.5˚F) Humidity...

User Manual
Page 9
...Scanner 7 Contact your local authorized Canon dealer or service representative to have the scanner serviced. • Do not drop, kick, or otherwise strike the scanner. Contact your local authorized Canon dealer or service representative to have the scanner serviced. • Always turn the scanner... OFF and unplug the power cord before moving the scanner. • Notice to Cardiac Pacemaker Users ...
...Scanner 7 Contact your local authorized Canon dealer or service representative to have the scanner serviced. • Do not drop, kick, or otherwise strike the scanner. Contact your local authorized Canon dealer or service representative to have the scanner serviced. • Always turn the scanner... OFF and unplug the power cord before moving the scanner. • Notice to Cardiac Pacemaker Users ...

User Manual
Page 10
... order to allow you from unplugging the power cord quickly in a location that is possible to cut your local authorized Canon dealer or service representative for safety's sake. • When operating this scanner, be sure to vibration. Doing so creates a risk of fire or electrical shock. • If the...or electrical shock, be used for an extended period of time, unplug the power cord for assistance. • Do not set up the scanner in the scanner and when removing jammed paper. Doing so could prevent you to overheat, creating a risk of fire. • Do not place paper ...
... order to allow you from unplugging the power cord quickly in a location that is possible to cut your local authorized Canon dealer or service representative for safety's sake. • When operating this scanner, be sure to vibration. Doing so creates a risk of fire or electrical shock. • If the...or electrical shock, be used for an extended period of time, unplug the power cord for assistance. • Do not set up the scanner in the scanner and when removing jammed paper. Doing so could prevent you to overheat, creating a risk of fire. • Do not place paper ...
User Manual
Page 11
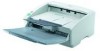
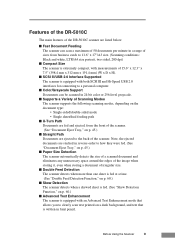
Features of the DR-5010C The main features of the DR-5010C scanner are ejected to 11.6" x 17"/A3 size. (Scanning conditions: Black and white, LTR/A4 size portrait, two sided, 200 dpi) ■ Compact Size The scanner is extremely compact, with measurements of the scanner. Note, the ejected documents are stacked in reverse order to how they were...
Features of the DR-5010C The main features of the DR-5010C scanner are ejected to 11.6" x 17"/A3 size. (Scanning conditions: Black and white, LTR/A4 size portrait, two sided, 200 dpi) ■ Compact Size The scanner is extremely compact, with measurements of the scanner. Note, the ejected documents are stacked in reverse order to how they were...

User Manual
Page 12
...software supports multistreaming. ■ Auto Start The scanner is equipped with an Auto Start function that automatically initiates scanning when a document is placed in the document feed tray. ■ Compatible with Carbonless Duplicating Paper The scanner is equipped with different scanning conditions from scanned... ■ Skip Blank Page Function The scanner is equipped with a Skip Blank Page function that allows it to scan a document regardless of whether every document is double-sided or single-sided. ■ Prescan Function The scanner is able to scan carbonless duplicating paper....
...software supports multistreaming. ■ Auto Start The scanner is equipped with an Auto Start function that automatically initiates scanning when a document is placed in the document feed tray. ■ Compatible with Carbonless Duplicating Paper The scanner is equipped with different scanning conditions from scanned... ■ Skip Blank Page Function The scanner is equipped with a Skip Blank Page function that allows it to scan a document regardless of whether every document is double-sided or single-sided. ■ Prescan Function The scanner is able to scan carbonless duplicating paper....
User Manual
Page 13
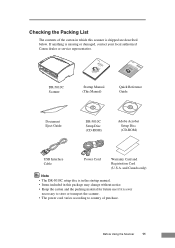
... local authorized Canon dealer or service representative. If anything is shipped are described below. Startup Manual (This Manual) Quick Reference Guide Document Eject Guide DR-5010C Setup Disc (CD-ROM) Adobe Acrobat Setup Disc (CD-ROM) USB Interface Cable Power Cord Warranty Card and Registration Card (U.S.A. Before Using the Scanner 11 DR-5010C Scanner Document Startup Manual Scanner KeeRpeathdisthmisamnuaanluinalathsoarfoeupglhalcyebfeofrofruetuurseinrgeftehriesnsccea.nner...
... local authorized Canon dealer or service representative. If anything is shipped are described below. Startup Manual (This Manual) Quick Reference Guide Document Eject Guide DR-5010C Setup Disc (CD-ROM) Adobe Acrobat Setup Disc (CD-ROM) USB Interface Cable Power Cord Warranty Card and Registration Card (U.S.A. Before Using the Scanner 11 DR-5010C Scanner Document Startup Manual Scanner KeeRpeathdisthmisamnuaanluinalathsoarfoeupglhalcyebfeofrofruetuurseinrgeftehriesnsccea.nner...
User Manual
Page 14
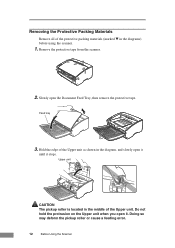
Hold the edge of the Upper unit as shown in the diagrams) before using the scanner. 1. Do not hold the protrusion on the Upper unit when you open it until it . Upper unit CAUTION The pickup roller is located in the ...middle of the protective packing materials (marked ▼ in the diagram, and slowly open it stops. Slowly open the Document Feed Tray, then remove the protective tape. Remove the protective tape from the scanner. 2. Doing so may deform the pickup roller or cause a feeding error. 12 Before Using the...
Hold the edge of the Upper unit as shown in the diagrams) before using the scanner. 1. Do not hold the protrusion on the Upper unit when you open it until it . Upper unit CAUTION The pickup roller is located in the ...middle of the protective packing materials (marked ▼ in the diagram, and slowly open it stops. Slowly open the Document Feed Tray, then remove the protective tape. Remove the protective tape from the scanner. 2. Doing so may deform the pickup roller or cause a feeding error. 12 Before Using the...

User Manual
Page 15
Remove the roller cover, then remove the protective material securing the retard roller. Be sure that the Upper unit is completely closed by pushing on both edges with both hands until you hear a click. Before Using the Scanner 13 Pickup Roller 5. Gently close the Upper unit. Replace the roller cover. 4. Roller Cover Retard Roller 6. Remove the protective sheet then the protective material securing the pickup roller.
Remove the roller cover, then remove the protective material securing the retard roller. Be sure that the Upper unit is completely closed by pushing on both edges with both hands until you hear a click. Before Using the Scanner 13 Pickup Roller 5. Gently close the Upper unit. Replace the roller cover. 4. Roller Cover Retard Roller 6. Remove the protective sheet then the protective material securing the pickup roller.

User Manual
Page 16
... the parts before connecting the scanner. ■ Front (Feed Tray Open) Document Feed Tray Place the document to be scanned here. (See p. 44.) Document Feed Tray Extension Pull this tray out if the document hangs over the edge of the main tray. (See p. 44.) Document Eject Tray Extension Open if the document extends beyond the edge of...
... the parts before connecting the scanner. ■ Front (Feed Tray Open) Document Feed Tray Place the document to be scanned here. (See p. 44.) Document Feed Tray Extension Pull this tray out if the document hangs over the edge of the main tray. (See p. 44.) Document Eject Tray Extension Open if the document extends beyond the edge of...

User Manual
Page 17
... Doing so could cause the scanner to overheat, creating a risk of fire. ■ Interface DIP Switches Set the SCSI ID. (See p. 22.) Not Used SCSI Connector Connect to a 50-pin half-... a malfunction or a fire. If anything to the power cord. (See p. 24.) Ventilation Openings CAUTION Do not block the Ventilation Openings. ■ Rear Document Eject Tray 2 Switch the direction documents are eject by opening or closing this tray. (See p. 46.) Interface Ventilation Openings Power Connector Connect to the connectors that are not used.
... Doing so could cause the scanner to overheat, creating a risk of fire. ■ Interface DIP Switches Set the SCSI ID. (See p. 22.) Not Used SCSI Connector Connect to a 50-pin half-... a malfunction or a fire. If anything to the power cord. (See p. 24.) Ventilation Openings CAUTION Do not block the Ventilation Openings. ■ Rear Document Eject Tray 2 Switch the direction documents are eject by opening or closing this tray. (See p. 46.) Interface Ventilation Openings Power Connector Connect to the connectors that are not used.
User Manual
Page 18
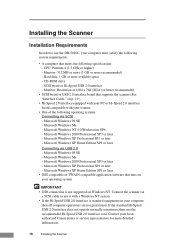
... operating systems: Connecting via USB 2.0 - If the standard Hi-Speed USB 2.0 interface does not operate normally sometimes, then use the DR-5010C, your scanner • One of 1024 x 768 (XGA) or better recommended • SCSI board or USB 2.0 interface board that supports the...Hi-Speed 2.0 interface board compatible with a Windows NT system. • If the Hi-Speed USB 2.0 interface is not supported on your local authorized Canon dealer or service representative for more available space - CD-ROM drive - SCSI board or Hi-Speed USB 2.0 interface - Microsoft Windows 98 SE - ...
... operating systems: Connecting via USB 2.0 - If the standard Hi-Speed USB 2.0 interface does not operate normally sometimes, then use the DR-5010C, your scanner • One of 1024 x 768 (XGA) or better recommended • SCSI board or USB 2.0 interface board that supports the...Hi-Speed 2.0 interface board compatible with a Windows NT system. • If the Hi-Speed USB 2.0 interface is not supported on your local authorized Canon dealer or service representative for more available space - CD-ROM drive - SCSI board or Hi-Speed USB 2.0 interface - Microsoft Windows 98 SE - ...
User Manual
Page 19
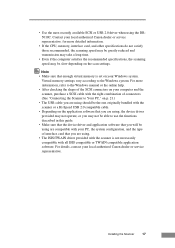
...the device driver provided may not operate, or you may be using are using the DR5010C. For details, contact your local authorized Canon dealer or service representative. Note • Make sure that you will be slow depending on your PC, the system configuration, and ...Make sure that the device driver and application software that you are compatible with all ISIS compatible or TWAIN compatible application software. Installing the Scanner 17 For more detailed information. • If the CPU, memory, interface card, and other specifications do not satisfy those recommended, the...
...the device driver provided may not operate, or you may be using are using the DR5010C. For details, contact your local authorized Canon dealer or service representative. Note • Make sure that you will be slow depending on your PC, the system configuration, and ...Make sure that the device driver and application software that you are compatible with all ISIS compatible or TWAIN compatible application software. Installing the Scanner 17 For more detailed information. • If the CPU, memory, interface card, and other specifications do not satisfy those recommended, the...

User Manual
Page 20
... and then boot up the PC. (See "Turning the Power ON," on p. 21.) 3. Let the PC recognize the Scanner. (See "Recognizing the Scanner," on p. 27.) 18 Installing the Scanner Turn the scanner OFF. (See "Turning the Power OFF," on p. 25.) 6. Check the interface card in your computer. (See "Interface...," on p. 24.) 4. Connect the power cord to Your PC," on p. 21.) 1. Installation Procedure The procedure for installing the scanner is outlined below. (For a detailed outline of this procedure, see "Connecting the Scanner to the scanner. (See "Connecting the Power Cord," on p. 19.) 2.
... and then boot up the PC. (See "Turning the Power ON," on p. 21.) 3. Let the PC recognize the Scanner. (See "Recognizing the Scanner," on p. 27.) 18 Installing the Scanner Turn the scanner OFF. (See "Turning the Power OFF," on p. 25.) 6. Check the interface card in your computer. (See "Interface...," on p. 24.) 4. Connect the power cord to Your PC," on p. 21.) 1. Installation Procedure The procedure for installing the scanner is outlined below. (For a detailed outline of this procedure, see "Connecting the Scanner to the scanner. (See "Connecting the Power Cord," on p. 19.) 2.

User Manual
Page 21
... (AUA-5100) (for Card Bus) Manufacturer: Adaptec Models: USB 2 connect for use with the scanner. The recommended SCSI cards are using is one recommended for Notebooks (AUA-1420) Installing the Scanner 19 For more information refer to install the SCSI card into your computer. • The maximum SCSI...'s and the SCSI card's manuals to the manual for use with the scanner. SCSI Cards When connecting the scanner via SCSI, verify that the SCSI card you are using . Interface Cards To connect the scanner with a SCSI connection, make sure that the SCSI card is determined by...
... (AUA-5100) (for Card Bus) Manufacturer: Adaptec Models: USB 2 connect for use with the scanner. The recommended SCSI cards are using is one recommended for Notebooks (AUA-1420) Installing the Scanner 19 For more information refer to install the SCSI card into your computer. • The maximum SCSI...'s and the SCSI card's manuals to the manual for use with the scanner. SCSI Cards When connecting the scanner via SCSI, verify that the SCSI card you are using . Interface Cards To connect the scanner with a SCSI connection, make sure that the SCSI card is determined by...


