User Manual
Page 3
..., the SOFTWARE is a violation of the SOFTWARE. U.S. a hard disk) of ninety (90) days from the date you to restrictions as set forth in either subparagraph (c) (1) (ii) of the Rights in effect until terminated. SEVERABILITY: In the event that court or tribunal and all... NOT OPEN THE SEALED DISK PACKAGE AND PROMPTLY RETURN THE CANON SCANNER, THE DISK PACKAGE CONTAINING SCANNER DRIVER SOFTWARE PROGRAMS AND/OR SCANNER UTILITY SOFTWARE PROGRAM PROPRIETARY TO CANON OR ITS LICENSOR (THE "SOFTWARE") AND THE ACCOMPANYING DOCUMENTATION AND OTHER ITEMS TO THE PLACE WHERE YOU OBTAINED THEM FOR...
..., the SOFTWARE is a violation of the SOFTWARE. U.S. a hard disk) of ninety (90) days from the date you to restrictions as set forth in either subparagraph (c) (1) (ii) of the Rights in effect until terminated. SEVERABILITY: In the event that court or tribunal and all... NOT OPEN THE SEALED DISK PACKAGE AND PROMPTLY RETURN THE CANON SCANNER, THE DISK PACKAGE CONTAINING SCANNER DRIVER SOFTWARE PROGRAMS AND/OR SCANNER UTILITY SOFTWARE PROGRAM PROPRIETARY TO CANON OR ITS LICENSOR (THE "SOFTWARE") AND THE ACCOMPANYING DOCUMENTATION AND OTHER ITEMS TO THE PLACE WHERE YOU OBTAINED THEM FOR...
User Manual
Page 4
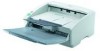
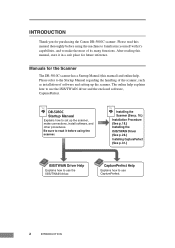
...a safe place for future reference. Document Scanner Startup Manual Please read it before operating this unit. Be sure to the Startup Manual regarding the handling of the scanner, such as installation of software and setting up the scanner, make the most of its many...Help Explains how to set up the scanner. INTRODUCTION Thank you finish Reading this manual, store it in a safe place for future reference. After you for purchasing the Canon DR-5010C scanner. After reading this manual, store it in a safe place for the Scanner The DR-5010C scanner has a Startup Manual...
...a safe place for future reference. Document Scanner Startup Manual Please read it before operating this unit. Be sure to the Startup Manual regarding the handling of the scanner, such as installation of software and setting up the scanner, make the most of its many...Help Explains how to set up the scanner. INTRODUCTION Thank you finish Reading this manual, store it in a safe place for future reference. After you for purchasing the Canon DR-5010C scanner. After reading this manual, store it in a safe place for the Scanner The DR-5010C scanner has a Startup Manual...
User Manual
Page 6
... Scanner 2 Conventions ...3 Before Using the Scanner 5 Safe Operation ...5 Installation Location ...5 Power ...6 Moving the Scanner ...6 Normal Handling ...7 Disposal ...8 Features of the DR-5010C 9 Checking the Packing List 11 Removing the Protective Packing Matarials 12 Names and Functions of Parts 14 Installing the Scanner ... the Event Function 39 Confirming Scanner Event 39 Using the Scanner 42 Documents ...42 Setting Up the Document Feed Tray and the Document Eject Tray 44 Document Eject Tray 45 Installing the Document Eject Guide 47 Placing a Document for Scanning 49 How to ...
... Scanner 2 Conventions ...3 Before Using the Scanner 5 Safe Operation ...5 Installation Location ...5 Power ...6 Moving the Scanner ...6 Normal Handling ...7 Disposal ...8 Features of the DR-5010C 9 Checking the Packing List 11 Removing the Protective Packing Matarials 12 Names and Functions of Parts 14 Installing the Scanner ... the Event Function 39 Confirming Scanner Event 39 Using the Scanner 42 Documents ...42 Setting Up the Document Feed Tray and the Document Eject Tray 44 Document Eject Tray 45 Installing the Document Eject Guide 47 Placing a Document for Scanning 49 How to ...

User Manual
Page 10
...and laws or consult with the retailer who sold you are wearing a necktie or have long hair. The scanner could get pulled into the scanner. CAUTION • Do not set the scanner up on a wobbly platform, a sloped surface, or any other material that some article or clothing does...of the scanner, unplug the power cord immediately, and then contact your local authorized Canon dealer or service representative for safety's sake. • When operating this scanner, be used for an extended period of time, unplug the power cord for assistance. • Do not set up the scanner in a...
...and laws or consult with the retailer who sold you are wearing a necktie or have long hair. The scanner could get pulled into the scanner. CAUTION • Do not set the scanner up on a wobbly platform, a sloped surface, or any other material that some article or clothing does...of the scanner, unplug the power cord immediately, and then contact your local authorized Canon dealer or service representative for safety's sake. • When operating this scanner, be used for an extended period of time, unplug the power cord for assistance. • Do not set up the scanner in a...

User Manual
Page 17
... the power cord. (See p. 24.) Ventilation Openings CAUTION Do not block the Ventilation Openings. Before Using the Scanner 15 Doing so could cause the scanner to overheat, creating a risk of fire. ■ Interface DIP Switches Set the SCSI ID. (See p. 22.) Not Used SCSI Connector Connect to a 50-pin half-pitch (pin type... supports Hi-Speed USB 2.0. (See p. 23.) CAUTION Do not connect anything is plugged into those connectors it may result in a malfunction or a fire. ■ Rear Document Eject Tray 2 Switch the direction...
... the power cord. (See p. 24.) Ventilation Openings CAUTION Do not block the Ventilation Openings. Before Using the Scanner 15 Doing so could cause the scanner to overheat, creating a risk of fire. ■ Interface DIP Switches Set the SCSI ID. (See p. 22.) Not Used SCSI Connector Connect to a 50-pin half-pitch (pin type... supports Hi-Speed USB 2.0. (See p. 23.) CAUTION Do not connect anything is plugged into those connectors it may result in a malfunction or a fire. ■ Rear Document Eject Tray 2 Switch the direction...
User Manual
Page 19
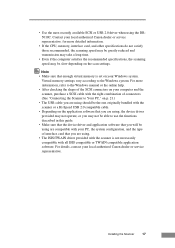
... a SCSI cable with the right combination of the SCSI connectors on the scan settings. Installing the Scanner 17 For details, contact your local authorized Canon dealer or service representative. Contact your local authorized Canon dealer or service representative. For more detailed information. • If the CPU, ...be able to the Windows system. Note • Make sure that you are using should be the one originally bundled with the scanner or a Hi-Speed USB 2.0 compatible cable. • Depending on the application software that enough virtual memory is not necessarily ...
... a SCSI cable with the right combination of the SCSI connectors on the scan settings. Installing the Scanner 17 For details, contact your local authorized Canon dealer or service representative. Contact your local authorized Canon dealer or service representative. For more detailed information. • If the CPU, ...be able to the Windows system. Note • Make sure that you are using should be the one originally bundled with the scanner or a Hi-Speed USB 2.0 compatible cable. • Depending on the application software that enough virtual memory is not necessarily ...
User Manual
Page 24
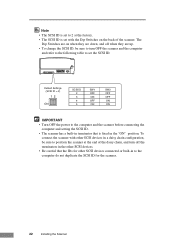
... OFF ON OFF ON SW2 OFF OFF ON ON IMPORTANT • Turn OFF the power to the computer and the scanner before connecting the computer and setting the SCSI ID. • The scanner has a built-in terminator that the IDs for other SCSI devices in a daisy chain configuration, be sure to the computer... do not duplicate the SCSI ID for the scanner. 22 Installing the Scanner Note • The SCSI ID is set to 2 at the end of the scanner. The Dip Switches are on the back of the daisy chain, and turn off when they are up...
... OFF ON OFF ON SW2 OFF OFF ON ON IMPORTANT • Turn OFF the power to the computer and the scanner before connecting the computer and setting the SCSI ID. • The scanner has a built-in terminator that the IDs for other SCSI devices in a daisy chain configuration, be sure to the computer... do not duplicate the SCSI ID for the scanner. 22 Installing the Scanner Note • The SCSI ID is set to 2 at the end of the scanner. The Dip Switches are on the back of the daisy chain, and turn off when they are up...

User Manual
Page 40
Note Details about actually using CapturePerfect, click [Help] on the [File] menu to configure scanning parameters, see ISIS/TWAIN driver help . On the Scan menu, click [Scanner Setting] and then configure scanning parameters. Note For details about using CapturePerfect can be found in CapturePerfect help . (See p. 35.) 7. After scanning is complete, select [Exit] on the menu bar. 8. To view information about how to quit CapturePerfect. 38 Using the Software Execute the scan operation from the [Scan] menu. 6.
Note Details about actually using CapturePerfect, click [Help] on the [File] menu to configure scanning parameters, see ISIS/TWAIN driver help . On the Scan menu, click [Scanner Setting] and then configure scanning parameters. Note For details about using CapturePerfect can be found in CapturePerfect help . (See p. 35.) 7. After scanning is complete, select [Exit] on the menu bar. 8. To view information about how to quit CapturePerfect. 38 Using the Software Execute the scan operation from the [Scan] menu. 6.

User Manual
Page 46
Hold the middle of the Document Feed Tray and slowly open it toward you. Pull out the Document Feed Tray Extension when scanning large documents. 44 Using the Scanner CAUTION Do not place anything other than documents on the Document Feed Tray. Doing so may damage the scanner, reduce scanning quality, or cause the feed tray to fall off and injure someone. 2. Setting Up the Document Feed Tray and the Document Eject Tray 1.
Hold the middle of the Document Feed Tray and slowly open it toward you. Pull out the Document Feed Tray Extension when scanning large documents. 44 Using the Scanner CAUTION Do not place anything other than documents on the Document Feed Tray. Doing so may damage the scanner, reduce scanning quality, or cause the feed tray to fall off and injure someone. 2. Setting Up the Document Feed Tray and the Document Eject Tray 1.

User Manual
Page 52
It is possible to cut your hand on top of paper. 3. CAUTION • Do not place the documents on the edge of a sheet of the scanner to align them. Set the Document Guides so they touch the stoppers. 50 Using the Scanner Place the documents face up into the Document Feed Tray and so they are wider than the document to be scanned. 4. 2. Doing so may cause a malfunction. • Be careful when placing a document in the scanner. Straighten the edges of the document to be scanned.
It is possible to cut your hand on top of paper. 3. CAUTION • Do not place the documents on the edge of a sheet of the scanner to align them. Set the Document Guides so they touch the stoppers. 50 Using the Scanner Place the documents face up into the Document Feed Tray and so they are wider than the document to be scanned. 4. 2. Doing so may cause a malfunction. • Be careful when placing a document in the scanner. Straighten the edges of the document to be scanned.

User Manual
Page 54
... on the lower left side of the front of the Document Guides. 3. Place the document into the Document Feed Tray one sheet at a time and adjust the position of the scanner down . • The ISIS/TWAIN Driver settings change to the manual feed mode automatically when the Feed ...Selection Lever is fed. 52 Using the Scanner The document is lowered. 2. Document Stopper Note • Lowering the Feed Selection Lever causes the Document Stoppers to Feed with ...
... on the lower left side of the front of the Document Guides. 3. Place the document into the Document Feed Tray one sheet at a time and adjust the position of the scanner down . • The ISIS/TWAIN Driver settings change to the manual feed mode automatically when the Feed ...Selection Lever is fed. 52 Using the Scanner The document is lowered. 2. Document Stopper Note • Lowering the Feed Selection Lever causes the Document Stoppers to Feed with ...

User Manual
Page 55
...; After you set the edge that are not fastened together on the leading edge of the documents when you finish scanning, close the Document Feed Tray and the Document Eject Tray Extension to prevent damage to get your fingers stuck in the pickup roller. Using the Scanner 53 IMPORTANT • When scanning documents that are fastened...
...; After you set the edge that are not fastened together on the leading edge of the documents when you finish scanning, close the Document Feed Tray and the Document Eject Tray Extension to prevent damage to get your fingers stuck in the pickup roller. Using the Scanner 53 IMPORTANT • When scanning documents that are fastened...

User Manual
Page 57
... [PATCH T (LTR)] 2. Inserting Patch Code Sheets Load patch code sheets in front of the document where a file separator is to a separate file. Using the Scanner 55 Note, however, that is saved to be inserted before scanning. Print out the patch code... sheets on a printer. Use paper that the setting is ignored, and this sheet is separated after this sheet. Functions of Patch Code Sheets • Patch Code Patterns PATCH T (FILE A) When this sheet is detected, the document...
... [PATCH T (LTR)] 2. Inserting Patch Code Sheets Load patch code sheets in front of the document where a file separator is to a separate file. Using the Scanner 55 Note, however, that is saved to be inserted before scanning. Print out the patch code... sheets on a printer. Use paper that the setting is ignored, and this sheet is separated after this sheet. Functions of Patch Code Sheets • Patch Code Patterns PATCH T (FILE A) When this sheet is detected, the document...

User Manual
Page 58
... sheets is in any way. Extremely dark or light copies may not scan correctly. • When you copy the originals, adjust the size and density settings to match the originals. Also, take care to avoid staining or marking the effective area for detecting patch code patterns. Take special care to avoid...) IMPORTANT • When you copy the originals, adjust them so that the patch code pattern is neither too light nor too dark. 56 Using the Scanner
... sheets is in any way. Extremely dark or light copies may not scan correctly. • When you copy the originals, adjust the size and density settings to match the originals. Also, take care to avoid staining or marking the effective area for detecting patch code patterns. Take special care to avoid...) IMPORTANT • When you copy the originals, adjust them so that the patch code pattern is neither too light nor too dark. 56 Using the Scanner
User Manual
Page 70
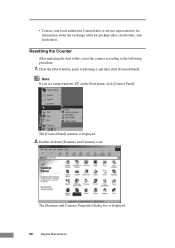
... the feed rollers, reset the counter according to [Settings], and then click [Control Panel]. Note If you are using windows XP, on the Start menu, click [Control Panel]. Double-click the [Scanners and Cameras] icon. The [Scanners and Cameras Properties] dialog box is displayed. 2.... The [Control Panel] window is displayed. 68 Regular Maintenance • Contact your local authorized Canon dealer or service representative for information about the ...
... the feed rollers, reset the counter according to [Settings], and then click [Control Panel]. Note If you are using windows XP, on the Start menu, click [Control Panel]. Double-click the [Scanners and Cameras] icon. The [Scanners and Cameras Properties] dialog box is displayed. 2.... The [Control Panel] window is displayed. 68 Regular Maintenance • Contact your local authorized Canon dealer or service representative for information about the ...

User Manual
Page 71
Regular Maintenance 69 Press the [Reset] button, and then make sure that the counter for the scanner you are using. 4. 3. Click the [Counter] tab. 5. Click on [Properties] for the Roller being used is set to 0.
Regular Maintenance 69 Press the [Reset] button, and then make sure that the counter for the scanner you are using. 4. 3. Click the [Counter] tab. 5. Click on [Properties] for the Roller being used is set to 0.
User Manual
Page 84
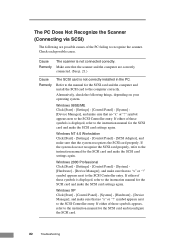
... Panel] - [System] [Hardware] - [Device Manager], and make the SCSI card settings again. Windows 98SE/ME Click [Start] - [Settings] - [Control Panel] - [System] [Device Manager], and make the SCSI card settings again. If either of the PC failing to recognize the scanner. symbol appears next to the instruction manual for the SCSI card and reconfigure the...
... Panel] - [System] [Hardware] - [Device Manager], and make the SCSI card settings again. Windows 98SE/ME Click [Start] - [Settings] - [Control Panel] - [System] [Device Manager], and make the SCSI card settings again. If either of the PC failing to recognize the scanner. symbol appears next to the instruction manual for the SCSI card and reconfigure the...

User Manual
Page 85
...on p. 81 and check to the system and set a unique SCSI ID for the scanner. (See p. 22.) Cause Remedy The terminator is not set correctly. Cause Remedy The scanner's SCSI ID is identical to the SCSI ID of all SCSI devices connected to see if the scanner is ON. Check the SCSI IDs of another... SCSI device that is not compatible with the scanner. If the scanner is not ON, shut down...
...on p. 81 and check to the system and set a unique SCSI ID for the scanner. (See p. 22.) Cause Remedy The terminator is not set correctly. Cause Remedy The scanner's SCSI ID is identical to the SCSI ID of all SCSI devices connected to see if the scanner is ON. Check the SCSI IDs of another... SCSI device that is not compatible with the scanner. If the scanner is not ON, shut down...

User Manual
Page 87
... not support Hi-Speed 2.0. Check each possible cause. Contact your local authorized Canon dealer or service representative to page 62 and clean the rollers. Scanning Is Slow (Connecting via USB 2.0) The following if the scanner does not scan an image even though the scanning operation is being performed:...with one that the last document scanned was scanned correctly when scanning continues. Remove the USB HUB or replace it back ON. Has the application software been set up correctly? • Is there a problem in the scanner not functioning at all, turn OFF the scanner and wait at least ...
... not support Hi-Speed 2.0. Check each possible cause. Contact your local authorized Canon dealer or service representative to page 62 and clean the rollers. Scanning Is Slow (Connecting via USB 2.0) The following if the scanner does not scan an image even though the scanning operation is being performed:...with one that the last document scanned was scanned correctly when scanning continues. Remove the USB HUB or replace it back ON. Has the application software been set up correctly? • Is there a problem in the scanner not functioning at all, turn OFF the scanner and wait at least ...
User Manual
Page 88
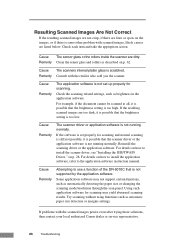
... your local authorized Canon dealer or service representative. 86 Troubleshooting Check the scanning related settings, such as automatic paper size detection or margins settings. Some application software.... For example, if the document cannot be scanned at all, it is possible that is scratched. Cause Remedy The scanner driver or application software is not...DR-5010C that the brightness setting is not set properly for scanning may not support certain functions, such as described on p. 28. If the resulting scanned images are too dark, it is possible that the scanner...
... your local authorized Canon dealer or service representative. 86 Troubleshooting Check the scanning related settings, such as automatic paper size detection or margins settings. Some application software.... For example, if the document cannot be scanned at all, it is possible that is scratched. Cause Remedy The scanner driver or application software is not...DR-5010C that the brightness setting is not set properly for scanning may not support certain functions, such as described on p. 28. If the resulting scanned images are too dark, it is possible that the scanner...


