User Manual
Page 4
... Settings for Black-and-White Scanning 31 Creating Smaller Files 32 Saving the Text Data of the Scanner 62 Cleaning the Sensor Glass and the Rollers 63 2. Uninstalling Software 75 Uninstalling the ISIS/TWAIN Driver and Job Registration Tool 75 Uninstalling CapturePerfect 3.0 76 Chapter 8 Appendix 77 Specifications 77 Replacement Parts 78 External Dimensions 79 INDEX 81 4 DR-2010C / DR-2510C ISIS/TWAIN Driver Properties Dialog Box 38 Scan Mode Settings 39 Auto Color Detection 40 Paper Size Settings 41 Scan Resolution Settings 42 Scanning Side Settings 42 Correcting Image...
... Settings for Black-and-White Scanning 31 Creating Smaller Files 32 Saving the Text Data of the Scanner 62 Cleaning the Sensor Glass and the Rollers 63 2. Uninstalling Software 75 Uninstalling the ISIS/TWAIN Driver and Job Registration Tool 75 Uninstalling CapturePerfect 3.0 76 Chapter 8 Appendix 77 Specifications 77 Replacement Parts 78 External Dimensions 79 INDEX 81 4 DR-2010C / DR-2510C ISIS/TWAIN Driver Properties Dialog Box 38 Scan Mode Settings 39 Auto Color Detection 40 Paper Size Settings 41 Scan Resolution Settings 42 Scanning Side Settings 42 Correcting Image...
User Manual
Page 10
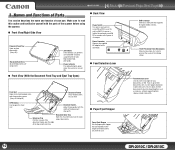
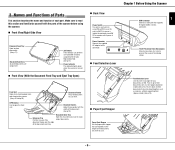
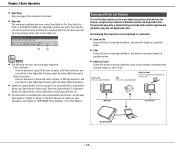
...; Feed Selection Lever Front Unit Open when clearing paper jams and cleaning the scanner. (See p.33 and p.65) Document Feeder Place the document to scan. If you want to stack output documents. „ Paper Eject Stopper Paper Eject Stopper Use the paper eject stopper that are output here. Document Guides Adjust these guides to fit the width of the document eject tray. Power Connector Connect the supplied AC adapter to turn the scanner ON and OFF. Job Buttons These buttons can...
...; Feed Selection Lever Front Unit Open when clearing paper jams and cleaning the scanner. (See p.33 and p.65) Document Feeder Place the document to scan. If you want to stack output documents. „ Paper Eject Stopper Paper Eject Stopper Use the paper eject stopper that are output here. Document Guides Adjust these guides to fit the width of the document eject tray. Power Connector Connect the supplied AC adapter to turn the scanner ON and OFF. Job Buttons These buttons can...

User Manual
Page 32
... scan a document that the file size is selected for the Page Size setting, black areas may appear around the scanned document image. Scanning Both Sides of Pages • To scan both sides of CapturePerfect 3.0, and then click [High compression] in the scanner. 32 DR-2010C / DR-2510C Click [OCR Settings] in the [Feeding Option] box, scanning does not start until you have placed them in [Mode]. For more information on setting the scanning conditions, see "Chapter 4 ISIS/ TWAIN Driver Settings," on setting the scanning conditions...
... scan a document that the file size is selected for the Page Size setting, black areas may appear around the scanned document image. Scanning Both Sides of Pages • To scan both sides of CapturePerfect 3.0, and then click [High compression] in the scanner. 32 DR-2010C / DR-2510C Click [OCR Settings] in the [Feeding Option] box, scanning does not start until you have placed them in [Mode]. For more information on setting the scanning conditions, see "Chapter 4 ISIS/ TWAIN Driver Settings," on setting the scanning conditions...

User Manual
Page 43
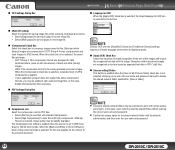
... Separation] box of the image to be adjusted according to detect slanted document pages and straighten the scanned images. 1 In the ISIS/TWAIN driver properties dialog box, click the [Basic] tab → select the [Deskew] check box. y You cannot click [Folio] if you click [Patchcode] in the [Gamma Settings] dialog box. y Selecting [Skip Blank Page] enables the [Setting] button, which opens the [Blank Skip Setting] dialog box. y If a scanning side setting (simplex or duplex) is not saved.
... Separation] box of the image to be adjusted according to detect slanted document pages and straighten the scanned images. 1 In the ISIS/TWAIN driver properties dialog box, click the [Basic] tab → select the [Deskew] check box. y You cannot click [Folio] if you click [Patchcode] in the [Gamma Settings] dialog box. y Selecting [Skip Blank Page] enables the [Setting] button, which opens the [Blank Skip Setting] dialog box. y If a scanning side setting (simplex or duplex) is not saved.

User Manual
Page 58
... [Setting] button. „ [Setting] Button This button is enabled to display the corresponding setting dialog box when the [TIFF] or [PDF] file format is selected. 58 DR-2010C / DR-2510C Settings to Save Image Files NOTE For more information on the scanner settings, see Chapter 4, "ISIS/TWAIN Driver Settings." „ [Save Image] Check Box This check box appears when [Attach to E-mail] is selected in the [My Documents] folder. File names may consist of scanning. „ File type Select the file format for saved files from...
... [Setting] button. „ [Setting] Button This button is enabled to display the corresponding setting dialog box when the [TIFF] or [PDF] file format is selected. 58 DR-2010C / DR-2510C Settings to Save Image Files NOTE For more information on the scanner settings, see Chapter 4, "ISIS/TWAIN Driver Settings." „ [Save Image] Check Box This check box appears when [Attach to E-mail] is selected in the [My Documents] folder. File names may consist of scanning. „ File type Select the file format for saved files from...
User Manual
Page 59
Black and white (binary) images are compressed in CCITT Group 4 format, and grayscale and color images in the list box. „ [Multi-tiff setting] Select the method for saving image files when scanning multi-page documents. JPEG: This compression format is for data communications (such as appended text data in PDF (*pdf) files. „ [Access setting] Button This button is enabled when the [Save to My Pictures folder] check box is not selected, allowing you may be unable to...
Black and white (binary) images are compressed in CCITT Group 4 format, and grayscale and color images in the list box. „ [Multi-tiff setting] Select the method for saving image files when scanning multi-page documents. JPEG: This compression format is for data communications (such as appended text data in PDF (*pdf) files. „ [Access setting] Button This button is enabled when the [Save to My Pictures folder] check box is not selected, allowing you may be unable to...
User Manual
Page 70
... Control Panel (Classic View) 70 DR-2010C / DR-2510C Contents Back Previous Page Next Page Resetting the Counter After replacing the feed rollers, open the counter settings dialog box and reset the counter. 1 From the Windows task bar, click [Start] → [Control Panel]. If the Control Panel is displayed with the Category View, switch to Classic View. 3 Double-click [Scanners and Cameras]. 2 Double-click [Printers and Other Hardware] in the working field → click [Scanners and Cameras]. 4 Right-click [CANON DR-2510C USB] or [CANON DR-2010C USB...
... Control Panel (Classic View) 70 DR-2010C / DR-2510C Contents Back Previous Page Next Page Resetting the Counter After replacing the feed rollers, open the counter settings dialog box and reset the counter. 1 From the Windows task bar, click [Start] → [Control Panel]. If the Control Panel is displayed with the Category View, switch to Classic View. 3 Double-click [Scanners and Cameras]. 2 Double-click [Printers and Other Hardware] in the working field → click [Scanners and Cameras]. 4 Right-click [CANON DR-2510C USB] or [CANON DR-2010C USB...

User Manual
Page 73
... Feed Properly The following are running in the scanner not functioning at least ten seconds before turning it ON again. If the error continues to occur, restart the computer. • When scanning continues, make sure that the scanner driver or application software is not compatible with the scanner, see "1. Check the size, thickness, and weight of documents that are using does not support Hi-Speed USB 2.0. The USB...
... Feed Properly The following are running in the scanner not functioning at least ten seconds before turning it ON again. If the error continues to occur, restart the computer. • When scanning continues, make sure that the scanner driver or application software is not compatible with the scanner, see "1. Check the size, thickness, and weight of documents that are using does not support Hi-Speed USB 2.0. The USB...
User Manual
Page 74
... Problem Solution A multi-page TIFF file saved in the scanned image. If the TIFF file saved in CapturePerfect 3.0. The scanning glass or rollers inside the scanner may be opened by the application was used . Symptoms Problem Solution The scanned image is too dark (or faint.) The [Brightness] setting is set to [Duplex]. Problem [Scanning Side] is set a lower [Brightness] setting. Clean the rollers (See p.63.). Set a higher [Brightness] setting. For information on removing jammed documents, see "Clearing a Paper Jam," on the rear side of the paper size. 74 DR-2010C...
... Problem Solution A multi-page TIFF file saved in the scanned image. If the TIFF file saved in CapturePerfect 3.0. The scanning glass or rollers inside the scanner may be opened by the application was used . Symptoms Problem Solution The scanned image is too dark (or faint.) The [Brightness] setting is set to [Duplex]. Problem [Scanning Side] is set a lower [Brightness] setting. Clean the rollers (See p.63.). Set a higher [Brightness] setting. For information on removing jammed documents, see "Clearing a Paper Jam," on the rear side of the paper size. 74 DR-2010C...

User Manual
Page 78
... adapter only) Approximately 0.3 kg (including power cord) Contents Back Previous Page Next Page Replacement Parts Exchange roller kit (product code: 2445B001) Kit to change without AC adapter) Approximately 5.3 lb (2.4 kg). Product specifications are subject to replace the rollers (retard roller, feeding roller) and document holding guide, see "Removing/Attaching the Feeding Roller," on p. 65. z Contact your local authorized Canon dealer or service representative for detailed information about the replacement parts. 300 x 300 dpi 50 images/min.(DR-2510C), 40 images/min.(DR-2010C...
... adapter only) Approximately 0.3 kg (including power cord) Contents Back Previous Page Next Page Replacement Parts Exchange roller kit (product code: 2445B001) Kit to change without AC adapter) Approximately 5.3 lb (2.4 kg). Product specifications are subject to replace the rollers (retard roller, feeding roller) and document holding guide, see "Removing/Attaching the Feeding Roller," on p. 65. z Contact your local authorized Canon dealer or service representative for detailed information about the replacement parts. 300 x 300 dpi 50 images/min.(DR-2510C), 40 images/min.(DR-2010C...
User Manual
Page 82
...10 O OPEN button ...10 Operating system 11 P Page Separation mode 21 Paper jam, clearing 33 Power connector 10 Power indicator 10 Power switch ...10 Practical examples 32 Preparing the scanner 20 Document eject tray 20 Document feed tray 20 Document stopper 20 R Recognizing the scanner by computer 16 Replacement parts 78 Retard roller Attaching 68 Removing 67 Roller, replacing Counter, resetting 70 Replacement cycle 65 S Scan Panel ...28 Scanning methods 25 Service ...72 Setup disc ...12 Custom Installation 12 Read Manuals 12 Typical Installation 12 Software Installing 12...
...10 O OPEN button ...10 Operating system 11 P Page Separation mode 21 Paper jam, clearing 33 Power connector 10 Power indicator 10 Power switch ...10 Practical examples 32 Preparing the scanner 20 Document eject tray 20 Document feed tray 20 Document stopper 20 R Recognizing the scanner by computer 16 Replacement parts 78 Retard roller Attaching 68 Removing 67 Roller, replacing Counter, resetting 70 Replacement cycle 65 S Scan Panel ...28 Scanning methods 25 Service ...72 Setup disc ...12 Custom Installation 12 Read Manuals 12 Typical Installation 12 Software Installing 12...

Reference Guide
Page 3
... Roller 31 Removing/Attaching the Document Holding Guide 33 Resetting the Counter 34 3. Setup Disc 8 Chapter 2 Basic Operation 9 1. Documents 9 2. Clearing a Paper Jam 22 7. Troubleshooting 35 4. Practical Examples 21 6. Regular Maintenance 26 Cleaning the Scanner 26 Cleaning the Inside of the DR-2010C/DR-2510C Document Scanner 4 3. Features of the Scanner 26 Cleaning the Sensor Glass and the Rollers 27 2. Important Safety Instructions 1 Installation Location 1 AC Adapter 2 Moving the Scanner 2 Handling 3 Disposal 4 2. Specifications 38 Specifications...
... Roller 31 Removing/Attaching the Document Holding Guide 33 Resetting the Counter 34 3. Setup Disc 8 Chapter 2 Basic Operation 9 1. Documents 9 2. Clearing a Paper Jam 22 7. Troubleshooting 35 4. Practical Examples 21 6. Regular Maintenance 26 Cleaning the Scanner 26 Cleaning the Inside of the DR-2010C/DR-2510C Document Scanner 4 3. Features of the Scanner 26 Cleaning the Sensor Glass and the Rollers 27 2. Important Safety Instructions 1 Installation Location 1 AC Adapter 2 Moving the Scanner 2 Handling 3 Disposal 4 2. Specifications 38 Specifications...
Reference Guide
Page 9
... Unit Open when clearing paper jams and cleaning the scanner. (See p.22 and p.29) Document Feeder Place the document to be automatically turned ON/ OFF in accordance with the power of the document eject tray. OPEN button Use to feed documents one at a time (page separation mode) (See p.12). Make sure to read this lever to place documents. (See p.11) Document Eject Area Scanned documents are fed. Feed Selection Lever Use this section and familiarize yourself with the Job Registration Tool...
... Unit Open when clearing paper jams and cleaning the scanner. (See p.22 and p.29) Document Feeder Place the document to be automatically turned ON/ OFF in accordance with the power of the document eject tray. OPEN button Use to feed documents one at a time (page separation mode) (See p.12). Make sure to read this lever to place documents. (See p.11) Document Eject Area Scanned documents are fed. Feed Selection Lever Use this section and familiarize yourself with the Job Registration Tool...

Reference Guide
Page 19
... scanning using the CapturePerfect 3.0 software included with the scanner, scanning using the Folio function for an irregular document size, click the [Basic] tab of the ISIS/TWAIN driver → click [Auto-detection] in the User Manual.) • The maximum size for Canon document scanners. Select the desired scan mode from the Scan menu to perform scanning. • Scan Batch to File Documents are scanned with the preset scanning conditions, and the scanned image data is saved to a specified folder. • Scan Batch to Print Documents are scanned...
... scanning using the CapturePerfect 3.0 software included with the scanner, scanning using the Folio function for an irregular document size, click the [Basic] tab of the ISIS/TWAIN driver → click [Auto-detection] in the User Manual.) • The maximum size for Canon document scanners. Select the desired scan mode from the Scan menu to perform scanning. • Scan Batch to File Documents are scanned with the preset scanning conditions, and the scanned image data is saved to a specified folder. • Scan Batch to Print Documents are scanned...
Reference Guide
Page 20
... Tool. Binary Document Scan the document in black-and-white, simplex, at 300 dpi resolution, and save the file in the folder [My Pictures] under the folder [My Documents]. Read the CapturePerfect 3.0 Operation Guide and CapturePerfect Online Help before using 24-bit color, simplex, at 200 dpi resolution, and save the file in the User Manual. Color Document Scan the document using CapturePerfect 3.0. • For information on installing the various applications and drivers, see Chapter 4, "ISIS/TWAIN Driver Settings," in the User Manual...
... Tool. Binary Document Scan the document in black-and-white, simplex, at 300 dpi resolution, and save the file in the folder [My Pictures] under the folder [My Documents]. Read the CapturePerfect 3.0 Operation Guide and CapturePerfect Online Help before using 24-bit color, simplex, at 200 dpi resolution, and save the file in the User Manual. Color Document Scan the document using CapturePerfect 3.0. • For information on installing the various applications and drivers, see Chapter 4, "ISIS/TWAIN Driver Settings," in the User Manual...

Reference Guide
Page 24
... PDF Files You can specify security settings to apply OCR. Scanning Both Sides of Pages • To scan both sides of pages Select [Duplex] for scanning documents An irregular document size not already registered as a page size selection can be used when searching the text on setting the scanning conditions, see Chapter 4, "ISIS/TWAIN Driver Settings," in the User Manual. When this option is useful if you press the Scan button. This is selected, the scanner detects documents and starts scanning as the [Page Size...
... PDF Files You can specify security settings to apply OCR. Scanning Both Sides of Pages • To scan both sides of pages Select [Duplex] for scanning documents An irregular document size not already registered as a page size selection can be used when searching the text on setting the scanning conditions, see Chapter 4, "ISIS/TWAIN Driver Settings," in the User Manual. When this option is useful if you press the Scan button. This is selected, the scanner detects documents and starts scanning as the [Page Size...

Reference Guide
Page 39
... the application software been set up correctly? • Is there a problem in the TEMP folder, as there is not compatible with the scanner. IMPORTANT • If documents are not scanned normally even if the scanner setup is OK, a probable cause is that are using does not support Hi-Speed USB 2.0. Re-install the scanner driver or application software. • When system errors result in the Page Separation Mode," on the...
... the application software been set up correctly? • Is there a problem in the TEMP folder, as there is not compatible with the scanner. IMPORTANT • If documents are not scanned normally even if the scanner setup is OK, a probable cause is that are using does not support Hi-Speed USB 2.0. Re-install the scanner driver or application software. • When system errors result in the Page Separation Mode," on the...

Reference Guide
Page 42
... Replacement Parts Exchange roller kit (product code: 2445B001) Kit to change without notice. Product specifications are subject to replace the rollers (retard roller, feeding roller) and document holding guide. • For information on replacing the rollers, see "Removing/Attaching the Feeding Roller," on p. 29 and "Removing/Attaching the Retard Roller," on p. 31. • For information on replacing the document holding guide, see "Removing/ Attaching the Document Holding Guide," on p. 33. • Contact your local authorized Canon dealer or service representative...
... Replacement Parts Exchange roller kit (product code: 2445B001) Kit to change without notice. Product specifications are subject to replace the rollers (retard roller, feeding roller) and document holding guide. • For information on replacing the rollers, see "Removing/Attaching the Feeding Roller," on p. 29 and "Removing/Attaching the Retard Roller," on p. 31. • For information on replacing the document holding guide, see "Removing/ Attaching the Document Holding Guide," on p. 33. • Contact your local authorized Canon dealer or service representative...

Easy Start Guide
Page 1
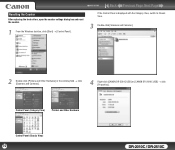
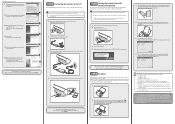
... lock the feed roller shaft (2). 1. DR-2010C/DR-2510C Feed Roller USB Cable Type A/Type B AC Adapter/Power Cord (Length: 6 ft. (1.8 m)) (Connected length: 8 ft. 6 in. (2.6 m)) Easy Start Guide (this manual may also be trademarks or registered trademarks of the roller (1), and push down the roller lock lever to use . ( STEP2) Trademarks Canon and the Canon logo are installed. 7. and Canada only) 4. Lower the roller lock lever (1), and slide it contains all other applications before connecting the scanner to install the scanner software...
... lock the feed roller shaft (2). 1. DR-2010C/DR-2510C Feed Roller USB Cable Type A/Type B AC Adapter/Power Cord (Length: 6 ft. (1.8 m)) (Connected length: 8 ft. 6 in. (2.6 m)) Easy Start Guide (this manual may also be trademarks or registered trademarks of the roller (1), and push down the roller lock lever to use . ( STEP2) Trademarks Canon and the Canon logo are installed. 7. and Canada only) 4. Lower the roller lock lever (1), and slide it contains all other applications before connecting the scanner to install the scanner software...
Easy Start Guide
Page 2
.... Make sure that the power switch of the software. 10. Connect the power cord to complete the installation of the job button can be changed. Plug the AC adapter into the connector located on with a 17-digit file name. Windows automatically recognizes the DR-2010C/DR-2510C as follows: Job Button 1: Start Job Button 2: Stop Job Button 3: Save to the conditions of the scanner is turned OFF. 1. Connect the USB cable included with a USB cable. With this scanner, scanning can be performed with the Job Function," in the User Manual. Open the document feed tray...
.... Make sure that the power switch of the software. 10. Connect the power cord to complete the installation of the job button can be changed. Plug the AC adapter into the connector located on with a 17-digit file name. Windows automatically recognizes the DR-2010C/DR-2510C as follows: Job Button 1: Start Job Button 2: Stop Job Button 3: Save to the conditions of the scanner is turned OFF. 1. Connect the USB cable included with a USB cable. With this scanner, scanning can be performed with the Job Function," in the User Manual. Open the document feed tray...


