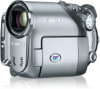

DC40 Instruction Manual
Page 2
... • Consult the dealer or an experienced radio/TV technician for class B digital device, pursuant to stop operation of the FCC Rules. Use of shielded cable ... of important operating and maintenance (servicing) instructions in a particular installation. Inc. DVD Camcorder, DC40 A systems This device complies with arrowhead symbol, within the product's enclosure, that interference... FIRE OR ELECTRIC SHOCK, DO NOT EXPOSE THIS PRODUCT TO RAIN OR MOISTURE. Canon U.S.A. COPYRIGHT WARNING: Unauthorized recording of copyrighted materials may cause harmful interference to comply...
... • Consult the dealer or an experienced radio/TV technician for class B digital device, pursuant to stop operation of the FCC Rules. Use of shielded cable ... of important operating and maintenance (servicing) instructions in a particular installation. Inc. DVD Camcorder, DC40 A systems This device complies with arrowhead symbol, within the product's enclosure, that interference... FIRE OR ELECTRIC SHOCK, DO NOT EXPOSE THIS PRODUCT TO RAIN OR MOISTURE. Canon U.S.A. COPYRIGHT WARNING: Unauthorized recording of copyrighted materials may cause harmful interference to comply...

DC40 Instruction Manual
Page 7
...DVD media, contact directly the manufacturer's customer support center. • Attempting to record or play with this camcorder DVD discs that were recorded, initialized or finalized with other digital devices can result in lost data. • You need to unfinalize the disc first. • Recommended... Discs: This camcorder's performance was tested using them for recording - 90 Giving a title to the disc 91 ...
...DVD media, contact directly the manufacturer's customer support center. • Attempting to record or play with this camcorder DVD discs that were recorded, initialized or finalized with other digital devices can result in lost data. • You need to unfinalize the disc first. • Recommended... Discs: This camcorder's performance was tested using them for recording - 90 Giving a title to the disc 91 ...

DC40 Instruction Manual
Page 13
Date of the Digital Video Software instruction manual on PDF file. The serial number of this book as a permanent record of your purchase to aid identification in case of the camcorder. Write down the number and other information here and retain this product can be found ... IFC-300PCU USB Cable Blank DVD-R Disc (8 cm Mini DVD) DIGITAL VIDEO SOLUTION DISK Software CD-ROM* Introduction Roxio MyDVD for Canon Software CD-ROM Ferrite Core (Asia only) * Includes the electronic version of Purchase: Model Name: DC40 A Purchased From: Serial No.: Dealer Address: Dealer Phone No.:...
Date of the Digital Video Software instruction manual on PDF file. The serial number of this book as a permanent record of your purchase to aid identification in case of the camcorder. Write down the number and other information here and retain this product can be found ... IFC-300PCU USB Cable Blank DVD-R Disc (8 cm Mini DVD) DIGITAL VIDEO SOLUTION DISK Software CD-ROM* Introduction Roxio MyDVD for Canon Software CD-ROM Ferrite Core (Asia only) * Includes the electronic version of Purchase: Model Name: DC40 A Purchased From: Serial No.: Dealer Address: Dealer Phone No.:...
DC40 Instruction Manual
Page 18
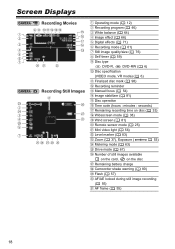
Screen Displays Recording Movies Recording Still Images Operating mode ( 12) Recording program ( 46) White balance ( 64) Image effect ( 66) Digital effects ( 71) Recording mode ( 61) Still image quality/size ( 76) Self timer ( 59) Disc type DVD-R, DVD-RW ( 6) Disc specification (VIDEO mode, VR mode) ( 6) Finalized... 83) Zoom ( 37), Exposure ( 53) Metering mode ( 63) Drive mode ( 67) Number of still images available on the card, on the disc Remaining battery charge Camcorder shake warning ( 80) Flash ( 57) AF/AE locked during still image recording ( 55) AF frame ( 55) 18
Screen Displays Recording Movies Recording Still Images Operating mode ( 12) Recording program ( 46) White balance ( 64) Image effect ( 66) Digital effects ( 71) Recording mode ( 61) Still image quality/size ( 76) Self timer ( 59) Disc type DVD-R, DVD-RW ( 6) Disc specification (VIDEO mode, VR mode) ( 6) Finalized... 83) Zoom ( 37), Exposure ( 53) Metering mode ( 63) Drive mode ( 67) Number of still images available on the card, on the disc Remaining battery charge Camcorder shake warning ( 80) Flash ( 57) AF/AE locked during still image recording ( 55) AF frame ( 55) 18

DC40 Instruction Manual
Page 37
... can focus on a subject as close as with the wireless controller will be the same as 1 cm (0.39 in.). The zoom speed with the camcorder (when one of three fixed zoom speeds or a variable speed that depends on the wireless controller. Basic Functions Recording 37 You can also use the... 200x digital zoom E Zoom out Zoom in 10x Optical Zoom Move the zoom lever toward T to zoom in (telephoto). Move it toward W to zoom out (...
... can focus on a subject as close as with the wireless controller will be the same as 1 cm (0.39 in.). The zoom speed with the camcorder (when one of three fixed zoom speeds or a variable speed that depends on the wireless controller. Basic Functions Recording 37 You can also use the... 200x digital zoom E Zoom out Zoom in 10x Optical Zoom Move the zoom lever toward T to zoom in (telephoto). Move it toward W to zoom out (...

DC40 Instruction Manual
Page 60
... setting the [SET] option for the white balance function ( 64), the [CUSTOM] option for the image effect function ( 66), or the [MULTI-S] option for the digital effect function ( 73). 4. Press the FUNC. Refer to change. 3. button 1. Changing Settings with the ChangingtheFUNC.Settings FUNC. Press the FUNC. button. Multi Selector In ...the recording modes ( or ): 2. Use the multi selector ( ) to save the settings and close the menu. The symbols of the camcorder's functions can be adjusted from the menu that opens after pressing the FUNC.
... setting the [SET] option for the white balance function ( 64), the [CUSTOM] option for the image effect function ( 66), or the [MULTI-S] option for the digital effect function ( 73). 4. Press the FUNC. Refer to change. 3. button 1. Changing Settings with the ChangingtheFUNC.Settings FUNC. Press the FUNC. button. Multi Selector In ...the recording modes ( or ): 2. Use the multi selector ( ) to save the settings and close the menu. The symbols of the camcorder's functions can be adjusted from the menu that opens after pressing the FUNC.

DC40 Instruction Manual
Page 65
... Depending on the light source, may keep flashing. Changing lighting conditions - If the color looks unnatural, adjust it off the digital zoom. The camcorder retains the custom white balance setting even if you turn it using [AUTO] or [SET]. When you have set the ...custom white balance: - The result will still be obtained with the [AUTO] setting. - Close-ups - Settings • Keep the camcorder zoomed at the white object until step 5 is completed. • flashes and stops flashing when the adjustment is complete. 5. Reset the white balance when...
... Depending on the light source, may keep flashing. Changing lighting conditions - If the color looks unnatural, adjust it off the digital zoom. The camcorder retains the custom white balance setting even if you turn it using [AUTO] or [SET]. When you have set the ...custom white balance: - The result will still be obtained with the [AUTO] setting. - Close-ups - Settings • Keep the camcorder zoomed at the white object until step 5 is completed. • flashes and stops flashing when the adjustment is complete. 5. Reset the white balance when...

DC40 Instruction Manual
Page 72
... . ) and set the mode 2. Fade out: Press the start /stop button in a small animation at the right corner of the bottom bar. 5. Set the camcorder to record movies ( dial to save the setting and close the menu. Press the FUNC. Fade in: Press the start /stop button in record pause...to select again the still image for the Card Mix effect. The symbol of 4, 9 or 16 still images and displays them . The camcorder retains the setting last used even if you turn off the digital effects [D.EFFECT OFF] when you will be shown in record mode. 72 First, select ( ) the current...
... . ) and set the mode 2. Fade out: Press the start /stop button in a small animation at the right corner of the bottom bar. 5. Set the camcorder to record movies ( dial to save the setting and close the menu. Press the FUNC. Fade in: Press the start /stop button in record pause...to select again the still image for the Card Mix effect. The symbol of 4, 9 or 16 still images and displays them . The camcorder retains the setting last used even if you turn off the digital effects [D.EFFECT OFF] when you will be shown in record mode. 72 First, select ( ) the current...

DC40 Instruction Manual
Page 73
...a small animation at the right corner of the selected effect appears. 6. button to step 5. 4. The symbol of the bottom bar. 5. Set the camcorder to record movies ( dial to a position other than . 2. button. 3. Using the Multi-Image Screen ( 60) D.EFFECT OFF 1. When recording still...Selecting an Effect D.EFFECT OFF ( 60) E 1. Select ( ) an effect from the bottom bar and press ( ). First, select ( ) the current digital effects symbol from the left side column and then select ( ) the [ EFFECT] option from the list. Press the FUNC. Press the D.EFFECTS button. ...
...a small animation at the right corner of the selected effect appears. 6. button to step 5. 4. The symbol of the bottom bar. 5. Set the camcorder to record movies ( dial to a position other than . 2. button. 3. Using the Multi-Image Screen ( 60) D.EFFECT OFF 1. When recording still...Selecting an Effect D.EFFECT OFF ( 60) E 1. Select ( ) an effect from the bottom bar and press ( ). First, select ( ) the current digital effects symbol from the left side column and then select ( ) the [ EFFECT] option from the list. Press the FUNC. Press the D.EFFECTS button. ...

DC40 Instruction Manual
Page 75
...the FUNC. Refer to Adding Still Images from Your Computer to close the menu. Press the FUNC. button to the Memory Card in the Digital Video Software instruction manual (electronic version on the memory card while the Card Mix function is activated. Set the mode dial to record movies (... left side column and then select ( ) the [ CARD MIX] option from the supplied CD-ROM to save the settings and press the FUNC. Set the camcorder to a position other than . 4. button E Multi Selector ( 60) D.EFFECT OFF 1. Select ( ) the [IMAGE SELECT] option, and then select ( still image ...
...the FUNC. Refer to Adding Still Images from Your Computer to close the menu. Press the FUNC. button to the Memory Card in the Digital Video Software instruction manual (electronic version on the memory card while the Card Mix function is activated. Set the mode dial to record movies (... left side column and then select ( ) the [ CARD MIX] option from the supplied CD-ROM to save the settings and press the FUNC. Set the camcorder to a position other than . 4. button E Multi Selector ( 60) D.EFFECT OFF 1. Select ( ) the [IMAGE SELECT] option, and then select ( still image ...

DC40 Instruction Manual
Page 78
Set the camcorder to save the setting and close the menu. 5. First, select ( ) the current image recording symbol from the left side column and then select ( ) the desired ... on the disc. The quality of the still image is slightly lower than a still image of the same size recorded in Widescreen or while a digital effect is activated. 78
Set the camcorder to save the setting and close the menu. 5. First, select ( ) the current image recording symbol from the left side column and then select ( ) the desired ... on the disc. The quality of the still image is slightly lower than a still image of the same size recorded in Widescreen or while a digital effect is activated. 78

DC40 Instruction Manual
Page 80
... - WIND SCREEN ON , OFF - D.ZOOM: Determines the operation of the digital zoom. When the digital zoom is activated, the camcorder will switch automatically to the digital zoom when you zoom in beyond the optical zoom range. With the digital zoom the image is digitally processed, so image resolution will deteriorate the more you zoom...
... - WIND SCREEN ON , OFF - D.ZOOM: Determines the operation of the digital zoom. When the digital zoom is activated, the camcorder will switch automatically to the digital zoom when you zoom in beyond the optical zoom range. With the digital zoom the image is digitally processed, so image resolution will deteriorate the more you zoom...

DC40 Instruction Manual
Page 98
..., let the camcorder cool off before resuming operation. Place the camcorder on a table or other digital device, you need to unfinalize the disc first. Doing so can be started if the camcorder is powered only with the camcorder discs that were not recorded using this camcorder. ...scenes beforehand ( 95). Be sure to finalize the disc in permanent data loss. When finalizing a disc, always power the camcorder using the MENU button ( 79). Unfinalizing the Disc - - 98 The finalization process cannot be able to initialize the disc, edit your still images...
..., let the camcorder cool off before resuming operation. Place the camcorder on a table or other digital device, you need to unfinalize the disc first. Doing so can be started if the camcorder is powered only with the camcorder discs that were not recorded using this camcorder. ...scenes beforehand ( 95). Be sure to finalize the disc in permanent data loss. When finalizing a disc, always power the camcorder using the MENU button ( 79). Unfinalizing the Disc - - 98 The finalization process cannot be able to initialize the disc, edit your still images...

DC40 Instruction Manual
Page 104
... copy and pause playback shortly before the scene. 4. Stop recording when copying is complete. 6. This camcorder: Locate the scene you wish to play movies ( disc. ) and load a recorded 2. This camcorder: Stop playback. We recommend powering the camcorder using the compact power adapter. By default, the on a TV Screen ( 102). 1. Connected... screen displays or select the data that will be embedded in the output video signal, but you can copy your recordings by connecting the camcorder to a VCR or a digital video device. This camcorder: Resume the movie playback. 5.
... copy and pause playback shortly before the scene. 4. Stop recording when copying is complete. 6. This camcorder: Locate the scene you wish to play movies ( disc. ) and load a recorded 2. This camcorder: Stop playback. We recommend powering the camcorder using the compact power adapter. By default, the on a TV Screen ( 102). 1. Connected... screen displays or select the data that will be embedded in the output video signal, but you can copy your recordings by connecting the camcorder to a VCR or a digital video device. This camcorder: Resume the movie playback. 5.
DC40 Instruction Manual
Page 110
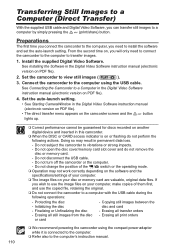
...Still Images to a Computer (Direct Transfer) With the supplied USB cable and Digital Video Software, you need to connect the camcorder to the computer to transfer images. 1. Connect the camcorder to a Computer in this camcorder. When the DISC or CARD access indicator is connected to the... file). • The direct transfer menu appears on the camcorder screen and the button lights up. Correct performance cannot be guaranteed for discs recorded on another digital device and inserted in the Digital Video Software instruction manual (electronic version on , you wish ...
...Still Images to a Computer (Direct Transfer) With the supplied USB cable and Digital Video Software, you need to connect the camcorder to the computer to transfer images. 1. Connect the camcorder to a Computer in this camcorder. When the DISC or CARD access indicator is connected to the... file). • The direct transfer menu appears on the camcorder screen and the button lights up. Correct performance cannot be guaranteed for discs recorded on another digital device and inserted in the Digital Video Software instruction manual (electronic version on , you wish ...

DC40 Instruction Manual
Page 111
...ORDERS... Allows you to select the still image you to download still images (JPEG only) by simply connecting the camcorder to a computer via USB cable without installing the software from the DIGITAL VIDEO SOLUTION DISK. Press the button. • [ SELECT & TRANSFER]: The selected image is transferred and displayed...8226; Press the MENU button to return to the transfer menu. 111 Users of Windows XP and Mac OS X: Your camcorder is equipped with transfer orders to the computer. NEW IMAGES... Transfers all images to transfer. 4. Select ( ) a transfer option. 2.
...ORDERS... Allows you to select the still image you to download still images (JPEG only) by simply connecting the camcorder to a computer via USB cable without installing the software from the DIGITAL VIDEO SOLUTION DISK. Press the button. • [ SELECT & TRANSFER]: The selected image is transferred and displayed...8226; Press the MENU button to return to the transfer menu. 111 Users of Windows XP and Mac OS X: Your camcorder is equipped with transfer orders to the computer. NEW IMAGES... Transfers all images to transfer. 4. Select ( ) a transfer option. 2.

DC40 Instruction Manual
Page 113
... MENU button and use the multi selector ( the [STILL IMG OPER.] menu and then select the [ ORDER] option. , ) to the camcorder while setting the transfer orders. ( 60) TRANSFER ORDER 1. Press the MENU button to select other images as a transfer order. External Connections Connecting... to [ON] and press ( ). The stills index screen appears with the Digital Print Order Format (DPOF) standards. Set the camcorder to transfer and press ( ). Set it ( ) to a Computer 113 Bring ( , ) the cursor to the image...
... MENU button and use the multi selector ( the [STILL IMG OPER.] menu and then select the [ ORDER] option. , ) to the camcorder while setting the transfer orders. ( 60) TRANSFER ORDER 1. Press the MENU button to select other images as a transfer order. External Connections Connecting... to [ON] and press ( ). The stills index screen appears with the Digital Print Order Format (DPOF) standards. Set the camcorder to transfer and press ( ). Set it ( ) to a Computer 113 Bring ( , ) the cursor to the image...

DC40 Instruction Manual
Page 115
...the disc - Erasing all still images from a disc recorded on the printer. 4. Canon printers: SELPHY CP, SELPHY DS and PIXMA printers Connecting the Camcorder to view still images ( ). 2. Set the camcorder to the Printer Open the terminal cover USB Cable (supplied) PictBridge compatible printer 1. ... correctly connected to . You can be recognized. - Copying still images between the disc and card - Turn on another digital device and inserted in this camcorder. • The (print/share) button lights up and the current print setting will not be connected to print. ...
...the disc - Erasing all still images from a disc recorded on the printer. 4. Canon printers: SELPHY CP, SELPHY DS and PIXMA printers Connecting the Camcorder to view still images ( ). 2. Set the camcorder to the Printer Open the terminal cover USB Cable (supplied) PictBridge compatible printer 1. ... correctly connected to . You can be recognized. - Copying still images between the disc and card - Turn on another digital device and inserted in this camcorder. • The (print/share) button lights up and the current print setting will not be connected to print. ...

DC40 Instruction Manual
Page 120
...copies as a print order. Set ( ) the desired number of copies and press ( ). • and the selected number of copies to 0. 5. Set the camcorder to view still images recorded on the memory card, and set the number of copies appear on the memory card ( / ). 2. Press the MENU button to... copies and press ( ). The stills index screen appears with up to select PRINT ORDER] 4. These print order settings are compatible with the Digital Print Order Format (DPOF) standards and can be selected. Setting Print Orders from the Index Screen MENU ( 79) STILL IMG OPER. Up...
...copies as a print order. Set ( ) the desired number of copies and press ( ). • and the selected number of copies to 0. 5. Set the camcorder to view still images recorded on the memory card, and set the number of copies appear on the memory card ( / ). 2. Press the MENU button to... copies and press ( ). The stills index screen appears with up to select PRINT ORDER] 4. These print order settings are compatible with the Digital Print Order Format (DPOF) standards and can be selected. Setting Print Orders from the Index Screen MENU ( 79) STILL IMG OPER. Up...

Digital Video Software (Windows) Ver.21 Instruction Manual
Page 100
...folders. 1. Double-click [dbconverter.exe]. 3. Select the database you installed ZoomBrowser EX 4 or higher (C:\Program Files\ Canon\ZoomBrowser EX\Program). 2. If [Hide extensions for Canon digital camcorders starting with a prior version than ZoomBrowser EX version 4 do not appear in ZoomBrowser EX 4 or higher. Î... Files] folder (such as "0" or "1" will have the same number as the [Oem*.inf] file. Please note that contains "*** Canon Camera Driver Setup File***" in the comment list. If You Were Using ZoomBrowser EX Version 2 or 3 (This manual explains version 5.x) ...
...folders. 1. Double-click [dbconverter.exe]. 3. Select the database you installed ZoomBrowser EX 4 or higher (C:\Program Files\ Canon\ZoomBrowser EX\Program). 2. If [Hide extensions for Canon digital camcorders starting with a prior version than ZoomBrowser EX version 4 do not appear in ZoomBrowser EX 4 or higher. Î... Files] folder (such as "0" or "1" will have the same number as the [Oem*.inf] file. Please note that contains "*** Canon Camera Driver Setup File***" in the comment list. If You Were Using ZoomBrowser EX Version 2 or 3 (This manual explains version 5.x) ...


