ZoomBrowser EX 6.5 for Windows Instruction Manual
Page 5
... Appendices Exporting...33 Changing Image (Stills) Sizes and Types 33 Changing Movie Sizes and Types 33 Extracting Stills from Movies...34 Exporting Shooting Information 34 Creating Computer Screen Saver Images 35 Creating Computer Wallpaper Images 35 Saving to CDs...36 Uploading Movies to YouTube 37 Uploading to YouTube...37 Email...38 Attaching Images to Email...38 Slide Shows...39 Viewing Images in Slide Shows...39 Image Management...40 Changing File Names in Batches...
... Appendices Exporting...33 Changing Image (Stills) Sizes and Types 33 Changing Movie Sizes and Types 33 Extracting Stills from Movies...34 Exporting Shooting Information 34 Creating Computer Screen Saver Images 35 Creating Computer Wallpaper Images 35 Saving to CDs...36 Uploading Movies to YouTube 37 Uploading to YouTube...37 Email...38 Attaching Images to Email...38 Slide Shows...39 Viewing Images in Slide Shows...39 Image Management...40 Changing File Names in Batches...
ZoomBrowser EX 6.5 for Windows Instruction Manual
Page 53
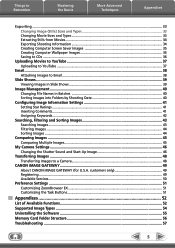
... Techniques Appendices Task Button Names Edit Image Edit Export Print & Email Stitch Photos Edit Movie Digital Photo Professional Process RAW Images Export Still Images Export Movies Extract frames from a movie Export Shooting Properties Export as a Screen Saver Export as a Wallpaper Backup to CD Photo Print Index Print Print Using Other Software Email Images Register/Add Product CANON iMAGE GATEWAY Top Page View Online Photo Album Upload Images Download My Camera Contents Description of Function Allows you...
... Techniques Appendices Task Button Names Edit Image Edit Export Print & Email Stitch Photos Edit Movie Digital Photo Professional Process RAW Images Export Still Images Export Movies Extract frames from a movie Export Shooting Properties Export as a Screen Saver Export as a Wallpaper Backup to CD Photo Print Index Print Print Using Other Software Email Images Register/Add Product CANON iMAGE GATEWAY Top Page View Online Photo Album Upload Images Download My Camera Contents Description of Function Allows you...
DC40 Instruction Manual
Page 11
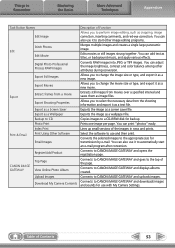
... MENU button to turning the camcorder on and off, the power switch also toggles the camcorder's operating mode. To turn on the screen. "Screen" refers to be operated Step 6: Setting the Time Zone, Date and Time Setting the Time Zone/Daylight Saving Time MENU ( 79) D/TIME SETUP T.ZONE/DST NEW YORK 1. green indicator). 11 Conventions Used in the Manual : Precautions related to the camcorder operation. : Additional topics that complement the basic operating procedures. : Reference page number...
... MENU button to turning the camcorder on and off, the power switch also toggles the camcorder's operating mode. To turn on the screen. "Screen" refers to be operated Step 6: Setting the Time Zone, Date and Time Setting the Time Zone/Daylight Saving Time MENU ( 79) D/TIME SETUP T.ZONE/DST NEW YORK 1. green indicator). 11 Conventions Used in the Manual : Precautions related to the camcorder operation. : Additional topics that complement the basic operating procedures. : Reference page number...
DC40 Instruction Manual
Page 18
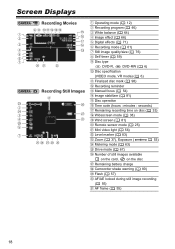
... Self timer ( 59) Disc type DVD-R, DVD-RW ( 6) Disc specification (VIDEO mode, VR mode) ( 6) Finalized disc mark ( 98) Recording reminder Manual focus ( 54) Image stabilizer ( 81) Disc operation Time code (hours : minutes : seconds) Remaining recording time on disc ( 33) Widescreen mode ( 38) Wind screen ( 81) Remote sensor mode ( 25) Mini video light ( 56) Level marker ( 83) Zoom ( 37), Exposure ( 53) Metering mode ( 63) Drive mode ( 67) Number of still images available on the card, on the disc Remaining battery charge Camcorder shake warning ( 80) Flash ( 57) AF/AE...
... Self timer ( 59) Disc type DVD-R, DVD-RW ( 6) Disc specification (VIDEO mode, VR mode) ( 6) Finalized disc mark ( 98) Recording reminder Manual focus ( 54) Image stabilizer ( 81) Disc operation Time code (hours : minutes : seconds) Remaining recording time on disc ( 33) Widescreen mode ( 38) Wind screen ( 81) Remote sensor mode ( 25) Mini video light ( 56) Level marker ( 83) Zoom ( 37), Exposure ( 53) Metering mode ( 63) Drive mode ( 67) Number of still images available on the card, on the disc Remaining battery charge Camcorder shake warning ( 80) Flash ( 57) AF/AE...

DC40 Instruction Manual
Page 32
... message will be asked to confirm the disc specification you press the OPEN switch after pressing the OPEN switch for the disc cover to start recording. You will appear on the screen. The display will take a moment after recording, important data is on or flashing do not subject the camcorder to shocks such as forcefully laying it stops. • Do not subject the camcorder to set the camcorder in CAMERA mode ( 11...
... message will be asked to confirm the disc specification you press the OPEN switch after pressing the OPEN switch for the disc cover to start recording. You will appear on the screen. The display will take a moment after recording, important data is on or flashing do not subject the camcorder to shocks such as forcefully laying it stops. • Do not subject the camcorder to set the camcorder in CAMERA mode ( 11...
DC40 Instruction Manual
Page 33
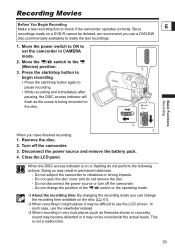
... use the LCD screen. Move the power switch to ON to check if the camcorder operates correctly. Turn off the camcorder. - Disconnect the power source and remove the battery pack. 4. Since E recordings made on the disc. Do not disconnect the power source or turn off the camcorder. 3. Close the LCD panel. When the DISC access indicator is on the disc ( 61). When recording in CAMERA mode. 2. Basic Functions Recording Recording Movies Before You Begin Recording Make a test recording first to set...
... use the LCD screen. Move the power switch to ON to check if the camcorder operates correctly. Turn off the camcorder. - Disconnect the power source and remove the battery pack. 4. Since E recordings made on the disc. Do not disconnect the power source or turn off the camcorder. 3. Close the LCD panel. When the DISC access indicator is on the disc ( 61). When recording in CAMERA mode. 2. Basic Functions Recording Recording Movies Before You Begin Recording Make a test recording first to set...

DC40 Instruction Manual
Page 84
..., select the setting according to save power when the camcorder is powered by a battery pack, it already contains image files, a new image will accompany some operations like turning on a computer. If the memory card or disc already contains an image with the wireless controller. We recommend using the [CONTINUOUS] setting. The [FILE NOS.] setting is useful for organizing images on the camcorder, the selftimer countdown, etc. Date/Time Setup DATE/TIME SETUP Menu Items Setting Options CAMERA PLAY T.ZONE/DST DATE/TIME DATE FORMAT Y.M.D (2006.1.1 AM12...
..., select the setting according to save power when the camcorder is powered by a battery pack, it already contains image files, a new image will accompany some operations like turning on a computer. If the memory card or disc already contains an image with the wireless controller. We recommend using the [CONTINUOUS] setting. The [FILE NOS.] setting is useful for organizing images on the camcorder, the selftimer countdown, etc. Date/Time Setup DATE/TIME SETUP Menu Items Setting Options CAMERA PLAY T.ZONE/DST DATE/TIME DATE FORMAT Y.M.D (2006.1.1 AM12...
DC40 Instruction Manual
Page 86
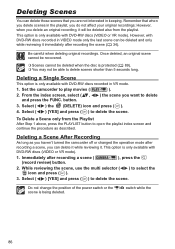
... Step 1 above, press the PLAYLIST button to open the playlist index screen and continue the procedure as you haven't turned the camcorder off or changed the operation mode after recording a scene ( (record review) button. ), press the 2. However, when you can delete it while reviewing it. Set the camcorder to select the 3. While reviewing the scene, use the multi selector ( icon and press ( ). ) to play movies ( ). 2. Select ( ) the (DELETE) icon and press ( ). 4.
... Step 1 above, press the PLAYLIST button to open the playlist index screen and continue the procedure as you haven't turned the camcorder off or changed the operation mode after recording a scene ( (record review) button. ), press the 2. However, when you can delete it while reviewing it. Set the camcorder to select the 3. While reviewing the scene, use the multi selector ( icon and press ( ). ) to play movies ( ). 2. Select ( ) the (DELETE) icon and press ( ). 4.
DC40 Instruction Manual
Page 108
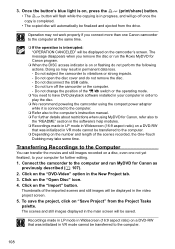
... displayed on "Save Project" from the drive. Do not disconnect the USB cable. - To save the project, click on the camcorder's screen. Connect the camcorder to the computer. 108 Thumbnails of the / switch or the operating mode. You need to have DVD playback software installed in your computer for Canon program. When the DISC access indicator is on the "DVD-Video" option in the video project screen. 5. Operation may result in VR mode cannot be transferred...
... displayed on "Save Project" from the drive. Do not disconnect the USB cable. - To save the project, click on the camcorder's screen. Connect the camcorder to the computer. 108 Thumbnails of the / switch or the operating mode. You need to have DVD playback software installed in your computer for Canon program. When the DISC access indicator is on the "DVD-Video" option in the video project screen. 5. Operation may result in VR mode cannot be transferred...
DC40 Instruction Manual
Page 110
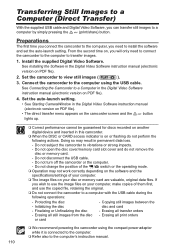
... the Digital Video Software instruction manual (electronic version on or flashing do not remove the disc or memory card. - Protecting the disc - Erasing all transfer orders - Preparations The first time you connect the camcorder to the computer, you can transfer still images to a computer by simply pressing the (print/share) button. Connect the camcorder to the computer using the compact power adapter while it is on PDF file). 4. Erasing all print orders We recommend powering the camcorder using the USB cable...
... the Digital Video Software instruction manual (electronic version on or flashing do not remove the disc or memory card. - Protecting the disc - Erasing all transfer orders - Preparations The first time you connect the camcorder to the computer, you can transfer still images to a computer by simply pressing the (print/share) button. Connect the camcorder to the computer using the compact power adapter while it is on PDF file). 4. Erasing all print orders We recommend powering the camcorder using the USB cable...

DC40 Instruction Manual
Page 124
... picture is inserted with other DVD recorders or computer DVD drives. Adjust the viewfinder with a soft lens-cleaning cloth. 130 video noise, the sound is not a malfunction. If using a single-sided disc, check that the disc is blurred. Clean the disc with the dioptric adjustment lever. 24 Playback/Editing Problem Solution Pressing the playback button Check that was protected - You cannot add a title to a DVD-R disc after it with another digital device. with - Load a disc. 31 Set the camcorder...
... picture is inserted with other DVD recorders or computer DVD drives. Adjust the viewfinder with a soft lens-cleaning cloth. 130 video noise, the sound is not a malfunction. If using a single-sided disc, check that the disc is blurred. Clean the disc with the dioptric adjustment lever. 24 Playback/Editing Problem Solution Pressing the playback button Check that was protected - You cannot add a title to a DVD-R disc after it with another digital device. with - Load a disc. 31 Set the camcorder...

DC40 Instruction Manual
Page 125
... red. Memory card cannot be recorded. Initialize the memory card. 97 The folder and file numbers have reached their maximum 84 value. disc or the picture is not operating 1. use. Playing Back the Disc in an External DVD Device External DVD device refers to . 41 Make sure the memory card is selected as the media for still 36 images. Stop - Insert a memory card. 30 Set the camcorder to DVD players, DVD recorders, computer's DVD drives and other digital devices. recognized by the device. camcorder recordings Disconnect the compact power adapter and remove...
... red. Memory card cannot be recorded. Initialize the memory card. 97 The folder and file numbers have reached their maximum 84 value. disc or the picture is not operating 1. use. Playing Back the Disc in an External DVD Device External DVD device refers to . 41 Make sure the memory card is selected as the media for still 36 images. Stop - Insert a memory card. 30 Set the camcorder to DVD players, DVD recorders, computer's DVD drives and other digital devices. recognized by the device. camcorder recordings Disconnect the compact power adapter and remove...
DC40 Instruction Manual
Page 127
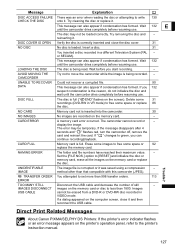
... IMAGES No images are recorded on the memory card. - NAMING ERROR The folder and file numbers have reached their maximum value. - Trouble? method other than 998 transfer orders. 113 ERROR TOO MANY STILL Disconnect the USB cable and decrease the number of still - Message Explanation DISC ACCESS FAILURE There was saved using a compression - Wait 132 until the camcorder dries completely before resuming use. DISC FULL The disc is full (" END" flashes on the computer screen...
... IMAGES No images are recorded on the memory card. - NAMING ERROR The folder and file numbers have reached their maximum value. - Trouble? method other than 998 transfer orders. 113 ERROR TOO MANY STILL Disconnect the USB cable and decrease the number of still - Message Explanation DISC ACCESS FAILURE There was saved using a compression - Wait 132 until the camcorder dries completely before resuming use. DISC FULL The disc is full (" END" flashes on the computer screen...

DC40 Instruction Manual
Page 128
... printing using the button, check the print settings. The print setting cannot be used with the selected paper or paper output tray is a problem with a battery, it back on and reconnect the USB cable. The paper settings of images. The printer is experiencing a data transfer error. Paper lever error occurred. Close the printer cover securely. The ink cartridge needs to print an image that contains a large number of ink. Consult a Canon Service...
... printing using the button, check the print settings. The print setting cannot be used with the selected paper or paper output tray is a problem with a battery, it back on and reconnect the USB cable. The paper settings of images. The printer is experiencing a data transfer error. Paper lever error occurred. Close the printer cover securely. The ink cartridge needs to print an image that contains a large number of ink. Consult a Canon Service...

DC40 Instruction Manual
Page 137
... pixels File Format Design rule for Camera File system (DCF), Exif 2.2** compliant, DPOF compliant Image Compression Method JPEG (compression: Super Fine, Fine, Normal) * This camcorder has been tested with the DVD-R or DVD-RW logo Maximum Recording Time (1.4 GB single-sided 8 cm Mini DVD) XP: approx. 20 min., SP: approx. 30 min., LP: approx. 60 min. By connecting to 256 MB. Specifications DC40 E System Disc Recording System Video: DVD-VIDEO (VIDEO mode) DVD...
... pixels File Format Design rule for Camera File system (DCF), Exif 2.2** compliant, DPOF compliant Image Compression Method JPEG (compression: Super Fine, Fine, Normal) * This camcorder has been tested with the DVD-R or DVD-RW logo Maximum Recording Time (1.4 GB single-sided 8 cm Mini DVD) XP: approx. 20 min., SP: approx. 30 min., LP: approx. 60 min. By connecting to 256 MB. Specifications DC40 E System Disc Recording System Video: DVD-VIDEO (VIDEO mode) DVD...
DC40 Instruction Manual
Page 140
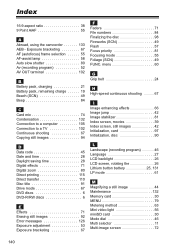
..., disc 90 D Data code 45 Date and time 28 Daylight saving time 28 Digital effects 71 Digital zoom 80 Direct printing 115 Direct transfer 110 Disc title 91 Drive mode 67 DVD discs 6 DVD-R/RW discs 6 E Effects 71 Erasing still images 92 Error messages 126 Exposure adjustment 53 Exposure bracketing 67 L Landscape (recording program 46 Language 27 LCD backlight 26 LCD screen, rotating the 26 Lithium button battery 25, 131 LP mode 61 M Magnifying a still image 44 Maintenance 132 Memory card 30 MENU 79 Metering method 63 Mini video light...
..., disc 90 D Data code 45 Date and time 28 Daylight saving time 28 Digital effects 71 Digital zoom 80 Direct printing 115 Direct transfer 110 Disc title 91 Drive mode 67 DVD discs 6 DVD-R/RW discs 6 E Effects 71 Erasing still images 92 Error messages 126 Exposure adjustment 53 Exposure bracketing 67 L Landscape (recording program 46 Language 27 LCD backlight 26 LCD screen, rotating the 26 Lithium button battery 25, 131 LP mode 61 M Magnifying a still image 44 Maintenance 132 Memory card 30 MENU 79 Metering method 63 Mini video light...
DC40 Instruction Manual
Page 141
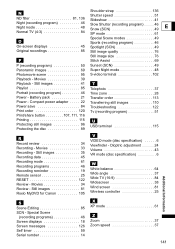
... Protecting still images 96 Protecting the disc 89 U USB terminal 115 R Record review 34 Recording - Battery pack 21 Transfer order 113 Power - Still images 35 Recording data 45 Recording mode 61 Recording programs 46 Recording reminder 19 Remote sensor 25 RESET 122 Review - Still images 81 Roxio MyDVD for Canon 105 V VIDEO mode (disc specification 6 Viewfinder - Special Scene (recording programs 46 Screen displays 18 Screen messages 126 Self timer 59 Serial number 14 X XP mode 61 Z Zoom 37 Zoom speed 37 141 N Shoulder strap 136 Shutter speed 51...
... Protecting still images 96 Protecting the disc 89 U USB terminal 115 R Record review 34 Recording - Battery pack 21 Transfer order 113 Power - Still images 35 Recording data 45 Recording mode 61 Recording programs 46 Recording reminder 19 Remote sensor 25 RESET 122 Review - Still images 81 Roxio MyDVD for Canon 105 V VIDEO mode (disc specification 6 Viewfinder - Special Scene (recording programs 46 Screen displays 18 Screen messages 126 Self timer 59 Serial number 14 X XP mode 61 Z Zoom 37 Zoom speed 37 141 N Shoulder strap 136 Shutter speed 51...

Digital Video Software (Windows) Ver.21 Instruction Manual
Page 37
...) in full screen mode. - [Launch ZoomBrowser EX]: Starts ZoomBrowser EX after downloading the images. - [Show Window]: The Camera Control window appears when you can set the action that is carried out for how to set and operate the camcorder to transfer images. • For instructions on the taskbar and select an action from the displayed menu. - [Show image(s) in fullscreen mode]: Displays downloaded images in Auto-Downloading Settings. • The button cannot be used when it is...
...) in full screen mode. - [Launch ZoomBrowser EX]: Starts ZoomBrowser EX after downloading the images. - [Show Window]: The Camera Control window appears when you can set the action that is carried out for how to set and operate the camcorder to transfer images. • For instructions on the taskbar and select an action from the displayed menu. - [Show image(s) in fullscreen mode]: Displays downloaded images in Auto-Downloading Settings. • The button cannot be used when it is...

Digital Video Software (Windows) Ver.21 Instruction Manual
Page 97
... are experiencing operational problems, detach the USB cable from the SYSTEM SETUP menu. First uninstall the TWAIN/WIA Driver, then reinstall the driver from the DIGITAL VIDEO SOLUTION DISK (remove the check marks from the SYSTEM SETUP menu. Î Camcorder is not correctly connected to be different when an image file has been moved or copied using the correct cable and that you are using Windows functions or edited with Windows 98/Windows Me/Windows 2000 preinstalled? Image files or...
... are experiencing operational problems, detach the USB cable from the SYSTEM SETUP menu. First uninstall the TWAIN/WIA Driver, then reinstall the driver from the DIGITAL VIDEO SOLUTION DISK (remove the check marks from the SYSTEM SETUP menu. Î Camcorder is not correctly connected to be different when an image file has been moved or copied using the correct cable and that you are using Windows functions or edited with Windows 98/Windows Me/Windows 2000 preinstalled? Image files or...

Digital Video Software (Macintosh) Ver.21 Instruction Manual
Page 36
... Images (Direct Transfer Function) If your camcorder supports the Direct Transfer Function, you can use the camcorder to download images. 1 Set the direct transfer settings on the camcorder screen after starting the Camera Control window. • See your camcorder instruction manual for how to set and operate the camcorder to transfer images. • For instructions on how to change the destination folder and the folder name, see Applying Auto-downloading Settings ( 30). • The button cannot be used when it is not lighted. 2 Press the button on the camcorder. „ Setting...
... Images (Direct Transfer Function) If your camcorder supports the Direct Transfer Function, you can use the camcorder to download images. 1 Set the direct transfer settings on the camcorder screen after starting the Camera Control window. • See your camcorder instruction manual for how to set and operate the camcorder to transfer images. • For instructions on how to change the destination folder and the folder name, see Applying Auto-downloading Settings ( 30). • The button cannot be used when it is not lighted. 2 Press the button on the camcorder. „ Setting...


