
DC40 Instruction Manual
Page 2
...OPEN CAUTION: TO REDUCE THE RISK OF ELECTRIC SHOCK, DO NOT REMOVE COVER (OR BACK). Important Introduction Usage Instructions WARNING! DVD Camcorder, DC40 A systems This device complies with class B limits in a residential installation. Do not make any interference received, including interference that ...modifications should be made, you could be required to Part 15 of copyrighted materials may cause harmful interference to copyright laws. Canon U.S.A. Note: This equipment has been tested and found to comply with the limits for help. COPYRIGHT WARNING: Unauthorized recording of...
...OPEN CAUTION: TO REDUCE THE RISK OF ELECTRIC SHOCK, DO NOT REMOVE COVER (OR BACK). Important Introduction Usage Instructions WARNING! DVD Camcorder, DC40 A systems This device complies with class B limits in a residential installation. Do not make any interference received, including interference that ...modifications should be made, you could be required to Part 15 of copyrighted materials may cause harmful interference to copyright laws. Canon U.S.A. Note: This equipment has been tested and found to comply with the limits for help. COPYRIGHT WARNING: Unauthorized recording of...

DC40 Instruction Manual
Page 3
... and Moisture - The CA-570 Compact refers to be followed. Retain Instructions - The safety and operating instructions should be routed so that they to the Canon DVD Camcorder DC40 A Power Adapter should be walked on the marking label. for the grounding electrode. Polarization - All warnings on an proper grounding of the mast and...
... and Moisture - The CA-570 Compact refers to be followed. Retain Instructions - The safety and operating instructions should be routed so that they to the Canon DVD Camcorder DC40 A Power Adapter should be walked on the marking label. for the grounding electrode. Polarization - All warnings on an proper grounding of the mast and...

DC40 Instruction Manual
Page 5
...DVDs RECORDING With a DVD you just press the recording start a new recording. SHARING YOUR VIDEOS Windows** users: With the supplied Roxio MyDVD for Canon software you can easily create copies of your DVDs to share with family and friends and transfer your finalized* disc into a DVD player and ...immediately find from where to start / stop button and the camcorder will find that scene you want to play the whole thing or run the tape forward and back to a computer for further editing. ** Windows...
...DVDs RECORDING With a DVD you just press the recording start a new recording. SHARING YOUR VIDEOS Windows** users: With the supplied Roxio MyDVD for Canon software you can easily create copies of your DVDs to share with family and friends and transfer your finalized* disc into a DVD player and ...immediately find from where to start / stop button and the camcorder will find that scene you want to play the whole thing or run the tape forward and back to a computer for further editing. ** Windows...

DC40 Instruction Manual
Page 6
... mode will play in two sizes the more common 12 cm DVDs and 8 cm Mini DVDs. An Introduction to DVDs You have the disc... This camcorder uses 8 cm DVD-R discs (like the supplied one) or DVD-RW discs (commercially available). Now that I choose to choose? So... However, the disc can record...
... mode will play in two sizes the more common 12 cm DVDs and 8 cm Mini DVDs. An Introduction to DVDs You have the disc... This camcorder uses 8 cm DVD-R discs (like the supplied one) or DVD-RW discs (commercially available). Now that I choose to choose? So... However, the disc can record...

DC40 Instruction Manual
Page 7
...it again for the first time. 7 For use of disc you use and the disc specification selected when initializing it 98 with this camcorder DVD discs that were recorded, initialized or finalized with other DVD media, contact directly the manufacturer's customer support center. • Attempting... to record or play it . Differences in Available Features Depending on the Disc The camcorder's features and functions available will differ depending on the type of other digital devices can result in lost data. • You need to...
...it again for the first time. 7 For use of disc you use and the disc specification selected when initializing it 98 with this camcorder DVD discs that were recorded, initialized or finalized with other DVD media, contact directly the manufacturer's customer support center. • Attempting... to record or play it . Differences in Available Features Depending on the Disc The camcorder's features and functions available will differ depending on the type of other digital devices can result in lost data. • You need to...

DC40 Instruction Manual
Page 8
... 7 About this Manual 11 Checking the Supplied Accessories 13 Components Guide 14 Screen Displays 18 Preparations Step 1: Preparing the Power Supply 21 Step 2: Preparing the Camcorder 24 Step 3: Using the Wireless Controller 25 Step 4: Adjusting the LCD Screen 26 Step 5: Changing the Display Language 27 Step 6: Setting the Time Zone, Date...
... 7 About this Manual 11 Checking the Supplied Accessories 13 Components Guide 14 Screen Displays 18 Preparations Step 1: Preparing the Power Supply 21 Step 2: Preparing the Camcorder 24 Step 3: Using the Wireless Controller 25 Step 4: Adjusting the LCD Screen 26 Step 5: Changing the Display Language 27 Step 6: Setting the Time Zone, Date...
DC40 Instruction Manual
Page 11
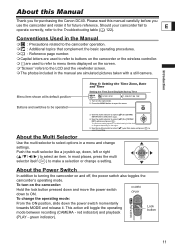
... multi selector like a joystick up, down the power switch momentarily towards MODE and release it for purchasing the Canon DC40. red indicator) and playback Lock button (PLAY - Please read this Manual Thank you use the camcorder and retain it . The time zone setting appears. About the Power Switch In addition to select an...
... multi selector like a joystick up, down the power switch momentarily towards MODE and release it for purchasing the Canon DC40. red indicator) and playback Lock button (PLAY - Please read this Manual Thank you use the camcorder and retain it . The time zone setting appears. About the Power Switch In addition to select an...

DC40 Instruction Manual
Page 12
... disc 39 Recording still images or * on the memory card or 35 disc or * Viewing still images from Dolby Laboratories. About the Operating Modes The camcorder's operating mode is a trademark of DVD Format/Logo Licensing Corporation. • Manufactured under license from the memory card or disc 41 * Depending on whether you...
... disc 39 Recording still images or * on the memory card or 35 disc or * Viewing still images from Dolby Laboratories. About the Operating Modes The camcorder's operating mode is a trademark of DVD Format/Logo Licensing Corporation. • Manufactured under license from the memory card or disc 41 * Depending on whether you...

DC40 Instruction Manual
Page 13
... Write down the number and other information here and retain this product can be found at the battery attachment unit of Purchase: Model Name: DC40 A Purchased From: Serial No.: Dealer Address: Dealer Phone No.: 13 power cord) BP-208 Battery Pack WL-D86 Wireless Controller Lithium Button ... Multi Cable IFC-300PCU USB Cable Blank DVD-R Disc (8 cm Mini DVD) DIGITAL VIDEO SOLUTION DISK Software CD-ROM* Introduction Roxio MyDVD for Canon Software CD-ROM Ferrite Core (Asia only) * Includes the electronic version of theft. The serial number of this book as a permanent record ...
... Write down the number and other information here and retain this product can be found at the battery attachment unit of Purchase: Model Name: DC40 A Purchased From: Serial No.: Dealer Address: Dealer Phone No.: 13 power cord) BP-208 Battery Pack WL-D86 Wireless Controller Lithium Button ... Multi Cable IFC-300PCU USB Cable Blank DVD-R Disc (8 cm Mini DVD) DIGITAL VIDEO SOLUTION DISK Software CD-ROM* Introduction Roxio MyDVD for Canon Software CD-ROM Ferrite Core (Asia only) * Includes the electronic version of theft. The serial number of this book as a permanent record ...
DC40 Instruction Manual
Page 18
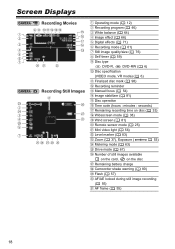
... ( 83) Zoom ( 37), Exposure ( 53) Metering mode ( 63) Drive mode ( 67) Number of still images available on the card, on the disc Remaining battery charge Camcorder shake warning ( 80) Flash ( 57) AF/AE locked during still image recording ( 55) AF frame ( 55) 18
... ( 83) Zoom ( 37), Exposure ( 53) Metering mode ( 63) Drive mode ( 67) Number of still images available on the card, on the disc Remaining battery charge Camcorder shake warning ( 80) Flash ( 57) AF/AE locked during still image recording ( 55) AF frame ( 55) 18

DC40 Instruction Manual
Page 19
...be displayed and the recording will always be indicated accurately. 19 Card/Disc Access Display " " is writing on the conditions under which the camcorder and the battery pack are too short. Remaining battery charge • When " " starts flashing in green. • Depending on the ...recording conditions, the number of images available while the camcorder is displayed next to avoid scenes that are used, the actual battery charge may decrease by 2 still images at once. Introduction Remaining ...
...be displayed and the recording will always be indicated accurately. 19 Card/Disc Access Display " " is writing on the conditions under which the camcorder and the battery pack are too short. Remaining battery charge • When " " starts flashing in green. • Depending on the ...recording conditions, the number of images available while the camcorder is displayed next to avoid scenes that are used, the actual battery charge may decrease by 2 still images at once. Introduction Remaining ...

DC40 Instruction Manual
Page 21
... Power Adapter. Disconnect the power adapter from the power outlet and the adapter. Unplug the power cord from the camcorder. 2. Connect the power adapter to the DC IN terminal camcorder. Attach the ferrite core to the cable about 7 cm from the ridge on when the charging is fully charged...: 1. Connect the power cord to the camcorder. Attaching the Ferrite Core (Asia only) Attach the enclosed ferrite core before use. Slide in the connector end of the battery in the...
... Power Adapter. Disconnect the power adapter from the power outlet and the adapter. Unplug the power cord from the camcorder. 2. Connect the power adapter to the DC IN terminal camcorder. Attach the ferrite core to the cable about 7 cm from the ridge on when the charging is fully charged...: 1. Connect the power cord to the camcorder. Attaching the Ferrite Core (Asia only) Attach the enclosed ferrite core before use. Slide in the connector end of the battery in the...

DC40 Instruction Manual
Page 22
... the BP-208 battery pack is 155 min. Turn off the camcorder. 2. This is not expressly recommended for use with this camcorder. You may hear some noise from the power adapter during use the camcorder without worrying about the battery power. The following recording and playback... You can keep the battery pack attached; Connect the power adapter to the camcorder's DC IN terminal. Turn off the camcorder before connecting or disconnecting the power adapter. Do not connect to the camcorder's DC IN terminal or to the power adapter any electrical equipment that is ...
... the BP-208 battery pack is 155 min. Turn off the camcorder. 2. This is not expressly recommended for use with this camcorder. You may hear some noise from the power adapter during use the camcorder without worrying about the battery power. The following recording and playback... You can keep the battery pack attached; Connect the power adapter to the camcorder's DC IN terminal. Turn off the camcorder before connecting or disconnecting the power adapter. Do not connect to the camcorder's DC IN terminal or to the power adapter any electrical equipment that is ...

DC40 Instruction Manual
Page 24
Fastening the Grip Belt Adjust the grip belt so that you can reach the zoom lever with your index finger, and the start/stop button with your thumb. 24 Step 2: Preparing the Camcorder Adjusting the Viewfinder (Dioptric Adjustment) 1. Turn on the camcorder and keep the LCD panel closed. 2. Adjust the dioptric adjustment lever as necessary.
Fastening the Grip Belt Adjust the grip belt so that you can reach the zoom lever with your index finger, and the start/stop button with your thumb. 24 Step 2: Preparing the Camcorder Adjusting the Viewfinder (Dioptric Adjustment) 1. Turn on the camcorder and keep the LCD panel closed. 2. Adjust the dioptric adjustment lever as necessary.

DC40 Instruction Manual
Page 25
... or direct sunlight. If the wireless controller does not work, check that the remote sensor is not set to [OFF ] ( 84). When the camcorder cannot be operated at the camcorder's remote sensor when you press the buttons. Step 3: Using the Wireless Controller Inserting the Battery (Lithium Button Battery CR2025) E 1.
... or direct sunlight. If the wireless controller does not work, check that the remote sensor is not set to [OFF ] ( 84). When the camcorder cannot be operated at the camcorder's remote sensor when you press the buttons. Step 3: Using the Wireless Controller Inserting the Battery (Lithium Button Battery CR2025) E 1.

DC40 Instruction Manual
Page 27
... ENGLISH 1. Turn on screen while changing the print and direct transfer settings will not change the setting. The displays and that appear on the camcorder. 2. Press the MENU button. Use the multi selector to select ( , ) the language desired and press ( ) to select ( ) the [DISPLAY SETUP] menu... and press ( ). 4. Step 5: Changing the Display Language The language used in the camcorder displays and menu items can be changed the language by mistake, follow the mark next to the menu item to change regardless of the language...
... ENGLISH 1. Turn on screen while changing the print and direct transfer settings will not change the setting. The displays and that appear on the camcorder. 2. Press the MENU button. Use the multi selector to select ( , ) the language desired and press ( ) to select ( ) the [DISPLAY SETUP] menu... and press ( ). 4. Step 5: Changing the Display Language The language used in the camcorder displays and menu items can be changed the language by mistake, follow the mark next to the menu item to change regardless of the language...

DC40 Instruction Manual
Page 28
.... • The next part of the date/time is displayed in orange. • Set the day, year, hours and minutes in orange. 7. Turn on the camcorder. 2. Use the multi selector to select ( ) your time zone and press ( ) to change all settings, you do not need to change . 8.
.... • The next part of the date/time is displayed in orange. • Set the day, year, hours and minutes in orange. 7. Turn on the camcorder. 2. Use the multi selector to select ( ) your time zone and press ( ) to change all settings, you do not need to change . 8.

DC40 Instruction Manual
Page 29
...; You can also change the date format ( 84). When you do not need to reset the clock every time you do not use the camcorder for about 3 months, the built-in lithium battery ( 131) and set the time zone, date and time, you travel to the date and time displayed...
...; You can also change the date format ( 84). When you do not need to reset the clock every time you do not use the camcorder for about 3 months, the built-in lithium battery ( 131) and set the time zone, date and time, you travel to the date and time displayed...

DC40 Instruction Manual
Page 30
... inserted. Open the cover. 3. Do not force the cover closed if the memory card is not flashing before using them with this camcorder ( 97). Performance cannot be used with this camcorder. Inserting the Card 1. To remove the memory card: First push the memory card once to initialize all memory cards before you...
... inserted. Open the cover. 3. Do not force the cover closed if the memory card is not flashing before using them with this camcorder ( 97). Performance cannot be used with this camcorder. Inserting the Card 1. To remove the memory card: First push the memory card once to initialize all memory cards before you...
DC40 Instruction Manual
Page 31
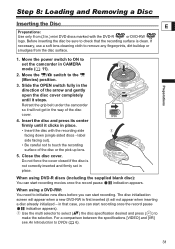
...label side facing out). • Be careful not to the (Movies) position. 3. in that the recording surface is clean. Retract the grip belt under the camcorder so it stops. Use the multi selector to select ( ) the disc specification desired and press ( ) to DVDs ( 6). 31 Preparations 1. Do not force...once the record pause indication appears. The disc initialization screen will appear when a new DVD-RW is not correctly inserted and firmly set the camcorder in CAMERA mode ( 11). 2. Slide the OPEN switch fully in the direction of the arrow and gently open the disc cover completely ...
...label side facing out). • Be careful not to the (Movies) position. 3. in that the recording surface is clean. Retract the grip belt under the camcorder so it stops. Use the multi selector to select ( ) the disc specification desired and press ( ) to DVDs ( 6). 31 Preparations 1. Do not force...once the record pause indication appears. The disc initialization screen will appear when a new DVD-RW is not correctly inserted and firmly set the camcorder in CAMERA mode ( 11). 2. Slide the OPEN switch fully in the direction of the arrow and gently open the disc cover completely ...


