CanoScan N670U/N676U/N1240U Toolbox3.1 for Win Guide
Page 6
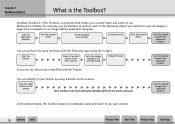
Set the detailed scan settings. You can perform the same functions with the Toolbox. View the scanned image in the main window. Start the scanner driver. Close the scanner driver. Select a function button in the application program. Set a few simple settings in the application program. You can see, ...using the Toolbox. Start the application program. As you would have to perform each of the following steps using a button on the scanner. (The Toolbox will start and automatically perform the entire process) View the scanned image in an image editing application program. View ...
Set the detailed scan settings. You can perform the same functions with the Toolbox. View the scanned image in the main window. Start the scanner driver. Close the scanner driver. Select a function button in the application program. Set a few simple settings in the application program. You can see, ...using the Toolbox. Start the application program. As you would have to perform each of the following steps using a button on the scanner. (The Toolbox will start and automatically perform the entire process) View the scanned image in an image editing application program. View ...
CanoScan N670U/N676U/N1240U Toolbox3.1 for Win Guide
Page 8
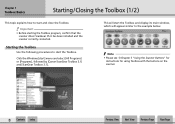
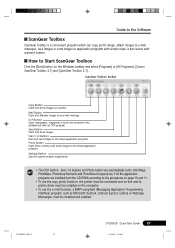
... Toolbox and display its main window, which will appear similar to start ] menu and select [All Programs] or [Programs], followed by [Canon ScanGear Toolbox 3.1] and [ScanGear Toolbox 3.1]. w w 8 Contents Index Previous View Next View Previous Page Next Page e Important • Before starting the Toolbox program, confirm that the scanner driver ScanGear CS-U has been installed...
... Toolbox and display its main window, which will appear similar to start ] menu and select [All Programs] or [Programs], followed by [Canon ScanGear Toolbox 3.1] and [ScanGear Toolbox 3.1]. w w 8 Contents Index Previous View Next View Previous Page Next Page e Important • Before starting the Toolbox program, confirm that the scanner driver ScanGear CS-U has been installed...
CanoScan N670U/N676U/N1240U Toolbox3.1 for Win Guide
Page 11
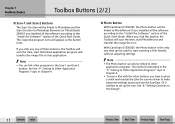
f Note • You can link other buttons, you have to place a check mark beside the [Use the scanner driver to make advanced settings] option and use the ScanGear CS-U window to set up the scan. When you installed all the software according to the "Install the Software" section of the... be used to start PhotoRecord and transfer the image file to it. With CanoScan D1250U2F, the Photo button is described in the j "Linking to Other Application Programs" topic in Chapter 4. ■ Photo Button With CanoScan D1250U2F, the Photo button will be linked to PhotoRecord if you click this button,...
f Note • You can link other buttons, you have to place a check mark beside the [Use the scanner driver to make advanced settings] option and use the ScanGear CS-U window to set up the scan. When you installed all the software according to the "Install the Software" section of the... be used to start PhotoRecord and transfer the image file to it. With CanoScan D1250U2F, the Photo button is described in the j "Linking to Other Application Programs" topic in Chapter 4. ■ Photo Button With CanoScan D1250U2F, the Photo button will be linked to PhotoRecord if you click this button,...

CanoScan N670U/N676U/N1240U Toolbox3.1 for Win Guide
Page 16
... the dialog, the ScanGear CS-U window will open to set when this option is placed beside it, when you to allow you click the [Scan] button (or the [Copy] button in the Copy function) in the ScanGear CS-U window. Refer to the Dialogs (4/6) Scanner settings - Use the scanner driver to make advanced settings If a check...
... the dialog, the ScanGear CS-U window will open to set when this option is placed beside it, when you to allow you click the [Scan] button (or the [Copy] button in the Copy function) in the ScanGear CS-U window. Refer to the Dialogs (4/6) Scanner settings - Use the scanner driver to make advanced settings If a check...
CanoScan N670U/N676U/N1240U Toolbox3.1 for Win Guide
Page 39
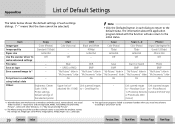
...information about the application program linked with other Windows, it is "\My Documents\My Pictures". *2 The Photo settings are ; Put picture in "My Documents" folder On Upper limit of the case the D1250U2F scanner is "\Documents and Settings\USER_NAME_FOLDER\My Documents\My...Image type Image quality Paper size Use the scanner driver to make advanced settings File name Save as type Save scanned image to *3: PhotoRecord 1), Photoshop Elements (CanoScan D1250U2F only) or PhotoStudio 2000 (Scan-2) *1 With Windows 2000 Professional or Windows XP (Professional, Home Edition), the actual ...
...information about the application program linked with other Windows, it is "\My Documents\My Pictures". *2 The Photo settings are ; Put picture in "My Documents" folder On Upper limit of the case the D1250U2F scanner is "\Documents and Settings\USER_NAME_FOLDER\My Documents\My...Image type Image quality Paper size Use the scanner driver to make advanced settings File name Save as type Save scanned image to *3: PhotoRecord 1), Photoshop Elements (CanoScan D1250U2F only) or PhotoStudio 2000 (Scan-2) *1 With Windows 2000 Professional or Windows XP (Professional, Home Edition), the actual ...
CanoScan N670U/N676U/N1240U Toolbox3.1 for Win Guide
Page 40
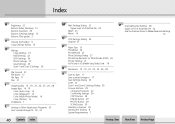
Index B Brightness 20 Buttons (Main Window) 10 Buttons (Scanner) 29 Buttons (Settings dialog) 13 Buttons (This guide) 3 C Closing the Toolbox 9 Copy Settings Dialog 19 D Dialogs Copy Settings 19 Mail Settings 22 OCR Settings 24 ... , 24 , 25 , 26 , 28 S Save as Type 17 Save scanned image to 17 Save Settings Dialog 25 Scale 20 Scan-1 and Scan-2 Settings Dialog 26 Scanner Buttons 29 Changing Functions 32 Confirming Settings 29 COPY Button 29 E-MAIL Button 29 PHOTO Button 29 SCAN Button 29 Selecting...
Index B Brightness 20 Buttons (Main Window) 10 Buttons (Scanner) 29 Buttons (Settings dialog) 13 Buttons (This guide) 3 C Closing the Toolbox 9 Copy Settings Dialog 19 D Dialogs Copy Settings 19 Mail Settings 22 OCR Settings 24 ... , 24 , 25 , 26 , 28 S Save as Type 17 Save scanned image to 17 Save Settings Dialog 25 Scale 20 Scan-1 and Scan-2 Settings Dialog 26 Scanner Buttons 29 Changing Functions 32 Confirming Settings 29 COPY Button 29 E-MAIL Button 29 PHOTO Button 29 SCAN Button 29 Selecting...
CanoScan D1250U2 ScanGear CS-U 6.3 for Win Guide
Page 55
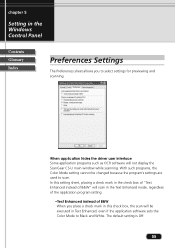
... sheet allows you place a check mark in this check box, the scan will not display the ScanGear CS-U main window while scanning. The default setting is Off. 55 When application hides the driver user interface Some application programs such as OCR software will be changed because the program's settings are used to...
... sheet allows you place a check mark in this check box, the scan will not display the ScanGear CS-U main window while scanning. The default setting is Off. 55 When application hides the driver user interface Some application programs such as OCR software will be changed because the program's settings are used to...
CanoScan D1250U2F Quick Start Guide
Page 9
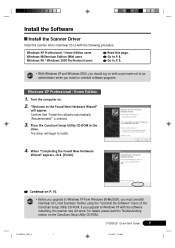
... the CanoScan Setup Utility CD-ROM in the drive. D1250U2F Quick Start Guide 7 *D1250U2F_QSG_E 7 11/24/01, 7:18 AM Install the Software Install the Scanner Driver Install the scanner driver (ScanGear CS-U) with the software remaining, the scanner may not work. When "Completing the Found New Hardware Wizard" appears, click [Finish]. If you upgrade to Windows XP with...
... the CanoScan Setup Utility CD-ROM in the drive. D1250U2F Quick Start Guide 7 *D1250U2F_QSG_E 7 11/24/01, 7:18 AM Install the Software Install the Scanner Driver Install the scanner driver (ScanGear CS-U) with the software remaining, the scanner may not work. When "Completing the Found New Hardware Wizard" appears, click [Finish]. If you upgrade to Windows XP with...
CanoScan D1250U2F Quick Start Guide
Page 10
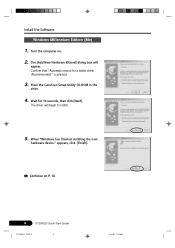
Confirm that "Automatic search for 10 seconds, then click [Next]. Install the Software Windows Millennium Edition (Me) 1. appears, click [Finish]. Continue on . 2. Place the CanoScan Setup Utility CD-ROM in the drive. 4. When "Windows has finished installing the new hardware device." Turn the computer on P. 10. 8 D1250U2F Quick Start Guide *D1250U2F_QSG_E 8 11/24/01, 7:19 AM The [Add New Hardware Wizard] dialog box will begin to install. 5. The driver will appear. Wait for a better driver (Recommended)" is selected. 3.
Confirm that "Automatic search for 10 seconds, then click [Next]. Install the Software Windows Millennium Edition (Me) 1. appears, click [Finish]. Continue on . 2. Place the CanoScan Setup Utility CD-ROM in the drive. 4. When "Windows has finished installing the new hardware device." Turn the computer on P. 10. 8 D1250U2F Quick Start Guide *D1250U2F_QSG_E 8 11/24/01, 7:19 AM The [Add New Hardware Wizard] dialog box will begin to install. 5. The driver will appear. Wait for a better driver (Recommended)" is selected. 3.
CanoScan D1250U2F Quick Start Guide
Page 11
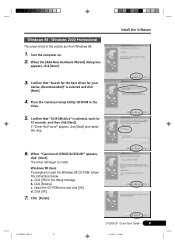
... the [Add New Hardware Wizard] dialog box appears, click [Next]. 3. If "Driver Not Found" appears, click [Back] and repeat this section are from Windows 98. 1. Click [OK] to install. Confirm that "CD-ROM drive" is selected and click [Next]. 4. When "CanoScan D1250U2/D1250U2F" appears, click [Next]. Click [OK]. 7. Confirm that "Search for the best...
... the [Add New Hardware Wizard] dialog box appears, click [Next]. 3. If "Driver Not Found" appears, click [Back] and repeat this section are from Windows 98. 1. Click [OK] to install. Confirm that "CD-ROM drive" is selected and click [Next]. 4. When "CanoScan D1250U2/D1250U2F" appears, click [Next]. Click [OK]. 7. Confirm that "Search for the best...
CanoScan D1250U2F Quick Start Guide
Page 12
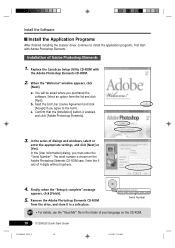
...is enabled, and click [Adobe Photoshop Elements]. 3. Installation of dialogs and windows, select or enter the appropriate settings, and click [Next] or [Yes]. Replace the CanoScan Setup Utility CD-ROM with Adobe Photoshop Elements. You will be asked ...window appears, click [Next]. Select an option from the drive, and store it in the folder of 4 digits without hyphens. 4. The serial number is shown on the CD-ROM. 10 D1250U2F Quick Start Guide *D1250U2F_QSG_E 10 11/24/01, 7:19 AM Install the Software Install the Application Programs After finished installing the scanner driver...
...is enabled, and click [Adobe Photoshop Elements]. 3. Installation of dialogs and windows, select or enter the appropriate settings, and click [Next] or [Yes]. Replace the CanoScan Setup Utility CD-ROM with Adobe Photoshop Elements. You will be asked ...window appears, click [Next]. Select an option from the drive, and store it in the folder of 4 digits without hyphens. 4. The serial number is shown on the CD-ROM. 10 D1250U2F Quick Start Guide *D1250U2F_QSG_E 10 11/24/01, 7:19 AM Install the Software Install the Application Programs After finished installing the scanner driver...
CanoScan D1250U2F Quick Start Guide
Page 16
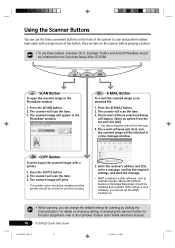
...a single touch of the scanner to scan and perform related tasks easily with a printer 1. The scanned image will print. • The printer driver should be installed and the printer should be on the front of the button. Select an option from the CanoScan Setup Utility CD-ROM....to the ScanGear Toolbox User's Guide (electronic manual). 14 D1250U2F Quick Start Guide *D1250U2F_QSG_E 14 11/24/01, 7:19 AM The e-mail software will start, and the scanned image will appear in the PhotoBase window. Using the Scanner Buttons You can change the default settings for the first ...
...a single touch of the scanner to scan and perform related tasks easily with a printer 1. The scanned image will print. • The printer driver should be installed and the printer should be on the front of the button. Select an option from the CanoScan Setup Utility CD-ROM....to the ScanGear Toolbox User's Guide (electronic manual). 14 D1250U2F Quick Start Guide *D1250U2F_QSG_E 14 11/24/01, 7:19 AM The e-mail software will start, and the scanned image will appear in the PhotoBase window. Using the Scanner Buttons You can change the default settings for the first ...

CanoScan D1250U2F Quick Start Guide
Page 21
... [File] menu and select [Import], then [CanoScan D1250U2/D1250U2F..]. (see P. 12) ArcSoft PhotoBase 1. Select [Start], [Programs] or [All Programs], [Caere Applications] and [OmniPage Pro 9.0] to start ScanGear CS-U from the program. Click one of the buttons on the toolbar, and select [Use the scanner driver to start Canon ScanGear Toolbox. 2. How to Start ScanGear CS...
... [File] menu and select [Import], then [CanoScan D1250U2/D1250U2F..]. (see P. 12) ArcSoft PhotoBase 1. Select [Start], [Programs] or [All Programs], [Caere Applications] and [OmniPage Pro 9.0] to start ScanGear CS-U from the program. Click one of the buttons on the toolbar, and select [Use the scanner driver to start Canon ScanGear Toolbox. 2. How to Start ScanGear CS...
CanoScan D1250U2F Quick Start Guide
Page 23
...copy (print) function, the printer must be connected and on-line and its printer driver must be installed on a printer. Mail Button Scans and attaches images to the ...button on the Windows taskbar and select [Programs] or [All Programs], [Canon ScanGear Toolbox 3.1] and [ScanGear Toolbox 3.1]. How to application programs with simple steps. Settings Button Sets the scanner buttons assignments. ...Outlook, Outlook Express, Eudora or Netscape Messenger, must be installed and enabled. *D1250U2F_QSG_E 21 D1250U2F Quick Start Guide 21 11/24/01, 7:19 AM It also works with an OCR...
...copy (print) function, the printer must be connected and on-line and its printer driver must be installed on a printer. Mail Button Scans and attaches images to the ...button on the Windows taskbar and select [Programs] or [All Programs], [Canon ScanGear Toolbox 3.1] and [ScanGear Toolbox 3.1]. How to application programs with simple steps. Settings Button Sets the scanner buttons assignments. ...Outlook, Outlook Express, Eudora or Netscape Messenger, must be installed and enabled. *D1250U2F_QSG_E 21 D1250U2F Quick Start Guide 21 11/24/01, 7:19 AM It also works with an OCR...


