Basic Guide
Page 1
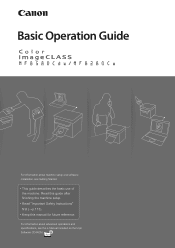
Basic Operation Guide For information about advanced operations and specifications, see Getting Started. This guide describes the basic use of the machine. Read zImportant Safety Instructionsz first (→p.113). Read this manual for future reference. Keep this guide after finishing the machine setup. For information about machine setup and software installation, see the e-Manual included on the User Software CD-ROM.
Basic Operation Guide For information about advanced operations and specifications, see Getting Started. This guide describes the basic use of the machine. Read zImportant Safety Instructionsz first (→p.113). Read this manual for future reference. Keep this guide after finishing the machine setup. For information about machine setup and software installation, see the e-Manual included on the User Software CD-ROM.
Basic Guide
Page 2
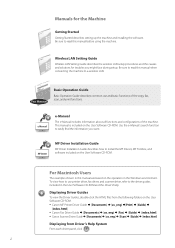
... use printer driver, fax driver, and scanner driver, refer to a wireless LAN. This manual is included on the User Software CD-ROM. • Canon MF Printer Driver Guide [Documents] [us_eng] [Print] [Guide] [index.html] • Canon Fax Driver Guide [Documents] [us_eng] [Fax] [Guide] ...
... use printer driver, fax driver, and scanner driver, refer to a wireless LAN. This manual is included on the User Software CD-ROM. • Canon MF Printer Driver Guide [Documents] [us_eng] [Print] [Guide] [index.html] • Canon Fax Driver Guide [Documents] [us_eng] [Fax] [Guide] ...
Basic Guide
Page 3
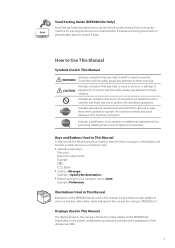
...sure not to only one machine, this manual is highly recommended. Indicates a clarification of the MF8580Cdw are used in This Manual Indicates a situation that must not be clearly indicated in This Manual In this manual. Displays Used in This Manual The display shown in this will be ... to shared folders (Store to these warnings. How to Use This Manual Symbols Used in this manual, the following styles are used to CAUTION equipment. Reading these notes is the factory preset display for the MF8580Cdw. Depending on a computer screen: [Item] Example: [Preference] Illustrations...
...sure not to only one machine, this manual is highly recommended. Indicates a clarification of the MF8580Cdw are used in This Manual Indicates a situation that must not be clearly indicated in This Manual In this manual. Displays Used in This Manual The display shown in this will be ... to shared folders (Store to these warnings. How to Use This Manual Symbols Used in this manual, the following styles are used to CAUTION equipment. Reading these notes is the factory preset display for the MF8580Cdw. Depending on a computer screen: [Item] Example: [Preference] Illustrations...
Basic Guide
Page 6
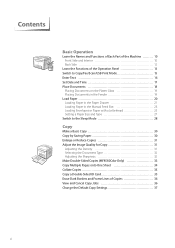
... on the Platen Glass 19 Placing Documents in the Feeder 19 Load Paper 20 Loading Paper in the Paper Drawer 21 Loading Paper in the Manual Feed Slot 23 Loading Envelopes or Paper with a Letterhead 25 Setting a Paper Size and Type 27 Switch to the Sleep Mode 28 Copy Make a Basic... 31 Adjust the Image Quality for Copy 31 Adjusting the Density 31 Selecting the Document Type 32 Adjusting the Sharpness 32 Make Double-Sided Copies (MF8580Cdw Only 33 Copy Multiple Pages onto One Sheet 34 Collate Copies 35 Copy a Double-Sided ID Card 35 Erase Dark Borders and Frame Lines of...
... on the Platen Glass 19 Placing Documents in the Feeder 19 Load Paper 20 Loading Paper in the Paper Drawer 21 Loading Paper in the Manual Feed Slot 23 Loading Envelopes or Paper with a Letterhead 25 Setting a Paper Size and Type 27 Switch to the Sleep Mode 28 Copy Make a Basic... 31 Adjust the Image Quality for Copy 31 Adjusting the Density 31 Selecting the Document Type 32 Adjusting the Sharpness 32 Make Double-Sided Copies (MF8580Cdw Only 33 Copy Multiple Pages onto One Sheet 34 Collate Copies 35 Copy a Double-Sided ID Card 35 Erase Dark Borders and Frame Lines of...
Basic Guide
Page 7
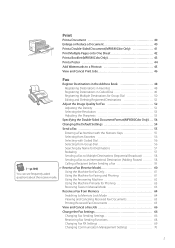
...Adjust the Image Quality for Fax 52 Adjusting the Density 52 Selecting the Resolution 53 Adjusting the Sharpness 53 Specifying the Double-Sided Document Format (MF8580Cdw Only)...... 54 Changing the Default Settings 54 Send a Fax 55 Entering a Fax Number with the Numeric Keys 55 Selecting from Favorites 56 ... Only 61 Using the Machine for Faxing and Phoning 61 Using the Answering Machine 62 Using the Machine Primarily for Phoning 63 Receiving Faxes in Manual Mode 63 Receive a Fax from Memory 64 Switching to a Printout 45 View and Cancel Print Jobs 46 (→ p.109) You can see...
...Adjust the Image Quality for Fax 52 Adjusting the Density 52 Selecting the Resolution 53 Adjusting the Sharpness 53 Specifying the Double-Sided Document Format (MF8580Cdw Only)...... 54 Changing the Default Settings 54 Send a Fax 55 Entering a Fax Number with the Numeric Keys 55 Selecting from Favorites 56 ... Only 61 Using the Machine for Faxing and Phoning 61 Using the Answering Machine 62 Using the Machine Primarily for Phoning 63 Receiving Faxes in Manual Mode 63 Receive a Fax from Memory 64 Switching to a Printout 45 View and Cancel Print Jobs 46 (→ p.109) You can see...

Basic Guide
Page 9
... on the Platen Glass 19 Placing Documents in the Feeder 19 Load Paper 20 Loading Paper in the Paper Drawer 21 Loading Paper in the Manual Feed Slot 23 Loading Envelopes or Paper with a Letterhead 25 Setting a Paper Size and Type 27 Switch to place the documents and load the paper...
... on the Platen Glass 19 Placing Documents in the Feeder 19 Load Paper 20 Loading Paper in the Paper Drawer 21 Loading Paper in the Manual Feed Slot 23 Loading Envelopes or Paper with a Letterhead 25 Setting a Paper Size and Type 27 Switch to place the documents and load the paper...
Basic Guide
Page 11
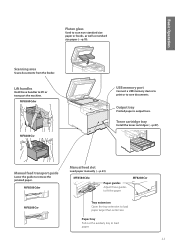
Output tray Printed paper is output here. MF8580Cdw Manual feed slot Load paper manually (→p.23). MF8580Cdw Paper guides Adjust these handles to remove the jammed paper. Scanning area Scans documents from the feeder. Toner cartridge tray Install the toner cartridges ... the paper. Basic Operation Platen glass Used to save documents. MF8580Cdw MF8280Cw USB memory port Connect a USB memory device to print or to scan non-standard size paper or books, as well as standard size paper (→p.19). Manual feed transport guide Lower the guide to lift or transport the ...
Output tray Printed paper is output here. MF8580Cdw Manual feed slot Load paper manually (→p.23). MF8580Cdw Paper guides Adjust these handles to remove the jammed paper. Scanning area Scans documents from the feeder. Toner cartridge tray Install the toner cartridges ... the paper. Basic Operation Platen glass Used to save documents. MF8580Cdw MF8280Cw USB memory port Connect a USB memory device to print or to scan non-standard size paper or books, as well as standard size paper (→p.19). Manual feed transport guide Lower the guide to lift or transport the ...

Basic Guide
Page 13
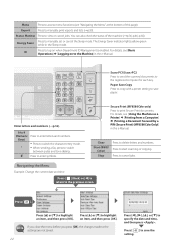
... the Address Book (→p.56). Error Indicator The indicator blinks or lights up when the machine is connected to search for the paper drawer or manual feed slot (→p.27). Select Paper/Settings Press to the standby mode. Press to scroll up and down, or to increase or decrease a value. •...
... the Address Book (→p.56). Error Indicator The indicator blinks or lights up when the machine is connected to search for the paper drawer or manual feed slot (→p.27). Select Paper/Settings Press to the standby mode. Press to scroll up and down, or to increase or decrease a value. •...
Basic Guide
Page 14
... the Machine as a Printer] [Printing from a Computer] [Printing a Document Secured by a PIN (Secure Print) (MF8580Cdw Only)] in the e-Manual. Press to manually set or cancel the Sleep mode. For details, see [Basic Operations] [Logging on when Department ID Management is enabled. ID Press...If you close the menu before you press [OK], the changes made to switch between pulse and tone dialing. Clear Start (B&W/ Color) Stop Press to save the setting. 14 Paper Save Copy Press to copy with a preset setting to delete letters and numbers....
... the Machine as a Printer] [Printing from a Computer] [Printing a Document Secured by a PIN (Secure Print) (MF8580Cdw Only)] in the e-Manual. Press to manually set or cancel the Sleep mode. For details, see [Basic Operations] [Logging on when Department ID Management is enabled. ID Press...If you close the menu before you press [OK], the changes made to switch between pulse and tone dialing. Clear Start (B&W/ Color) Stop Press to save the setting. 14 Paper Save Copy Press to copy with a preset setting to delete letters and numbers....
Basic Guide
Page 20
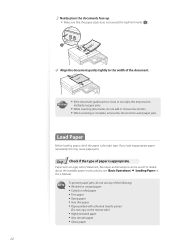
... • Very smooth paper • Glossy paper 20 IMPORTANT • If the document guides are too loose or too tight, this may result in the e-Manual. Paper such as Legal, Letter, Statement, Executive, and envelopes can be used.
... • Very smooth paper • Glossy paper 20 IMPORTANT • If the document guides are too loose or too tight, this may result in the e-Manual. Paper such as Legal, Letter, Statement, Executive, and envelopes can be used.
Basic Guide
Page 21
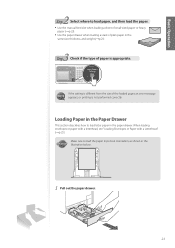
... in the same size, thickness, and weight (→p.21). Basic Operation 2 Step Select where to load paper, and then load the paper. • Use the manual feed slot when loading a sheet of small-sized paper or heavy paper (→p.23). • Use the paper drawer when loading a stack of the loaded...
... in the same size, thickness, and weight (→p.21). Basic Operation 2 Step Select where to load paper, and then load the paper. • Use the manual feed slot when loading a sheet of small-sized paper or heavy paper (→p.23). • Use the paper drawer when loading a stack of the loaded...
Basic Guide
Page 22
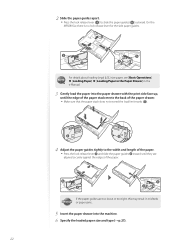
If the paper guides are too loose or too tight, this may result in the e-Manual. 3 Gently load the paper into the machine. 6 Specify the loaded paper size and type (→p.27). 22 2 Slide the paper guides apart. • Press the ...
If the paper guides are too loose or too tight, this may result in the e-Manual. 3 Gently load the paper into the machine. 6 Specify the loaded paper size and type (→p.27). 22 2 Slide the paper guides apart. • Press the ...
Basic Guide
Page 23
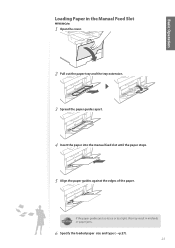
If the paper guides are too loose or too tight, this may result in the Manual Feed Slot MF8580Cdw 1 Open the cover. 2 Pull out the paper tray and the tray extension. 3 Spread the paper guides apart. 4 Insert the paper into the manual feed slot until the paper stops. 5 Align the paper guides against the edges of the paper. Basic Operation Loading Paper in misfeeds IMPORTANT or paper jams. 6 Specify the loaded paper size and type (→p.27). 23
If the paper guides are too loose or too tight, this may result in the Manual Feed Slot MF8580Cdw 1 Open the cover. 2 Pull out the paper tray and the tray extension. 3 Spread the paper guides apart. 4 Insert the paper into the manual feed slot until the paper stops. 5 Align the paper guides against the edges of the paper. Basic Operation Loading Paper in misfeeds IMPORTANT or paper jams. 6 Specify the loaded paper size and type (→p.27). 23
Basic Guide
Page 25
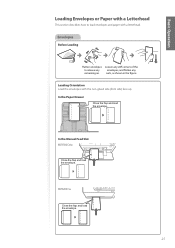
curls, as shown in the figure. In the Paper Drawer Close the flap and load the envelope. MF8280Cw Close the flap and load the envelope. 25 Loading Orientation Load the envelopes with a letterhead. Envelopes Before Loading Flatten envelopes Loosen any stiff corners of the to load envelopes and paper with the non-glued side (front side) face up. In the Manual Feed Slot MF8580Cdw Close the flap and load the envelope. Basic Operation Loading Envelopes or Paper with a Letterhead This section describes how to release any envelopes, and flatten any remaining air.
curls, as shown in the figure. In the Paper Drawer Close the flap and load the envelope. MF8280Cw Close the flap and load the envelope. 25 Loading Orientation Load the envelopes with a letterhead. Envelopes Before Loading Flatten envelopes Loosen any stiff corners of the to load envelopes and paper with the non-glued side (front side) face up. In the Manual Feed Slot MF8580Cdw Close the flap and load the envelope. Basic Operation Loading Envelopes or Paper with a Letterhead This section describes how to release any envelopes, and flatten any remaining air.
Basic Guide
Page 26
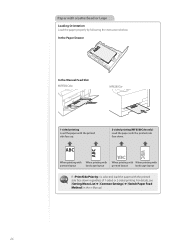
... [Setting Menu List] [Common Settings] [Switch Paper Feed Method] in the e-Manual. 26 In the Paper Drawer In the Manual Feed Slot MF8580Cdw MF8280Cw 1-sided printing Load the paper with the printed side face up. 2-sided printing (MF8580Cdw only) Load the paper with a Letterhead or Logo Loading Orientation Load the paper properly...
... [Setting Menu List] [Common Settings] [Switch Paper Feed Method] in the e-Manual. 26 In the Paper Drawer In the Manual Feed Slot MF8580Cdw MF8280Cw 1-sided printing Load the paper with the printed side face up. 2-sided printing (MF8580Cdw only) Load the paper with a Letterhead or Logo Loading Orientation Load the paper properly...
Basic Guide
Page 27
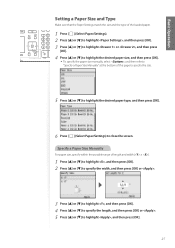
...]. 4 Press [▲] or [▼] to highlight the desired paper size, and then press [OK]. • To specify the paper size manually, select , and then refer to "Specify a Paper Size Manually" at the bottom of length and width ( ≥ ). 1 Press [▲] or [▼] to highlight , and then press [OK... [▼] to specify the length, and then press [OK] or . 5 Press [▲] or [▼] to close the screen. Specify a Paper Size Manually For paper size, specify within the possible range of this page to specify the size. 5 Press [▲] or [▼] to highlight the desired paper type...
...]. 4 Press [▲] or [▼] to highlight the desired paper size, and then press [OK]. • To specify the paper size manually, select , and then refer to "Specify a Paper Size Manually" at the bottom of length and width ( ≥ ). 1 Press [▲] or [▼] to highlight , and then press [OK... [▼] to specify the length, and then press [OK] or . 5 Press [▲] or [▼] to close the screen. Specify a Paper Size Manually For paper size, specify within the possible range of this page to specify the size. 5 Press [▲] or [▼] to highlight the desired paper type...
Basic Guide
Page 30
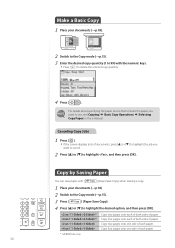
... the job you want to cancel. 2 Press [▲] or [▼] to use, see [Copying] [Basic Copy Operations] [Selecting Copy Paper] in the e-Manual. For details about specifying the paper source that contains the paper you want to highlight , and then press [OK]. Make a Basic Copy 1 Place your documents... 4 Press [▲] or [▼] to delete the entered copy quantity. 4 Press [ ]. Canceling Copy Jobs 1 Press [ ]. • If the screen displays a list of each paper. * MF8580Cdw only 30 Copy four pages onto one side of each of both sides of paper.
... the job you want to cancel. 2 Press [▲] or [▼] to use, see [Copying] [Basic Copy Operations] [Selecting Copy Paper] in the e-Manual. For details about specifying the paper source that contains the paper you want to highlight , and then press [OK]. Make a Basic Copy 1 Place your documents... 4 Press [▲] or [▼] to delete the entered copy quantity. 4 Press [ ]. Canceling Copy Jobs 1 Press [ ]. • If the screen displays a list of each paper. * MF8580Cdw only 30 Copy four pages onto one side of each of both sides of paper.
Basic Guide
Page 31
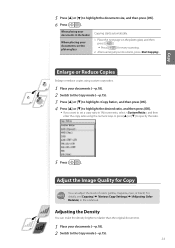
... highlight the document size, and then press [OK]. 6 Press [ ]. For details, see [Copying] [Various Copy Settings] [Adjusting Color Balance] in the feeder When placing your documents on the platen glass, and then press [ ]. • Press [ ] for Copy You can make the... density brighter or darker than the original documents. 1 Place your documents in the e-Manual. Copy 5 Press [▲] or [▼] to specify the ratio. 5 Press [ ]. Enlarge or Reduce Copies Enlarge or reduce copies using custom copy ...
... highlight the document size, and then press [OK]. 6 Press [ ]. For details, see [Copying] [Various Copy Settings] [Adjusting Color Balance] in the feeder When placing your documents on the platen glass, and then press [ ]. • Press [ ] for Copy You can make the... density brighter or darker than the original documents. 1 Place your documents in the e-Manual. Copy 5 Press [▲] or [▼] to specify the ratio. 5 Press [ ]. Enlarge or Reduce Copies Enlarge or reduce copies using custom copy ...

Basic Guide
Page 32
...[Copying] [Various Copy Settings] [Selecting Document Type] in the e-Manual. 5 Press [ ]. For details, see [Copying] [Various Copy Settings] [Adjusting Density] in the e-Manual. Best suited for documents that contain printed photos. Suitable for documents that contain text, photos... 4 Press [▲] or [▼] to highlight , and then press [OK]. 32 Adjusting the Sharpness You can adjust the background color. Suitable for documents that contain text, photos, and maps. (Scanned documents are at a high resolution at high speed.) Suitable for ...
...[Copying] [Various Copy Settings] [Selecting Document Type] in the e-Manual. 5 Press [ ]. For details, see [Copying] [Various Copy Settings] [Adjusting Density] in the e-Manual. Best suited for documents that contain printed photos. Suitable for documents that contain text, photos... 4 Press [▲] or [▼] to highlight , and then press [OK]. 32 Adjusting the Sharpness You can adjust the background color. Suitable for documents that contain text, photos, and maps. (Scanned documents are at a high resolution at high speed.) Suitable for ...

Basic Guide
Page 34
... to scan the entire page of an LTR-size document. 6 Press [▲] or [▼] to use, and then press [OK]. 7 Press [ ]. Specifying the page layout manually If you select at step 4 above, you want to highlight the paper source that contains the paper you may specify the desired page layout. 34...
... to scan the entire page of an LTR-size document. 6 Press [▲] or [▼] to use, and then press [OK]. 7 Press [ ]. Specifying the page layout manually If you select at step 4 above, you want to highlight the paper source that contains the paper you may specify the desired page layout. 34...


