Product Setup, User Guides & Manuals
Page 5
Table of Contents Features of the CanoScan FB620U 7 Safety Precautions 9 Setup and Use ...13 Components Guide ...16 Placement and Connection 18 Connecting to the Computer 19 About the USB Interface 21 Positioning the Documents 22 How to Use the Start Button 24 The Smart Button and... Button Functions 25 Transporting the Scanner 27 Appendices 29 Troubleshooting ...30 Problems with the Initial Connection of the Scanner to a USB Port 31 Problems with Software Installation 32 Problems Starting Software Programs 32 Problems with the Scanner 34 Problems with Scanning 35 Other questions...
Table of Contents Features of the CanoScan FB620U 7 Safety Precautions 9 Setup and Use ...13 Components Guide ...16 Placement and Connection 18 Connecting to the Computer 19 About the USB Interface 21 Positioning the Documents 22 How to Use the Start Button 24 The Smart Button and... Button Functions 25 Transporting the Scanner 27 Appendices 29 Troubleshooting ...30 Problems with the Initial Connection of the Scanner to a USB Port 31 Problems with Software Installation 32 Problems Starting Software Programs 32 Problems with the Scanner 34 Problems with Scanning 35 Other questions...
Product Setup, User Guides & Manuals
Page 17
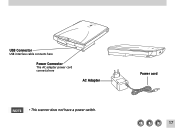
USB Connector USB interface cable connects here Power Connector The AC adapter power cord connects here AC Adapter • This scanner does not have a power switch. Power cord 17
USB Connector USB interface cable connects here Power Connector The AC adapter power cord connects here AC Adapter • This scanner does not have a power switch. Power cord 17
Product Setup, User Guides & Manuals
Page 18
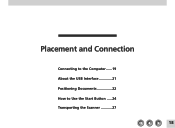
Placement and Connection Connecting to the Computer ......19 About the USB Interface 21 Positioning Documents 22 How to Use the Start Button .....24 Transporting the Scanner ...........27 18
Placement and Connection Connecting to the Computer ......19 About the USB Interface 21 Positioning Documents 22 How to Use the Start Button .....24 Transporting the Scanner ...........27 18
Product Setup, User Guides & Manuals
Page 19
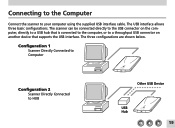
Configuration 1 Scanner Directly Connected to Computer Configuration 2 Scanner Directly Connected to your computer using the supplied USB interface cable. Connecting to the Computer Connect the scanner to HUB Other USB Device USB Hub 19 The scanner can be connected directly to the USB connector on the computer, directly to a USB hub that is connected to the computer, or to a throughput USB connector on another device that supports the USB interface. The three configurations are shown below. The USB interface allows three basic configurations.
Configuration 1 Scanner Directly Connected to Computer Configuration 2 Scanner Directly Connected to your computer using the supplied USB interface cable. Connecting to the Computer Connect the scanner to HUB Other USB Device USB Hub 19 The scanner can be connected directly to the USB connector on the computer, directly to a USB hub that is connected to the computer, or to a throughput USB connector on another device that supports the USB interface. The three configurations are shown below. The USB interface allows three basic configurations.
Product Setup, User Guides & Manuals
Page 20
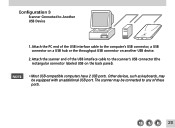
The scanner may be connected to any of the USB interface cable to the computer's USB connector, a USB connector on a USB hub or the throughput USB connector on the back panel). • Most USB-compatible computers have 2 USB ports. Other devices, such as keyboards, may be equipped with an additional USB port. Configuration 3 Scanner Connected to Another USB Device 1.Attach the PC end of the USB interface cable to the scanner's USB connector (the rectangular connector labeled USB on another USB device. 2.Attach the scanner end of these ports. 20
The scanner may be connected to any of the USB interface cable to the computer's USB connector, a USB connector on a USB hub or the throughput USB connector on the back panel). • Most USB-compatible computers have 2 USB ports. Other devices, such as keyboards, may be equipped with an additional USB port. Configuration 3 Scanner Connected to Another USB Device 1.Attach the PC end of the USB interface cable to the scanner's USB connector (the rectangular connector labeled USB on another USB device. 2.Attach the scanner end of these ports. 20
Product Setup, User Guides & Manuals
Page 21
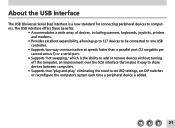
... a wide array of devices, including scanners, keyboards, joysticks, printers and modems. • Provides excellent expansibility, allowing up to 127 devices to be connected to one USB controller. • Supports two-way communication at speeds faster than a parallel port (12 megabits per second versus 1) or a serial port. • Supports 'hot swapping,' which...
... a wide array of devices, including scanners, keyboards, joysticks, printers and modems. • Provides excellent expansibility, allowing up to 127 devices to be connected to one USB controller. • Supports two-way communication at speeds faster than a parallel port (12 megabits per second versus 1) or a serial port. • Supports 'hot swapping,' which...
Product Setup, User Guides & Manuals
Page 31
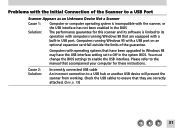
... of the guarantee. You must change the BIOS settings to a USB hub or another USB device will prevent the scanner from working. Check the USB cables to its software is incompatible with the scanner, or the USB interface has not been enabled in the BIOS Solution: The performance ...guarantee for these instructions. Please refer to the manual that they are equipped with a USB port on an optional expansion card fall outside the limits of the Scanner to a USB Port Scanner Appears as an Unknown Device Not a Scanner Cause 1: Computer or computer operating system is...
... of the guarantee. You must change the BIOS settings to a USB hub or another USB device will prevent the scanner from working. Check the USB cables to its software is incompatible with the scanner, or the USB interface has not been enabled in the BIOS Solution: The performance ...guarantee for these instructions. Please refer to the manual that they are equipped with a USB port on an optional expansion card fall outside the limits of the Scanner to a USB Port Scanner Appears as an Unknown Device Not a Scanner Cause 1: Computer or computer operating system is...
Product Setup, User Guides & Manuals
Page 32
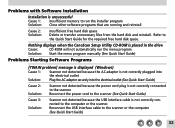
Refer to the scanner or the computer (See Quick Start Guide) 32 Reconnect the USB interface cable to the Quick Start Guide for the required free hard disk space.... Reconnect the power cord to the scanner (See Quick Start Guide) Cause 3: Solution: Scanner not detected because the USB interface cable is placed in the drive Cause: CD-ROM will not automatically run the installer program Solution: Close other... or transfer unnecessary files from the hard disk and reinstall. Nothing displays when the CanoScan Setup Utility CD-ROM is not correctly connected to the computer or the scanner.
Refer to the scanner or the computer (See Quick Start Guide) 32 Reconnect the USB interface cable to the Quick Start Guide for the required free hard disk space.... Reconnect the power cord to the scanner (See Quick Start Guide) Cause 3: Solution: Scanner not detected because the USB interface cable is placed in the drive Cause: CD-ROM will not automatically run the installer program Solution: Close other... or transfer unnecessary files from the hard disk and reinstall. Nothing displays when the CanoScan Setup Utility CD-ROM is not correctly connected to the computer or the scanner.
Product Setup, User Guides & Manuals
Page 34
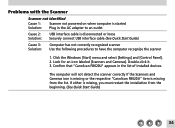
... [Control Panel]. 2. Double-click it. 3. Look for an icon labeled [Scanners and Cameras]. Confirm that "CanoScan FB620U" appears in the AC adapter to an outlet Cause 2: Solution: USB interface cable is disconnected or loose Securely connect USB interface cable (See Quick Start Guide) Cause 3: Solution: Computer has not correctly recognized scanner Use the...
... [Control Panel]. 2. Double-click it. 3. Look for an icon labeled [Scanners and Cameras]. Confirm that "CanoScan FB620U" appears in the AC adapter to an outlet Cause 2: Solution: USB interface cable is disconnected or loose Securely connect USB interface cable (See Quick Start Guide) Cause 3: Solution: Computer has not correctly recognized scanner Use the...

Product Setup, User Guides & Manuals
Page 38
Detach the USB interface cable from the document glass by wiping them with a dry cloth. • Do not use substances containing alcohol, thinners or benzene on the scanner's ...
Detach the USB interface cable from the document glass by wiping them with a dry cloth. • Do not use substances containing alcohol, thinners or benzene on the scanner's ...
Product Setup, User Guides & Manuals
Page 40
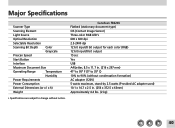
... Document Size Operating Range Temperature Humidity Power Requirements Power Consumption External Dimensions (w x l x h) Weight • Specifications are subject to 90% (without notice. CanoScan FB620U Flatbed (stationary document type) CIS (Contact Image Sensor) Three-color RGB LED's 600 x 600 dpi 2.5-2400 dpi 12 bit input/8 bit output for... each color (RGB) 12 bit input/8 bit output 15 sec Yes USB A4/Letter, 8.5 x 11.7 in. (216 x 297 mm) 41º to 95º F (5º to 35º C) 10% to change without ...
... Document Size Operating Range Temperature Humidity Power Requirements Power Consumption External Dimensions (w x l x h) Weight • Specifications are subject to 90% (without notice. CanoScan FB620U Flatbed (stationary document type) CIS (Contact Image Sensor) Three-color RGB LED's 600 x 600 dpi 2.5-2400 dpi 12 bit input/8 bit output for... each color (RGB) 12 bit input/8 bit output 15 sec Yes USB A4/Letter, 8.5 x 11.7 in. (216 x 297 mm) 41º to 95º F (5º to 35º C) 10% to change without ...
Product Setup, User Guides & Manuals
Page 41
Index A AC Adapter 17 Alignment Mark 16, 22 C Care and Maintenance 38 Connecting to the Computer 19 D Document Cover 16 Document Glass 16 L Locations 9, 14 Locations to Avoid 14 Lock mark 28 Lock Position 28 Lock Switch 16, 28 M Maximum Scanning Size 23 P Positioning the Documents 22 Power Connector 17 Power cord 17 Power Supply 10 S Scanning Unit 16, 27 Space around the scanner 13 Specifications 40 Start Button 16 T Troubleshooting 30 U USB 19, 21 41
Index A AC Adapter 17 Alignment Mark 16, 22 C Care and Maintenance 38 Connecting to the Computer 19 D Document Cover 16 Document Glass 16 L Locations 9, 14 Locations to Avoid 14 Lock mark 28 Lock Position 28 Lock Switch 16, 28 M Maximum Scanning Size 23 P Positioning the Documents 22 Power Connector 17 Power cord 17 Power Supply 10 S Scanning Unit 16, 27 Space around the scanner 13 Specifications 40 Start Button 16 T Troubleshooting 30 U USB 19, 21 41

