CanoScan D646U Toolbox1.3 for Mac Guide
Page 3
... the CanoScan Toolbox ...5 3 The CanoScan Toolbox Main Window 6 4 Using the Scanner Button 6 5 Selecting the Scanner ...6 6 Scanning ...7 7 Saving Scanned Images 7 8 Opening Files ...8 Opening a Stored File ...8 Opening a New Image Window ...8 9 Faxing a Scanned Image 9 Setting the Fax Preferences ...9 Selecting the Fax Print Driver ...9 Scanning and Faxing a Document 9 10 Printing Copies of a Scanned Image 10 Setting the Copy Preferences ...10 Copying a Document ...10...
... the CanoScan Toolbox ...5 3 The CanoScan Toolbox Main Window 6 4 Using the Scanner Button 6 5 Selecting the Scanner ...6 6 Scanning ...7 7 Saving Scanned Images 7 8 Opening Files ...8 Opening a Stored File ...8 Opening a New Image Window ...8 9 Faxing a Scanned Image 9 Setting the Fax Preferences ...9 Selecting the Fax Print Driver ...9 Scanning and Faxing a Document 9 10 Printing Copies of a Scanned Image 10 Setting the Copy Preferences ...10 Copying a Document ...10...

CanoScan D646U Toolbox1.3 for Mac Guide
Page 10
... 10 Choose Scan Preferences from a different source. 6. Click OK. Specify a page range. 5. Click the Print button. Printing Copies of copies you are printed. The Printer driver dialog box opens. 3. Copying a Document To copy documents using . Click the Copy button in steps 3 through 5 above varies depending on the type of any scanned ... source to print from the Edit menu. 2. The image is scanned and the number specified copies are using your scanner and printer to copy photos. 10. NOTE: The information you enter in the CanoScan Toolbox Main window.
... 10 Choose Scan Preferences from a different source. 6. Click OK. Specify a page range. 5. Click the Print button. Printing Copies of copies you are printed. The Printer driver dialog box opens. 3. Copying a Document To copy documents using . Click the Copy button in steps 3 through 5 above varies depending on the type of any scanned ... source to print from the Edit menu. 2. The image is scanned and the number specified copies are using your scanner and printer to copy photos. 10. NOTE: The information you enter in the CanoScan Toolbox Main window.
CanoScan D646U ScanGear CS-U 6.0 for Win Guide
Page 13
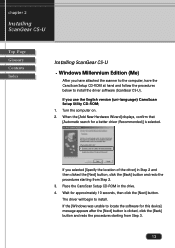
...Index Installing ScanGear CS-U • Windows Millennium Edition (Me) After you have attached the scanner to the computer, have the CanoScan Setup CD-ROM at hand and follow the procedures below to install. The driver will begin to install the driver software (ScanGear CS-U). If you...version (uni-language) CanoScan Setup Utility CD-ROM; 1. Wait for this device] message appears after the [Next] button is selected. If you selected [Specify the location of the driver] in the drive. 4. If the [Windows was unable to locate the software for approximately 10 seconds, then click ...
...Index Installing ScanGear CS-U • Windows Millennium Edition (Me) After you have attached the scanner to the computer, have the CanoScan Setup CD-ROM at hand and follow the procedures below to install. The driver will begin to install the driver software (ScanGear CS-U). If you...version (uni-language) CanoScan Setup Utility CD-ROM; 1. Wait for this device] message appears after the [Next] button is selected. If you selected [Specify the location of the driver] in the drive. 4. If the [Windows was unable to locate the software for approximately 10 seconds, then click ...
CanoScan D646U ScanGear CS-U 6.0 for Win Guide
Page 15
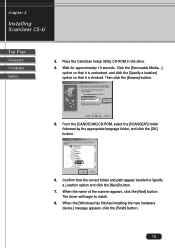
Place the CanoScan Setup Utility CD-ROM in the drive. 4. When the [Windows has finished installing the new hardware device.] message appears, click the [Finish] button. 15 Wait for approximately 10 seconds. Then click the [Browse] button. 5. The driver will begin to install. 8. Click the [Removable Media...] option so that it is unchecked, and click...
Place the CanoScan Setup Utility CD-ROM in the drive. 4. When the [Windows has finished installing the new hardware device.] message appears, click the [Finish] button. 15 Wait for approximately 10 seconds. Then click the [Browse] button. 5. The driver will begin to install. 8. Click the [Removable Media...] option so that it is unchecked, and click...
CanoScan D646U Quick Start Guide
Page 5
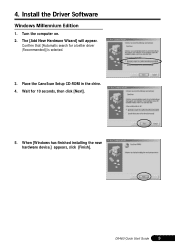
Confirm that [Automatic search for 10 seconds, then click [Next]. 5. Wait for a better driver (Recommended)] is selected. 3. When [Windows has finished installing the new hardware device.] appears, click [Finish]. The [Add New Hardware Wizard] will appear. D646U Quick Start Guide 3 4. Place the CanoScan Setup CD-ROM in the drive. 4. Turn the computer on. 2. Install the Driver Software Windows Millennium Edition 1.
Confirm that [Automatic search for 10 seconds, then click [Next]. 5. Wait for a better driver (Recommended)] is selected. 3. When [Windows has finished installing the new hardware device.] appears, click [Finish]. The [Add New Hardware Wizard] will appear. D646U Quick Start Guide 3 4. Place the CanoScan Setup CD-ROM in the drive. 4. Turn the computer on. 2. Install the Driver Software Windows Millennium Edition 1.
CanoScan D646U Quick Start Guide
Page 6
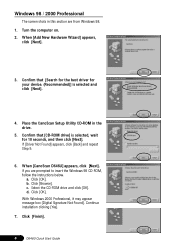
If [Driver Not Found] appears, click [Back] and repeat Step 5. 6. Click [Browse]. Click [OK]. Continue installation clicking [Yes]. 7. When [Add New Hardware Wizard] appears, click [Next]. 3. Click [OK]. b. c. d. With Windows 2000 Professional, it may appear message box [Digital Signature Not Found]. When [CanoScan D646U] appears, click [Next]. Click [Finish]. 4 D646U Quick Start Guide a. Windows 98 / 2000 Professional...
If [Driver Not Found] appears, click [Back] and repeat Step 5. 6. Click [Browse]. Click [OK]. Continue installation clicking [Yes]. 7. When [Add New Hardware Wizard] appears, click [Next]. 3. Click [OK]. b. c. d. With Windows 2000 Professional, it may appear message box [Digital Signature Not Found]. When [CanoScan D646U] appears, click [Next]. Click [Finish]. 4 D646U Quick Start Guide a. Windows 98 / 2000 Professional...


