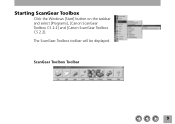
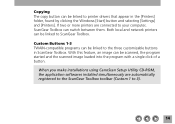
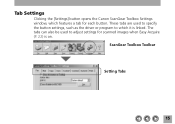
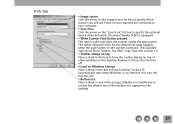
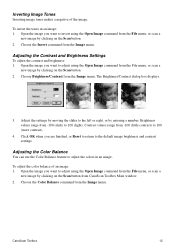
CanoScan D646U Toolbox2.2 for Win Guide
Page 3
Trademarks Microsoft and Windows are the trademarks or registered trademarks of Microsoft Corporation in the United States and other Windows, different screens may appear from this manual, most screen shots are taken with Windows Millennium Edition. Other names and products listed in this publication are trademarks or registered trademarks of the respective companies. 3 When you use other countries. Regarding screen shots In this manual.
CanoScan D646U Toolbox2.2 for Win Guide
Page 5
.... Before installing ScanGear Toolbox, the scanner driver and the printer driver are those with using the CanoScan Setup Utility CD-ROM bundled with the service. When you log on as an Administrator to install. 5 With Windows 2000 Professional, ensure that you obtain the ScanGear Toolbox through the download service, refer to the...
CanoScan D646U Toolbox2.2 for Win Guide
Page 6
.... Installing As described in the Getting Started Guide provided with the installation. Click the [Start Installation] button. Place the CanoScan Setup Utility CD-ROM in the CD-ROM's menu window. 3. The Install window will automatically be added to proceed with the scanner, if ScanGear Toolbox is already installed, the following procedures below are...
CanoScan D646U Toolbox2.2 for Win Guide
Page 7
Select Add/Remove Programs. 7 Uninstalling with Add/Remove Programs Properties 1. Click the Windows [Start] button on the taskbar and select [Programs], [Canon ScanGear Toolbox CS 2.2] and [Uninstall Canon ScanGear Toolbox CS 2.2] to open the Control Panel. 2. Uninstalling Uninstalling from the start menu Click the Windows [Start] button on the taskbar and select [Settings], [Control Panel] to uninstall the software.
CanoScan D646U Toolbox2.2 for Win Guide
Page 8
Follow the on ) or [Change/Remove] button (Windows 2000 Professional). Select [Canon ScanGear Toolbox CS 2.2] from the list and click the [Add/Remove] button (Windows Me/98 and so on -screen instructions to complete the procedure. 8 3.
CanoScan D646U Toolbox2.2 for Win Guide
Page 9
Starting ScanGear Toolbox Click the Windows [Start] button on the taskbar and select [Programs], [Canon ScanGear Toolbox CS 2.2] and [Canon ScanGear Toolbox CS 2.2]. The ScanGear Toolbox toolbar will be displayed. ScanGear Toolbox Toolbar 9
CanoScan D646U Toolbox2.2 for Win Guide
Page 12
ScanGear Toolbox continues to close it was displayed. 12 ScanGear Toolbox will close . Closing ScanGear Toolbox Closing the Toolbar Click the close box at the same time if it . Only the toolbar will also close at the upper right of the toolbar to run even after the toolbar is closed by the above method. The toolbar will close . Closing ScanGear Toolbox Right-click the shortcut icon ( ) on the Windows taskbar and select [Exit Canon ScanGear Toolbox CS] from the pop-up menu.
CanoScan D646U Toolbox2.2 for Win Guide
Page 14
... and network printers can be linked to the three customizable buttons in the [Printers] folder, found by clicking the Windows [Start] button and selecting [Settings] and [Printers]. When you make installations using CanoScan Setup Utility CD-ROM, the application softwares installed simultaneously are connected to your computer, ScanGear Toolbox can be linked...
CanoScan D646U Toolbox2.2 for Win Guide
Page 15
These tabs are used to which features a tab for scanned images when Easy Acquire (P. 22) is linked. Tab Settings Clicking the [Settings] button opens the Canon ScanGear Toolbox Settings window, which it is on. ScanGear Toolbox Toolbar Setting Tabs 15 The tabs can also be used to specify the button settings, such as the driver or program to adjust settings for each button.
CanoScan D646U Toolbox2.2 for Win Guide
Page 21
...selected in one of the [Large], [Medium] or [Small] box to control the relative size of other windows on the desktop. Remove it to turn this function off . • Load on Windows Startup Place a check in this box to have ScanGear Toolbox CS automatically start button. Remove it to turn this...Automatic Document Feeder (ADF) is equipped. • When Scanner Push Button pressed This item is valid only when the scanner equips the start when Windows is pressed. Prefs Tab • Image source Click the arrow on the image source list box to specify which scanner you will use if ...
CanoScan D646U Toolbox2.2 for Win Guide
Page 24
..., Letter Output File Formats 24 bit 8 bit 1 bit Threshold 128 A4, A5 (Portrait), A5 (Landscape), B5, Letter, Executive, Statement (Portrait), Statement (Landscape), Business Card, Custom Windows Bitmap (*.bmp) JPEG Image (*.jpg) PC PaintBrush Image (*.pcx) Portable Network Graphics (*.png) Tagged Image File Format (*.tif) Unit for millimeter, inch Scanning Area millimeter...
CanoScan D646U Toolbox2.2 for Win Guide
Page 25
... bit 8 bit 1 bit Threshold 128 Paper Size A4, A5 (Portrait), A5 (Landscape), B5, Letter, Executive, Statement (Portrait), Statement (Landscape), Business Card, Custom Output File Formats Windows Bitmap (*.bmp) JPEG Image (*.jpg) PC PaintBrush Image (*.pcx) Portable Network Graphics (*.png) Tagged Image File Format (*.tif) Unit for millimeter, inch Scanning Area millimeter...
CanoScan D646U Toolbox1.3 for Mac Guide
Page 3
... of Contents 1 Introduction ...4 About the CanoScan Toolbox ...4 Obtaining Customer Support ...4 2 Installing the CanoScan Toolbox 5 System Requirements...5 Installing the CanoScan Toolbox ...5 3 The CanoScan Toolbox Main Window 6 4 Using the Scanner Button 6 5 Selecting the Scanner ...6 6 Scanning ...7 7 Saving Scanned Images 7 8 Opening Files ...8 Opening a Stored File ...8 Opening a New Image Window ...8 9 Faxing a Scanned Image 9 ......20 Viewing an Image Catalog ...20 Opening a Scanned Image from the Catalog 21 14 Linking Applications to the CanoScan Toolbox 22 CanoScan Toolbox 3
CanoScan D646U Toolbox1.3 for Mac Guide
Page 6
... Start Button on the front of the Select Scanner command from the Window menu. If the CanoScan Toolbox is closed, pressing the start button on the left-top of the scanner launches the CanoScan Toolbox. 5. Click the Scan button to launch the Canon Plug-in Module CS Click the Copy button to scan and... copy a document Click the Catalog button to specify an application you can hide the Main window by clicking the close box on the front...
CanoScan D646U Toolbox1.3 for Mac Guide
Page 7
...specify the compression level. 4. When you choose JPEG or TIFF formats, an Options dialog box appears so you scan and/or edit in a new CanoScan Toolbox Image window. 6. The Canon Plug-in a different file format, use the Save As command. The plug-in closes and the scanned image appears in the... CanoScan Toolbox. Specify the image format. Scanning Once the scanner is connected and the software is very simple. Place the photo or document on ...
CanoScan D646U Toolbox1.3 for Mac Guide
Page 8
...File menu, or click the Edit button in the CanoScan Toolbox Main window. CanoScan Toolbox 8 Choose the Open Image command from the File menu, an empty image window appears. The Open Image dialog box appears. 2. Opening a New Image Window When you have scanned as well as other image ...files using the CanoScan Toolbox. To open a stored file: 1. 8. Opening Files Opening a Stored File...
CanoScan D646U Toolbox1.3 for Mac Guide
Page 9
Click on the Fax button from the CanoScan Toolbox Main window. 3. To change the fax driver, delete the CanoScan Toolbox Prefs file in the Preferences folder in the scanner. 2. Place the document you fax from your computer. CanoScan Toolbox 9 Locate the fax driver in the Fax Settings...document: 1. Click the Text/Line art button in the Driver dialog box, click to fax photos. Choose Scan Preferences from the CanoScan Toolbox Main window. 2. Then set the optimum scanning preferences for faxing: 1. The selected fax driver launches the fax application so you can fax the...
CanoScan D646U Toolbox1.3 for Mac Guide
Page 10
... you enter in steps 3 through 5 above varies depending on the type of printer you are printed. Click the Text/Line art button in the CanoScan Toolbox Main window. Setting the Copy Preferences To set the optimum scanning preferences for copying: 1. Click OK. Click the Print button. Copying a Document To copy documents using...
CanoScan D646U Toolbox1.3 for Mac Guide
Page 11
...image: 1. The area outside of the selected portion of the image. Position the cursor over the image window. 3. The zoom capabilities only modify the image display. Choose Crop from the Image menu, or click...Lasso tool (to select irregular shapes) from the editing toolbox and move the cursor over the image window and click to enlarge the view (Zoom In) or press the Option key and click the ...new image by choosing Open Image from the File menu, or click the Scan button from the CanoScan Toolbox Main window. 2. Open the image you want to reduce the view (Zoom Out). Use the Zoom Out ...
CanoScan D646U Toolbox1.3 for Mac Guide
Page 12
... and brightness: 1. Adjust the settings by moving the slider to the left or right, or by clicking on the Scan button. 2. CanoScan Toolbox 12 To invert the tones in an image. Choose the Invert command from the Image menu. The Brightness/Contrast dialog box displays. ...3. Adjusting the Color Balance You can use the Color Balance feature to adjust using the Open Image command from CanoScan Toolbox Main window. 2. To adjust the color balance of the image. Choose Brightness/Contrast from the Image menu. Brightness values range from the Image...