CanoScan 8400F Quick Start Guide
Page 9
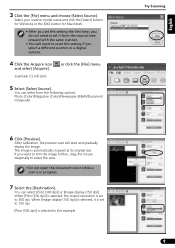
... . After calibration, the preview scan will start and gradually display the image. The image is set to reset this example. Try Scanning 9 English 3 Click the [File] menu and choose [Select Source]. Photo (Color)/Magazine (Color)/Newspaper (B&W)/Document (Grayscale). 6 Click [Preview]. If you select a different scanner or a digital camera. 4 Click the Acquire icon and select [Acquire...
... . After calibration, the preview scan will start and gradually display the image. The image is set to reset this example. Try Scanning 9 English 3 Click the [File] menu and choose [Select Source]. Photo (Color)/Magazine (Color)/Newspaper (B&W)/Document (Grayscale). 6 Click [Preview]. If you select a different scanner or a digital camera. 4 Click the Acquire icon and select [Acquire...

CanoScan 8400F Quick Start Guide
Page 13
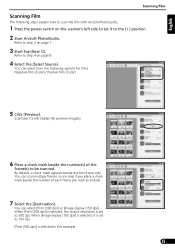
.... • Use a blower brush to shield the light if you are inserting a film strip with 5 or fewer frames, or if the edge of a scanned image appears whitened. • Ensure that there is obstructed. 35mm Film Strip c Open the film holder on the Film Guide when you are scanning film. d Align...Film Guide as shown in the diagram to the right. 13 Film Holder Calibration Slot • Place a black piece of the scanner. English 2 Insert the film into the Film Guide. Colors will not be scanned correctly if the calibration slot is no gap between the edge of the film and the film...
.... • Use a blower brush to shield the light if you are inserting a film strip with 5 or fewer frames, or if the edge of a scanned image appears whitened. • Ensure that there is obstructed. 35mm Film Strip c Open the film holder on the Film Guide when you are scanning film. d Align...Film Guide as shown in the diagram to the right. 13 Film Holder Calibration Slot • Place a black piece of the scanner. English 2 Insert the film into the Film Guide. Colors will not be scanned correctly if the calibration slot is no gap between the edge of the film and the film...
CanoScan 8400F Quick Start Guide
Page 15
...step if you wish to include. 7 Select the [Destination]. ScanGear CS will display the preview image(s). 6 Place a check mark beside the number(s) of each frame you place a check mark beside the number...You can scan multiple frames in this example. 15 You can select [Print (300 dpi)] or [Image display (150 dpi)]. Refer to step 2 on page 8. 4 Select the [Select Source]. You can... the following steps explain how to scan the film with ArcSoft PhotoStudio. 1 Press the power switch on the scanner's left side to set it is selected, it to the ( I ) position. 2 Start ArcSoft PhotoStudio...
...step if you wish to include. 7 Select the [Destination]. ScanGear CS will display the preview image(s). 6 Place a check mark beside the number(s) of each frame you place a check mark beside the number...You can scan multiple frames in this example. 15 You can select [Print (300 dpi)] or [Image display (150 dpi)]. Refer to step 2 on page 8. 4 Select the [Select Source]. You can... the following steps explain how to scan the film with ArcSoft PhotoStudio. 1 Press the power switch on the scanner's left side to set it is selected, it to the ( I ) position. 2 Start ArcSoft PhotoStudio...


