
XH G1S / XH A1S Instruction Manual
Page 5
... two sets of 800 TV lines, the highest in microphone. And More Audio options The camcorder is equipped with phantom power supply. DIGIC DV II image processor The next generation of any multi-camera shooting setup. In addition, you ...camcorder's operation. you can also activate the audio peak limiter ( 51) to be part of Canon's video processing engine ensures optimal video quality and color reproduction for uncompressed HD signal output, embedded audio and SMPTE time code (LTC) are just a few of the features of professional broadcast cameras. Introduction The XH G1S / XH A1S...
... two sets of 800 TV lines, the highest in microphone. And More Audio options The camcorder is equipped with phantom power supply. DIGIC DV II image processor The next generation of any multi-camera shooting setup. In addition, you ...camcorder's operation. you can also activate the audio peak limiter ( 51) to be part of Canon's video processing engine ensures optimal video quality and color reproduction for uncompressed HD signal output, embedded audio and SMPTE time code (LTC) are just a few of the features of professional broadcast cameras. Introduction The XH G1S / XH A1S...

XH G1S / XH A1S Instruction Manual
Page 8
... the Supplied Accessories...10 Components Guide ...11 Preparations Preparing the Power Supply...16 Preparing the Camcorder ...19 Using the Wireless Controller ...24 Loading/Removing a Cassette ...25 Inserting/Removing a Memory...Filter ...41 Selecting the Frame Rate ...42 Setting the Time Code...44 Synchronizing the Camcorder's Time Code 46 Setting the User Bit ...48 Audio Recording...49 Image Stabilizer ...54... Output ...83 Digital Video Control...85 Recording an External Video Signal (HDV/DV In, Analog Line-In 86 Converting Analog Signals into Digital Signals (Analog-Digital Converter 87 ...
... the Supplied Accessories...10 Components Guide ...11 Preparations Preparing the Power Supply...16 Preparing the Camcorder ...19 Using the Wireless Controller ...24 Loading/Removing a Cassette ...25 Inserting/Removing a Memory...Filter ...41 Selecting the Frame Rate ...42 Setting the Time Code...44 Synchronizing the Camcorder's Time Code 46 Setting the User Bit ...48 Audio Recording...49 Image Stabilizer ...54... Output ...83 Digital Video Control...85 Recording an External Video Signal (HDV/DV In, Analog Line-In 86 Converting Analog Signals into Digital Signals (Analog-Digital Converter 87 ...

XH G1S / XH A1S Instruction Manual
Page 13
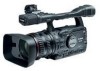
...the terminal. Operation cannot be guaranteed for connections with mounting screws longer than the buttons on the camcorder. 13 Connect only devices with the mark to the camcorder. About the Terminal (LANC) stands for the optional TA-100 Tripod Adapter ( 148) or the ... ( 114) Battery/memory card compartment ( 16) Dioptric adjustment lever ( 19) VIEWFINDER COMPONENT OUT terminal ( 80) terminal A/V1 terminal ( 79) HDV indicator HDV/DV terminal ( 81, 86, 88) (headphones) terminal HD/SD COMPONENT OUT terminal ( 80) START/STOP button ( 30) Memory card slot ( 26) Battery attachment...
...the terminal. Operation cannot be guaranteed for connections with mounting screws longer than the buttons on the camcorder. 13 Connect only devices with the mark to the camcorder. About the Terminal (LANC) stands for the optional TA-100 Tripod Adapter ( 148) or the ... ( 114) Battery/memory card compartment ( 16) Dioptric adjustment lever ( 19) VIEWFINDER COMPONENT OUT terminal ( 80) terminal A/V1 terminal ( 79) HDV indicator HDV/DV terminal ( 81, 86, 88) (headphones) terminal HD/SD COMPONENT OUT terminal ( 80) START/STOP button ( 30) Memory card slot ( 26) Battery attachment...
XH G1S / XH A1S Instruction Manual
Page 23
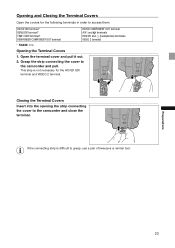
...similar tool. HD/SD SDI terminal* GENLOCK terminal* TIME CODE terminal* VIEWFINDER COMPONENT OUT terminal HD/SD COMPONENT OUT terminal A/V1 and terminals HDV/DV and (headphones) terminals VIDEO 2 terminal * only. Open the terminal cover and pull it out. 2. Closing the Terminal Covers Insert into the ...opening the strip connecting the cover to the camcorder and pull. Opening the Terminal Covers 1. Opening and Closing the Terminal Covers Open the covers for the HD/SD SDI terminal and VIDEO 2 terminal...
...similar tool. HD/SD SDI terminal* GENLOCK terminal* TIME CODE terminal* VIEWFINDER COMPONENT OUT terminal HD/SD COMPONENT OUT terminal A/V1 and terminals HDV/DV and (headphones) terminals VIDEO 2 terminal * only. Open the terminal cover and pull it out. 2. Closing the Terminal Covers Insert into the ...opening the strip connecting the cover to the camcorder and pull. Opening the Terminal Covers 1. Opening and Closing the Terminal Covers Open the covers for the HD/SD SDI terminal and VIDEO 2 terminal...

XH G1S / XH A1S Instruction Manual
Page 30
... tape. Move the / (card/tape) switch to OFF. 2. The end search, date search and index search functions may not work correctly if you turn the camcorder off. 30 If necessary, clean the video heads ( 143). Set the dial to . 3. Replace the lens cap. 3. Tally lamp When You Have Finished Recording 1. ..., wait until the tape counter stops completely before you start recording. Turn the dial to OFF if you do not intend to use the camcorder for a long time. If you do not remove the cassette, you can record the next scene without any noise or blank sections between ...
... tape. Move the / (card/tape) switch to OFF. 2. The end search, date search and index search functions may not work correctly if you turn the camcorder off. 30 If necessary, clean the video heads ( 143). Set the dial to . 3. Replace the lens cap. 3. Tally lamp When You Have Finished Recording 1. ..., wait until the tape counter stops completely before you start recording. Turn the dial to OFF if you do not intend to use the camcorder for a long time. If you do not remove the cassette, you can record the next scene without any noise or blank sections between ...
XH G1S / XH A1S Instruction Manual
Page 34
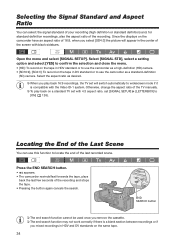
... displays on the tape in DV standard or to use the camcorder as desired. When you play back 16:9 recordings, the TV set [SIGNAL SETUP] [LETTERBOX] to widescreen mode if it is a blank section between recordings or if you mixed recordings in HDV and DV standards on a standard TV ...-definition (SD) camera. Otherwise, change the aspect ratio of the last recorded scene. Press the END SEARCH button. • appears. • The camcorder rewinds/fast forwards the tape, plays back the last few seconds of the recording. Selecting the Signal Standard and Aspect Ratio You can use the...
... displays on the tape in DV standard or to use the camcorder as desired. When you play back 16:9 recordings, the TV set [SIGNAL SETUP] [LETTERBOX] to widescreen mode if it is a blank section between recordings or if you mixed recordings in HDV and DV standards on a standard TV ...-definition (SD) camera. Otherwise, change the aspect ratio of the last recorded scene. Press the END SEARCH button. • appears. • The camcorder rewinds/fast forwards the tape, plays back the last few seconds of the recording. Selecting the Signal Standard and Aspect Ratio You can use the...

XH G1S / XH A1S Instruction Manual
Page 39
... to the VIEWFINDER COMPONENT OUT terminal will show the exact same picture as it is to the HD/SD SDI terminal ( only) and the HDV/DV terminal. With the custom function [CUSTOM REC] ( 97) you can select to have the magnified picture recorded on the tape ( mode...129; You can use two assist functions: Peaking emphasizes the outlines of the subject creating a clearer contrast, and Magnifying enlarges the image on the camcorder's viewfinder screen. Peaking While recording or in record pause, press the PEAKING button. • appears and the outlines of the subject will be set...
... to the VIEWFINDER COMPONENT OUT terminal will show the exact same picture as it is to the HD/SD SDI terminal ( only) and the HDV/DV terminal. With the custom function [CUSTOM REC] ( 97) you can select to have the magnified picture recorded on the tape ( mode...129; You can use two assist functions: Peaking emphasizes the outlines of the subject creating a clearer contrast, and Magnifying enlarges the image on the camcorder's viewfinder screen. Peaking While recording or in record pause, press the PEAKING button. • appears and the outlines of the subject will be set...

XH G1S / XH A1S Instruction Manual
Page 48
... [00 00 00 00]: 2. The first character of the user bit flashes. 3. Select [UB DISPLAY], set in the camcorder cannot be recorded when recording with the camcorder or from digital devices (HDV or DV). Otherwise, close the menu. 48 Select [SET]. continue with the procedure below. There are sixteen possible characters: the numbers...
... [00 00 00 00]: 2. The first character of the user bit flashes. 3. Select [UB DISPLAY], set in the camcorder cannot be recorded when recording with the camcorder or from digital devices (HDV or DV). Otherwise, close the menu. 48 Select [SET]. continue with the procedure below. There are sixteen possible characters: the numbers...

XH G1S / XH A1S Instruction Manual
Page 49
...two channels. Selecting the Microphone's Audio Recording Mode You can record audio in microphone. Select [DV AUDIO], select a setting option and close the menu. Note that when you use this camcorder is locked audio except for audio recorded from an analog input, or from a digital input ...To reduce the background sound of wind when recording outdoors in either HDV or DV standard, audio is recorded on channels 1 and 2, leaving the other channels unused. • Audio cannot be dubbed using this camcorder. • Audio recorded with this setting some low-frequency sounds may be 48...
...two channels. Selecting the Microphone's Audio Recording Mode You can record audio in microphone. Select [DV AUDIO], select a setting option and close the menu. Note that when you use this camcorder is locked audio except for audio recorded from an analog input, or from a digital input ...To reduce the background sound of wind when recording outdoors in either HDV or DV standard, audio is recorded on channels 1 and 2, leaving the other channels unused. • Audio cannot be dubbed using this camcorder. • Audio recorded with this setting some low-frequency sounds may be 48...

XH G1S / XH A1S Instruction Manual
Page 75
...LOCK button. The data code appears. The time code superimposed on the video signal output from the TIME CODE*, HD/SD SDI*, (LANC) and HDV/DV terminals will be displayed with the custom keys. button to freeze the display of the time code. Press the button again to prevent its accidental... KEY (1 or 2) button. LOCK button to hide the data code. [TC HOLD] Time Code Hold You can only be canceled when you turn the camcorder on/off, change the operating mode between recording and playback or change the position of the time code. • While on hold , the time code...
...LOCK button. The data code appears. The time code superimposed on the video signal output from the TIME CODE*, HD/SD SDI*, (LANC) and HDV/DV terminals will be displayed with the custom keys. button to freeze the display of the time code. Press the button again to prevent its accidental... KEY (1 or 2) button. LOCK button to hide the data code. [TC HOLD] Time Code Hold You can only be canceled when you turn the camcorder on/off, change the operating mode between recording and playback or change the position of the time code. • While on hold , the time code...

XH G1S / XH A1S Instruction Manual
Page 81
...). Open the menu and select [SIGNAL SETUP]. 3 Using the HDV/DV Terminal Open the terminal cover CV-250F DV Cable (optional) or commercially available 6 pin-6 pin DV cable 4-pin 6-pin • When connecting the camcorder to a monitor or TV that supports DV input, you connect the camcorder to the TV using a BNC cable (commercially available). ...
...). Open the menu and select [SIGNAL SETUP]. 3 Using the HDV/DV Terminal Open the terminal cover CV-250F DV Cable (optional) or commercially available 6 pin-6 pin DV cable 4-pin 6-pin • When connecting the camcorder to a monitor or TV that supports DV input, you connect the camcorder to the TV using a BNC cable (commercially available). ...

XH G1S / XH A1S Instruction Manual
Page 85
... reached its end), the connected device will continue recording. When this camcorder for DV control. With some non-Canon devices the DV control may be connected to this camcorder stops recording you may notice a brief interruption of the connected device is indicated...129; The status of the audio on the camcorder (inserting a cassette, etc.), the camcorder will start recording. Connected device is in a mode other devices can be overwritten. When connecting two DV Control-compatible Canon camcorders with the IEEE1394 AV/C protocol. Digital Video Control...
... reached its end), the connected device will continue recording. When this camcorder for DV control. With some non-Canon devices the DV control may be connected to this camcorder stops recording you may notice a brief interruption of the connected device is indicated...129; The status of the audio on the camcorder (inserting a cassette, etc.), the camcorder will start recording. Connected device is in a mode other devices can be overwritten. When connecting two DV Control-compatible Canon camcorders with the IEEE1394 AV/C protocol. Digital Video Control...
XH G1S / XH A1S Instruction Manual
Page 86
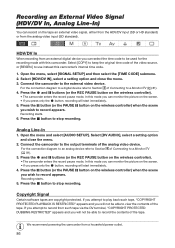
... the button (or the PAUSE you wish to a Monitor/TV ( 81). 3. Connect the camcorder to record the contents of the tape. We recommend powering the camcorder from such tape via the DV terminal, "COPYRIGHT PROTECTED DUBBING RESTRICTED" appears and you press only the button, recording will not be...able to the external video device. Recording an External Video Signal (HDV/DV In, Analog Line-In) You can record on the wireless controller). • The camcorder enters the record pause mode. Connect the camcorder to the output terminals of Connecting to record appears. If you attempt...
... the button (or the PAUSE you wish to a Monitor/TV ( 81). 3. Connect the camcorder to record the contents of the tape. We recommend powering the camcorder from such tape via the DV terminal, "COPYRIGHT PROTECTED DUBBING RESTRICTED" appears and you press only the button, recording will not be...able to the external video device. Recording an External Video Signal (HDV/DV In, Analog Line-In) You can record on the wireless controller). • The camcorder enters the record pause mode. Connect the camcorder to the output terminals of Connecting to record appears. If you attempt...

XH G1S / XH A1S Instruction Manual
Page 87
... For normal use, set to [ON], digital signals cannot be able to transfer converted signals via the HDV/DV terminal. We recommend powering the camcorder from a household power outlet. You can convert analog video input signals to [OFF]. Converting Analog Signals into ...Digital Signals (Analog-Digital Converter) Using the camcorder you may not be input via the camcorder's HDV/DV terminal. Depending on the software and the specifications of your computer, you can also press the AV...
... For normal use, set to [ON], digital signals cannot be able to transfer converted signals via the HDV/DV terminal. We recommend powering the camcorder from a household power outlet. You can convert analog video input signals to [OFF]. Converting Analog Signals into ...Digital Signals (Analog-Digital Converter) Using the camcorder you may not be input via the camcorder's HDV/DV terminal. Depending on the software and the specifications of your computer, you can also press the AV...

XH G1S / XH A1S Instruction Manual
Page 88
...HDV output: Set [PLAYBACK STD] to [HDV] and [HD DOWN-CONV] to [DV]. - Connecting to a Computer To connect the camcorder to a computer you will need a computer equipped with an IEEE1394 (DV) terminal and video editing software with the video signal standard you are using. Should the ...to [ON]. For video input from the camcorder to the computer: - DV output: Set [PLAYBACK STD] to [OFF]. - DV input: Set [PLAYBACK STD] to the camcorder: - Use the optional CV-250F (4 pin-6 pin) DV cable or a commercially available 6 pin-6 pin DV cable. If the computer is not compatible with the...
...HDV output: Set [PLAYBACK STD] to [HDV] and [HD DOWN-CONV] to [DV]. - Connecting to a Computer To connect the camcorder to a computer you will need a computer equipped with an IEEE1394 (DV) terminal and video editing software with the video signal standard you are using. Should the ...to [ON]. For video input from the camcorder to the computer: - DV output: Set [PLAYBACK STD] to [OFF]. - DV input: Set [PLAYBACK STD] to the camcorder: - Use the optional CV-250F (4 pin-6 pin) DV cable or a commercially available 6 pin-6 pin DV cable. If the computer is not compatible with the...

XH G1S / XH A1S Instruction Manual
Page 102
...is active: [OFF], [ON] 13 [OBJ DST UNIT] Object Distance Units Display Selects the units (meters or feet) for that of the HDV/DV terminal. Setting Options: [CHARACTER REC] Recording of superimposed on when receiving a command from the wireless controller. Setting Options: [MARKER] Level/center/grid...assist functions are activated. Setting Options: [TYPE 1], [TYPE 2], [OFF] 20 [CUSTOM REC] Custom Recording Selects whether to embed the on the camcorder. Setting Options: [BAR], [NUMBER] 15 [COLOR BARS] Color Bars Signal Selects the type of the video recording and whether to record on the...
...is active: [OFF], [ON] 13 [OBJ DST UNIT] Object Distance Units Display Selects the units (meters or feet) for that of the HDV/DV terminal. Setting Options: [CHARACTER REC] Recording of superimposed on when receiving a command from the wireless controller. Setting Options: [MARKER] Level/center/grid...assist functions are activated. Setting Options: [TYPE 1], [TYPE 2], [OFF] 20 [CUSTOM REC] Custom Recording Selects whether to embed the on the camcorder. Setting Options: [BAR], [NUMBER] 15 [COLOR BARS] Color Bars Signal Selects the type of the video recording and whether to record on the...

XH G1S / XH A1S Instruction Manual
Page 104
Select [OK], press the SELECT/SET dial and close the menu. Custom display files saved with a Canon XL H1S, XL H1A, XH G1 or XH A1 cannot be used with this camcorder. From the column on the screen. Setting Options: [OFF], [ON(NORMAL)], [ON(ALWAYS)] 05 [ND] ND Filter displays Setting Options: [...focus. List of the custom function file currently active: [OFF], [ON] 09 [RECORDING STD] HD Standard Icon Setting Options: [OFF], [ON] 10 [DV REC MODE] Recording Mode in Standard Definition Setting Options: [OFF], [ON] 11 [FRAME RATE] Frame Rate Display Setting Options: [OFF], [ON] 104 Open...
Select [OK], press the SELECT/SET dial and close the menu. Custom display files saved with a Canon XL H1S, XL H1A, XH G1 or XH A1 cannot be used with this camcorder. From the column on the screen. Setting Options: [OFF], [ON(NORMAL)], [ON(ALWAYS)] 05 [ND] ND Filter displays Setting Options: [...focus. List of the custom function file currently active: [OFF], [ON] 09 [RECORDING STD] HD Standard Icon Setting Options: [OFF], [ON] 10 [DV REC MODE] Recording Mode in Standard Definition Setting Options: [OFF], [ON] 11 [FRAME RATE] Frame Rate Display Setting Options: [OFF], [ON] 104 Open...

XH G1S / XH A1S Instruction Manual
Page 107
... fast playback at 8x the normal playback speed. Playing Playback Back a Tape If the playback picture is distorted, clean the video heads using a Canon DVM-CL video head cleaning cassette or a commercially available digital video head cleaning cassette ( 143). Turn the dial to and set it to [...AUTO], [HDV] or [DV] to match the tape you wish to playback. 3. button on the camcorder or the PAUSE button on the wireless controller (rewind playback) / (fast forward playback) Press down and hold the ...
... fast playback at 8x the normal playback speed. Playing Playback Back a Tape If the playback picture is distorted, clean the video heads using a Canon DVM-CL video head cleaning cassette or a commercially available digital video head cleaning cassette ( 143). Turn the dial to and set it to [...AUTO], [HDV] or [DV] to match the tape you wish to playback. 3. button on the camcorder or the PAUSE button on the wireless controller (rewind playback) / (fast forward playback) Press down and hold the ...

XH G1S / XH A1S Instruction Manual
Page 108
... playback modes. The picture may be distorted. The picture may become distorted during some special playback modes. The camcorder stops the tape automatically after 4 minutes 30 seconds in playback pause mode to protect the tape and video heads. During fast forward playback...to normal playback. (play ) button to return to enter the fast playback. (frame reverse) / (frame advance) Plays back frame-by -frame. DV (playback pause) To pause playback, press the during normal playback, rewind or fast forward to normal playback. Press the (play ) button to enter the...
... playback modes. The picture may be distorted. The picture may become distorted during some special playback modes. The camcorder stops the tape automatically after 4 minutes 30 seconds in playback pause mode to protect the tape and video heads. During fast forward playback...to normal playback. (play ) button to return to enter the fast playback. (frame reverse) / (frame advance) Plays back frame-by -frame. DV (playback pause) To pause playback, press the during normal playback, rewind or fast forward to normal playback. Press the (play ) button to enter the...
XH G1S / XH A1S Instruction Manual
Page 110
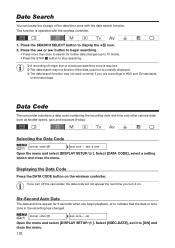
...SETUP/ 6SEC.DATE••••OFF Open the menu and select [DISPLAY SETUP/ close the menu. Data Code The camcorder maintains a data code containing the recording date and time and other camera data such as shutter speed, gain and exposure (f-stop... searching. A recording of the date/time zone with the wireless controller. 1. If you turn off the camcorder, the data code will not appear the next time you mix recordings in the recording has changed. Select [6SEC.DATE... to indicate that the date or time zone in HDV and DV standards on the wireless controller.
...SETUP/ 6SEC.DATE••••OFF Open the menu and select [DISPLAY SETUP/ close the menu. Data Code The camcorder maintains a data code containing the recording date and time and other camera data such as shutter speed, gain and exposure (f-stop... searching. A recording of the date/time zone with the wireless controller. 1. If you turn off the camcorder, the data code will not appear the next time you mix recordings in the recording has changed. Select [6SEC.DATE... to indicate that the date or time zone in HDV and DV standards on the wireless controller.

