Brochure
Page 1
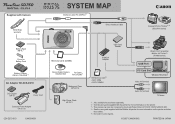
...*1 Direct Interface Cable Compact Photo Printers*2 *3 (SELPHY Series) Battery Pack NB-4L*1 Cover for Battery Pack Battery Charger CB-2LV / CB-2LVE*1 AC Adapter Kit ACK-DC10 DC Coupler DR-10 Power Cord Compact Power Adapter CA-DC10 CDI-E273-010 XXXXXXXX Memory Card (32MB) Canon Digital Camera AV Cable Solution Disk AVC-DC300*1 Waterproof Case WP-DC14 High-Power Flash HF-DC1 USB Card Reader PCMCIA Adapter SD Memory Card*5 •SDC-128M •SDC-512MSH Direct Print Compatible Bubble...
...*1 Direct Interface Cable Compact Photo Printers*2 *3 (SELPHY Series) Battery Pack NB-4L*1 Cover for Battery Pack Battery Charger CB-2LV / CB-2LVE*1 AC Adapter Kit ACK-DC10 DC Coupler DR-10 Power Cord Compact Power Adapter CA-DC10 CDI-E273-010 XXXXXXXX Memory Card (32MB) Canon Digital Camera AV Cable Solution Disk AVC-DC300*1 Waterproof Case WP-DC14 High-Power Flash HF-DC1 USB Card Reader PCMCIA Adapter SD Memory Card*5 •SDC-128M •SDC-512MSH Direct Print Compatible Bubble...

Brochure
Page 2
... for Battery Pack • Memory Card (32 MB) • Interface Cable IFC-400PCU • AV Cable AVC-DC300 • Canon Digital Camera Solution Disk • Basic Camera User Guide • Advanced Camera User Guide • Direct Print User Guide • Software Starter Guide • System Map (this waterproof case to the camera, you attach this sheet) • Warranty Card • "Canon Customer Support" Leaflet • "Use of Genuine Canon Accessories Recommended" Leaflet The following separately sold printers for taking worry-free pictures...
... for Battery Pack • Memory Card (32 MB) • Interface Cable IFC-400PCU • AV Cable AVC-DC300 • Canon Digital Camera Solution Disk • Basic Camera User Guide • Advanced Camera User Guide • Direct Print User Guide • Software Starter Guide • System Map (this waterproof case to the camera, you attach this sheet) • Warranty Card • "Canon Customer Support" Leaflet • "Use of Genuine Canon Accessories Recommended" Leaflet The following separately sold printers for taking worry-free pictures...

User Manual
Page 1
CDI-E271-010 XX07XXX © 2007 CANON INC. PRINTED IN JAPAN ENGLISH The Components Guide Preparations Basic Operations Shooting Playback/Erasing Menus and Settings Printing Basic Downloading Images to a Computer Camera User Guide Please Read This First This guide explains how to prepare the camera and use its basic features.
CDI-E271-010 XX07XXX © 2007 CANON INC. PRINTED IN JAPAN ENGLISH The Components Guide Preparations Basic Operations Shooting Playback/Erasing Menus and Settings Printing Basic Downloading Images to a Computer Camera User Guide Please Read This First This guide explains how to prepare the camera and use its basic features.

User Manual
Page 2
... the various shooting and playback functions Advanced Camera User Guide Printing • Installing the software • Downloading images to a computer • Using the software Direct Print User Guide Basic Camera User Guide (This Guide) Software Starter Guide You may not be able to achieve the full performance of this guide, the Basic Camera User Guide is called the Basic Guide, and the Advanced Camera User Guide is called the Advanced Guide. Also, "battery" refers to the flowchart below. ZoomBrowser EX/ ImageBrowser Software User Guide • PDF manuals available on...
... the various shooting and playback functions Advanced Camera User Guide Printing • Installing the software • Downloading images to a computer • Using the software Direct Print User Guide Basic Camera User Guide (This Guide) Software Starter Guide You may not be able to achieve the full performance of this guide, the Basic Camera User Guide is called the Basic Guide, and the Advanced Camera User Guide is called the Advanced Guide. Also, "battery" refers to the flowchart below. ZoomBrowser EX/ ImageBrowser Software User Guide • PDF manuals available on...

User Manual
Page 4
„ Back View a bc d e fg a LCD Monitor (Advanced Guide pp. 12, 15) b DIGITAL Terminal (p. 28) c A/V OUT (Audio/Video output) Terminal (Advanced Guide p. 101) d Terminal Cover e Tripod Socket f DC Coupler Terminal Cover (Advanced Guide p. 131) g Memory Card Slot/Battery Cover (p. 7) The interface cable and AV cable cannot be covered with a thin plastic film for protection against scratches during shipment. The LCD monitor may be connected simultaneously. If so, remove the film before using the camera. 2
„ Back View a bc d e fg a LCD Monitor (Advanced Guide pp. 12, 15) b DIGITAL Terminal (p. 28) c A/V OUT (Audio/Video output) Terminal (Advanced Guide p. 101) d Terminal Cover e Tripod Socket f DC Coupler Terminal Cover (Advanced Guide p. 131) g Memory Card Slot/Battery Cover (p. 7) The interface cable and AV cable cannot be covered with a thin plastic film for protection against scratches during shipment. The LCD monitor may be connected simultaneously. If so, remove the film before using the camera. 2

User Manual
Page 5
...)/ (Telephoto) Playback: (Index)/ (Magnify) d Shutter Button (p. 11) e (Print/Share) Button (pp. 23, 31, Advanced Guide pp. 66, 67) f Playback Button (pp. 10, 19, Advanced Guide pp. 76, 100) g FUNC./SET (Function/Set) Button (p. 21, Advanced Guide p. 22) h Touch Control Dial (p. 4) i Indicator (p. 5) j MENU Button (p. 22, Advanced Guide p. 23) k DISP. (Display) Button (Advanced Guide p. 12) l (Macro)/ (Infinity)/ Button (p. 16) m (ISO Speed)/ (Jump)/ Button (Advanced Guide pp. 65, 79) n (Flash)/ Button (p. 15) o (Continuous)/ (Self-timer)/ (Single Image Erase) / Button (pp. 17...
...)/ (Telephoto) Playback: (Index)/ (Magnify) d Shutter Button (p. 11) e (Print/Share) Button (pp. 23, 31, Advanced Guide pp. 66, 67) f Playback Button (pp. 10, 19, Advanced Guide pp. 76, 100) g FUNC./SET (Function/Set) Button (p. 21, Advanced Guide p. 22) h Touch Control Dial (p. 4) i Indicator (p. 5) j MENU Button (p. 22, Advanced Guide p. 23) k DISP. (Display) Button (Advanced Guide p. 12) l (Macro)/ (Infinity)/ Button (p. 16) m (ISO Speed)/ (Jump)/ Button (Advanced Guide pp. 65, 79) n (Flash)/ Button (p. 15) o (Continuous)/ (Self-timer)/ (Single Image Erase) / Button (pp. 17...

User Manual
Page 7
... Indicator The camera indicator lights or blinks under the following while the indicator is blinking green. Never do the following circumstances. These actions may corrupt image data. • Shake or jolt the camera • Shut off the power, or open the memory card slot/battery cover Green: Ready to shoot (camera beeps twice)*/ connected to computer/display off (Advanced p. 26) Blinking Green: Camera starting up/Time Lapse (movie) recording/ Image recording/reading/erasing/transferring (when connected to a computer/printer) Orange: Ready to shoot (flash on) Blinking Orange...
... Indicator The camera indicator lights or blinks under the following while the indicator is blinking green. Never do the following circumstances. These actions may corrupt image data. • Shake or jolt the camera • Shut off the power, or open the memory card slot/battery cover Green: Ready to shoot (camera beeps twice)*/ connected to computer/display off (Advanced p. 26) Blinking Green: Camera starting up/Time Lapse (movie) recording/ Image recording/reading/erasing/transferring (when connected to a computer/printer) Orange: Ready to shoot (flash on) Blinking Orange...

User Manual
Page 10
... correct time is displayed and press the FUNC./SET button (c). The date and time can use the or button to change its value (b). First Time Settings „ Setting the Date/Time a b c 1. „ To Remove the Memory Card Push the memory card with this guide. You can also be set the daylight saving option, select the icon and use SD memory cards, SDHC memory cards and MultiMediaCards with your finger or the toggle on the wrist strap until the memory card...
... correct time is displayed and press the FUNC./SET button (c). The date and time can use the or button to change its value (b). First Time Settings „ Setting the Date/Time a b c 1. „ To Remove the Memory Card Push the memory card with this guide. You can also be set the daylight saving option, select the icon and use SD memory cards, SDHC memory cards and MultiMediaCards with your finger or the toggle on the wrist strap until the memory card...

User Manual
Page 11
... button to save such settings as the date/time. Press the (playback) button. 2. The display language can also be lost after approximately three weeks if you purchase the camera, place the main battery in it for approximately four hours or use AC Adapter Kit ACK-DC10 (sold separately) to charge the lithium battery. When you remove the main battery. This battery charges when the main battery is turned off. • The date/time settings...
... button to save such settings as the date/time. Press the (playback) button. 2. The display language can also be lost after approximately three weeks if you purchase the camera, place the main battery in it for approximately four hours or use AC Adapter Kit ACK-DC10 (sold separately) to charge the lithium battery. When you remove the main battery. This battery charges when the main battery is turned off. • The date/time settings...

User Manual
Page 12
... MENU button while turning the camera on. Î See the Advanced Guide: Using the LCD Monitor (p. 12). Î See the Advanced Guide: Power Saving Function (p. 19). Î See the Advanced Guide: Set up image will display in the LCD monitor. • Pressing the power button sets the camera to the shooting mode and pressing the button set it to the button playback mode. • Pressing the power button again turns the camera off. • To switch to the button (Advanced Guide, p. 100). 10 Basic Operations Turning...
... MENU button while turning the camera on. Î See the Advanced Guide: Using the LCD Monitor (p. 12). Î See the Advanced Guide: Power Saving Function (p. 19). Î See the Advanced Guide: Set up image will display in the LCD monitor. • Pressing the power button sets the camera to the shooting mode and pressing the button set it to the button playback mode. • Pressing the power button again turns the camera off. • To switch to the button (Advanced Guide, p. 100). 10 Basic Operations Turning...

User Manual
Page 13
... FUNC./SET button (d). 3. When the camera focuses, it beeps twice and the indicator lights green (orange when the flash fires). Power button Basic Operation Shooting Î See Turning the Camera On/Off (p. 10). 2. In addition, a green AF frame appears in the LCD monitor on the portion of the image used to (Rec.) (a). Press the power button. Slide the mode switch to set the focus. 2. The shutter sound will play and the image will blink green while the image is recorded to the memory card...
... FUNC./SET button (d). 3. When the camera focuses, it beeps twice and the indicator lights green (orange when the flash fires). Power button Basic Operation Shooting Î See Turning the Camera On/Off (p. 10). 2. In addition, a green AF frame appears in the LCD monitor on the portion of the image used to (Rec.) (a). Press the power button. Slide the mode switch to set the focus. 2. The shutter sound will play and the image will blink green while the image is recorded to the memory card...

User Manual
Page 15
... digital zoom. Î See the Advanced Guide (p. 34). Shooting Portrait Produces a soft effect when photographing people. Kids&Pets Allows you to create one panoramic image on a computer. Î See the Advanced Guide (p. 44). Indoor Prevents camera shake and maintains the subject's true color when shooting under fluorescent or tungsten lighting. Foliage Shoots trees and leaves-such as the exposure compensation, white balance, my colors or ISO speed. Color Swap Use...
... digital zoom. Î See the Advanced Guide (p. 34). Shooting Portrait Produces a soft effect when photographing people. Kids&Pets Allows you to create one panoramic image on a computer. Î See the Advanced Guide (p. 44). Indoor Prevents camera shake and maintains the subject's true color when shooting under fluorescent or tungsten lighting. Foliage Shoots trees and leaves-such as the exposure compensation, white balance, my colors or ISO speed. Color Swap Use...

User Manual
Page 16
... MOVIE Underwater Appropriate for shooting images with Waterproof Case WPDC14 (sold separately). • We recommend you press the shutter button. Beach Shoots without making people appear dark near water or sand where reflected sunlight is slow in black and white except for the selected color; [ Color Swap] for recording a selected color as a different color; This mode uses an optimal white balance setting to avoid camera shake. • In , , , , , or mode, the ISO speed...
... MOVIE Underwater Appropriate for shooting images with Waterproof Case WPDC14 (sold separately). • We recommend you press the shutter button. Beach Shoots without making people appear dark near water or sand where reflected sunlight is slow in black and white except for the selected color; [ Color Swap] for recording a selected color as a different color; This mode uses an optimal white balance setting to avoid camera shake. • In , , , , , or mode, the ISO speed...

User Manual
Page 19
Shooting Using the Self-Timer 1. before the shutter releases. later. When [Shots] is set to more sec., the self-timer sound beeps quickly 2 sec. To Cancel: press the button and display . a b 10 sec. after you press the shutter button and the shutter releases 2 sec. Custom Timer: you can change the delay time and number of shots (1-3*2-10). • When [Delay] is pressed fully, the self-timer will activate and the self-timer lamp will blink (when using red-eye reduction...
Shooting Using the Self-Timer 1. before the shutter releases. later. When [Shots] is set to more sec., the self-timer sound beeps quickly 2 sec. To Cancel: press the button and display . a b 10 sec. after you press the shutter button and the shutter releases 2 sec. Custom Timer: you can change the delay time and number of shots (1-3*2-10). • When [Delay] is pressed fully, the self-timer will activate and the self-timer lamp will blink (when using red-eye reduction...

User Manual
Page 20
... exposure and white balance are locked at the set to change the setting and press the FUNC./SET button. 3. Press the MENU button. In the [ (Rec)] menu, select [Self-timer] and press the FUNC./ SET button. Î See Menus and Settings (p. 22). 2. If the [Shots] option is used, the interval between shots lengthens because the flash must charge. • The interval between shots lengthens when the built-in memory of Shots ( ) 1. „ Changing the Delay Time and Number...
... exposure and white balance are locked at the set to change the setting and press the FUNC./SET button. 3. Press the MENU button. In the [ (Rec)] menu, select [Self-timer] and press the FUNC./ SET button. Î See Menus and Settings (p. 22). 2. If the [Shots] option is used, the interval between shots lengthens because the flash must charge. • The interval between shots lengthens when the built-in memory of Shots ( ) 1. „ Changing the Delay Time and Number...

User Manual
Page 26
... select an image to print (b) and press the button (c). • You can also use the touch control dial to the printer model. • will display in the upper left of the LCD monitor (a). • The button will light blue. • The displayed icon will vary according to make a selection. • The button will blink blue and printing will start. Turn on the camera and confirm that , or is displayed in the movie mode. 3.
... select an image to print (b) and press the button (c). • You can also use the touch control dial to the printer model. • will display in the upper left of the LCD monitor (a). • The button will light blue. • The displayed icon will vary according to make a selection. • The button will blink blue and printing will start. Turn on the camera and confirm that , or is displayed in the movie mode. 3.

User Manual
Page 29
Install the software. 1. Click [Easy Installation]. Remove the CD-ROM from the drive when your normal desktop screen appears. Follow the onscreen instructions to Prepare • Camera and computer • Canon Digital Camera Solution Disk supplied with the camera • Interface cable supplied with the installation. 3. Downloading Images to a Computer Preparing to Download Images Ensure that appears. 4. Double-click the in the computer's CD-ROM drive. 2. Follow the onscreen messages to proceed...
Install the software. 1. Click [Easy Installation]. Remove the CD-ROM from the drive when your normal desktop screen appears. Follow the onscreen instructions to Prepare • Camera and computer • Canon Digital Camera Solution Disk supplied with the camera • Interface cable supplied with the installation. 3. Downloading Images to a Computer Preparing to Download Images Ensure that appears. 4. Double-click the in the computer's CD-ROM drive. 2. Follow the onscreen messages to proceed...

User Manual
Page 31
... default, the downloaded images are saved into the [Pictures] or [My Pictures] folder. By default, all images that have yet to download and the destination folder. Thumbnails (small versions) of image to be downloaded will display in the ZoomBrowser EX Main Window. You can set the preferences will appear when a connection is established between the camera and computer. 1. Downloading Images Using the Camera (p. 31). DV 6] and [CameraWindow]. 2. Select [Canon CameraWindow] and click [OK] (first time...
... default, the downloaded images are saved into the [Pictures] or [My Pictures] folder. By default, all images that have yet to download and the destination folder. Thumbnails (small versions) of image to be downloaded will display in the ZoomBrowser EX Main Window. You can set the preferences will appear when a connection is established between the camera and computer. 1. Downloading Images Using the Camera (p. 31). DV 6] and [CameraWindow]. 2. Select [Canon CameraWindow] and click [OK] (first time...

User Manual
Page 32
... images using the camera or the computer. • By default, the downloaded images are saved into the [Pictures] folder. Downloading Images Using the Camera (p. 31). By default, all images that have yet to download and the destination folder. You can set the type of image to be downloaded will appear when you establish a connection between the camera and computer. By default, the downloaded images are saved into folders according to a Computer The following window will download. Downloading Images Using a Computer. Downloading Images to their shooting dates...
... images using the camera or the computer. • By default, the downloaded images are saved into the [Pictures] folder. Downloading Images Using the Camera (p. 31). By default, all images that have yet to download and the destination folder. You can set the type of image to be downloaded will appear when you establish a connection between the camera and computer. By default, the downloaded images are saved into folders according to a Computer The following window will download. Downloading Images Using a Computer. Downloading Images to their shooting dates...

User Manual
Page 33
... downloading is displayed on the camera's LCD monitor. • The button will light blue. • Press the MENU button if the Direct Transfer menu fails to the computer as the background on the computer desktop. 1. All Images Transfers and saves all images to the computer only the images with DPOF Transfer Order settings (Advanced Guide, p. 108). The transferred images as you view and select them . Install the supplied software and adjust the computer settings before using camera operations. New Images Transfers...
... downloading is displayed on the camera's LCD monitor. • The button will light blue. • Press the MENU button if the Direct Transfer menu fails to the computer as the background on the computer desktop. 1. All Images Transfers and saves all images to the computer only the images with DPOF Transfer Order settings (Advanced Guide, p. 108). The transferred images as you view and select them . Install the supplied software and adjust the computer settings before using camera operations. New Images Transfers...


