
Accessory Catalog
Page 13
...(2.5 cm) past the needle to guide your first row of the grooves. 4. The ruffling blade on lightweight fabric. Sew slowly for details.) Brother Embellishment Feet Pin Tuck Foot 24 Ruffler Foot Pin Tuck Foot This presser foot has 7 grooves and produces perfect pin tucks and corded pin tucks...twin needle on the lower portion of stitch length, tuck setting and depth setting. 2. The intervals of tucks can be adjusted. 1. Install and manually thread a twin needle. 2. SA143 AFJKM Ruffler Foot Makes ruffles with this presser foot. 1. Adjust the amount of tuck or gather by placing...
...(2.5 cm) past the needle to guide your first row of the grooves. 4. The ruffling blade on lightweight fabric. Sew slowly for details.) Brother Embellishment Feet Pin Tuck Foot 24 Ruffler Foot Pin Tuck Foot This presser foot has 7 grooves and produces perfect pin tucks and corded pin tucks...twin needle on the lower portion of stitch length, tuck setting and depth setting. 2. The intervals of tucks can be adjusted. 1. Install and manually thread a twin needle. 2. SA143 AFJKM Ruffler Foot Makes ruffles with this presser foot. 1. Adjust the amount of tuck or gather by placing...

Accessory Catalog
Page 34
...is completed. Available in the 61 color set of fabrics with a stabilizer. Dependable thread delivery through machine tensions. All 61 exclusive Brother palette colors are also available at selected Dealers. Individual colors are included in a fun assortment of fabrics. MT986, MT987, MT988...30 Color Thread Pack) Attention all embroiderers, Quilters and Heirloom stitchers! Made to last a long time. Consult your instruction manual for placement on how to provide a good foundation as well as decorative sewing. Stabilizers and Water Soluble Stabilizers When doing ...
...is completed. Available in the 61 color set of fabrics with a stabilizer. Dependable thread delivery through machine tensions. All 61 exclusive Brother palette colors are also available at selected Dealers. Individual colors are included in a fun assortment of fabrics. MT986, MT987, MT988...30 Color Thread Pack) Attention all embroiderers, Quilters and Heirloom stitchers! Made to last a long time. Consult your instruction manual for placement on how to provide a good foundation as well as decorative sewing. Stabilizers and Water Soluble Stabilizers When doing ...

Users Manual - English
Page 1
... into water. Do not operate where aerosol (spray) products are being administered. 8. Special care is being used as described in this manual. Do not pull or push fabric while stitching. Always unplug the machine from the electrical outlet when removing covers, lubricating, or when...needle plate. To reduce the risk of burns, fire, electric shock, or injury to the symbol "O" position when making any adjustments in this manual. 3. To reduce the risk of electric shock: 1. Return the machine to break. 12. "IMPORTANT SAFETY INSTRUCTIONS" When using this machine, ...
... into water. Do not operate where aerosol (spray) products are being administered. 8. Special care is being used as described in this manual. Do not pull or push fabric while stitching. Always unplug the machine from the electrical outlet when removing covers, lubricating, or when...needle plate. To reduce the risk of burns, fire, electric shock, or injury to the symbol "O" position when making any adjustments in this manual. 3. To reduce the risk of electric shock: 1. Return the machine to break. 12. "IMPORTANT SAFETY INSTRUCTIONS" When using this machine, ...
Users Manual - English
Page 6
...the foot controller. 4. For a longer service life 1. Do not drop or hit the machine. 4. Plug the machine directly into the wall. Always consult the operation manual when replacing or installing any other parts to keep your local authorized dealer. Use only neutral soaps or detergents to inspect and adjust the machine...turn off the power switch and unplug the cord when: • Operation is required, first follow the troubleshooting table in the back of the operation manual to clean the case. Do not use • Maintaining the machine • Leaving the machine unattended. 3.
...the foot controller. 4. For a longer service life 1. Do not drop or hit the machine. 4. Plug the machine directly into the wall. Always consult the operation manual when replacing or installing any other parts to keep your local authorized dealer. Use only neutral soaps or detergents to inspect and adjust the machine...turn off the power switch and unplug the cord when: • Operation is required, first follow the troubleshooting table in the back of the operation manual to clean the case. Do not use • Maintaining the machine • Leaving the machine unattended. 3.

Users Manual - English
Page 26
...) SS Fixed 2.5 (3/32) SS Fixed 2.5 (3/32) SS Fixed 2.5 (3/32) SS Fixed 2.5 (3/32) SS Fixed 2.5 (3/32) SS Fixed 2.5 (3/32) SS Fixed 2.5 (3/32) SS Fixed 2.5 (3/32) INSTRUCTION MANUAL PAGE 55 42, 63, 65 45, 62, 66, 67 46 47 48 46 50 49 53 51 51 42 54 53 53 54 53 51...
...) SS Fixed 2.5 (3/32) SS Fixed 2.5 (3/32) SS Fixed 2.5 (3/32) SS Fixed 2.5 (3/32) SS Fixed 2.5 (3/32) SS Fixed 2.5 (3/32) SS Fixed 2.5 (3/32) SS Fixed 2.5 (3/32) INSTRUCTION MANUAL PAGE 55 42, 63, 65 45, 62, 66, 67 46 47 48 46 50 49 53 51 51 42 54 53 53 54 53 51...

Users Manual - English
Page 27
KNOWING YOUR SEWING MACHINE CONNAITRE SA MACHINE A COUDRE CONOZCA SU MÁQUINA DE COSER RECOMMENDED WIDTHS AND LENGTHS FOR STITCHES (Model XL-6452, XR-46) PATTERN STITCH NAME RECOMMENDED WIDTH [mm(inch)] 1-STEP AUTOMATIC BUTTONHOLE STRAIGHT STITCH ZIGZAG STITCH BLIND HEM STITCH SHELL TUCK STITCH ELASTIC STITCH STRETCH BLIND ...) SS Fixed 2.5 (3/32) SS Fixed 2.5 (3/32) SS Fixed 2.5 (3/32) SS Fixed 2.5 (3/32) SS Fixed 2.5 (3/32) SS Fixed 2.5 (3/32) SS Fixed 2.5 (3/32) SS Fixed 2.5 (3/32) INSTRUCTION MANUAL PAGE 55 42, 63, 65 45, 62, 66, 67 46 47 48 46 50 49 53 51 42 54 53 53 54 53 51 52...
KNOWING YOUR SEWING MACHINE CONNAITRE SA MACHINE A COUDRE CONOZCA SU MÁQUINA DE COSER RECOMMENDED WIDTHS AND LENGTHS FOR STITCHES (Model XL-6452, XR-46) PATTERN STITCH NAME RECOMMENDED WIDTH [mm(inch)] 1-STEP AUTOMATIC BUTTONHOLE STRAIGHT STITCH ZIGZAG STITCH BLIND HEM STITCH SHELL TUCK STITCH ELASTIC STITCH STRETCH BLIND ...) SS Fixed 2.5 (3/32) SS Fixed 2.5 (3/32) SS Fixed 2.5 (3/32) SS Fixed 2.5 (3/32) SS Fixed 2.5 (3/32) SS Fixed 2.5 (3/32) SS Fixed 2.5 (3/32) SS Fixed 2.5 (3/32) INSTRUCTION MANUAL PAGE 55 42, 63, 65 45, 62, 66, 67 46 47 48 46 50 49 53 51 42 54 53 53 54 53 51 52...

Users Manual - English
Page 38
... Setting the bobbin improperly may tangle around the bobbin a few times. Immediately after winding the bobbin, it may cause the thread tension to sew or manually turning the balance wheel. Turn the bobbin clockwise, by hand, until the spring on the shaft slides into the groove of the bobbin. 1 Spring on...
... Setting the bobbin improperly may tangle around the bobbin a few times. Immediately after winding the bobbin, it may cause the thread tension to sew or manually turning the balance wheel. Turn the bobbin clockwise, by hand, until the spring on the shaft slides into the groove of the bobbin. 1 Spring on...

Users Manual - English
Page 44
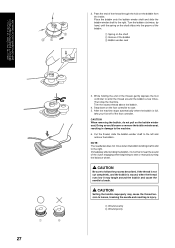
..., be used. Otherwise, the hook may be used to "O". 1. CAUTION The needle threader can be sure the needle holder is OFF when threading the needle manually. 33 Pull down the needle threader lever as much as possible, then rotate the lever toward you ). Raise the needle threader lever and pull out... presser foot lever. 2. While lightly holding the thread, rotate the needle threader lever toward the front of the machine (toward the back of the needle manually. Check the table on page 39 for appropriate needle and thread combinations.
..., be used. Otherwise, the hook may be used to "O". 1. CAUTION The needle threader can be sure the needle holder is OFF when threading the needle manually. 33 Pull down the needle threader lever as much as possible, then rotate the lever toward you ). Raise the needle threader lever and pull out... presser foot lever. 2. While lightly holding the thread, rotate the needle threader lever toward the front of the machine (toward the back of the needle manually. Check the table on page 39 for appropriate needle and thread combinations.

Users Manual - English
Page 90
... correctly installed. Inferior needle is used . Page 38 No Spool of thread is incorrect. Page 77 No Threading is not threaded properly in this instruction manual that details the operation you are performing to make sure you are correctly using the machine. Page 31 No Page 39 79 No CONTACT YOUR...
... correctly installed. Inferior needle is used . Page 38 No Spool of thread is incorrect. Page 77 No Threading is not threaded properly in this instruction manual that details the operation you are performing to make sure you are correctly using the machine. Page 31 No Page 39 79 No CONTACT YOUR...

User Manual - French
Page 1
...the machine to persons: 1. Keep ventilation openings of lint, dust, and loose cloth. 5. Special care is being used as contained in this manual. 3. The wrong plate can cause the needle to ensure that do not play with this machine. Always unplug the machine from all instructions before...working properly, if it has been dropped or damaged, or dropped into any adjustments in the needle area, such as described in this manual. Keep fingers away from the electrical outlet when removing covers, lubricating, or when making any opening. 6. Always unplug this machine from the...
...the machine to persons: 1. Keep ventilation openings of lint, dust, and loose cloth. 5. Special care is being used as contained in this manual. 3. The wrong plate can cause the needle to ensure that do not play with this machine. Always unplug the machine from all instructions before...working properly, if it has been dropped or damaged, or dropped into any adjustments in the needle area, such as described in this manual. Keep fingers away from the electrical outlet when removing covers, lubricating, or when making any opening. 6. Always unplug this machine from the...

User Manual - French
Page 6
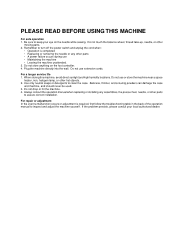
... turn off the power switch and unplug the cord when: • Operation is required, first follow the troubleshooting table in the back of the operation manual to clean the case. PLEASE READ BEFORE USING THIS MACHINE For safe operation 1. Be sure to assure correct installation. Do not use extension cords. Always...
... turn off the power switch and unplug the cord when: • Operation is required, first follow the troubleshooting table in the back of the operation manual to clean the case. PLEASE READ BEFORE USING THIS MACHINE For safe operation 1. Be sure to assure correct installation. Do not use extension cords. Always...

User Manual - French
Page 26
...) SS Fixed 2.5 (3/32) SS Fixed 2.5 (3/32) SS Fixed 2.5 (3/32) SS Fixed 2.5 (3/32) SS Fixed 2.5 (3/32) SS Fixed 2.5 (3/32) SS Fixed 2.5 (3/32) SS Fixed 2.5 (3/32) INSTRUCTION MANUAL PAGE 55 42, 63, 65 45, 62, 66, 67 46 47 48 46 50 49 53 51 51 42 54 53 53 54 53 51...
...) SS Fixed 2.5 (3/32) SS Fixed 2.5 (3/32) SS Fixed 2.5 (3/32) SS Fixed 2.5 (3/32) SS Fixed 2.5 (3/32) SS Fixed 2.5 (3/32) SS Fixed 2.5 (3/32) SS Fixed 2.5 (3/32) INSTRUCTION MANUAL PAGE 55 42, 63, 65 45, 62, 66, 67 46 47 48 46 50 49 53 51 51 42 54 53 53 54 53 51...

User Manual - French
Page 27
KNOWING YOUR SEWING MACHINE CONNAITRE SA MACHINE A COUDRE CONOZCA SU MÁQUINA DE COSER RECOMMENDED WIDTHS AND LENGTHS FOR STITCHES (Model XL-6452, XR-46) PATTERN STITCH NAME RECOMMENDED WIDTH [mm(inch)] 1-STEP AUTOMATIC BUTTONHOLE STRAIGHT STITCH ZIGZAG STITCH BLIND HEM STITCH SHELL TUCK STITCH ELASTIC STITCH STRETCH BLIND ...) SS Fixed 2.5 (3/32) SS Fixed 2.5 (3/32) SS Fixed 2.5 (3/32) SS Fixed 2.5 (3/32) SS Fixed 2.5 (3/32) SS Fixed 2.5 (3/32) SS Fixed 2.5 (3/32) SS Fixed 2.5 (3/32) INSTRUCTION MANUAL PAGE 55 42, 63, 65 45, 62, 66, 67 46 47 48 46 50 49 53 51 42 54 53 53 54 53 51 52...
KNOWING YOUR SEWING MACHINE CONNAITRE SA MACHINE A COUDRE CONOZCA SU MÁQUINA DE COSER RECOMMENDED WIDTHS AND LENGTHS FOR STITCHES (Model XL-6452, XR-46) PATTERN STITCH NAME RECOMMENDED WIDTH [mm(inch)] 1-STEP AUTOMATIC BUTTONHOLE STRAIGHT STITCH ZIGZAG STITCH BLIND HEM STITCH SHELL TUCK STITCH ELASTIC STITCH STRETCH BLIND ...) SS Fixed 2.5 (3/32) SS Fixed 2.5 (3/32) SS Fixed 2.5 (3/32) SS Fixed 2.5 (3/32) SS Fixed 2.5 (3/32) SS Fixed 2.5 (3/32) SS Fixed 2.5 (3/32) SS Fixed 2.5 (3/32) INSTRUCTION MANUAL PAGE 55 42, 63, 65 45, 62, 66, 67 46 47 48 46 50 49 53 51 42 54 53 53 54 53 51 52...
User Manual - French
Page 38
... off of the thread through the hole on the bobbin winder seat. After the machine stops automatically when the bobbin is slid to sew or manually turning the balance wheel. While holding the end of the clutch engaging when beginning to the right. If the thread is not cut completely, and...
... off of the thread through the hole on the bobbin winder seat. After the machine stops automatically when the bobbin is slid to sew or manually turning the balance wheel. While holding the end of the clutch engaging when beginning to the right. If the thread is not cut completely, and...

User Manual - French
Page 44
...needle and wing needle. Otherwise, the hook may be damaged. 3. Make sure the main power switch is in the range of the needle manually. Check the table on page 39 for appropriate needle and thread combinations. KNOWING YOUR SEWING MACHINE CONNAITRE SA MACHINE A COUDRE CONOZCA SU MÁ... position. 1 Needle holder 2 Needle threader lever CAUTION When using the needle threader, be sure the needle holder is OFF when threading the needle manually. 33 Lower the presser foot lever. 2. While lowering the needle threader lever, hook the thread onto the guide. 4. Pull down the needle ...
...needle and wing needle. Otherwise, the hook may be damaged. 3. Make sure the main power switch is in the range of the needle manually. Check the table on page 39 for appropriate needle and thread combinations. KNOWING YOUR SEWING MACHINE CONNAITRE SA MACHINE A COUDRE CONOZCA SU MÁ... position. 1 Needle holder 2 Needle threader lever CAUTION When using the needle threader, be sure the needle holder is OFF when threading the needle manually. 33 Lower the presser foot lever. 2. While lowering the needle threader lever, hook the thread onto the guide. 4. Pull down the needle ...

User Manual - French
Page 90
... Page 38 Upper thread is not correctly installed. Page 38 No Spool of needle size/thread size/fabric is not threaded properly in this instruction manual that details the operation you are performing to the bottom of needle size/thread size/fabric is not correctly installed. Page 9 No The combination of...
... Page 38 Upper thread is not correctly installed. Page 38 No Spool of needle size/thread size/fabric is not threaded properly in this instruction manual that details the operation you are performing to the bottom of needle size/thread size/fabric is not correctly installed. Page 9 No The combination of...


