
Accessory Catalog
Page 4
... exactly on either left ). 2. Position the presser foot over the long feed dogs on the edge of zipper/piping, avoiding the non-flat parts of the presser foot and slide the presser foot so that the needle fits on the opening on the presser foot and select a straight stitch... pipings easily. Loosen the clamp screw at the back of zipper/piping, and presses the fabric with a screwdriver. 5. SA161 All Brother home-use sewing machines www.brother.com Brother General Sewing Accessories 05 Sew as you like. Use these utility presser feet and accessories to add a professional finish to your sewing...
... exactly on either left ). 2. Position the presser foot over the long feed dogs on the edge of zipper/piping, avoiding the non-flat parts of the presser foot and slide the presser foot so that the needle fits on the opening on the presser foot and select a straight stitch... pipings easily. Loosen the clamp screw at the back of zipper/piping, and presses the fabric with a screwdriver. 5. SA161 All Brother home-use sewing machines www.brother.com Brother General Sewing Accessories 05 Sew as you like. Use these utility presser feet and accessories to add a professional finish to your sewing...

Accessory Catalog
Page 6
... the edge and sew 2-3 stitches. 4. Slowly sew 2-3 stitches, making sure the fabric is rolling around the curled part of the foot. 8. Select a desired stitch and sew. Overlock Foot For vertical bobbin machines only. Increase upper thread tension. 2. Brother General Sewing Accessories 09 Narrow Hemmer Foot Non Stick Foot Overlock Foot Picot Foot...
... the edge and sew 2-3 stitches. 4. Slowly sew 2-3 stitches, making sure the fabric is rolling around the curled part of the foot. 8. Select a desired stitch and sew. Overlock Foot For vertical bobbin machines only. Increase upper thread tension. 2. Brother General Sewing Accessories 09 Narrow Hemmer Foot Non Stick Foot Overlock Foot Picot Foot...

Users Manual - English
Page 1
... plug, not the cord. 10. "IMPORTANT SAFETY INSTRUCTIONS" When using this machine, basic safety precautions should always be taken , including the following: "Read all moving parts. To reduce the risk of lint, dust, and loose cloth. 5. To reduce the risk of the user service adjustments mentioned in .
... plug, not the cord. 10. "IMPORTANT SAFETY INSTRUCTIONS" When using this machine, basic safety precautions should always be taken , including the following: "Read all moving parts. To reduce the risk of lint, dust, and loose cloth. 5. To reduce the risk of the user service adjustments mentioned in .
Users Manual - English
Page 6
...the event a malfunction occurs or adjustment is completed • Replacing or removing the needle or any assemblies, the presser feet, needle, or other parts • A power failure occurs during use • Maintaining the machine • Leaving the machine unattended. 3. Remember to turn off the power... needle, or other hot objects. 2. Do not use or store the machine near a space heater, iron, halogen lamp, or other moving parts. 2. PLEASE READ BEFORE USING THIS MACHINE For safe operation 1. Be sure to assure correct installation. Use only neutral soaps or detergents to inspect...
...the event a malfunction occurs or adjustment is completed • Replacing or removing the needle or any assemblies, the presser feet, needle, or other parts • A power failure occurs during use • Maintaining the machine • Leaving the machine unattended. 3. Remember to turn off the power... needle, or other hot objects. 2. Do not use or store the machine near a space heater, iron, halogen lamp, or other moving parts. 2. PLEASE READ BEFORE USING THIS MACHINE For safe operation 1. Be sure to assure correct installation. Use only neutral soaps or detergents to inspect...

Users Manual - English
Page 9
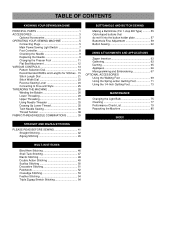
TABLE OF CONTENTS KNOWING YOUR SEWING MACHINE PRINCIPAL PARTS 1 ACCESSORIES 3 Optional Accessories 3 OPERATING YOUR SEWING MACHINE 5 Connecting Plugs 5 Main Power/Sewing Light Switch 7 Foot Controller 8 Checking the Needle 9 Replacing the Needle 9 Changing the Presser ...
TABLE OF CONTENTS KNOWING YOUR SEWING MACHINE PRINCIPAL PARTS 1 ACCESSORIES 3 Optional Accessories 3 OPERATING YOUR SEWING MACHINE 5 Connecting Plugs 5 Main Power/Sewing Light Switch 7 Foot Controller 8 Checking the Needle 9 Replacing the Needle 9 Changing the Presser ...
Users Manual - English
Page 12
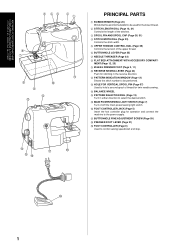
... for stitching in either direction to the power supply. KNOWING YOUR SEWING MACHINE CONNAITRE SA MACHINE A COUDRE CONOZCA SU MÁQUINA DE COSER 5 43 2 1 6 7 A 8 : 9 B C PRINCIPAL PARTS 1 BOBBIN WINDER (Page 26) Winds the thread onto the bobbin to be performed. MENT (Page 12, 25) 9 ZIGZAG PRESSER FOOT (Page 3, 11) : REVERSE SEWING LEVER...
... for stitching in either direction to the power supply. KNOWING YOUR SEWING MACHINE CONNAITRE SA MACHINE A COUDRE CONOZCA SU MÁQUINA DE COSER 5 43 2 1 6 7 A 8 : 9 B C PRINCIPAL PARTS 1 BOBBIN WINDER (Page 26) Winds the thread onto the bobbin to be performed. MENT (Page 12, 25) 9 ZIGZAG PRESSER FOOT (Page 3, 11) : REVERSE SEWING LEVER...

Users Manual - English
Page 14
... (1 pc.) B Seam Ripper (1 pc.) C Darning Plate (1pc.) D Hard Case (1 pc.) (Model XR-46) Parts Code for Zigzag Presser Foot: X51953-051 Parts Code for Model XL-6562, XL-6452, XR46. only): Foot Controller: Model N Parts Code: J00360-051 (110/120V Area) This foot controller can be used for Spool Cap... (Medium): X55260-153 Foot Controller: Model N Parts Code: J00360-051 XA6400-051 XA6402-051 XA6404-051 XA6434-051 (110/120V Area)...
... (1 pc.) B Seam Ripper (1 pc.) C Darning Plate (1pc.) D Hard Case (1 pc.) (Model XR-46) Parts Code for Zigzag Presser Foot: X51953-051 Parts Code for Model XL-6562, XL-6452, XR46. only): Foot Controller: Model N Parts Code: J00360-051 (110/120V Area) This foot controller can be used for Spool Cap... (Medium): X55260-153 Foot Controller: Model N Parts Code: J00360-051 XA6400-051 XA6402-051 XA6404-051 XA6434-051 (110/120V Area)...

Users Manual - English
Page 80
.... Raise the needle and the presser foot. 3. Lower the presser foot lever and then tighten the accessory presser bar holder fixing screw. (See fig.C) 1 Forked part of the connecting lever to the needle clamp, install the walking foot to low speeds. 69 Loosen the presser foot screw to check that the...
.... Raise the needle and the presser foot. 3. Lower the presser foot lever and then tighten the accessory presser bar holder fixing screw. (See fig.C) 1 Forked part of the connecting lever to the needle clamp, install the walking foot to low speeds. 69 Loosen the presser foot screw to check that the...

Users Manual - English
Page 82
.... 6. Set the Pattern Selection Dial to Straight Stitch. * Before starting to remove the presser foot holder. (See fig.A) 4. Attach the quilting foot, making sure that part indicated by A in fig. If the screw is loose, the needle may strike the presser foot and cause injury. • Be sure to turn the...
.... 6. Set the Pattern Selection Dial to Straight Stitch. * Before starting to remove the presser foot holder. (See fig.A) 4. Attach the quilting foot, making sure that part indicated by A in fig. If the screw is loose, the needle may strike the presser foot and cause injury. • Be sure to turn the...
Users Manual - English
Page 88
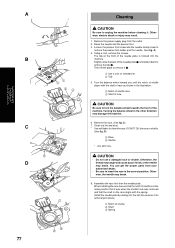
... 9 Spring 9 8 77 DO NOT OIL the race or shuttle. (See fig. CAUTION • Do not use a damaged race or shuttle. You can get the proper parts from the outlet. 2. A) 4. Remove the race. (See fig. Clean out lint and dust. * Use soft fabric to remove the presser foot holder and the needle...
... 9 Spring 9 8 77 DO NOT OIL the race or shuttle. (See fig. CAUTION • Do not use a damaged race or shuttle. You can get the proper parts from the outlet. 2. A) 4. Remove the race. (See fig. Clean out lint and dust. * Use soft fabric to remove the presser foot holder and the needle...
Users Manual - English
Page 97
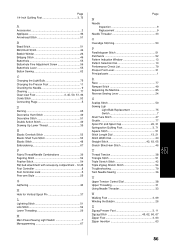
... O Overedge Stitching 53 P Parallelogram Stitch 51 Patchwork 52 Pattern Indication Window 13 Pattern Selection Dial 13 Performance Check List 79 Presser Foot Lever 31 Principal parts 1 R Race 77 Rampart Stitch 49 Repacking the Machine 85 Reverse Sewing Lever 24 S Scallop Stitch 50 Sewing Ligh Light Bulb Replacement 75 Switch 7 Shell Tuck...
... O Overedge Stitching 53 P Parallelogram Stitch 51 Patchwork 52 Pattern Indication Window 13 Pattern Selection Dial 13 Performance Check List 79 Presser Foot Lever 31 Principal parts 1 R Race 77 Rampart Stitch 49 Repacking the Machine 85 Reverse Sewing Lever 24 S Scallop Stitch 50 Sewing Ligh Light Bulb Replacement 75 Switch 7 Shell Tuck...

User Manual - French
Page 1
... service center for its intended use outdoors. 7. Do not allow this machine, basic safety precautions should never be taken , including the following: "Read all moving parts. Do not pull or push fabric while stitching. It may deflect the needle causing it is required around the machine needle. 11. Do not use...
... service center for its intended use outdoors. 7. Do not allow this machine, basic safety precautions should never be taken , including the following: "Read all moving parts. Do not pull or push fabric while stitching. It may deflect the needle causing it is required around the machine needle. 11. Do not use...

User Manual - French
Page 6
...store the machine near a space heater, iron, halogen lamp, or other moving parts. 2. Plug the machine directly into the wall. Always consult the operation manual when replacing or installing any other parts to assure correct installation. Do not drop or hit the machine. 4. Remember to... event a malfunction occurs or adjustment is completed • Replacing or removing the needle or any assemblies, the presser feet, needle, or other parts • A power failure occurs during use extension cords. PLEASE READ BEFORE USING THIS MACHINE For safe operation 1. For a longer service life...
...store the machine near a space heater, iron, halogen lamp, or other moving parts. 2. Plug the machine directly into the wall. Always consult the operation manual when replacing or installing any other parts to assure correct installation. Do not drop or hit the machine. 4. Remember to... event a malfunction occurs or adjustment is completed • Replacing or removing the needle or any assemblies, the presser feet, needle, or other parts • A power failure occurs during use extension cords. PLEASE READ BEFORE USING THIS MACHINE For safe operation 1. For a longer service life...
User Manual - French
Page 9
TABLE OF CONTENTS KNOWING YOUR SEWING MACHINE PRINCIPAL PARTS 1 ACCESSORIES 3 Optional Accessories 3 OPERATING YOUR SEWING MACHINE 5 Connecting Plugs 5 Main Power/Sewing Light Switch 7 Foot Controller 8 Checking the Needle 9 Replacing the Needle 9 Changing the Presser ...
TABLE OF CONTENTS KNOWING YOUR SEWING MACHINE PRINCIPAL PARTS 1 ACCESSORIES 3 Optional Accessories 3 OPERATING YOUR SEWING MACHINE 5 Connecting Plugs 5 Main Power/Sewing Light Switch 7 Foot Controller 8 Checking the Needle 9 Replacing the Needle 9 Changing the Presser ...

User Manual - French
Page 12
... I FOOT CONTROLLER (Page 8) Used to select the desired stitch. KNOWING YOUR SEWING MACHINE CONNAITRE SA MACHINE A COUDRE CONOZCA SU MÁQUINA DE COSER 5 43 2 1 6 7 A 8 : 9 B C PRINCIPAL PARTS 1 BOBBIN WINDER (Page 26) Winds the thread onto the bobbin to be performed. MENT (Page 12, 25) 9 ZIGZAG PRESSER FOOT (Page 3, 11) : REVERSE SEWING LEVER...
... I FOOT CONTROLLER (Page 8) Used to select the desired stitch. KNOWING YOUR SEWING MACHINE CONNAITRE SA MACHINE A COUDRE CONOZCA SU MÁQUINA DE COSER 5 43 2 1 6 7 A 8 : 9 B C PRINCIPAL PARTS 1 BOBBIN WINDER (Page 26) Winds the thread onto the bobbin to be performed. MENT (Page 12, 25) 9 ZIGZAG PRESSER FOOT (Page 3, 11) : REVERSE SEWING LEVER...

User Manual - French
Page 14
....) 9 Cleaning Brush (1 pc.) 0 Extra Spool Pin (1 pc.) A Screwdriver (1 pc.) B Seam Ripper (1 pc.) C Darning Plate (1pc.) D Hard Case (1 pc.) (Model XR-46) Parts Code for Zigzag Presser Foot: X51953-051 Parts Code for Model XL-6562, XL-6452, XR46. The above accessories are stored in the flat bed attachment. only): Foot Controller...: J00360-051 (110/120V Area) This foot controller can be used for Spool Cap (Medium): X55260-153 Foot Controller: Model N Parts Code: J00360-051 XA6400-051 XA6402-051 XA6404-051 XA6434-051 (110/120V Area) (220/240V Area) (U.K.) (Australia, New Zealand) (110/220V...
....) 9 Cleaning Brush (1 pc.) 0 Extra Spool Pin (1 pc.) A Screwdriver (1 pc.) B Seam Ripper (1 pc.) C Darning Plate (1pc.) D Hard Case (1 pc.) (Model XR-46) Parts Code for Zigzag Presser Foot: X51953-051 Parts Code for Model XL-6562, XL-6452, XR46. The above accessories are stored in the flat bed attachment. only): Foot Controller...: J00360-051 (110/120V Area) This foot controller can be used for Spool Cap (Medium): X55260-153 Foot Controller: Model N Parts Code: J00360-051 XA6400-051 XA6402-051 XA6404-051 XA6434-051 (110/120V Area) (220/240V Area) (U.K.) (Australia, New Zealand) (110/220V...

User Manual - French
Page 80
... useful for straight sewing and zigzag stitching. Lower the presser foot lever and then tighten the accessory presser bar holder fixing screw. (See fig.C) 1 Forked part of the machine to feed when sewing. Loosen the presser foot screw to tighten the screw securely. USING ATTACHMENTS AND APPLICATIONS UTILISATION DES ACCESSOIRES ET...
... useful for straight sewing and zigzag stitching. Lower the presser foot lever and then tighten the accessory presser bar holder fixing screw. (See fig.C) 1 Forked part of the machine to feed when sewing. Loosen the presser foot screw to tighten the screw securely. USING ATTACHMENTS AND APPLICATIONS UTILISATION DES ACCESSOIRES ET...

User Manual - French
Page 82
... may strike the presser foot and cause injury. • Be sure to turn the balance wheel toward the front of the machine to check that part indicated by A in fig. C. Remove the power supply plug from the outlet. 2. Set the Pattern Selection Dial to Straight Stitch. * Before starting to remove the...
... may strike the presser foot and cause injury. • Be sure to turn the balance wheel toward the front of the machine to check that part indicated by A in fig. C. Remove the power supply plug from the outlet. 2. Set the Pattern Selection Dial to Straight Stitch. * Before starting to remove the...

User Manual - French
Page 88
... power supply plug from your authorized dealer. • Be sure to insert the race in the other direction may result. 1. You can get the proper parts from the outlet. 2. A) 4. D) 5 Race 6 Shuttle * DO NOT OIL. Otherwise, electric shock or injury may damage the machine. 6. Usibg a coin, remove the screws. CAUTION • Do...
... power supply plug from your authorized dealer. • Be sure to insert the race in the other direction may result. 1. You can get the proper parts from the outlet. 2. A) 4. D) 5 Race 6 Shuttle * DO NOT OIL. Otherwise, electric shock or injury may damage the machine. 6. Usibg a coin, remove the screws. CAUTION • Do...

User Manual - French
Page 97
... O Overedge Stitching 53 P Parallelogram Stitch 51 Patchwork 52 Pattern Indication Window 13 Pattern Selection Dial 13 Performance Check List 79 Presser Foot Lever 31 Principal parts 1 R Race 77 Rampart Stitch 49 Repacking the Machine 85 Reverse Sewing Lever 24 S Scallop Stitch 50 Sewing Ligh Light Bulb Replacement 75 Switch 7 Shell Tuck...
... O Overedge Stitching 53 P Parallelogram Stitch 51 Patchwork 52 Pattern Indication Window 13 Pattern Selection Dial 13 Performance Check List 79 Presser Foot Lever 31 Principal parts 1 R Race 77 Rampart Stitch 49 Repacking the Machine 85 Reverse Sewing Lever 24 S Scallop Stitch 50 Sewing Ligh Light Bulb Replacement 75 Switch 7 Shell Tuck...

