
Accessory Catalog
Page 11
... Brother home-use the center guide). 2. Slip a cord from satin or decorative stitches. 2. Attach the presser foot and select a stitch from the right of 7 mm feed width. 1. Attach the presser foot and pull cords under the presser foot, and select zigzag stitch with maximum stitch width. Attach the presser foot and pull cords under the presser foot. 3. SA158 ABCDEFJKMN www.brother.com Line up the cords, and select zigzag stitch with maximum stitch width. Insert cords or threads into each hole on the machine. 2. Perfect for quilting appliqu...
... Brother home-use the center guide). 2. Slip a cord from satin or decorative stitches. 2. Attach the presser foot and select a stitch from the right of 7 mm feed width. 1. Attach the presser foot and pull cords under the presser foot, and select zigzag stitch with maximum stitch width. Attach the presser foot and pull cords under the presser foot. 3. SA158 ABCDEFJKMN www.brother.com Line up the cords, and select zigzag stitch with maximum stitch width. Insert cords or threads into each hole on the machine. 2. Perfect for quilting appliqu...

Accessory Catalog
Page 12
... thread. Requires Low Shank Adapter for gathering fabrics. Zigzag-sew with a single zigzag stitch. Its wide groove also helps you are using zigzag stitch with the guideline and sew. Adjust the upper thread tension. 2. Making loops or fringes: 1. Line up the center of the fabric facing down. Increase the upper thread tension. 3. Line up the center guide mark (red) of the foot. 3. Stitch in groove of the presser foot to the seam or pattern line and sew. Select zigzag stitch and set the stitch...
... thread. Requires Low Shank Adapter for gathering fabrics. Zigzag-sew with a single zigzag stitch. Its wide groove also helps you are using zigzag stitch with the guideline and sew. Adjust the upper thread tension. 2. Making loops or fringes: 1. Line up the center of the fabric facing down. Increase the upper thread tension. 3. Line up the center guide mark (red) of the foot. 3. Stitch in groove of the presser foot to the seam or pattern line and sew. Select zigzag stitch and set the stitch...

Accessory Catalog
Page 13
... IP This presser foot does not include the bobbin cover. The intervals of tucks can be adjusted. 1. www.brother.com Adjust the amount of tuck or gather by placing the completed row in the center position. 3. Draw a reference line to sew the first row in one of stitching and use that to guide your first row of the grooves. 4. Install and manually thread a twin needle. 2. Use a stiff card to get started.
... IP This presser foot does not include the bobbin cover. The intervals of tucks can be adjusted. 1. www.brother.com Adjust the amount of tuck or gather by placing the completed row in the center position. 3. Draw a reference line to sew the first row in one of stitching and use that to guide your first row of the grooves. 4. Install and manually thread a twin needle. 2. Use a stiff card to get started.

Accessory Catalog
Page 15
... machine's lower feed dogs to hold fabric in length. Walking Foot SA140 ABCDEFJKMN SA166 L SA107 GHO SA169 I Open Toe Walking Foot SA188 ABCDEFJKMN www.brother.com While starting to sew, press the needle position button twice to pull the bobbin thread to straight stitch. 3. Requires Low Shank Adapter for free-motion, outline quilting, etc. 1. Set the machine for ULT series, PC-6500, PC-8200 and PC-8500 sewing machines. Set the machine to the quilt top. 7. Lower the feed dogs. 3. Requires Low Shank Adapter for straight stitch. 3. Use the walking foot...
... machine's lower feed dogs to hold fabric in length. Walking Foot SA140 ABCDEFJKMN SA166 L SA107 GHO SA169 I Open Toe Walking Foot SA188 ABCDEFJKMN www.brother.com While starting to sew, press the needle position button twice to pull the bobbin thread to straight stitch. 3. Requires Low Shank Adapter for free-motion, outline quilting, etc. 1. Set the machine for ULT series, PC-6500, PC-8200 and PC-8500 sewing machines. Set the machine to the quilt top. 7. Lower the feed dogs. 3. Requires Low Shank Adapter for straight stitch. 3. Use the walking foot...

Accessory Catalog
Page 17
... simplifies the process of 2 new small fonts and 2 new Cyrillic fonts. *Requires additional purchase. Sewing Decorative Stitches as border designs. Add appliqué capability to embroider beautiful motifs continuously as embroidery. Compatible with the SAVR4000D Premium Package. Includes three new free-motion presser feet: Free-motion quilting foot "C" for more features to your top of your QuattroTM 6000D. Automatic Height Adjuster™ (AHA) feature adjusts the presser foot pressure automatically and continuously to give...
... simplifies the process of 2 new small fonts and 2 new Cyrillic fonts. *Requires additional purchase. Sewing Decorative Stitches as border designs. Add appliqué capability to embroider beautiful motifs continuously as embroidery. Compatible with the SAVR4000D Premium Package. Includes three new free-motion presser feet: Free-motion quilting foot "C" for more features to your top of your QuattroTM 6000D. Automatic Height Adjuster™ (AHA) feature adjusts the presser foot pressure automatically and continuously to give...

Accessory Catalog
Page 33
... Innov-is 900D series, SE-350, HE-240, LB6770, Innov-is 4000D/2500D/1500D SA560 QuattroTM 6000D Embroidery Machine Hoops Select hoops appropriate for your threads in the storage slots. Some hoops can easily be used thread colors. Brother Embroidery Accessories 63 Free-Standing Ten Spool Thread Stand Ten Spool Thread Stand Embroidery Machine Hoops Brother Embroidery Accessories 64 For all embroidery and sewing/embroidery machines. Allows easy access to your machine. Place your next embroidery, quilting or sewing project.
... Innov-is 900D series, SE-350, HE-240, LB6770, Innov-is 4000D/2500D/1500D SA560 QuattroTM 6000D Embroidery Machine Hoops Select hoops appropriate for your threads in the storage slots. Some hoops can easily be used thread colors. Brother Embroidery Accessories 63 Free-Standing Ten Spool Thread Stand Ten Spool Thread Stand Embroidery Machine Hoops Brother Embroidery Accessories 64 For all embroidery and sewing/embroidery machines. Allows easy access to your machine. Place your next embroidery, quilting or sewing project.

Accessory Catalog
Page 34
... Stabilizers When doing machine embroidery, the use the Brother Bobbin Thread designed specifically for your sewing counter or can illustrate more of needle and stabilizer types. Out metallic thread maintains its color, heat resistance and strength. Dependable thread delivery through machine tensions. Brother Embroidery Accessories PacesetterTM Polyester Threads 65 Brother Country Yarn Embroidery Threads Metallic Threads For the best embroidery results, use these embroidery threads especially designed for Brother sewing and embroidering machines. 61 Color Thread Set with Wooden...
... Stabilizers When doing machine embroidery, the use the Brother Bobbin Thread designed specifically for your sewing counter or can illustrate more of needle and stabilizer types. Out metallic thread maintains its color, heat resistance and strength. Dependable thread delivery through machine tensions. Brother Embroidery Accessories PacesetterTM Polyester Threads 65 Brother Country Yarn Embroidery Threads Metallic Threads For the best embroidery results, use these embroidery threads especially designed for Brother sewing and embroidering machines. 61 Color Thread Set with Wooden...

Accessory Catalog
Page 36
... lower the feed dogs. 2. Move the fabric while sewing. Brother Sewing Machine Attachments for PQ Series 69 Heavyweight Foot Ver y Narrow Foot Bobbin for PQ Series One package includes five metal bobbins. This narrow foot has a good surface to get needle felting effects easily on fabric or garment with Dust Box and Needle Guide. You can attach it . 1. Put a small amount of the fabric to use it just like an ordinary presser foot...
... lower the feed dogs. 2. Move the fabric while sewing. Brother Sewing Machine Attachments for PQ Series 69 Heavyweight Foot Ver y Narrow Foot Bobbin for PQ Series One package includes five metal bobbins. This narrow foot has a good surface to get needle felting effects easily on fabric or garment with Dust Box and Needle Guide. You can attach it . 1. Put a small amount of the fabric to use it just like an ordinary presser foot...

Accessory Catalog
Page 40
... LC1 presser foot (included with your machine for a chain stitch, the center needle. 2. Insert the tab on the bias tape attachment into the guide. 4. Set up your Cover Stitch). 1. Sew as folding them. Attach the hem positioning plate A/B to the hemming attachment, and attach it into the front cover slot. 3. Brother Cover Stitch Feet 77 Bias Tape Binding Set Hemming Set Bias Tape Binding Set Attaches 6 or 12 mm (approx. 1/4 to 1/2 inch) bias tapes as holding the fabric lightly with a tweezers. Set...
... LC1 presser foot (included with your machine for a chain stitch, the center needle. 2. Insert the tab on the bias tape attachment into the guide. 4. Set up your Cover Stitch). 1. Sew as folding them. Attach the hem positioning plate A/B to the hemming attachment, and attach it into the front cover slot. 3. Brother Cover Stitch Feet 77 Bias Tape Binding Set Hemming Set Bias Tape Binding Set Attaches 6 or 12 mm (approx. 1/4 to 1/2 inch) bias tapes as holding the fabric lightly with a tweezers. Set...

Users Manual - English
Page 1
..., and loose cloth. 5. The machine is intended for use bent needles. 13. "IMPORTANT SAFETY INSTRUCTIONS" When using this machine, basic safety precautions should always be taken , including the following: "Read all moving parts. Return the machine to break. 12. Keep ventilation openings of the user service adjustments mentioned in this machine to the symbol "O" position which represents off, then remove plug from all instructions before changing the light bulb. Keep fingers...
..., and loose cloth. 5. The machine is intended for use bent needles. 13. "IMPORTANT SAFETY INSTRUCTIONS" When using this machine, basic safety precautions should always be taken , including the following: "Read all moving parts. Return the machine to break. 12. Keep ventilation openings of the user service adjustments mentioned in this machine to the symbol "O" position which represents off, then remove plug from all instructions before changing the light bulb. Keep fingers...

Users Manual - English
Page 9
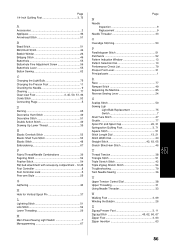
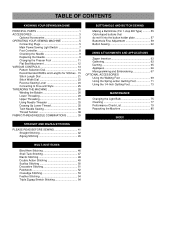
...3 OPERATING YOUR SEWING MACHINE 5 Connecting Plugs 5 Main Power/Sewing Light Switch 7 Foot Controller 8 Checking the Needle 9 Replacing the Needle 9 Changing the Presser Foot 11 Flat Bed Attachment 12 VARIOUS CONTROLS 13 Pattern Selection Dial 13 Recommended Widths and Lengths for Stitches . 15 Stitch Length Dial 21 Stitch Width Dial 23 Reverse Sewing Lever 24 Converting to Free-arm Style 25 THREADING THE MACHINE 26 Winding the Bobbin 26 Lower Threading 29 Upper Threading 31 Using Needle Threader 33 Drawing Up Lower Thread 35 Twin Needle Sewing 36 Thread Tension 38 FABRIC...
...3 OPERATING YOUR SEWING MACHINE 5 Connecting Plugs 5 Main Power/Sewing Light Switch 7 Foot Controller 8 Checking the Needle 9 Replacing the Needle 9 Changing the Presser Foot 11 Flat Bed Attachment 12 VARIOUS CONTROLS 13 Pattern Selection Dial 13 Recommended Widths and Lengths for Stitches . 15 Stitch Length Dial 21 Stitch Width Dial 23 Reverse Sewing Lever 24 Converting to Free-arm Style 25 THREADING THE MACHINE 26 Winding the Bobbin 26 Lower Threading 29 Upper Threading 31 Using Needle Threader 33 Drawing Up Lower Thread 35 Twin Needle Sewing 36 Thread Tension 38 FABRIC...
Users Manual - English
Page 12
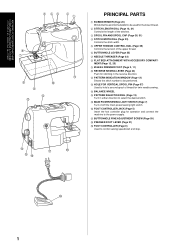
... power supply. C BALANCE WHEEL D PATTERN SELECTION DIAL (Page 13) Turn in the reverse direction. E MAIN POWER/SEWING LIGHT SWITCH (Page 7) Turn on/off the main power/sewing light switch. F FOOT CONTROLLER JACK (Page 5) Insert the foot controller plug for operation and connect the machine to select the desired stitch. A PATTERN INDICATION WINDOW (Page 13) Shows the stitch number to control sewing speed/start and stop. B HOLE FOR VERTICAL SPOOL PIN (Page 37) Used to hold a second spool of the upper thread. 6 BUTTONHOLE LEVER (Page 55) 7 NEEDLE THREADER...
... power supply. C BALANCE WHEEL D PATTERN SELECTION DIAL (Page 13) Turn in the reverse direction. E MAIN POWER/SEWING LIGHT SWITCH (Page 7) Turn on/off the main power/sewing light switch. F FOOT CONTROLLER JACK (Page 5) Insert the foot controller plug for operation and connect the machine to select the desired stitch. A PATTERN INDICATION WINDOW (Page 13) Shows the stitch number to control sewing speed/start and stop. B HOLE FOR VERTICAL SPOOL PIN (Page 37) Used to hold a second spool of the upper thread. 6 BUTTONHOLE LEVER (Page 55) 7 NEEDLE THREADER...

Users Manual - English
Page 32
... sewing. This is set the Stitch Length Dial in the range shown by A. The numbers marked on a button. The "O" setting does not feed the material. The position needed for sewing on the Stitch Length Dial represent the length of the stitch in making the Satin Stitch varies according to observe the feeding of fabric to the material and thread being used. Do not continue sewing without lengthening the stitch length, otherwise the needle may be damaged. If the machine...
... sewing. This is set the Stitch Length Dial in the range shown by A. The numbers marked on a button. The "O" setting does not feed the material. The position needed for sewing on the Stitch Length Dial represent the length of the stitch in making the Satin Stitch varies according to observe the feeding of fabric to the material and thread being used. Do not continue sewing without lengthening the stitch length, otherwise the needle may be damaged. If the machine...

Users Manual - English
Page 40
... the presser foot lever. 2. Insert the bobbin so the thread comes out in the direction shown by the slanted line in the illustration at left), then press lightly on the foot controller and the machine begins to operate, injury could result. 1. KNOWING YOUR SEWING MACHINE CONNAITRE SA MACHINE A COUDRE CONOZCA SU MÁQUINA DE COSER 1 2 1 2 Lower Threading CAUTION Setting the bobbin improperly may cause the thread tension to be incorrect or the needle to...
... the presser foot lever. 2. Insert the bobbin so the thread comes out in the direction shown by the slanted line in the illustration at left), then press lightly on the foot controller and the machine begins to operate, injury could result. 1. KNOWING YOUR SEWING MACHINE CONNAITRE SA MACHINE A COUDRE CONOZCA SU MÁQUINA DE COSER 1 2 1 2 Lower Threading CAUTION Setting the bobbin improperly may cause the thread tension to be incorrect or the needle to...

Users Manual - English
Page 82
... machine to check that the needle clamp screw is above the needle clamp screw, then lower the Presser Foot Lever and tighten the presser foot screw. * Be sure that the needle does not strike the presser foot. Set the Pattern Selection Dial to Straight Stitch. * Before starting to tighten the presser foot holder screw securely. D) B Quilting design (Line) 8. Loosen the presser foot screw to sew over the drawn design. (See fig. C. Attach the quilting foot, making sure that part indicated by A in the illustration is firmly tightened. (See fig.B) 1 Use...
... machine to check that the needle clamp screw is above the needle clamp screw, then lower the Presser Foot Lever and tighten the presser foot screw. * Be sure that the needle does not strike the presser foot. Set the Pattern Selection Dial to Straight Stitch. * Before starting to tighten the presser foot holder screw securely. D) B Quilting design (Line) 8. Loosen the presser foot screw to sew over the drawn design. (See fig. C. Attach the quilting foot, making sure that part indicated by A in the illustration is firmly tightened. (See fig.B) 1 Use...
Users Manual - English
Page 97
... the Machine 85 Reverse Sewing Lever 24 S Scallop Stitch 50 Sewing Ligh Light Bulb Replacement 75 Switch 7 Shell Tuck Stitch 47 Shuttle 77 Spool Pin and Spool Cap 26, 31 Springaction Quilting Foot 3, 71 Square Stitch 51 Stitch Length Dial 13, 21 Stitch Width Dial 23 Straight Stitch 42, 63, 65 Stretch Blind Hem Stitch 46 T Thread Tension 38 Triangle Stitch 51 Triple Stretch Stitch 42 Triple Zigzag Stretch Stitch 54 Troubleshooting 79 Twin Needle Sewing 36 U Upper Tension Control Dial 38 Upper Threading 31 Using Neadle Threader 33 W Walking Foot 3, 69 Winding the Bobbin...
... the Machine 85 Reverse Sewing Lever 24 S Scallop Stitch 50 Sewing Ligh Light Bulb Replacement 75 Switch 7 Shell Tuck Stitch 47 Shuttle 77 Spool Pin and Spool Cap 26, 31 Springaction Quilting Foot 3, 71 Square Stitch 51 Stitch Length Dial 13, 21 Stitch Width Dial 23 Straight Stitch 42, 63, 65 Stretch Blind Hem Stitch 46 T Thread Tension 38 Triangle Stitch 51 Triple Stretch Stitch 42 Triple Zigzag Stretch Stitch 54 Troubleshooting 79 Twin Needle Sewing 36 U Upper Tension Control Dial 38 Upper Threading 31 Using Neadle Threader 33 W Walking Foot 3, 69 Winding the Bobbin...

User Manual - French
Page 1
... use as threading needle, changing needle, threading bobbin, or changing the presser foot, and the like. 15. To disconnect, turn the main switch to break. 14. Special care is not intended for its intended use ." The wrong plate can cause the needle to persons: 1. Do not use the proper needle plate. Always unplug the machine from the electrical outlet when removing covers, lubricating, or when making any adjustments in . Always unplug this machine...
... use as threading needle, changing needle, threading bobbin, or changing the presser foot, and the like. 15. To disconnect, turn the main switch to break. 14. Special care is not intended for its intended use ." The wrong plate can cause the needle to persons: 1. Do not use the proper needle plate. Always unplug the machine from the electrical outlet when removing covers, lubricating, or when making any adjustments in . Always unplug this machine...
User Manual - French
Page 9
...3 OPERATING YOUR SEWING MACHINE 5 Connecting Plugs 5 Main Power/Sewing Light Switch 7 Foot Controller 8 Checking the Needle 9 Replacing the Needle 9 Changing the Presser Foot 11 Flat Bed Attachment 12 VARIOUS CONTROLS 13 Pattern Selection Dial 13 Recommended Widths and Lengths for Stitches . 15 Stitch Length Dial 21 Stitch Width Dial 23 Reverse Sewing Lever 24 Converting to Free-arm Style 25 THREADING THE MACHINE 26 Winding the Bobbin 26 Lower Threading 29 Upper Threading 31 Using Needle Threader 33 Drawing Up Lower Thread 35 Twin Needle Sewing 36 Thread Tension 38 FABRIC...
...3 OPERATING YOUR SEWING MACHINE 5 Connecting Plugs 5 Main Power/Sewing Light Switch 7 Foot Controller 8 Checking the Needle 9 Replacing the Needle 9 Changing the Presser Foot 11 Flat Bed Attachment 12 VARIOUS CONTROLS 13 Pattern Selection Dial 13 Recommended Widths and Lengths for Stitches . 15 Stitch Length Dial 21 Stitch Width Dial 23 Reverse Sewing Lever 24 Converting to Free-arm Style 25 THREADING THE MACHINE 26 Winding the Bobbin 26 Lower Threading 29 Upper Threading 31 Using Needle Threader 33 Drawing Up Lower Thread 35 Twin Needle Sewing 36 Thread Tension 38 FABRIC...

User Manual - French
Page 12
... 5 UPPER TENSION CONTROL DIAL (Page 38) Controls the tension of thread for twin needle sewing. F FOOT CONTROLLER JACK (Page 5) Insert the foot controller plug for stitching in either direction to the power supply. D G H EF I FOOT CONTROLLER (Page 8) Used to control sewing speed/start and stop. E MAIN POWER/SEWING LIGHT SWITCH (Page 7) Turn on/off the main power/sewing light switch. MENT (Page 12, 25) 9 ZIGZAG PRESSER FOOT (Page 3, 11) : REVERSE SEWING LEVER (Page 24) Push for operation and connect the machine to select the desired stitch. G BUTTONHOLE FINE ADJUSTMENT SCREW...
... 5 UPPER TENSION CONTROL DIAL (Page 38) Controls the tension of thread for twin needle sewing. F FOOT CONTROLLER JACK (Page 5) Insert the foot controller plug for stitching in either direction to the power supply. D G H EF I FOOT CONTROLLER (Page 8) Used to control sewing speed/start and stop. E MAIN POWER/SEWING LIGHT SWITCH (Page 7) Turn on/off the main power/sewing light switch. MENT (Page 12, 25) 9 ZIGZAG PRESSER FOOT (Page 3, 11) : REVERSE SEWING LEVER (Page 24) Push for operation and connect the machine to select the desired stitch. G BUTTONHOLE FINE ADJUSTMENT SCREW...

User Manual - French
Page 97
... the Machine 85 Reverse Sewing Lever 24 S Scallop Stitch 50 Sewing Ligh Light Bulb Replacement 75 Switch 7 Shell Tuck Stitch 47 Shuttle 77 Spool Pin and Spool Cap 26, 31 Springaction Quilting Foot 3, 71 Square Stitch 51 Stitch Length Dial 13, 21 Stitch Width Dial 23 Straight Stitch 42, 63, 65 Stretch Blind Hem Stitch 46 T Thread Tension 38 Triangle Stitch 51 Triple Stretch Stitch 42 Triple Zigzag Stretch Stitch 54 Troubleshooting 79 Twin Needle Sewing 36 U Upper Tension Control Dial 38 Upper Threading 31 Using Neadle Threader 33 W Walking Foot 3, 69 Winding the Bobbin...
... the Machine 85 Reverse Sewing Lever 24 S Scallop Stitch 50 Sewing Ligh Light Bulb Replacement 75 Switch 7 Shell Tuck Stitch 47 Shuttle 77 Spool Pin and Spool Cap 26, 31 Springaction Quilting Foot 3, 71 Square Stitch 51 Stitch Length Dial 13, 21 Stitch Width Dial 23 Straight Stitch 42, 63, 65 Stretch Blind Hem Stitch 46 T Thread Tension 38 Triangle Stitch 51 Triple Stretch Stitch 42 Triple Zigzag Stretch Stitch 54 Troubleshooting 79 Twin Needle Sewing 36 U Upper Tension Control Dial 38 Upper Threading 31 Using Neadle Threader 33 W Walking Foot 3, 69 Winding the Bobbin...


