
Users Manual - English
Page 4
... ...28 Scallop Stitching ...28 Double Action Stitching ...29 Overedge Stitching ...29 Feather Stitching ...29 Triple Zigzag Stretch Stitching ...30 Decorative Stitching ...30 Making a Buttonhole (1-Step Automatic Buttonhole 30 Making a Buttonhole (4-Step Buttonhole) ...31 Adjusting Buttonholes ...33 Sewing Buttons ...33 Zipper Insertion ...34 Gathering ...35 Darning...35 Appliqués ...36 Monogramming and Embroidering ...36 MAINTENANCE ...38 Changing the...
... ...28 Scallop Stitching ...28 Double Action Stitching ...29 Overedge Stitching ...29 Feather Stitching ...29 Triple Zigzag Stretch Stitching ...30 Decorative Stitching ...30 Making a Buttonhole (1-Step Automatic Buttonhole 30 Making a Buttonhole (4-Step Buttonhole) ...31 Adjusting Buttonholes ...33 Sewing Buttons ...33 Zipper Insertion ...34 Gathering ...35 Darning...35 Appliqués ...36 Monogramming and Embroidering ...36 MAINTENANCE ...38 Changing the...
Users Manual - English
Page 14
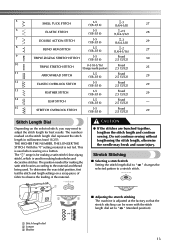
... THE STITCH. Do not continue sewing without lengthening the stitch length, otherwise the needle may need to adjust the stitch length for making buttonholes and decorative stitches. With the "0" setting material is used for best results. This is adjusted at the factory so that the ... you may break and cause injury. SS 1 10 2 2 3 1 ■ Adjusting the stretch stitching The machine is used . The position needed for making the satin stitch varies according to " SS " (standard position). 1 Stitch length dial 2 Longer 3 Shorter 13 To determine the exact dial position, first ...
... THE STITCH. Do not continue sewing without lengthening the stitch length, otherwise the needle may need to adjust the stitch length for making buttonholes and decorative stitches. With the "0" setting material is used for best results. This is adjusted at the factory so that the ... you may break and cause injury. SS 1 10 2 2 3 1 ■ Adjusting the stretch stitching The machine is used . The position needed for making the satin stitch varies according to " SS " (standard position). 1 Stitch length dial 2 Longer 3 Shorter 13 To determine the exact dial position, first ...
Users Manual - English
Page 27
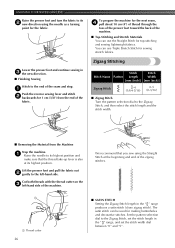
... end of the fabric. Cut both threads with the thread cutter on the 3 left -hand side. The satin stitch can use Triple Stretch Stitch for making buttonholes and decorative stitches. To prepare the machine for the next seam, 4 pull about 10 cm (4") of thread through the toes of the presser foot toward.... KNOWING YOUR SEWING MACHINE Raise the presser foot and turn the fabric to its 2 new direction using the Straight Stitch at its highest position and make sure that you sew using the needle as a turning point for the fabric.
... end of the fabric. Cut both threads with the thread cutter on the 3 left -hand side. The satin stitch can use Triple Stretch Stitch for making buttonholes and decorative stitches. To prepare the machine for the next seam, 4 pull about 10 cm (4") of thread through the toes of the presser foot toward.... KNOWING YOUR SEWING MACHINE Raise the presser foot and turn the fabric to its 2 new direction using the Straight Stitch at its highest position and make sure that you sew using the needle as a turning point for the fabric.
Users Manual - English
Page 31
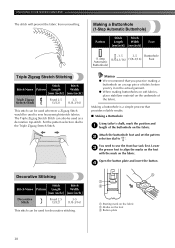
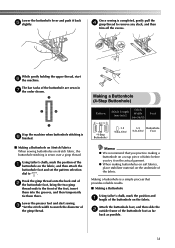
... foot to sew the front bar tack first. Memo ● We recommend that provides reliable results. ■ Making a Buttonhole Using tailor's chalk, mark the position and 1 length of the fabric. You need to align the marks on...button plate and insert the button. 4 Decorative Stitching 3 1 - Making a Buttonhole (1-Step Automatic Buttonhole) Stitch Stitch Pattern Length Width Foot [mm (inch)] [mm (inch)] -1.5 3-5 Buttonhole (1-Step (1/64-1/16) (1/8-3/16) Foot Automatic Buttonhole) Triple Zigzag Stretch Stitching Stitch Stitch Stitch Name Pattern Length Width ...
... foot to sew the front bar tack first. Memo ● We recommend that provides reliable results. ■ Making a Buttonhole Using tailor's chalk, mark the position and 1 length of the fabric. You need to align the marks on...button plate and insert the button. 4 Decorative Stitching 3 1 - Making a Buttonhole (1-Step Automatic Buttonhole) Stitch Stitch Pattern Length Width Foot [mm (inch)] [mm (inch)] -1.5 3-5 Buttonhole (1-Step (1/64-1/16) (1/8-3/16) Foot Automatic Buttonhole) Triple Zigzag Stretch Stitching Stitch Stitch Stitch Name Pattern Length Width ...
Users Manual - English
Page 32
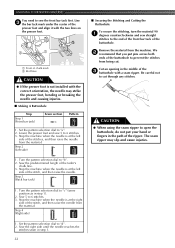
... 6 the machine. Using tailor's chalk, mark the position of the 1 buttonhole on the fabric. Attach the buttonhole foot, and then slide the 2 outside frame of the gimp thread. Making a Buttonhole (4-Step Buttonhole) Pattern Stitch Length [mm (inch)] Stitch Width [mm (inch)] Foot (4-Step Buttonhole) -1.5 (1/64-1/16) 3-5 Buttonhole (1/8-3/16) Foot Memo ● We recommend that provides reliable results...
... 6 the machine. Using tailor's chalk, mark the position of the 1 buttonhole on the fabric. Attach the buttonhole foot, and then slide the 2 outside frame of the gimp thread. Making a Buttonhole (4-Step Buttonhole) Pattern Stitch Length [mm (inch)] Stitch Width [mm (inch)] Foot (4-Step Buttonhole) -1.5 (1/64-1/16) 3-5 Buttonhole (1/8-3/16) Foot Memo ● We recommend that provides reliable results...
Users Manual - English
Page 33
...of the stitch, and then raise the needle. The seam ripper may strike the presser foot, bending or breaking the needle and causing injuries. ■ Making A Buttonhole Remove the material from the material. Turn the pattern selection dial to "a". 2. Sew the right side until the needle reaches the stitches sewn in step...machine when the needle is at the left side of the ripper. Be careful not to the end of the front bar tack of the buttonhole. 2 1 1 Front of the presser foot and align it with the two lines on the presser foot. ■ Securing the Stitching and Cutting the...
...of the stitch, and then raise the needle. The seam ripper may strike the presser foot, bending or breaking the needle and causing injuries. ■ Making A Buttonhole Remove the material from the material. Turn the pattern selection dial to "a". 2. Sew the right side until the needle reaches the stitches sewn in step...machine when the needle is at the left side of the ripper. Be careful not to the end of the front bar tack of the buttonhole. 2 1 1 Front of the presser foot and align it with the two lines on the presser foot. ■ Securing the Stitching and Cutting the...
Users Manual - English
Page 34
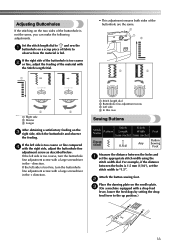
... Longer After obtaining a satisfactory feeding on the needle plate. 3 (On a machine equipped with a large screwdriver in the + direction. 1 Stitch length dial 2 Buttonhole fine adjustment screw 3 Left side 4 In this case Sewing Buttons Stitch Stitch Stitch Name Pattern Length Width Foot [mm (inch)] [mm (inch)] Zigzag Stitch (1/64...Button Any Sewing Foot Measure the distance between the holes is not the same, you can make the following adjustments. direction. If the right side of the buttonhole is too coarse 2 or fine, adjust the feeding of the material with the Stitch Length ...
... Longer After obtaining a satisfactory feeding on the needle plate. 3 (On a machine equipped with a large screwdriver in the + direction. 1 Stitch length dial 2 Buttonhole fine adjustment screw 3 Left side 4 In this case Sewing Buttons Stitch Stitch Stitch Name Pattern Length Width Foot [mm (inch)] [mm (inch)] Zigzag Stitch (1/64...Button Any Sewing Foot Measure the distance between the holes is not the same, you can make the following adjustments. direction. If the right side of the buttonhole is too coarse 2 or fine, adjust the feeding of the material with the Stitch Length ...
Users Manual - English
Page 44
... 29 B Blind Hem Stitch 11, 12, 13, 27 Bobbin Threading 15, 20 Bobbin Winder 15 Bridging Stitch 11 Buttonhole 30, 31 Buttonhole Fine Adjustment 33 Buttonhole Sewing 30, 31 C Changing Sewing Direction 25 Changing the Light Bulb 38 Changing the Presser Foot 8 Chart of Sewing ... Needle 7 L Leaf Stitch 11, 12, 13 Legs Stitch 11 Lower Threading 16 M Main Power and Sewing Light Switch 2, 7 Maintenance 38 Making a Buttonhole 30, 31 Monogramming and Embroidering 36 N Needle Replacement 7 Needle Threader 19 O Oiling 38 Overedge Stitching 29 P Pattern Length 11 Pattern Selection Dial...
... 29 B Blind Hem Stitch 11, 12, 13, 27 Bobbin Threading 15, 20 Bobbin Winder 15 Bridging Stitch 11 Buttonhole 30, 31 Buttonhole Fine Adjustment 33 Buttonhole Sewing 30, 31 C Changing Sewing Direction 25 Changing the Light Bulb 38 Changing the Presser Foot 8 Chart of Sewing ... Needle 7 L Leaf Stitch 11, 12, 13 Legs Stitch 11 Lower Threading 16 M Main Power and Sewing Light Switch 2, 7 Maintenance 38 Making a Buttonhole 30, 31 Monogramming and Embroidering 36 N Needle Replacement 7 Needle Threader 19 O Oiling 38 Overedge Stitching 29 P Pattern Length 11 Pattern Selection Dial...


