
Users Manual - English
Page 2
... the electrical outlet immediately after using and before changing the light bulb. WARNING - To reduce the risk of the sewing machine and foot controller free from outlet. 9. Always unplug before cleaning. 2. Never operate the sewing machine with same type rated 15 watts. Do not use ." Special care is not working properly, if it to ensure...
... the electrical outlet immediately after using and before changing the light bulb. WARNING - To reduce the risk of the sewing machine and foot controller free from outlet. 9. Always unplug before cleaning. 2. Never operate the sewing machine with same type rated 15 watts. Do not use ." Special care is not working properly, if it to ensure...
Users Manual - English
Page 5
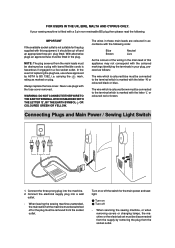
...The plug severed from the main leads must be connected to the terminal which is marked with the coloured markings identifying the terminals in your sewing machine is not suitable for the main power and sewlight. 1 Turn on plug. Always replace the fuse cover. Turn on or off - WARNING... which is hazardous if engaged in the plug. Never use a fuse approved by removing the plug from the socket outlet. When leaving the sewing machine unattended, the main switch of replacing the plug fuse, use plugs with a 3 pin non-rewireable BS plug then please read the following code...
...The plug severed from the main leads must be connected to the terminal which is marked with the coloured markings identifying the terminals in your sewing machine is not suitable for the main power and sewlight. 1 Turn on plug. Always replace the fuse cover. Turn on or off - WARNING... which is hazardous if engaged in the plug. Never use a fuse approved by removing the plug from the socket outlet. When leaving the sewing machine unattended, the main switch of replacing the plug fuse, use plugs with a 3 pin non-rewireable BS plug then please read the following code...

Users Manual - English
Page 6
... AND ZIGZAG STITCHING BUILT-IN STITCHES KNOWING YOUR SEWING MACHINE PRINCIPAL PARTS 1 ACCESSORIES 3 OPERATING YOUR SEWING MACHINE 5 Connecting Plugs 5 Main Power and Sewing Light Switches 6 Foot Controller 6 Inserting the Needle 7 Checking the Needle 7 Changing the Presser Foot 8 Converting to Free-Arm Style 9 Steadying the Machine 9 VARIOUS CONTROLS 10 Pattern Selection Dial 10 RECOMMENDED WIDTHS AND LENGTHS FOR STITCHES...
... AND ZIGZAG STITCHING BUILT-IN STITCHES KNOWING YOUR SEWING MACHINE PRINCIPAL PARTS 1 ACCESSORIES 3 OPERATING YOUR SEWING MACHINE 5 Connecting Plugs 5 Main Power and Sewing Light Switches 6 Foot Controller 6 Inserting the Needle 7 Checking the Needle 7 Changing the Presser Foot 8 Converting to Free-Arm Style 9 Steadying the Machine 9 VARIOUS CONTROLS 10 Pattern Selection Dial 10 RECOMMENDED WIDTHS AND LENGTHS FOR STITCHES...

Users Manual - English
Page 9
...B 0 7 Stitch width dial Controls the stitch width. 8 Pattern selection dial Turn in the reverse direction. CONTENTS KNOWING YOUR SEWING MACHINE STRAIGHT AND ZIGZAG STITCHING BUILT-IN STITCHES PRINCIPAL PARTS 34 62 1 1 Bobbin winding assembly Winds the thread onto the bobbin to...5 9 4 Thread take-up lever 8 5 Thread cutter 7 6 Upper tension control dial Controls the tension of the stitches. 0 Reverse sewing lever Push for operation. F Foot controller receptacle Insert the foot controller plug for stitching in either direction to select the desired stitch. 9 ...
...B 0 7 Stitch width dial Controls the stitch width. 8 Pattern selection dial Turn in the reverse direction. CONTENTS KNOWING YOUR SEWING MACHINE STRAIGHT AND ZIGZAG STITCHING BUILT-IN STITCHES PRINCIPAL PARTS 34 62 1 1 Bobbin winding assembly Winds the thread onto the bobbin to...5 9 4 Thread take-up lever 8 5 Thread cutter 7 6 Upper tension control dial Controls the tension of the stitches. 0 Reverse sewing lever Push for operation. F Foot controller receptacle Insert the foot controller plug for stitching in either direction to select the desired stitch. 9 ...

Users Manual - English
Page 13
... ATTACHMENTS AND APPLICATIONS MAINTENANCE INDEX 5 only This appliance has a polarized plug (one way. PRÉCAUTION: 1. CONTENTS KNOWING YOUR SEWING MACHINE STRAIGHT AND ZIGZAG STITCHING BUILT-IN STITCHES OPERATING YOUR SEWING MACHINE Connecting Plugs 1. ing machine is not in a polarized outlet only one blade wider than the other). Lors du remplacement de l'ampoule, de la...
... ATTACHMENTS AND APPLICATIONS MAINTENANCE INDEX 5 only This appliance has a polarized plug (one way. PRÉCAUTION: 1. CONTENTS KNOWING YOUR SEWING MACHINE STRAIGHT AND ZIGZAG STITCHING BUILT-IN STITCHES OPERATING YOUR SEWING MACHINE Connecting Plugs 1. ing machine is not in a polarized outlet only one blade wider than the other). Lors du remplacement de l'ampoule, de la...
Users Manual - English
Page 14
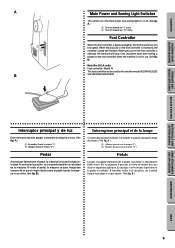
... también la velocidad de la máquina. B.) BUTTONHOLE AND BUTTON SEWING USING ATTACHMENTS AND APPLICATIONS MAINTENANCE INDEX 6 CONTENTS KNOWING YOUR SEWING MACHINE STRAIGHT AND ZIGZAG STITCHING BUILT-IN STITCHES A 1 2 B Main Power and Sewing Light Switches This switch turns the main power and sewing light on or off (toward the "I" mark) 2 Turn off . (See fig...
... también la velocidad de la máquina. B.) BUTTONHOLE AND BUTTON SEWING USING ATTACHMENTS AND APPLICATIONS MAINTENANCE INDEX 6 CONTENTS KNOWING YOUR SEWING MACHINE STRAIGHT AND ZIGZAG STITCHING BUILT-IN STITCHES A 1 2 B Main Power and Sewing Light Switches This switch turns the main power and sewing light on or off (toward the "I" mark) 2 Turn off . (See fig...
Users Manual - English
Page 19
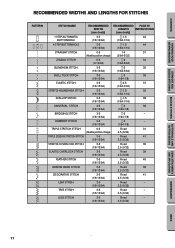
CONTENTS KNOWING YOUR SEWING MACHINE STRAIGHT AND ZIGZAG STITCHING BUILT-IN STITCHES RECOMMENDED WIDTHS AND LENGTHS FOR STITCHES PATTERN C A STITCH NAME RECOMMENDED WIDTH [mm (inch)] RECOMMENDED PAGE IN LENGTH INSTRUCTIONS [... 41 (1/8-13/64) 2.5 (3/32) LEAF STITCH 3-5 Fixed - (1/8-13/64) 2.5 (3/32) TREE STITCH 3-5 Fixed - (1/8-13/64) 2.5 (3/32) LEGS STITCH 3-5 Fixed - (1/8-13/64) 2.5 (3/32) BUTTONHOLE AND BUTTON SEWING USING ATTACHMENTS AND APPLICATIONS MAINTENANCE INDEX 11
CONTENTS KNOWING YOUR SEWING MACHINE STRAIGHT AND ZIGZAG STITCHING BUILT-IN STITCHES RECOMMENDED WIDTHS AND LENGTHS FOR STITCHES PATTERN C A STITCH NAME RECOMMENDED WIDTH [mm (inch)] RECOMMENDED PAGE IN LENGTH INSTRUCTIONS [... 41 (1/8-13/64) 2.5 (3/32) LEAF STITCH 3-5 Fixed - (1/8-13/64) 2.5 (3/32) TREE STITCH 3-5 Fixed - (1/8-13/64) 2.5 (3/32) LEGS STITCH 3-5 Fixed - (1/8-13/64) 2.5 (3/32) BUTTONHOLE AND BUTTON SEWING USING ATTACHMENTS AND APPLICATIONS MAINTENANCE INDEX 11

Users Manual - English
Page 28
... toward you (counterclockwise) to raise the thread take-up lever 4. Bring the thread through guides. (See fig. CONTENTS KNOWING YOUR SEWING MACHINE STRAIGHT AND ZIGZAG STITCHING BUILT-IN STITCHES 1 2 4 3 BUTTONHOLE AND BUTTON SEWING USING ATTACHMENTS AND APPLICATIONS A 4 23 1 C B D 4 4 E 5 Upper (Needle) Threading Turn power switch to break, skip stitches or wrinkle the fabric. 20...
... toward you (counterclockwise) to raise the thread take-up lever 4. Bring the thread through guides. (See fig. CONTENTS KNOWING YOUR SEWING MACHINE STRAIGHT AND ZIGZAG STITCHING BUILT-IN STITCHES 1 2 4 3 BUTTONHOLE AND BUTTON SEWING USING ATTACHMENTS AND APPLICATIONS A 4 23 1 C B D 4 4 E 5 Upper (Needle) Threading Turn power switch to break, skip stitches or wrinkle the fabric. 20...

Users Manual - English
Page 30
... the needle toward you ). While lightly holding the thread, rotate the needle threader lever toward the front of the machine (toward the back of the sewing machine. • Only use needles of thread through the needle. 6 Hook 7 Thread 6. Raise the needle threader lever...Needle holder 2 Needle threader lever 3 Guide 4 Hook holder 5 Align 5. CONTENTS KNOWING YOUR SEWING MACHINE STRAIGHT AND ZIGZAG STITCHING BUILT-IN STITCHES 1 2 3 1 2 4 5 7 6 6 Using the Needle Threader (when the machine is equipped with needle sizes #70 to #100. Turn the balance wheel toward the back...
... the needle toward you ). While lightly holding the thread, rotate the needle threader lever toward the front of the machine (toward the back of the sewing machine. • Only use needles of thread through the needle. 6 Hook 7 Thread 6. Raise the needle threader lever...Needle holder 2 Needle threader lever 3 Guide 4 Hook holder 5 Align 5. CONTENTS KNOWING YOUR SEWING MACHINE STRAIGHT AND ZIGZAG STITCHING BUILT-IN STITCHES 1 2 3 1 2 4 5 7 6 6 Using the Needle Threader (when the machine is equipped with needle sizes #70 to #100. Turn the balance wheel toward the back...

Users Manual - English
Page 33
...large. 4. Tirer environ 15 cm de chacun des deux fils et les placer vers l'arrière de la machine, juste derrière le pied-de-biche. CONTENTS KNOWING YOUR SEWING MACHINE STRAIGHT AND ZIGZAG STITCHING BUILT-IN STITCHES 1 2 Drawing Up Lower Thread 1. Pull the upper thread toward the ... les branches du pied-de-biche. 1 Fil supérieur 2 Boucle du fil inférieur 3 Fil inférieur BUTTONHOLE AND BUTTON SEWING USING ATTACHMENTS AND APPLICATIONS MAINTENANCE INDEX 25 The upper thread should pass between the toes of the presser foot. 1 Upper thread 2 Lower thread loop ...
...large. 4. Tirer environ 15 cm de chacun des deux fils et les placer vers l'arrière de la machine, juste derrière le pied-de-biche. CONTENTS KNOWING YOUR SEWING MACHINE STRAIGHT AND ZIGZAG STITCHING BUILT-IN STITCHES 1 2 Drawing Up Lower Thread 1. Pull the upper thread toward the ... les branches du pied-de-biche. 1 Fil supérieur 2 Boucle du fil inférieur 3 Fil inférieur BUTTONHOLE AND BUTTON SEWING USING ATTACHMENTS AND APPLICATIONS MAINTENANCE INDEX 25 The upper thread should pass between the toes of the presser foot. 1 Upper thread 2 Lower thread loop ...

Users Manual - English
Page 35
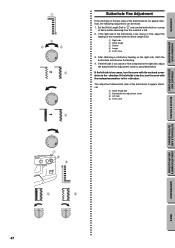
...to a higher number. 1 Reverse 2 Surface NOTE: The lower thread tension has already been adjusted at the factory for general use. CONTENTS KNOWING YOUR SEWING MACHINE STRAIGHT AND ZIGZAG STITCHING BUILT-IN STITCHES A 2 1 2 1 B 2 1 2 1 A-1 654 B-1 654 C 2 1 2 1 Thread... Tension Thread tension will weaken your seams or cause puckers in your fabric. 1 Reverse 2 Surface BUTTONHOLE AND BUTTON SEWING USING ATTACHMENTS AND APPLICATIONS MAINTENANCE INDEX 27 Locks appear on thin fabrics, the thread tension cannot be adjusted when you change fabric or thread ...
...to a higher number. 1 Reverse 2 Surface NOTE: The lower thread tension has already been adjusted at the factory for general use. CONTENTS KNOWING YOUR SEWING MACHINE STRAIGHT AND ZIGZAG STITCHING BUILT-IN STITCHES A 2 1 2 1 B 2 1 2 1 A-1 654 B-1 654 C 2 1 2 1 Thread... Tension Thread tension will weaken your seams or cause puckers in your fabric. 1 Reverse 2 Surface BUTTONHOLE AND BUTTON SEWING USING ATTACHMENTS AND APPLICATIONS MAINTENANCE INDEX 27 Locks appear on thin fabrics, the thread tension cannot be adjusted when you change fabric or thread ...

Users Manual - English
Page 37
Elija la aguja y el hilo correctos en la tabla de arriba. 2. CONTENTS KNOWING YOUR SEWING MACHINE STRAIGHT AND ZIGZAG STITCHING BUILT-IN STITCHES CHART OF SEWING FABRICS, NEEDLES AND THREAD COMBINATIONS VERY THIN LIGHTWEIGHT MEDIUM WEIGHT HEAVYWEIGHT SEWING FABRICS Fine tricot, Fine lace, Thin linen, Silk, Organza, Chiffon Voile, Taffeta, Synthetics, Silk, Batiste Cotton, Gingham...
Elija la aguja y el hilo correctos en la tabla de arriba. 2. CONTENTS KNOWING YOUR SEWING MACHINE STRAIGHT AND ZIGZAG STITCHING BUILT-IN STITCHES CHART OF SEWING FABRICS, NEEDLES AND THREAD COMBINATIONS VERY THIN LIGHTWEIGHT MEDIUM WEIGHT HEAVYWEIGHT SEWING FABRICS Fine tricot, Fine lace, Thin linen, Silk, Organza, Chiffon Voile, Taffeta, Synthetics, Silk, Batiste Cotton, Gingham...
Users Manual - English
Page 42
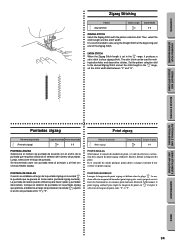
... conseillé de coudre quelques points droits à chaque extrémité d'une couture en points zigzag. CONTENTS KNOWING YOUR SEWING MACHINE STRAIGHT AND ZIGZAG STITCHING BUILT-IN STITCHES Zigzag Stitching Pattern (Zigzag Stitch) Stitch Length -4 Stitch Width 0-5 ZIGZAG STITCH Select the Zigzag ... el ancho de puntada entre "0" y "5". POINT DE BOURDON Lorsque la longueur du point zigzag est définie dans la plage " ", la machine effectue un point de bourdon (point zigzag très serré) qui peut servir à faire des boutonnières ou comme point fantaisie ...
... conseillé de coudre quelques points droits à chaque extrémité d'une couture en points zigzag. CONTENTS KNOWING YOUR SEWING MACHINE STRAIGHT AND ZIGZAG STITCHING BUILT-IN STITCHES Zigzag Stitching Pattern (Zigzag Stitch) Stitch Length -4 Stitch Width 0-5 ZIGZAG STITCH Select the Zigzag ... el ancho de puntada entre "0" y "5". POINT DE BOURDON Lorsque la longueur du point zigzag est définie dans la plage " ", la machine effectue un point de bourdon (point zigzag très serré) qui peut servir à faire des boutonnières ou comme point fantaisie ...
Users Manual - English
Page 43
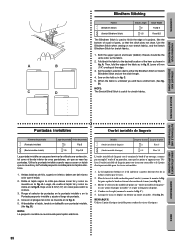
...the upper (spool) and lower (bobbin) threads should be the same color as in fig. BUTTONHOLE AND BUTTON SEWING USING ATTACHMENTS AND APPLICATIONS Puntadas invisibles Ourlet invisible de lingerie Número de puntada (Puntada invisible) (Basta invisible ...sert à terminer le bord d'un ouvrage, comme par exemple l'ourlet d'un pantalon, sans que les points n'apparaissent. CONTENTS KNOWING YOUR SEWING MACHINE STRAIGHT AND ZIGZAG STITCHING BUILT-IN STITCHES A B C D Blindhem Stitching Pattern (Blindhem Stitch) (Stretch Blindhem Stitch) Stitch Length -2 -1.5...
...the upper (spool) and lower (bobbin) threads should be the same color as in fig. BUTTONHOLE AND BUTTON SEWING USING ATTACHMENTS AND APPLICATIONS Puntadas invisibles Ourlet invisible de lingerie Número de puntada (Puntada invisible) (Basta invisible ...sert à terminer le bord d'un ouvrage, comme par exemple l'ourlet d'un pantalon, sans que les points n'apparaissent. CONTENTS KNOWING YOUR SEWING MACHINE STRAIGHT AND ZIGZAG STITCHING BUILT-IN STITCHES A B C D Blindhem Stitching Pattern (Blindhem Stitch) (Stretch Blindhem Stitch) Stitch Length -2 -1.5...

Users Manual - English
Page 50
... the buttonhole foot, then bring the two gimp thread ends to the front of the buttonhole on the fabric as in fig. CONTENTS KNOWING YOUR SEWING MACHINE STRAIGHT AND ZIGZAG STITCHING BUILT-IN STITCHES A B 1 2 - 3 C PUSH D 3 2 4 1 E PUSH Making a Buttonhole (1 Step Automatic Buttonhole) 4 Pattern... pattern selection dial to remove any slack, then trim off the excess. Lower the presser foot and start the machine. 7. When sewing buttonholes on thin fabrics, place stabilizer material on stretch fabric, place a gimp thread under the buttonhole stitching. ...
... the buttonhole foot, then bring the two gimp thread ends to the front of the buttonhole on the fabric as in fig. CONTENTS KNOWING YOUR SEWING MACHINE STRAIGHT AND ZIGZAG STITCHING BUILT-IN STITCHES A B 1 2 - 3 C PUSH D 3 2 4 1 E PUSH Making a Buttonhole (1 Step Automatic Buttonhole) 4 Pattern... pattern selection dial to remove any slack, then trim off the excess. Lower the presser foot and start the machine. 7. When sewing buttonholes on thin fabrics, place stabilizer material on stretch fabric, place a gimp thread under the buttonhole stitching. ...
Users Manual - English
Page 55
...material with the Stitch Length Dial. 1 Right side 2 Stitch length 3 Shorter 4 Longer 5 In this case 9 9 BUTTONHOLE AND BUTTON SEWING USING ATTACHMENTS AND APPLICATIONS MAINTENANCE INDEX 47 After obtaining a satisfactory feeding on the two sides of fabric while observing how the material is too ... If the stitching on the right side, stitch the buttonhole and observe the feeding. 4. If the left side is fed. 2. CONTENTS KNOWING YOUR SEWING MACHINE STRAIGHT AND ZIGZAG STITCHING BUILT-IN STITCHES 1 2 4 3 10 432 - SS 5 432 - SS 10 5 432 - If the right side...
...material with the Stitch Length Dial. 1 Right side 2 Stitch length 3 Shorter 4 Longer 5 In this case 9 9 BUTTONHOLE AND BUTTON SEWING USING ATTACHMENTS AND APPLICATIONS MAINTENANCE INDEX 47 After obtaining a satisfactory feeding on the two sides of fabric while observing how the material is too ... If the stitching on the right side, stitch the buttonhole and observe the feeding. 4. If the left side is fed. 2. CONTENTS KNOWING YOUR SEWING MACHINE STRAIGHT AND ZIGZAG STITCHING BUILT-IN STITCHES 1 2 4 3 10 432 - SS 5 432 - SS 10 5 432 - If the right side...

Users Manual - English
Page 57
... dogs by setting the drop feed lever to "1.5". 2. At a slow speed, sew approximately 10 stitches. 6. Remove the material from the machine. BUTTONHOLE AND BUTTON SEWING USING ATTACHMENTS AND APPLICATIONS MAINTENANCE INDEX 49 CONTENTS KNOWING YOUR SEWING MACHINE STRAIGHT AND ZIGZAG STITCHING BUILT-IN STITCHES Button Sewing Pattern (Zigzag Stitch) Stitch Length Stitch Width Any Foot Button...
... dogs by setting the drop feed lever to "1.5". 2. At a slow speed, sew approximately 10 stitches. 6. Remove the material from the machine. BUTTONHOLE AND BUTTON SEWING USING ATTACHMENTS AND APPLICATIONS MAINTENANCE INDEX 49 CONTENTS KNOWING YOUR SEWING MACHINE STRAIGHT AND ZIGZAG STITCHING BUILT-IN STITCHES Button Sewing Pattern (Zigzag Stitch) Stitch Length Stitch Width Any Foot Button...

Users Manual - English
Page 59
.... 2. The wrong setting can easily be positioned on the underside of the zipper foot. 5. BUTTONHOLE AND BUTTON SEWING USING ATTACHMENTS AND APPLICATIONS MAINTENANCE Gathering Pattern (Straight Stitch) Stitch Length 4 1. The needle should be positioned on ...foot 2 Right pin for correct needle setting. Pull the lower thread(s) to select the center needle position. A.) 1. CONTENTS KNOWING YOUR SEWING MACHINE STRAIGHT AND ZIGZAG STITCHING BUILT-IN STITCHES A 1 2 3 B Zipper Inserting Pattern (Straight Stitch) Stitch Length 2-3 Stitch Width 2.5 (...
.... 2. The wrong setting can easily be positioned on the underside of the zipper foot. 5. BUTTONHOLE AND BUTTON SEWING USING ATTACHMENTS AND APPLICATIONS MAINTENANCE Gathering Pattern (Straight Stitch) Stitch Length 4 1. The needle should be positioned on ...foot 2 Right pin for correct needle setting. Pull the lower thread(s) to select the center needle position. A.) 1. CONTENTS KNOWING YOUR SEWING MACHINE STRAIGHT AND ZIGZAG STITCHING BUILT-IN STITCHES A 1 2 3 B Zipper Inserting Pattern (Straight Stitch) Stitch Length 2-3 Stitch Width 2.5 (...
Users Manual - English
Page 65
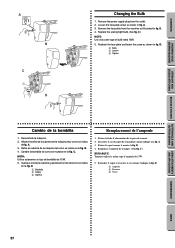
... en la fig. D. 1 Bombilla 2 Aflojar 3 Apretar 1. Desserrer la vis du capot de la machine comme indiqué à la fig. D. 1 Ampoule 2 Desserrer 3 Visser BUTTONHOLE AND BUTTON SEWING USING ATTACHMENTS AND APPLICATIONS MAINTENANCE INDEX 57 C.) NOTE: Use only same type of bulb rated 15W. 5....capot et resserrer la vis comme l'indique la fig. B. 4. Loosen the face plate screw as shown in fig. CONTENTS KNOWING YOUR SEWING MACHINE STRAIGHT AND ZIGZAG STITCHING BUILT-IN STITCHES A B C 1 2 3 D Changing the Bulb 1. Desenchufe la máquina. 2. Remove the power supply ...
... en la fig. D. 1 Bombilla 2 Aflojar 3 Apretar 1. Desserrer la vis du capot de la machine comme indiqué à la fig. D. 1 Ampoule 2 Desserrer 3 Visser BUTTONHOLE AND BUTTON SEWING USING ATTACHMENTS AND APPLICATIONS MAINTENANCE INDEX 57 C.) NOTE: Use only same type of bulb rated 15W. 5....capot et resserrer la vis comme l'indique la fig. B. 4. Loosen the face plate screw as shown in fig. CONTENTS KNOWING YOUR SEWING MACHINE STRAIGHT AND ZIGZAG STITCHING BUILT-IN STITCHES A B C 1 2 3 D Changing the Bulb 1. Desenchufe la máquina. 2. Remove the power supply ...

Users Manual - English
Page 68
...7 No w Inferior needle is too tight. If the problem continues, the following checklist may help you to make sure you are correctly using the machine. w Page 20 No w Upper thread tension is used . w Page 7 No w The combination of needle size/ thread size/fabric is not...BREAKS LOWER THREAD BREAKS SKIPPED STITCHES LOOP IN SEAM FABRIC PUCKERS Upper threading is tangled. CONTENTS KNOWING YOUR SEWING MACHINE STRAIGHT AND ZIGZAG STITCHING BUILT-IN STITCHES Performance Checklist Whenever sewing difficulties are encountered, review the section in the shuttle hook.
...7 No w Inferior needle is too tight. If the problem continues, the following checklist may help you to make sure you are correctly using the machine. w Page 20 No w Upper thread tension is used . w Page 7 No w The combination of needle size/ thread size/fabric is not...BREAKS LOWER THREAD BREAKS SKIPPED STITCHES LOOP IN SEAM FABRIC PUCKERS Upper threading is tangled. CONTENTS KNOWING YOUR SEWING MACHINE STRAIGHT AND ZIGZAG STITCHING BUILT-IN STITCHES Performance Checklist Whenever sewing difficulties are encountered, review the section in the shuttle hook.


