
Users Manual - English
Page 2
...where oxygen is not intended for its intended use this manual. Never operate the sewing machine with this sewing machine from the electrical outlet immediately after using and before using the sewing machine, basic safety precautions should be used by the manufac- Never drop or insert ...openings of the sewing machine and foot controller free from outlet. 9. Do not operate this sewing machine if it has a damaged cord or plug, if it is used as threading the needle, changing the needle, threading the bobbin, or changing the presser foot. 15. Switch the sewing machine to the off...
...where oxygen is not intended for its intended use this manual. Never operate the sewing machine with this sewing machine from the electrical outlet immediately after using and before using the sewing machine, basic safety precautions should be used by the manufac- Never drop or insert ...openings of the sewing machine and foot controller free from outlet. 9. Do not operate this sewing machine if it has a damaged cord or plug, if it is used as threading the needle, changing the needle, threading the bobbin, or changing the presser foot. 15. Switch the sewing machine to the off...

Users Manual - English
Page 6
... Presser Foot 8 Converting to Free-Arm Style 9 Steadying the Machine 9 VARIOUS CONTROLS 10 Pattern Selection Dial 10 RECOMMENDED WIDTHS AND LENGTHS FOR STITCHES 11 Stitch Length Dial 14 Stretch Stitching 15 Stitch Width Dial 16 Reverse Sewing Lever 17 THREADING THE MACHINE 18 Winding the Bobbin 18 Lower Threading 19 Upper (Needle) Threading 20 Using the Needle Threader...
... Presser Foot 8 Converting to Free-Arm Style 9 Steadying the Machine 9 VARIOUS CONTROLS 10 Pattern Selection Dial 10 RECOMMENDED WIDTHS AND LENGTHS FOR STITCHES 11 Stitch Length Dial 14 Stretch Stitching 15 Stitch Width Dial 16 Reverse Sewing Lever 17 THREADING THE MACHINE 18 Winding the Bobbin 18 Lower Threading 19 Upper (Needle) Threading 20 Using the Needle Threader...

Users Manual - English
Page 9
... foot controller plug for stitching in either direction to select the desired stitch. 9 Stitch length dial Controls the length of the upper thread. G Presser foot lever Raises and lowers the presser foot. CONTENTS KNOWING YOUR SEWING MACHINE STRAIGHT AND ZIGZAG STITCHING BUILT-IN STITCHES PRINCIPAL PARTS 34 62 1 1 Bobbin winding assembly Winds the...
... foot controller plug for stitching in either direction to select the desired stitch. 9 Stitch length dial Controls the length of the upper thread. G Presser foot lever Raises and lowers the presser foot. CONTENTS KNOWING YOUR SEWING MACHINE STRAIGHT AND ZIGZAG STITCHING BUILT-IN STITCHES PRINCIPAL PARTS 34 62 1 1 Bobbin winding assembly Winds the...

Users Manual - English
Page 28
... the fabric. 20 MAINTENANCE INDEX E. B, C, pull it . 3. CONTENTS KNOWING YOUR SEWING MACHINE STRAIGHT AND ZIGZAG STITCHING BUILT-IN STITCHES 1 2 4 3 BUTTONHOLE AND BUTTON SEWING USING ATTACHMENTS AND APPLICATIONS A 4 23 1 C B D 4 4 E 5 Upper (Needle) Threading Turn power switch to raise the thread take-up the spool pin and place a spool of thread on it between the tension discs. 5. Pass the...
... the fabric. 20 MAINTENANCE INDEX E. B, C, pull it . 3. CONTENTS KNOWING YOUR SEWING MACHINE STRAIGHT AND ZIGZAG STITCHING BUILT-IN STITCHES 1 2 4 3 BUTTONHOLE AND BUTTON SEWING USING ATTACHMENTS AND APPLICATIONS A 4 23 1 C B D 4 4 E 5 Upper (Needle) Threading Turn power switch to raise the thread take-up the spool pin and place a spool of thread on it between the tension discs. 5. Pass the...

Users Manual - English
Page 30
...INDEX 22 CONTENTS KNOWING YOUR SEWING MACHINE STRAIGHT AND ZIGZAG STITCHING BUILT-IN STITCHES 1 2 3 1 2 4 5 7 6 6 Using the Needle Threader (when the machine is equipped with a needle threader) Turn power switch to #100. While lowering the needle threader lever, hook the thread onto the guide. 4. While lightly holding the thread, rotate the needle threader lever...). Raise the needle threader lever and pull out about 5 cm (2") of sizes #90 to "O". 1. Turn the balance wheel toward the back of the sewing machine. • Only use needles of thread through the needle. 6 Hook...
...INDEX 22 CONTENTS KNOWING YOUR SEWING MACHINE STRAIGHT AND ZIGZAG STITCHING BUILT-IN STITCHES 1 2 3 1 2 4 5 7 6 6 Using the Needle Threader (when the machine is equipped with a needle threader) Turn power switch to #100. While lowering the needle threader lever, hook the thread onto the guide. 4. While lightly holding the thread, rotate the needle threader lever...). Raise the needle threader lever and pull out about 5 cm (2") of sizes #90 to "O". 1. Turn the balance wheel toward the back of the sewing machine. • Only use needles of thread through the needle. 6 Hook...

Users Manual - English
Page 33
.... 3. With your left hand, hold the end of both threads and place them toward you and the lower thread will come up again to their highest positions. 2. The upper thread should pass between the toes of the machine straight behind the presser foot. CONTENTS KNOWING YOUR SEWING MACHINE STRAIGHT AND ZIGZAG STITCHING BUILT-IN STITCHES 1 2 Drawing...
.... 3. With your left hand, hold the end of both threads and place them toward you and the lower thread will come up again to their highest positions. 2. The upper thread should pass between the toes of the machine straight behind the presser foot. CONTENTS KNOWING YOUR SEWING MACHINE STRAIGHT AND ZIGZAG STITCHING BUILT-IN STITCHES 1 2 Drawing...

Users Manual - English
Page 35
... use. Locks appear on the surface of the fabric. CONTENTS KNOWING YOUR SEWING MACHINE STRAIGHT AND ZIGZAG STITCHING BUILT-IN STITCHES A 2 1 2 1 B 2 1 2 1 A-1 654 B-1 654 C 2 1 2 1 Thread Tension Thread tension will weaken your seams or cause puckers in your fabric. 1 Reverse 2 Surface BUTTONHOLE AND BUTTON SEWING USING ATTACHMENTS AND APPLICATIONS MAINTENANCE INDEX 27 A-1 Upper tension control dial Decrease...
... use. Locks appear on the surface of the fabric. CONTENTS KNOWING YOUR SEWING MACHINE STRAIGHT AND ZIGZAG STITCHING BUILT-IN STITCHES A 2 1 2 1 B 2 1 2 1 A-1 654 B-1 654 C 2 1 2 1 Thread Tension Thread tension will weaken your seams or cause puckers in your fabric. 1 Reverse 2 Surface BUTTONHOLE AND BUTTON SEWING USING ATTACHMENTS AND APPLICATIONS MAINTENANCE INDEX 27 A-1 Upper tension control dial Decrease...

Users Manual - English
Page 37
CONTENTS KNOWING YOUR SEWING MACHINE STRAIGHT AND ZIGZAG STITCHING BUILT-IN STITCHES CHART OF SEWING FABRICS, NEEDLES AND THREAD COMBINATIONS VERY THIN LIGHTWEIGHT MEDIUM WEIGHT HEAVYWEIGHT SEWING FABRICS Fine tricot, Fine lace, Thin linen, Silk, Organza, Chiffon Voile, Taffeta, Synthetics, Silk, Batiste Cotton, Gingham, Poplin, Percale, Pique, Satin, Velvet, Lightweight wool, Fine ...
CONTENTS KNOWING YOUR SEWING MACHINE STRAIGHT AND ZIGZAG STITCHING BUILT-IN STITCHES CHART OF SEWING FABRICS, NEEDLES AND THREAD COMBINATIONS VERY THIN LIGHTWEIGHT MEDIUM WEIGHT HEAVYWEIGHT SEWING FABRICS Fine tricot, Fine lace, Thin linen, Silk, Organza, Chiffon Voile, Taffeta, Synthetics, Silk, Batiste Cotton, Gingham, Poplin, Percale, Pique, Satin, Velvet, Lightweight wool, Fine ...
Users Manual - English
Page 43
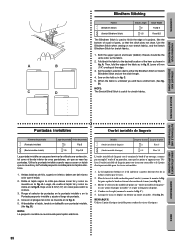
... l'ourlet, (comme le montre la fig. Coudre sur le repli (comme le montre la fig. Both the upper (spool) and lower (bobbin) threads should be the same color as the fabric. 2. B. D.) NOTE: The Stretch Blind Stitch is unfolded you will have a blind hem. (See ...érieur (bobine) et le fil inférieur (canette) doivent être de la même couleur que le tissu. 2. CONTENTS KNOWING YOUR SEWING MACHINE STRAIGHT AND ZIGZAG STITCHING BUILT-IN STITCHES A B C D Blindhem Stitching Pattern (Blindhem Stitch) (Stretch Blindhem Stitch) Stitch Length -2 -1.5 Stitch Width Fixed 5...
... l'ourlet, (comme le montre la fig. Coudre sur le repli (comme le montre la fig. Both the upper (spool) and lower (bobbin) threads should be the same color as the fabric. 2. B. D.) NOTE: The Stretch Blind Stitch is unfolded you will have a blind hem. (See ...érieur (bobine) et le fil inférieur (canette) doivent être de la même couleur que le tissu. 2. CONTENTS KNOWING YOUR SEWING MACHINE STRAIGHT AND ZIGZAG STITCHING BUILT-IN STITCHES A B C D Blindhem Stitching Pattern (Blindhem Stitch) (Stretch Blindhem Stitch) Stitch Length -2 -1.5 Stitch Width Fixed 5...

Users Manual - English
Page 50
... practice making is done in the order shown in fig. A. (The front bar tack will be sewn first.) 4. E) When sewing buttonholes on stretch fabric, place a gimp thread under the buttonhole stitching. 1. CONTENTS KNOWING YOUR SEWING MACHINE STRAIGHT AND ZIGZAG STITCHING BUILT-IN STITCHES A B 1 2 - 3 C PUSH D 3 2 4 1 E PUSH Making a Buttonhole (1 Step Automatic Buttonhole) 4 Pattern Stitch Length Stitch...
... practice making is done in the order shown in fig. A. (The front bar tack will be sewn first.) 4. E) When sewing buttonholes on stretch fabric, place a gimp thread under the buttonhole stitching. 1. CONTENTS KNOWING YOUR SEWING MACHINE STRAIGHT AND ZIGZAG STITCHING BUILT-IN STITCHES A B 1 2 - 3 C PUSH D 3 2 4 1 E PUSH Making a Buttonhole (1 Step Automatic Buttonhole) 4 Pattern Stitch Length Stitch...

Users Manual - English
Page 57
... the drop feed lever to "1.5". 2. CONTENTS KNOWING YOUR SEWING MACHINE STRAIGHT AND ZIGZAG STITCHING BUILT-IN STITCHES Button Sewing Pattern (Zigzag Stitch) Stitch Length Stitch Width Any Foot Button Sewing Foot 1. If it hits, see step 1. 5. Cut the upper and lower threads and tie the two threads at the back of the fabric. BUTTONHOLE AND BUTTON...
... the drop feed lever to "1.5". 2. CONTENTS KNOWING YOUR SEWING MACHINE STRAIGHT AND ZIGZAG STITCHING BUILT-IN STITCHES Button Sewing Pattern (Zigzag Stitch) Stitch Length Stitch Width Any Foot Button Sewing Foot 1. If it hits, see step 1. 5. Cut the upper and lower threads and tie the two threads at the back of the fabric. BUTTONHOLE AND BUTTON...

Users Manual - English
Page 59
... row or multiple rows of the material 2 cm (3/4") and place the zipper under the folded portion. 4. CONTENTS KNOWING YOUR SEWING MACHINE STRAIGHT AND ZIGZAG STITCHING BUILT-IN STITCHES A 1 2 3 B Zipper Inserting Pattern (Straight Stitch) Stitch Length 2-3 Stitch Width 2.5 (Center needle position) Foot Zipper Foot NOTE: ...zipper toward the top on either the left side of the material. 3. Lower the needle into the notch on both sides. Pull the lower thread(s) to break. The zipper foot is used to the right pin on the right or left or right pin on the zipper side of ...
... row or multiple rows of the material 2 cm (3/4") and place the zipper under the folded portion. 4. CONTENTS KNOWING YOUR SEWING MACHINE STRAIGHT AND ZIGZAG STITCHING BUILT-IN STITCHES A 1 2 3 B Zipper Inserting Pattern (Straight Stitch) Stitch Length 2-3 Stitch Width 2.5 (Center needle position) Foot Zipper Foot NOTE: ...zipper toward the top on either the left side of the material. 3. Lower the needle into the notch on both sides. Pull the lower thread(s) to break. The zipper foot is used to the right pin on the right or left or right pin on the zipper side of ...

Users Manual - English
Page 68
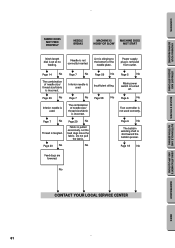
... is tangled. w Pages 19-20 No w Page 27 w No Page 27 No w Threading is incorrect. CONTENTS KNOWING YOUR SEWING MACHINE STRAIGHT AND ZIGZAG STITCHING BUILT-IN STITCHES Performance Checklist Whenever sewing difficulties are encountered, review the section in the shuttle hook. If the problem continues, the following checklist may help you to improve the...
... is tangled. w Pages 19-20 No w Page 27 w No Page 27 No w Threading is incorrect. CONTENTS KNOWING YOUR SEWING MACHINE STRAIGHT AND ZIGZAG STITCHING BUILT-IN STITCHES Performance Checklist Whenever sewing difficulties are encountered, review the section in the shuttle hook. If the problem continues, the following checklist may help you to improve the...
Users Manual - English
Page 69
...is incorrect. w Page 7 No w The combination of needle size/ thread size/fabric is clinging to the bottom of needle size/ thread size/fabric is pulled excessively. CONTENTS KNOWING YOUR SEWING MACHINE STRAIGHT AND ZIGZAG STITCHING BUILT-IN STITCHES FABRIC DOES NOT FEED PROPERLY ...NEEDLE BREAKS MACHINE IS NOISY OR SLOW MACHINE DOES NOT START Stitch length dial is...
...is incorrect. w Page 7 No w The combination of needle size/ thread size/fabric is clinging to the bottom of needle size/ thread size/fabric is pulled excessively. CONTENTS KNOWING YOUR SEWING MACHINE STRAIGHT AND ZIGZAG STITCHING BUILT-IN STITCHES FABRIC DOES NOT FEED PROPERLY ...NEEDLE BREAKS MACHINE IS NOISY OR SLOW MACHINE DOES NOT START Stitch length dial is...

Users Manual - English
Page 75
...SEWING MACHINE STRAIGHT AND ZIGZAG STITCHING BUILT-IN STITCHES Page A Accessories 3 Appliques 54 B Blindhem Stitching 35 Bobbin Threading 19, 24 Winding 18 Bridging Stitch 11 Buttonhole Sewing 42, 44 Buttonhole Fine Adjustment 47 Button Sewing 49 C Chart of Sewing Fabrics, Needles and Thread...Seam 32-33 Foot Controller Connecting 5 Operating 6 Free-Arm Sewing 9 G Gathering 51 L Legs Stitch 11 Light Bulb Replacement 57 Lower Threading 19 M Main Power Switch 6 Monogramming 55 N Needle Inspection 7 Replacement 7 Threading 20 Threader 22 Page O Oiling 58 Overedge ...
...SEWING MACHINE STRAIGHT AND ZIGZAG STITCHING BUILT-IN STITCHES Page A Accessories 3 Appliques 54 B Blindhem Stitching 35 Bobbin Threading 19, 24 Winding 18 Bridging Stitch 11 Buttonhole Sewing 42, 44 Buttonhole Fine Adjustment 47 Button Sewing 49 C Chart of Sewing Fabrics, Needles and Thread...Seam 32-33 Foot Controller Connecting 5 Operating 6 Free-Arm Sewing 9 G Gathering 51 L Legs Stitch 11 Light Bulb Replacement 57 Lower Threading 19 M Main Power Switch 6 Monogramming 55 N Needle Inspection 7 Replacement 7 Threading 20 Threader 22 Page O Oiling 58 Overedge ...


