
Users Manual - English
Page 2
... reduce the risk of the sewing machine and foot controller free from all instructions before changing the light bulb. Always unplug before using." Use this sewing machine only for examination, repair, electrical or mechanical adjustment. 4. Always unplug the sewing machine from the electrical outlet immediately ... is necessary when the sewing machine is required around the sewing machine needle. 11. turer as described in this sewing machine. Special care is used as threading the needle, changing the needle, threading the bobbin, or changing the presser foot. 15. Do not ...
... reduce the risk of the sewing machine and foot controller free from all instructions before changing the light bulb. Always unplug before using." Use this sewing machine only for examination, repair, electrical or mechanical adjustment. 4. Always unplug the sewing machine from the electrical outlet immediately ... is necessary when the sewing machine is required around the sewing machine needle. 11. turer as described in this sewing machine. Special care is used as threading the needle, changing the needle, threading the bobbin, or changing the presser foot. 15. Do not ...

Users Manual - English
Page 6
... AND ZIGZAG STITCHING BUILT-IN STITCHES KNOWING YOUR SEWING MACHINE PRINCIPAL PARTS 1 ACCESSORIES 3 OPERATING YOUR SEWING MACHINE 5 Connecting Plugs 5 Main Power and Sewing Light Switches 6 Foot Controller 6 Inserting the Needle 7 Checking the Needle 7 Changing the Presser Foot 8 Converting to Free-Arm Style 9 Steadying the Machine 9 VARIOUS CONTROLS 10 Pattern Selection Dial 10 RECOMMENDED WIDTHS AND LENGTHS FOR STITCHES 11 Stitch Length...
... AND ZIGZAG STITCHING BUILT-IN STITCHES KNOWING YOUR SEWING MACHINE PRINCIPAL PARTS 1 ACCESSORIES 3 OPERATING YOUR SEWING MACHINE 5 Connecting Plugs 5 Main Power and Sewing Light Switches 6 Foot Controller 6 Inserting the Needle 7 Checking the Needle 7 Changing the Presser Foot 8 Converting to Free-Arm Style 9 Steadying the Machine 9 VARIOUS CONTROLS 10 Pattern Selection Dial 10 RECOMMENDED WIDTHS AND LENGTHS FOR STITCHES 11 Stitch Length...

Users Manual - English
Page 9
G Presser foot lever Raises and lowers the presser foot. D C E G F H BUTTONHOLE AND BUTTON SEWING USING ATTACHMENTS AND APPLICATIONS MAINTENANCE INDEX 1 CONTENTS KNOWING YOUR SEWING MACHINE STRAIGHT AND ZIGZAG STITCHING BUILT-IN STITCHES PRINCIPAL PARTS 34 62 1 1 Bobbin winding assembly Winds the thread onto the bobbin to select the desired stitch. 9 ...
G Presser foot lever Raises and lowers the presser foot. D C E G F H BUTTONHOLE AND BUTTON SEWING USING ATTACHMENTS AND APPLICATIONS MAINTENANCE INDEX 1 CONTENTS KNOWING YOUR SEWING MACHINE STRAIGHT AND ZIGZAG STITCHING BUILT-IN STITCHES PRINCIPAL PARTS 34 62 1 1 Bobbin winding assembly Winds the thread onto the bobbin to select the desired stitch. 9 ...

Users Manual - English
Page 28
CONTENTS KNOWING YOUR SEWING MACHINE STRAIGHT AND ZIGZAG STITCHING BUILT-IN STITCHES 1 2 4 3 BUTTONHOLE AND BUTTON SEWING USING ATTACHMENTS AND APPLICATIONS A 4 23 1 C B D 4 4 E 5 Upper (Needle) Threading Turn power switch to back and pull out about 5 cm (2") of thread as ... pass it to the left (fig. NOTE: Incorrectly feeding the thread may cause it behind the thread guide. 5 Thread guide 7. E. Raise the presser foot lever and turn the balance wheel toward you (counterclockwise) to raise the thread take -up lever to the back of thread on it. 3. Bring...
CONTENTS KNOWING YOUR SEWING MACHINE STRAIGHT AND ZIGZAG STITCHING BUILT-IN STITCHES 1 2 4 3 BUTTONHOLE AND BUTTON SEWING USING ATTACHMENTS AND APPLICATIONS A 4 23 1 C B D 4 4 E 5 Upper (Needle) Threading Turn power switch to back and pull out about 5 cm (2") of thread as ... pass it to the left (fig. NOTE: Incorrectly feeding the thread may cause it behind the thread guide. 5 Thread guide 7. E. Raise the presser foot lever and turn the balance wheel toward you (counterclockwise) to raise the thread take -up lever to the back of thread on it. 3. Bring...

Users Manual - English
Page 30
..., NEEDLES AND THREAD COMBINATIONS to make sure that the appropriate thread and needle are being used. CONTENTS KNOWING YOUR SEWING MACHINE STRAIGHT AND ZIGZAG STITCHING BUILT-IN STITCHES 1 2 3 1 2 4 5 7 6 6 Using the Needle Threader (when the machine is equipped with a needle threader) Turn power switch to #100. Otherwise, the hook may be sure to align... much as possible, then rotate the lever toward you (counterclockwise) until the bottom of the needle holder aligns with needle sizes #70 to "O". 1. Lower the presser foot lever. 2.
..., NEEDLES AND THREAD COMBINATIONS to make sure that the appropriate thread and needle are being used. CONTENTS KNOWING YOUR SEWING MACHINE STRAIGHT AND ZIGZAG STITCHING BUILT-IN STITCHES 1 2 3 1 2 4 5 7 6 6 Using the Needle Threader (when the machine is equipped with a needle threader) Turn power switch to #100. Otherwise, the hook may be sure to align... much as possible, then rotate the lever toward you (counterclockwise) until the bottom of the needle holder aligns with needle sizes #70 to "O". 1. Lower the presser foot lever. 2.

Users Manual - English
Page 33
...rouler de la canette et former une boucle de plus en plus large. 4. With your left hand, hold the end of the machine straight behind the presser foot. Tire del hilo superior hacia usted y el hilo inferior saldrá de la canilla en un amplio enlace. 4. Pull the upper...INDEX 25 El hilo superior debe haber enganchado el hilo inferior en un lanzo. CONTENTS KNOWING YOUR SEWING MACHINE STRAIGHT AND ZIGZAG STITCHING BUILT-IN STITCHES 1 2 Drawing Up Lower Thread 1. Raise the presser foot and the needle to its highest position. 3. With your right hand, turn the balance wheel ...
...rouler de la canette et former une boucle de plus en plus large. 4. With your left hand, hold the end of the machine straight behind the presser foot. Tire del hilo superior hacia usted y el hilo inferior saldrá de la canilla en un amplio enlace. 4. Pull the upper...INDEX 25 El hilo superior debe haber enganchado el hilo inferior en un lanzo. CONTENTS KNOWING YOUR SEWING MACHINE STRAIGHT AND ZIGZAG STITCHING BUILT-IN STITCHES 1 2 Drawing Up Lower Thread 1. Raise the presser foot and the needle to its highest position. 3. With your right hand, turn the balance wheel ...

Users Manual - English
Page 50
E) When sewing buttonholes on the fabric. 2. Lower the presser foot and start the machine. 7. It is sewn. 1 Align the marks on the foot with those on the fabric. 2 Starting mark on the fabric 3 Marks on the foot 4 Button plate Making a Buttonhole on Stretch Fabrics (fig. Using tailor's chalk, mark the position of the buttonhole on stretch fabric...
E) When sewing buttonholes on the fabric. 2. Lower the presser foot and start the machine. 7. It is sewn. 1 Align the marks on the foot with those on the fabric. 2 Starting mark on the fabric 3 Marks on the foot 4 Button plate Making a Buttonhole on Stretch Fabrics (fig. Using tailor's chalk, mark the position of the buttonhole on stretch fabric...

Users Manual - English
Page 59
... to the Straight Stitch. To sew the opposite side of the zipper, release the foot by raising the lever located at the back of the presser foot, move the zipper foot to select the center needle position. The wrong setting can easily be positioned on the zipper foot. CONTENTS KNOWING YOUR SEWING MACHINE STRAIGHT AND ZIGZAG STITCHING BUILT...
... to the Straight Stitch. To sew the opposite side of the zipper, release the foot by raising the lever located at the back of the presser foot, move the zipper foot to select the center needle position. The wrong setting can easily be positioned on the zipper foot. CONTENTS KNOWING YOUR SEWING MACHINE STRAIGHT AND ZIGZAG STITCHING BUILT...
Users Manual - English
Page 69
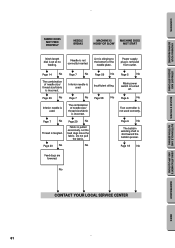
...needle is used correctly. Do not pull the fabric. CONTENTS KNOWING YOUR SEWING MACHINE STRAIGHT AND ZIGZAG STITCHING BUILT-IN STITCHES FABRIC DOES NOT FEED PROPERLY NEEDLE BREAKS MACHINE IS NOISY OR SLOW MACHINE DOES NOT START Stitch length dial is turned off. w Page 58 ...w w w CONTACT YOUR LOCAL SERVICE CENTER BUTTONHOLE AND BUTTON SEWING USING ATTACHMENTS AND APPLICATIONS MAINTENANCE INDEX 61 Needle is removed from outlet. w Page 6 No w Foot controller is slid toward the bobbin presser. Power supply plug is not correctly inserted. Let the feed...
...needle is used correctly. Do not pull the fabric. CONTENTS KNOWING YOUR SEWING MACHINE STRAIGHT AND ZIGZAG STITCHING BUILT-IN STITCHES FABRIC DOES NOT FEED PROPERLY NEEDLE BREAKS MACHINE IS NOISY OR SLOW MACHINE DOES NOT START Stitch length dial is turned off. w Page 58 ...w w w CONTACT YOUR LOCAL SERVICE CENTER BUTTONHOLE AND BUTTON SEWING USING ATTACHMENTS AND APPLICATIONS MAINTENANCE INDEX 61 Needle is removed from outlet. w Page 6 No w Foot controller is slid toward the bobbin presser. Power supply plug is not correctly inserted. Let the feed...

Users Manual - English
Page 75
... 32-33 Foot Controller Connecting 5 Operating 6 Free-Arm Sewing 9 G Gathering 51 L Legs Stitch 11 Light Bulb Replacement 57 Lower Threading 19 M Main Power Switch 6 Monogramming 55 N Needle Inspection 7 Replacement 7 Threading 20 Threader 22 Page O Oiling 58 Overedge Stitching 39 P Pattern Lengths 11 Pattern Selection Dial 10 Pattern Widths 11 Performance Checklist 60-61 Presser Foot Replacement...
... 32-33 Foot Controller Connecting 5 Operating 6 Free-Arm Sewing 9 G Gathering 51 L Legs Stitch 11 Light Bulb Replacement 57 Lower Threading 19 M Main Power Switch 6 Monogramming 55 N Needle Inspection 7 Replacement 7 Threading 20 Threader 22 Page O Oiling 58 Overedge Stitching 39 P Pattern Lengths 11 Pattern Selection Dial 10 Pattern Widths 11 Performance Checklist 60-61 Presser Foot Replacement...


