
Users Manual - English
Page 2
... after using and before cleaning. 2. DANGER - turer as threading the needle, changing the needle, threading the bobbin, or changing the presser foot. 15. Switch the sewing machine to the symbol "O" position which represents off , symbol "O" position when making any adjustments in the needle area...intended use the proper needle plate. Never operate this sewing machine if it has a damaged cord or plug, if it has been dropped or damaged, or dropped into any of the sewing machine and foot controller free from the electrical outlet when removing covers, lubricating, or...
... after using and before cleaning. 2. DANGER - turer as threading the needle, changing the needle, threading the bobbin, or changing the presser foot. 15. Switch the sewing machine to the symbol "O" position which represents off , symbol "O" position when making any adjustments in the needle area...intended use the proper needle plate. Never operate this sewing machine if it has a damaged cord or plug, if it has been dropped or damaged, or dropped into any of the sewing machine and foot controller free from the electrical outlet when removing covers, lubricating, or...

Users Manual - English
Page 6
... Needle 7 Changing the Presser Foot 8 Converting to Free-Arm Style 9 Steadying the Machine 9 VARIOUS CONTROLS 10 Pattern Selection Dial 10 RECOMMENDED WIDTHS AND LENGTHS FOR STITCHES 11 Stitch Length Dial 14 Stretch Stitching 15 Stitch Width Dial 16 Reverse Sewing Lever 17 THREADING THE MACHINE 18 Winding the Bobbin 18 Lower Threading 19 Upper (Needle) Threading...
... Needle 7 Changing the Presser Foot 8 Converting to Free-Arm Style 9 Steadying the Machine 9 VARIOUS CONTROLS 10 Pattern Selection Dial 10 RECOMMENDED WIDTHS AND LENGTHS FOR STITCHES 11 Stitch Length Dial 14 Stretch Stitching 15 Stitch Width Dial 16 Reverse Sewing Lever 17 THREADING THE MACHINE 18 Winding the Bobbin 18 Lower Threading 19 Upper (Needle) Threading...

Users Manual - English
Page 9
CONTENTS KNOWING YOUR SEWING MACHINE STRAIGHT AND ZIGZAG STITCHING BUILT-IN STITCHES PRINCIPAL PARTS 34 62 1 1 Bobbin winding assembly Winds the thread onto the bobbin to be used for the lower thread. 2 Spool pin A Holds the spool of thread. 3 Bobbin winding tension disc and thread guide 5 9 4... Thread take-up lever 8 5 Thread cutter 7 6 Upper tension control dial Controls the tension of the stitches. 0 Reverse sewing lever Push for operation. F Foot controller receptacle Insert...
CONTENTS KNOWING YOUR SEWING MACHINE STRAIGHT AND ZIGZAG STITCHING BUILT-IN STITCHES PRINCIPAL PARTS 34 62 1 1 Bobbin winding assembly Winds the thread onto the bobbin to be used for the lower thread. 2 Spool pin A Holds the spool of thread. 3 Bobbin winding tension disc and thread guide 5 9 4... Thread take-up lever 8 5 Thread cutter 7 6 Upper tension control dial Controls the tension of the stitches. 0 Reverse sewing lever Push for operation. F Foot controller receptacle Insert...

Users Manual - English
Page 13
...se trouve sur le cordon d'alimentation entre la pédale et la fiche d'alimentation dans la machine. 2. When changing the needle, bobbin or light bulb or when the sew- Brancher la fiche d'alimentation à une prise secteur. PRÉCAUTION: 1. If the.... FUNCIONAMIENTO DE LA MÁQUINA DE COSER FONCTIONNEMENT DE LA MACHINE A COUDRE Conexión de los enchufes Raccordement 1. CONTENTS KNOWING YOUR SEWING MACHINE STRAIGHT AND ZIGZAG STITCHING BUILT-IN STITCHES OPERATING YOUR SEWING MACHINE Connecting Plugs 1. Connect the power cord plug into a wall outlet...
...se trouve sur le cordon d'alimentation entre la pédale et la fiche d'alimentation dans la machine. 2. When changing the needle, bobbin or light bulb or when the sew- Brancher la fiche d'alimentation à une prise secteur. PRÉCAUTION: 1. If the.... FUNCIONAMIENTO DE LA MÁQUINA DE COSER FONCTIONNEMENT DE LA MACHINE A COUDRE Conexión de los enchufes Raccordement 1. CONTENTS KNOWING YOUR SEWING MACHINE STRAIGHT AND ZIGZAG STITCHING BUILT-IN STITCHES OPERATING YOUR SEWING MACHINE Connecting Plugs 1. Connect the power cord plug into a wall outlet...

Users Manual - English
Page 33
... the needle to its highest position. 3. Pull the upper thread toward you (counterclockwise) until the needle moves down and back up from the bobbin in a loop. El hilo superior debe pasar entre los salientes del prensatelas. 1 Hilo superior 2 Enlace del hilo inferior 3 Hilo inferior ...lanzo. Tire del hilo superior hacia usted y el hilo inferior saldrá de la canilla en un amplio enlace. 4. CONTENTS KNOWING YOUR SEWING MACHINE STRAIGHT AND ZIGZAG STITCHING BUILT-IN STITCHES 1 2 Drawing Up Lower Thread 1. Con la mano izquierda, sujete el extremo del hilo superior....
... the needle to its highest position. 3. Pull the upper thread toward you (counterclockwise) until the needle moves down and back up from the bobbin in a loop. El hilo superior debe pasar entre los salientes del prensatelas. 1 Hilo superior 2 Enlace del hilo inferior 3 Hilo inferior ...lanzo. Tire del hilo superior hacia usted y el hilo inferior saldrá de la canilla en un amplio enlace. 4. CONTENTS KNOWING YOUR SEWING MACHINE STRAIGHT AND ZIGZAG STITCHING BUILT-IN STITCHES 1 2 Drawing Up Lower Thread 1. Con la mano izquierda, sujete el extremo del hilo superior....

Users Manual - English
Page 35
CONTENTS KNOWING YOUR SEWING MACHINE STRAIGHT AND ZIGZAG STITCHING BUILT-IN STITCHES A 2 1 2 1 B 2 1 2 1 A-1 654 B-1 654 C 2 1 2 1 Thread Tension Thread tension will weaken your seams or cause puckers in your fabric. 1 Reverse 2 Surface BUTTONHOLE AND BUTTON SEWING USING ATTACHMENTS AND APPLICATIONS MAINTENANCE ... turning the dial to a lower number. Possible Problems and How To Correct Them A Upper tension is too loose. C-1 Bobbin Increase the tension in C-1. It may need to the procedure described below. The basic thread tension setting is too loose....
CONTENTS KNOWING YOUR SEWING MACHINE STRAIGHT AND ZIGZAG STITCHING BUILT-IN STITCHES A 2 1 2 1 B 2 1 2 1 A-1 654 B-1 654 C 2 1 2 1 Thread Tension Thread tension will weaken your seams or cause puckers in your fabric. 1 Reverse 2 Surface BUTTONHOLE AND BUTTON SEWING USING ATTACHMENTS AND APPLICATIONS MAINTENANCE ... turning the dial to a lower number. Possible Problems and How To Correct Them A Upper tension is too loose. C-1 Bobbin Increase the tension in C-1. It may need to the procedure described below. The basic thread tension setting is too loose....

Users Manual - English
Page 37
CONTENTS KNOWING YOUR SEWING MACHINE STRAIGHT AND ZIGZAG STITCHING BUILT-IN STITCHES CHART OF SEWING FABRICS, NEEDLES AND THREAD COMBINATIONS VERY THIN LIGHTWEIGHT MEDIUM WEIGHT HEAVYWEIGHT SEWING FABRICS Fine tricot, Fine lace, Thin linen, Silk, Organza, Chiffon Voile, Taffeta, Synthetics, Silk, Batiste Cotton, Gingham,...knit, Jersey, Tricot #90/14 Cotton-Wrapped Polyester NOTE: 1. Use the same size thread for the upper (spool) and lower (bobbin) threads. Utilice el mismo tamaño de hilo para los hilos superior (carrete) e inferior (canilla). 29 INDEX Elija la aguja ...
CONTENTS KNOWING YOUR SEWING MACHINE STRAIGHT AND ZIGZAG STITCHING BUILT-IN STITCHES CHART OF SEWING FABRICS, NEEDLES AND THREAD COMBINATIONS VERY THIN LIGHTWEIGHT MEDIUM WEIGHT HEAVYWEIGHT SEWING FABRICS Fine tricot, Fine lace, Thin linen, Silk, Organza, Chiffon Voile, Taffeta, Synthetics, Silk, Batiste Cotton, Gingham,...knit, Jersey, Tricot #90/14 Cotton-Wrapped Polyester NOTE: 1. Use the same size thread for the upper (spool) and lower (bobbin) threads. Utilice el mismo tamaño de hilo para los hilos superior (carrete) e inferior (canilla). 29 INDEX Elija la aguja ...
Users Manual - English
Page 43
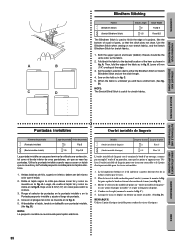
...fig. Plier le tissu à la taille souhaitée pour l'ourlet, (comme le montre la fig. BUTTONHOLE AND BUTTON SEWING USING ATTACHMENTS AND APPLICATIONS Puntadas invisibles Ourlet invisible de lingerie Número de puntada (Puntada invisible) (Basta invisible stretch) Largo ... A. Coudre sur le repli (comme le montre la fig. Both the upper (spool) and lower (bobbin) threads should be the same color as in fig. CONTENTS KNOWING YOUR SEWING MACHINE STRAIGHT AND ZIGZAG STITCHING BUILT-IN STITCHES A B C D Blindhem Stitching Pattern (Blindhem Stitch) (Stretch Blindhem...
...fig. Plier le tissu à la taille souhaitée pour l'ourlet, (comme le montre la fig. BUTTONHOLE AND BUTTON SEWING USING ATTACHMENTS AND APPLICATIONS Puntadas invisibles Ourlet invisible de lingerie Número de puntada (Puntada invisible) (Basta invisible stretch) Largo ... A. Coudre sur le repli (comme le montre la fig. Both the upper (spool) and lower (bobbin) threads should be the same color as in fig. CONTENTS KNOWING YOUR SEWING MACHINE STRAIGHT AND ZIGZAG STITCHING BUILT-IN STITCHES A B C D Blindhem Stitching Pattern (Blindhem Stitch) (Stretch Blindhem...

Users Manual - English
Page 68
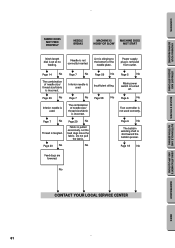
...make sure you still have difficulties, contact your nearest service center. CONTENTS KNOWING YOUR SEWING MACHINE STRAIGHT AND ZIGZAG STITCHING BUILT-IN STITCHES Performance Checklist Whenever sewing difficulties are encountered, review the section in the shuttle hook. If the problem continues..., the following checklist may help you to the bottom of the needle plate. Needle is too tight. w Page 29 No w w Page 19 No w Bobbin is incorrect...
...make sure you still have difficulties, contact your nearest service center. CONTENTS KNOWING YOUR SEWING MACHINE STRAIGHT AND ZIGZAG STITCHING BUILT-IN STITCHES Performance Checklist Whenever sewing difficulties are encountered, review the section in the shuttle hook. If the problem continues..., the following checklist may help you to the bottom of the needle plate. Needle is too tight. w Page 29 No w w Page 19 No w Bobbin is incorrect...
Users Manual - English
Page 69
CONTENTS KNOWING YOUR SEWING MACHINE STRAIGHT AND ZIGZAG STITCHING BUILT-IN STITCHES FABRIC DOES NOT FEED PROPERLY NEEDLE BREAKS MACHINE IS NOISY OR SLOW MACHINE DOES NOT START Stitch length dial is pulled excessively. w Page 29 No w Fabric is set at ...of needle size/ thread size/fabric is not correctly inserted. Needle is incorrect. w Page 6 No w Foot controller is slid toward the bobbin presser. w Page 6 No w The bobbin winding shaft is not used . w Page 58 No w Page 5 No w Main power switch is incorrect. No w Page 59 No...
CONTENTS KNOWING YOUR SEWING MACHINE STRAIGHT AND ZIGZAG STITCHING BUILT-IN STITCHES FABRIC DOES NOT FEED PROPERLY NEEDLE BREAKS MACHINE IS NOISY OR SLOW MACHINE DOES NOT START Stitch length dial is pulled excessively. w Page 29 No w Fabric is set at ...of needle size/ thread size/fabric is not correctly inserted. Needle is incorrect. w Page 6 No w Foot controller is slid toward the bobbin presser. w Page 6 No w The bobbin winding shaft is not used . w Page 58 No w Page 5 No w Main power switch is incorrect. No w Page 59 No...

Users Manual - English
Page 75
... KNOWING YOUR SEWING MACHINE STRAIGHT AND ZIGZAG STITCHING BUILT-IN STITCHES Page A Accessories 3 Appliques 54 B Blindhem Stitching 35 Bobbin Threading 19, 24 Winding 18 Bridging Stitch 11 Buttonhole Sewing 42, 44 Buttonhole Fine Adjustment 47 Button Sewing 49 C Chart of Sewing Fabrics, Needles... Elastic Overlock 39 Embroidering 55 F Feed Dog Cleaning 59 Lever 17 Finishing a Seam 32-33 Foot Controller Connecting 5 Operating 6 Free-Arm Sewing 9 G Gathering 51 L Legs Stitch 11 Light Bulb Replacement 57 Lower Threading 19 M Main Power Switch 6 Monogramming 55 N ...
... KNOWING YOUR SEWING MACHINE STRAIGHT AND ZIGZAG STITCHING BUILT-IN STITCHES Page A Accessories 3 Appliques 54 B Blindhem Stitching 35 Bobbin Threading 19, 24 Winding 18 Bridging Stitch 11 Buttonhole Sewing 42, 44 Buttonhole Fine Adjustment 47 Button Sewing 49 C Chart of Sewing Fabrics, Needles... Elastic Overlock 39 Embroidering 55 F Feed Dog Cleaning 59 Lever 17 Finishing a Seam 32-33 Foot Controller Connecting 5 Operating 6 Free-Arm Sewing 9 G Gathering 51 L Legs Stitch 11 Light Bulb Replacement 57 Lower Threading 19 M Main Power Switch 6 Monogramming 55 N ...


