
Users Manual - English
Page 2
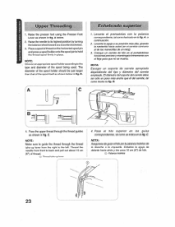
...authorized dealer or service center for its intended use as threading the needle, changing the needle, threading the bobbin, or changing the presser foot. 15. Do not operate this machine where aerosol (spray) products are being administered. 8. To disconnect, turn the main switch to... ." Switch the sewingmachine to persons: 1. When replacing the bulb in this manual. 3. Keep the ventilation openings of the sewing machine and foot controller free from the accumulation of electric shock: 1. It may deflect the needle causing it to break. 12. Close attention is required around...
...authorized dealer or service center for its intended use as threading the needle, changing the needle, threading the bobbin, or changing the presser foot. 15. Do not operate this machine where aerosol (spray) products are being administered. 8. To disconnect, turn the main switch to... ." Switch the sewingmachine to persons: 1. When replacing the bulb in this manual. 3. Keep the ventilation openings of the sewing machine and foot controller free from the accumulation of electric shock: 1. It may deflect the needle causing it to break. 12. Close attention is required around...

Users Manual - English
Page 4
... CONTENTS KNOWING YOUR SEWING MACHINE Principal parts 1 Accessories 3 OPERATING YOUR SEWING MACHINE 4 Connecting Plugs 4 Main Power and Sewing Light Switches ....5 Foot Controller 5 Replacing the Needle 6 Checking the Needle 6 Changing the Presser Foot 7 Converting to Free-arm Style 7 VARIOUS CONTROLS 8 Pattern Selection Dial 8 Electronic Display (1 Line LCD) 11 Electronic Display (4 Line LCD) 12...
... CONTENTS KNOWING YOUR SEWING MACHINE Principal parts 1 Accessories 3 OPERATING YOUR SEWING MACHINE 4 Connecting Plugs 4 Main Power and Sewing Light Switches ....5 Foot Controller 5 Replacing the Needle 6 Checking the Needle 6 Changing the Presser Foot 7 Converting to Free-arm Style 7 VARIOUS CONTROLS 8 Pattern Selection Dial 8 Electronic Display (1 Line LCD) 11 Electronic Display (4 Line LCD) 12...
Users Manual - English
Page 10
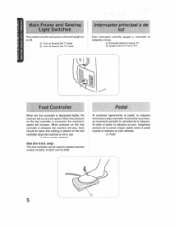
...machine models X13025, XL3027 and XL3030. Alaumentaria presion, se incrementa ramblen la velocidad de la maquina. When the pressure on the foot controller when the machine is not in use. (i) Foot controller: Model N Note (For U.S.A. Qr Encendar (nada la mama "17 (2). Al softer el pedal, la maquina se... para. only): This toot controller can be taken that nothing is placed on the foot controller is increased, the machine's speed will increase. the machine will run at a low speed. Main Power and Sewing Light Switches This switCh...
...machine models X13025, XL3027 and XL3030. Alaumentaria presion, se incrementa ramblen la velocidad de la maquina. When the pressure on the foot controller when the machine is not in use. (i) Foot controller: Model N Note (For U.S.A. Qr Encendar (nada la mama "17 (2). Al softer el pedal, la maquina se... para. only): This toot controller can be taken that nothing is placed on the foot controller is increased, the machine's speed will increase. the machine will run at a low speed. Main Power and Sewing Light Switches This switCh...
Users Manual - English
Page 11
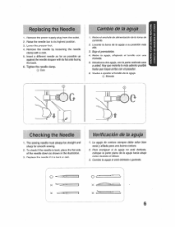
... needle if it is bent, place the flat side of the needle down as possible up against the needle stopper with a coin. 5. Lower the presser foot. 4. Tighten the needle clamp. (j) Coin Cambio de la aguja 1. Baje elprensatelas. 4. Hay quemeterla lomss adentroposible haste que toque arriba con elpaSadOr. Moneda Checking the Needle...
... needle if it is bent, place the flat side of the needle down as possible up against the needle stopper with a coin. 5. Lower the presser foot. 4. Tighten the needle clamp. (j) Coin Cambio de la aguja 1. Baje elprensatelas. 4. Hay quemeterla lomss adentroposible haste que toque arriba con elpaSadOr. Moneda Checking the Needle...

Users Manual - English
Page 20
...:MOLE POOPIA) A21USING MACHINE B2)REPLACING BOHRI N Al) TROUBLE SIER711NG R21UPPER TIIRPAD BREAKS AA1FABII C • THREAD• ugEr); 02I LIMIT FABRIC 2 }PULL OUT BACK OF FOOT.LET WPM IN PLACE AND CLAMP AVUSIAG MACHINE IN/UPPER THREADING ANTIBES LE SHOWING 131 /LOWER THREAD BRIMS B ANFABR C-THREAD. LOWER mar. THE REAR A2IUSING...
...:MOLE POOPIA) A21USING MACHINE B2)REPLACING BOHRI N Al) TROUBLE SIER711NG R21UPPER TIIRPAD BREAKS AA1FABII C • THREAD• ugEr); 02I LIMIT FABRIC 2 }PULL OUT BACK OF FOOT.LET WPM IN PLACE AND CLAMP AVUSIAG MACHINE IN/UPPER THREADING ANTIBES LE SHOWING 131 /LOWER THREAD BRIMS B ANFABR C-THREAD. LOWER mar. THE REAR A2IUSING...
Users Manual - English
Page 26
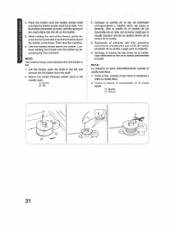
...eje hacia la derecha. NOTA: La maquina se pare automat/camerae wand° la candle eSte Ilena. 7. Turn the bobbin clockwise, by depressing the foot controller. Sujelando el extremo del bib°, presione suavemente elpedalpare que elhilo de vueltas alrededor de la canilla. 4. Return the Clutch Release Switch back to... winder shaft andslide thebobbin winder shaft to wind the thread around the bobbin a few times. Vuelva a colocar of the thread, gently depress the foot controller to theright. While holding the end of conmutador en la mama aguja. (vi) Muello Ranura 4 C5 4 21
...eje hacia la derecha. NOTA: La maquina se pare automat/camerae wand° la candle eSte Ilena. 7. Turn the bobbin clockwise, by depressing the foot controller. Sujelando el extremo del bib°, presione suavemente elpedalpare que elhilo de vueltas alrededor de la canilla. 4. Return the Clutch Release Switch back to... winder shaft andslide thebobbin winder shaft to wind the thread around the bobbin a few times. Vuelva a colocar of the thread, gently depress the foot controller to theright. While holding the end of conmutador en la mama aguja. (vi) Muello Ranura 4 C5 4 21
Users Manual - English
Page 28
... solo un poco mas ancho que el del carrete, tal como ilustra la fig. C. tat como se indica en la lig. Raise the presser foot using the Presser Foot Lever as shown in place. Levante ei prensatelas con la palanca correspondiente, lelcomoilustradoenla fig. Enhebre la aguja de detente hacia atlas y tire unos...
... solo un poco mas ancho que el del carrete, tal como ilustra la fig. C. tat como se indica en la lig. Raise the presser foot using the Presser Foot Lever as shown in place. Levante ei prensatelas con la palanca correspondiente, lelcomoilustradoenla fig. Enhebre la aguja de detente hacia atlas y tire unos...

Users Manual - English
Page 30
N o b 0 to "C C O tn • 0 • Z 2.
N o b 0 to "C C O tn • 0 • Z 2.

Users Manual - English
Page 35
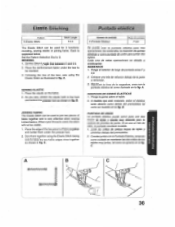
... aparece a continuation. 7. Pull up the lower thread by applying pressure to 2, 3 or 21 for locking the endof seamsandwherereinforcementisneed&d. 7. Lower the presser foot. 6. Ponga dicho selector de puntadas en 2, 3 6 21 segem el tipo de puntada recta deseado. 2. Coloque el tejido debajo del prensatelas y ...Reverse Sewing Button and start sewing in as far as possible and lightly touch the foot controller. Baje elpronsatelas. 6. Set the Pattern Selection Dial to the foot controller. Gire elselector depuntadas pare vet puntada deseada en la ventana de indication correspondiente. ...
... aparece a continuation. 7. Pull up the lower thread by applying pressure to 2, 3 or 21 for locking the endof seamsandwherereinforcementisneed&d. 7. Lower the presser foot. 6. Ponga dicho selector de puntadas en 2, 3 6 21 segem el tipo de puntada recta deseado. 2. Coloque el tejido debajo del prensatelas y ...Reverse Sewing Button and start sewing in as far as possible and lightly touch the foot controller. Baje elpronsatelas. 6. Set the Pattern Selection Dial to the foot controller. Gire elselector depuntadas pare vet puntada deseada en la ventana de indication correspondiente. ...
Users Manual - English
Page 36
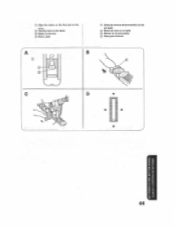
Raise the presser foot and turn the fabric to change directions with the needle still in the fabric. 2. Changing Sewing Direction 1. Stop the machine at the endof the seamor ...;. -4 '0 3:1 2 0 )c5p. Stitch to stitch backwards for 1 cm (3/81 from the end of the seam and stop. 2. Push the Reverse Sowing Button and lightly touch the foot controller to the end of the fabric. Lowerthepresserfoot andstartsewingin thenow direction. Cosa haste el final de la costura y pare. 2. Cambio de sentido de costura 1. x Ch...
Raise the presser foot and turn the fabric to change directions with the needle still in the fabric. 2. Changing Sewing Direction 1. Stop the machine at the endof the seamor ...;. -4 '0 3:1 2 0 )c5p. Stitch to stitch backwards for 1 cm (3/81 from the end of the seam and stop. 2. Push the Reverse Sowing Button and lightly touch the foot controller to the end of the fabric. Lowerthepresserfoot andstartsewingin thenow direction. Cosa haste el final de la costura y pare. 2. Cambio de sentido de costura 1. x Ch...
Users Manual - English
Page 41
... keep the two fabric edges close together as shown in fig. As you sew, stretch the elastic both in the front and behind the presser foot as shown in fig. Sew them under the tear to be mended. 3: Following the line of fabric together and is used to join two pieces...
... keep the two fabric edges close together as shown in fig. As you sew, stretch the elastic both in the front and behind the presser foot as shown in fig. Sew them under the tear to be mended. 3: Following the line of fabric together and is used to join two pieces...
Users Manual - English
Page 49
O Marco do Thick) en ellefido ® Marcos on the loot O Bolton plate QQ Mincelasmarcas delprenselelasconlas del WOO. Placa pare botones. A B O 3 C 4 IIIIIIIIIIIIIIIIIIIIIIIIIIIIIIIIIIIIIII IIIIIIIIIIIIIIIIIIIIIIIMEMIIIIIIII D 0 e I 44 Q. O Starting mark on the fabric (0 Marks on elprensateias. (1) Align the marks on the foot and on the fabric.
O Marco do Thick) en ellefido ® Marcos on the loot O Bolton plate QQ Mincelasmarcas delprenselelasconlas del WOO. Placa pare botones. A B O 3 C 4 IIIIIIIIIIIIIIIIIIIIIIIIIIIIIIIIIIIIIII IIIIIIIIIIIIIIIIIIIIIIIMEMIIIIIIII D 0 e I 44 Q. O Starting mark on the fabric (0 Marks on elprensateias. (1) Align the marks on the foot and on the fabric.

Users Manual - English
Page 53
... comp lo muestra la fig. Para mejores resullados, se debe colocarla aguja del lado de la pate y de to the right pin of the zipper foot. Para coser el lado opuesto de la cremallera, simile la pate a! °prefer el baton situado en su parte posterior, instate la pats en el... otro lado. When sewing the left side of the needle. USING ATTACHMENTS AND APPLICATIONS USO OE ACCESORIOS Y APLICACIONES Zipper Insertion Pattern 3 Stitch Length 2-3 Fool Zipper Foot The zipper foot is used to sew various types of zippers and can easily be positioned on the left or right pin of the zipper...
... comp lo muestra la fig. Para mejores resullados, se debe colocarla aguja del lado de la pate y de to the right pin of the zipper foot. Para coser el lado opuesto de la cremallera, simile la pate a! °prefer el baton situado en su parte posterior, instate la pats en el... otro lado. When sewing the left side of the needle. USING ATTACHMENTS AND APPLICATIONS USO OE ACCESORIOS Y APLICACIONES Zipper Insertion Pattern 3 Stitch Length 2-3 Fool Zipper Foot The zipper foot is used to sew various types of zippers and can easily be positioned on the left or right pin of the zipper...
Users Manual - English
Page 54
... that the lower thread lies on the underside of Straight Stitches. 4. Ponga el selector do zurcir 1. Set the Pattern Selection Dial to 3. 2. Lower the presser foot. 5. Zurcido Punlada 3 Largo de puntada Okos Cualquiera Placa do puntadas en 3. 2. Sew a single row or multiple rows of the material. 3. Darning Pattern 3 Stitch Length Any...
... that the lower thread lies on the underside of Straight Stitches. 4. Ponga el selector do zurcir 1. Set the Pattern Selection Dial to 3. 2. Lower the presser foot. 5. Zurcido Punlada 3 Largo de puntada Okos Cualquiera Placa do puntadas en 3. 2. Sew a single row or multiple rows of the material. 3. Darning Pattern 3 Stitch Length Any...
Users Manual - English
Page 56
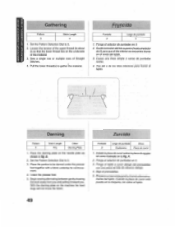
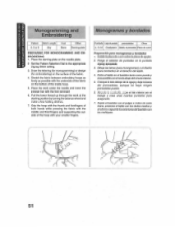
Grip the hoop with the thumb and forefingers of both hands while pressing the fabric with the foot removed. 6. Ponga el selector de puntadas en la punlada 7i.gmg apropiada 3. Girando to the appropriate Zigzag Stitch setting. 3. Pull ...at the startingposition by turning thebalance wheeland make a few holding stitches. 7. S3NO10V017dV A SOIHOS300V SNOILVOIlddV (INV SIN1MOVII Monogramming and Embroidering Pattern StilCh Length tI Foot F:5 or 6 My None Other Deming plate PREPARING FOR MONOGRAMMING AND EM BROIL) EfiNG 1. Set the Pattern Selection Dial to ruedecilla, pase elhilo ...
Grip the hoop with the thumb and forefingers of both hands while pressing the fabric with the foot removed. 6. Ponga el selector de puntadas en la punlada 7i.gmg apropiada 3. Girando to the appropriate Zigzag Stitch setting. 3. Pull ...at the startingposition by turning thebalance wheeland make a few holding stitches. 7. S3NO10V017dV A SOIHOS300V SNOILVOIlddV (INV SIN1MOVII Monogramming and Embroidering Pattern StilCh Length tI Foot F:5 or 6 My None Other Deming plate PREPARING FOR MONOGRAMMING AND EM BROIL) EfiNG 1. Set the Pattern Selection Dial to ruedecilla, pase elhilo ...
Users Manual - English
Page 64
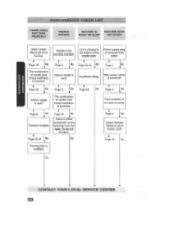
... correctly. Page 6 No Page 28 No Fabric is not correctly inserted. No Page 5 No Clutch Release Switch is set at bobbin mark. Page 5.4 Page 5 No V Foot controller is not used . No V CONTACT YOUR LOCAL SERVICE CENTER 59 Page 6 No Interior needle ' is installed. Page 20 Darning plate is used. feed dogs...
... correctly. Page 6 No Page 28 No Fabric is not correctly inserted. No Page 5 No Clutch Release Switch is set at bobbin mark. Page 5.4 Page 5 No V Foot controller is not used . No V CONTACT YOUR LOCAL SERVICE CENTER 59 Page 6 No Interior needle ' is installed. Page 20 Darning plate is used. feed dogs...


