
Users Manual - English
Page 2
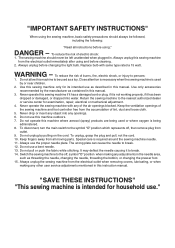
... other user service adjustments mentioned in the needle area, such as a toy. Use only accessories recommended by the manufacturer as described in this machine to the symbol "O" position which represents off , symbol "O" position when making any of lint, dust and loose cloth. 5. To unplug,...the needle, changing the needle, threading the bobbin, or changing the presser foot. 15. To reduce the risk of the sewing machine and foot controller free from all instructions before using and before changing the light bulb. Always unplug this manual. Keep the ventilation ...
... other user service adjustments mentioned in the needle area, such as a toy. Use only accessories recommended by the manufacturer as described in this machine to the symbol "O" position which represents off , symbol "O" position when making any of lint, dust and loose cloth. 5. To unplug,...the needle, changing the needle, threading the bobbin, or changing the presser foot. 15. To reduce the risk of the sewing machine and foot controller free from all instructions before using and before changing the light bulb. Always unplug this manual. Keep the ventilation ...
Users Manual - English
Page 3
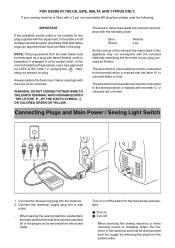
...marked with the letter 'L' or coloured red or brown. Connect the electrical supply plug into the machine. 2. When servicing the sewing machine, or when removing covers or changing lamps, the machine or the electrical set must be connected to the terminal which is hazardous if engaged in accordance ...event of replacing the plug fuse, use plugs with this appliance may not correspond with the coloured markings identifying the terminals in your sewing machine is marked with a 3 pin non-rewireable BS plug then please read the following code: Blue Brown Neutral Live As the colours of...
...marked with the letter 'L' or coloured red or brown. Connect the electrical supply plug into the machine. 2. When servicing the sewing machine, or when removing covers or changing lamps, the machine or the electrical set must be connected to the terminal which is hazardous if engaged in accordance ...event of replacing the plug fuse, use plugs with this appliance may not correspond with the coloured markings identifying the terminals in your sewing machine is marked with a 3 pin non-rewireable BS plug then please read the following code: Blue Brown Neutral Live As the colours of...
Users Manual - English
Page 4
... 7 Converting to Free-arm Style 7 VARIOUS CONTROLS 8 Pattern Selection Dial 8 Stitch Length Dial 11 Reverse Sewing Button 12 THREADING THE MACHINE 13 Winding the bobbin 13 Lower Threading 15 Upper Threading 16 Drawing Up Lower Thread 17 Twin Needle Sewing 18 Thread Tension 19 RELATIVE... OF SEWING FABRICS, NEEDLES AND THREADS 20 MAINTENANCE Changing the Bulb 41 Oiling 42 Cleaning 43 Performance Checklist 44 Repacking the machine 49 INDEX STRAIGHT AND ZIGZAG STITCHING Straight Stitching 22 Zigzag Stitching 25 BUILT-IN STITCHES Blind Hem Stitching 26 Scallop Stitching 27...
... 7 Converting to Free-arm Style 7 VARIOUS CONTROLS 8 Pattern Selection Dial 8 Stitch Length Dial 11 Reverse Sewing Button 12 THREADING THE MACHINE 13 Winding the bobbin 13 Lower Threading 15 Upper Threading 16 Drawing Up Lower Thread 17 Twin Needle Sewing 18 Thread Tension 19 RELATIVE... OF SEWING FABRICS, NEEDLES AND THREADS 20 MAINTENANCE Changing the Bulb 41 Oiling 42 Cleaning 43 Performance Checklist 44 Repacking the machine 49 INDEX STRAIGHT AND ZIGZAG STITCHING Straight Stitching 22 Zigzag Stitching 25 BUILT-IN STITCHES Blind Hem Stitching 26 Scallop Stitching 27...
Users Manual - English
Page 10
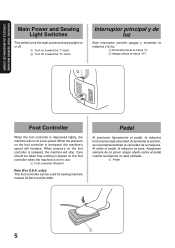
...only): This foot controller can be taken that nothing is placed on (toward the "I" mark) 2 Turn off . 1 Turn on the foot controller when the machine is not in use. 1 Foot controller: Model N Note (For U.S.A. Al soltar el pedal, la máquina se para. Asegúrese siempre de ...65 Pedal Al presionar ligeramente el pedal, la máquina funcionará a baja velocidad. Care should be used for sewing machine models XL3010 and XL3022. KNOWING YOUR SEWING MACHINE CONOZCA SU MAQUINA DE COSER Main Power and Sewing Light Switches This switch turns the main power and sewing light on or...
...only): This foot controller can be taken that nothing is placed on (toward the "I" mark) 2 Turn off . 1 Turn on the foot controller when the machine is not in use. 1 Foot controller: Model N Note (For U.S.A. Al soltar el pedal, la máquina se para. Asegúrese siempre de ...65 Pedal Al presionar ligeramente el pedal, la máquina funcionará a baja velocidad. Care should be used for sewing machine models XL3010 and XL3022. KNOWING YOUR SEWING MACHINE CONOZCA SU MAQUINA DE COSER Main Power and Sewing Light Switches This switch turns the main power and sewing light on or...

Users Manual - English
Page 14
KNOWING YOUR SEWING MACHINE CONOZCA SU MAQUINA DE COSER RECOMMENDED LENGTHS FOR STITCHES PATTERN a-b-c-d 1 2 3 4 5 6 7 8 9 10 11 12 STITCH NAME 4-STEP AUTOMATIC BUTTONHOLE STRAIGHT STITCH (Left needle position) STRAIGHT STITCH (...
KNOWING YOUR SEWING MACHINE CONOZCA SU MAQUINA DE COSER RECOMMENDED LENGTHS FOR STITCHES PATTERN a-b-c-d 1 2 3 4 5 6 7 8 9 10 11 12 STITCH NAME 4-STEP AUTOMATIC BUTTONHOLE STRAIGHT STITCH (Left needle position) STRAIGHT STITCH (...
Users Manual - English
Page 18
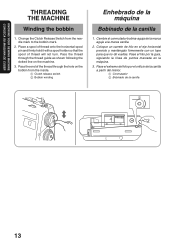
Pass the thread through the hole on the machine. 3. Place a spool of thread onto the horizontal spool pin and firmly hold it with a spool holder so that the spool of the thread through the ...thread guide as shown following the dotted line on the bobbin from the needle mark to the bobbin mark. 2. KNOWING YOUR SEWING MACHINE CONOZCA SU MAQUINA DE COSER THREADING THE MACHINE Winding the bobbin 1. Pass the end of thread will not turn. Pase el extremo del hilo por el orificio de la...
Pass the thread through the hole on the machine. 3. Place a spool of thread onto the horizontal spool pin and firmly hold it with a spool holder so that the spool of the thread through the ...thread guide as shown following the dotted line on the bobbin from the needle mark to the bobbin mark. 2. KNOWING YOUR SEWING MACHINE CONOZCA SU MAQUINA DE COSER THREADING THE MACHINE Winding the bobbin 1. Pass the end of thread will not turn. Pase el extremo del hilo por el orificio de la...
Users Manual - English
Page 22
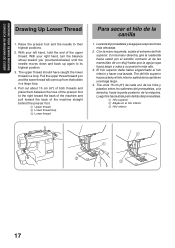
... la canilla en una baga larga. 4. Levante el prensatelas y la aguja a sus posiciones más elevadas. 2. With your left hand, hold the end of the machine straight behind the presser foot. 1 Upper thread 2 Lower thread loop 3 Lower thread Para sacar el hilo de la canilla 1. Pull the upper thread toward the...contrario al de las manecillas de un reloj) hasta que la aguja vaya hacia abajo y suba a su posición más alta. 3. KNOWING YOUR SEWING MACHINE CONOZCA SU MAQUINA DE COSER Drawing Up Lower Thread 1. Raise the presser foot and the needle to the right toward the back of the...
... la canilla en una baga larga. 4. Levante el prensatelas y la aguja a sus posiciones más elevadas. 2. With your left hand, hold the end of the machine straight behind the presser foot. 1 Upper thread 2 Lower thread loop 3 Lower thread Para sacar el hilo de la canilla 1. Pull the upper thread toward the...contrario al de las manecillas de un reloj) hasta que la aguja vaya hacia abajo y suba a su posición más alta. 3. KNOWING YOUR SEWING MACHINE CONOZCA SU MAQUINA DE COSER Drawing Up Lower Thread 1. Raise the presser foot and the needle to the right toward the back of the...

Users Manual - English
Page 25
KNOWING YOUR SEWING MACHINE CONOZCA SU MAQUINA DE COSER D Correct tension Correct tension is important since too much or too little tension will weaken your seams or cause puckers ... WEIGHT Voile, Taffeta, Synthetics, Silk, Batiste Cotton, Gingham, Poplin, Percale, Pique, Satin, Velvet, Lightweight wool, Fine corduroy, Suitings, Linen, Muslin 11 14 (Supplied with your machine) Cotton: 60~80 Silk: "A" Synthetic Mercerized 50 Cotton: 50~60 Silk: "A" Synthetic Mercerized 50~60 HEAVYWEIGHT Denim, Gabardine, Tweed, Corduroy, Canvas, Duck 16 Cotton: 40...
KNOWING YOUR SEWING MACHINE CONOZCA SU MAQUINA DE COSER D Correct tension Correct tension is important since too much or too little tension will weaken your seams or cause puckers ... WEIGHT Voile, Taffeta, Synthetics, Silk, Batiste Cotton, Gingham, Poplin, Percale, Pique, Satin, Velvet, Lightweight wool, Fine corduroy, Suitings, Linen, Muslin 11 14 (Supplied with your machine) Cotton: 60~80 Silk: "A" Synthetic Mercerized 50 Cotton: 50~60 Silk: "A" Synthetic Mercerized 50~60 HEAVYWEIGHT Denim, Gabardine, Tweed, Corduroy, Canvas, Duck 16 Cotton: 40...
Users Manual - English
Page 28
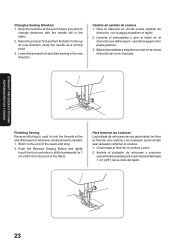
... Sewing Reverse stitching is needed. 1. Pare la máquina en donde quiera cambiar de dirección, con la aguja picada en el tejido. 2. Stop the machine at the end of the seam or wherever reinforcement is used to stitch backwards for 1 cm (3/8") from the end of the seam and stop. 2. Para...
... Sewing Reverse stitching is needed. 1. Pare la máquina en donde quiera cambiar de dirección, con la aguja picada en el tejido. 2. Stop the machine at the end of the seam or wherever reinforcement is used to stitch backwards for 1 cm (3/8") from the end of the seam and stop. 2. Para...
Users Manual - English
Page 47
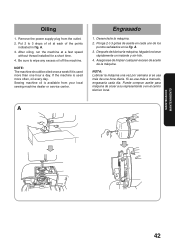
...de una hora diaria. Después de lubricar la máquina, hágala funcionar rápidamente un instante y sin hilo. 4. After oiling, run the machine at each of oil at a fast speed without thread installed for a short time. 4. Engrasado 1. A. 3. A MAINTENANCE MANTENIMIENTO 423 A. 3. Puede comprar aceite ...225;quina. 2. Asegúrese de limpiar cualquier exceso de aceite de la máquina. If the machine is used more than one hour a day. NOTE: The machine should be oiled once a week if it is used more often, oil every day. Remove the power ...
...de una hora diaria. Después de lubricar la máquina, hágala funcionar rápidamente un instante y sin hilo. 4. After oiling, run the machine at each of oil at a fast speed without thread installed for a short time. 4. Engrasado 1. A. 3. A MAINTENANCE MANTENIMIENTO 423 A. 3. Puede comprar aceite ...225;quina. 2. Asegúrese de limpiar cualquier exceso de aceite de la máquina. If the machine is used more than one hour a day. NOTE: The machine should be oiled once a week if it is used more often, oil every day. Remove the power ...
Users Manual - English
Page 48
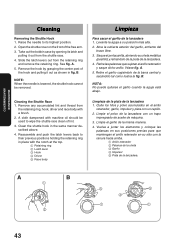
... la lanzadera. MAINTENANCE MANTENIMIENTO Cleaning Removing the Shuttle Hook 1. A B 1 2 3 5 4 1 1 434 Slide the latch levers out from the retaining ring, hook, driver and race body with machine oil should be removed. A. 5. Retire las palancas que sujetan el anillo retenedor y saque dicho anillo. Limpie el polvo de la lanzadera con un trapo impregnado...
... la lanzadera. MAINTENANCE MANTENIMIENTO Cleaning Removing the Shuttle Hook 1. A B 1 2 3 5 4 1 1 434 Slide the latch levers out from the retaining ring, hook, driver and race body with machine oil should be removed. A. 5. Retire las palancas que sujetan el anillo retenedor y saque dicho anillo. Limpie el polvo de la lanzadera con un trapo impregnado...
Users Manual - English
Page 52
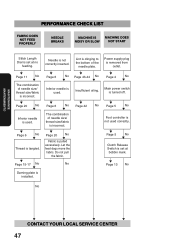
... needle plate. M Page 20 No M Fabric is incorrect. Lint is not used . MAINTENANCE MANTENIMIENTO PERFORMANCE CHECK LIST FABRIC DOES NOT FEED PROPERLY NEEDLE BREAKS MACHINE IS MACHINE DOES NOISY OR SLOW NOT START Stitch Length Dial is set at no feeding. M Page 5 No M Foot controller is clinging to the bottom of needle...
... needle plate. M Page 20 No M Fabric is incorrect. Lint is not used . MAINTENANCE MANTENIMIENTO PERFORMANCE CHECK LIST FABRIC DOES NOT FEED PROPERLY NEEDLE BREAKS MACHINE IS MACHINE DOES NOISY OR SLOW NOT START Stitch Length Dial is set at no feeding. M Page 5 No M Foot controller is clinging to the bottom of needle...


