
Users Manual - English
Page 2
... Use this sewing machine only for its intended use as threading the needle, changing the needle, threading the bobbin, or changing the presser foot. 15. Return the sewing machine to break. 12. Do not pull or push the fabric while stitching. Do not unplug by or ...reduce the risk of lint, dust and loose cloth. 5. Never operate this instruction manual. Keep the ventilation openings of the sewing machine and foot controller free from the electrical outlet when removing covers, lubricating, or when making any openings. 6. Keep fingers away from outlet. 9. It may deflect...
... Use this sewing machine only for its intended use as threading the needle, changing the needle, threading the bobbin, or changing the presser foot. 15. Return the sewing machine to break. 12. Do not pull or push the fabric while stitching. Do not unplug by or ...reduce the risk of lint, dust and loose cloth. 5. Never operate this instruction manual. Keep the ventilation openings of the sewing machine and foot controller free from the electrical outlet when removing covers, lubricating, or when making any openings. 6. Keep fingers away from outlet. 9. It may deflect...
Users Manual - English
Page 4
... SEWING MACHINE Principal parts 1 Accessories 3 OPERATING YOUR SEWING MACHINE .......... 4 Connecting Plugs 4 Main Power and Sewing Light Switches ... 5 Foot Controller 5 Replacing the Needle 6 Checking the Needle 6 Changing the Presser Foot 7 Converting to Free-arm Style 7 VARIOUS CONTROLS 8 Pattern Selection Dial 8 Stitch Length Dial 11 Reverse Sewing Button 12 THREADING THE MACHINE 13 Winding the bobbin...
... SEWING MACHINE Principal parts 1 Accessories 3 OPERATING YOUR SEWING MACHINE .......... 4 Connecting Plugs 4 Main Power and Sewing Light Switches ... 5 Foot Controller 5 Replacing the Needle 6 Checking the Needle 6 Changing the Presser Foot 7 Converting to Free-arm Style 7 VARIOUS CONTROLS 8 Pattern Selection Dial 8 Stitch Length Dial 11 Reverse Sewing Button 12 THREADING THE MACHINE 13 Winding the bobbin...
Users Manual - English
Page 10
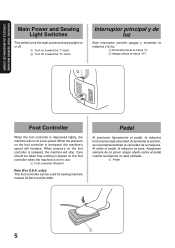
... de luz Este interruptor permite apagar y encender la máquina y la luz. 1 Encender (hacia la marca "I") 2 Apagar (hacia la marca "O") 1 2 Foot Controller When the foot controller is depressed lightly, the machine will run at a low speed. Al soltar el pedal, la máquina se para. Al aumentar la presió... This switch turns the main power and sewing light on or off (toward the "I" mark) 2 Turn off . 1 Turn on the foot controller is increased, the machine's speed will increase. Asegúrese siempre de no poner ningún objeto sobre el pedal cuando la má...
... de luz Este interruptor permite apagar y encender la máquina y la luz. 1 Encender (hacia la marca "I") 2 Apagar (hacia la marca "O") 1 2 Foot Controller When the foot controller is depressed lightly, the machine will run at a low speed. Al soltar el pedal, la máquina se para. Al aumentar la presió... This switch turns the main power and sewing light on or off (toward the "I" mark) 2 Turn off . 1 Turn on the foot controller is increased, the machine's speed will increase. Asegúrese siempre de no poner ningún objeto sobre el pedal cuando la má...
Users Manual - English
Page 28
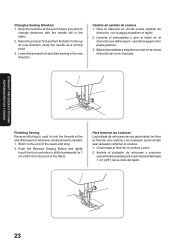
... wherever reinforcement is needed. 1. Push the Reverse Sewing Button and lightly touch the foot controller to the end of the fabric. Cosa hasta el final de la costura y pare. 2. Raise the presser foot and turn the fabric to lock the threads at the point where you wish to...el pulsador de retroceso y presione suavemente el pedal para coser hacia atrás hasta 1 cm (3/8") de la orilla del tejido. 234 Lower the presser foot and start sewing in the fabric. 2. Baje el prensatelas y empiece a coser en la nueva dirección tal como ilustrado. Changing Sewing Direction 1. Para...
... wherever reinforcement is needed. 1. Push the Reverse Sewing Button and lightly touch the foot controller to the end of the fabric. Cosa hasta el final de la costura y pare. 2. Raise the presser foot and turn the fabric to lock the threads at the point where you wish to...el pulsador de retroceso y presione suavemente el pedal para coser hacia atrás hasta 1 cm (3/8") de la orilla del tejido. 234 Lower the presser foot and start sewing in the fabric. 2. Baje el prensatelas y empiece a coser en la nueva dirección tal como ilustrado. Changing Sewing Direction 1. Para...
Users Manual - English
Page 52
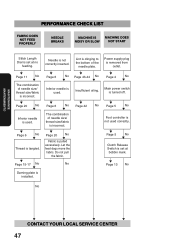
.../fabric is incorrect. M Page 6 No M Thread is installed. M M Page 6 No Page 42 No M The combination of needle size/ thread size/fabric is incorrect. M Page 5 No M Foot controller is not used . MAINTENANCE MANTENIMIENTO PERFORMANCE CHECK LIST FABRIC DOES NOT FEED PROPERLY NEEDLE BREAKS MACHINE IS MACHINE DOES NOISY OR SLOW NOT START Stitch...
.../fabric is incorrect. M Page 6 No M Thread is installed. M M Page 6 No Page 42 No M The combination of needle size/ thread size/fabric is incorrect. M Page 5 No M Foot controller is not used . MAINTENANCE MANTENIMIENTO PERFORMANCE CHECK LIST FABRIC DOES NOT FEED PROPERLY NEEDLE BREAKS MACHINE IS MACHINE DOES NOISY OR SLOW NOT START Stitch...


