Users Manual - English
Page 1
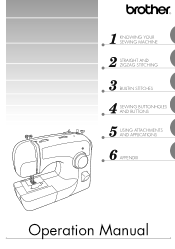
1 KNOWING YOUR SEWING MACHINE 2 STRAIGHT AND ZIGZAG STITCHING 3 BUILT-IN STITCHES 4 SEWING BUTTONHOLES AND BUTTONS 5 USING ATTACHMENTS AND APPLICATIONS 6 APPENDIX Operation Manual
1 KNOWING YOUR SEWING MACHINE 2 STRAIGHT AND ZIGZAG STITCHING 3 BUILT-IN STITCHES 4 SEWING BUTTONHOLES AND BUTTONS 5 USING ATTACHMENTS AND APPLICATIONS 6 APPENDIX Operation Manual
Users Manual - English
Page 5
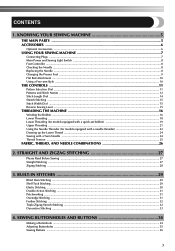
... ...30 Double Action Stitching ...31 Patchworking ...31 Overedge Stitching ...31 Feather Stitching ...32 Triple Zigzag Stretch Stitching ...32 Decorative Stitching ...33 4. SEWING BUTTONHOLES AND BUTTONS 34 Making a Buttonhole ...34 Adjusting Buttonholes ...35 Sewing Buttons ...36 3 KNOWING YOUR SEWING MACHINE 5 THE MAIN PARTS ...5 ACCESSORIES ...6 Optional Accessories ...6 USING YOUR SEWING MACHINE 7 Connecting Plugs ...7 Main Power...
... ...30 Double Action Stitching ...31 Patchworking ...31 Overedge Stitching ...31 Feather Stitching ...32 Triple Zigzag Stretch Stitching ...32 Decorative Stitching ...33 4. SEWING BUTTONHOLES AND BUTTONS 34 Making a Buttonhole ...34 Adjusting Buttonholes ...35 Sewing Buttons ...36 3 KNOWING YOUR SEWING MACHINE 5 THE MAIN PARTS ...5 ACCESSORIES ...6 Optional Accessories ...6 USING YOUR SEWING MACHINE 7 Connecting Plugs ...7 Main Power...
Users Manual - English
Page 7
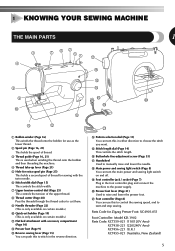
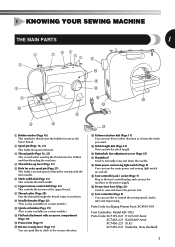
...-051 Foot Controller: Model KD-1902 Parts Code: XC7359-021 (110/120V Area) XC7438-221 (220/240V Area) XC7456-221 (U.K.) XC7455-021 (Australia, New Zealand) 5 F Buttonhole fine-adjustment screw (Page 35) G Handwheel Used to raise and lower the presser foot. I K D Pattern selection dial (Page 11) You can use as the lower...
...-051 Foot Controller: Model KD-1902 Parts Code: XC7359-021 (110/120V Area) XC7438-221 (220/240V Area) XC7456-221 (U.K.) XC7455-021 (Australia, New Zealand) 5 F Buttonhole fine-adjustment screw (Page 35) G Handwheel Used to raise and lower the presser foot. I K D Pattern selection dial (Page 11) You can use as the lower...
Users Manual - English
Page 8
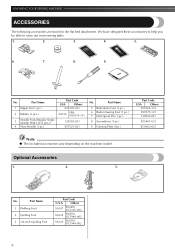
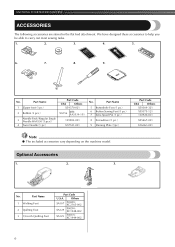
... (Regular Single Needle HAX130 (3 pcs.)) 4 Twin Needle (1 pc.) Part Code USA Others X59370-021 SA156 SFB: XA5539-151 129583-021 X57521-021 No. Part Name 5 Buttonhole Foot (1 pc.) 6 Button Sewing Foot (1 pc.) 7 Extra Spool Pin (1 pc.) 8 Screwdriver (1 pc.) 9 Darning Plate (1pc.) Part Code USA Others X59369-321 X59375-121 130920-021...
... (Regular Single Needle HAX130 (3 pcs.)) 4 Twin Needle (1 pc.) Part Code USA Others X59370-021 SA156 SFB: XA5539-151 129583-021 X57521-021 No. Part Name 5 Buttonhole Foot (1 pc.) 6 Button Sewing Foot (1 pc.) 7 Extra Spool Pin (1 pc.) 8 Screwdriver (1 pc.) 9 Darning Plate (1pc.) Part Code USA Others X59369-321 X59375-121 130920-021...
Users Manual - English
Page 14
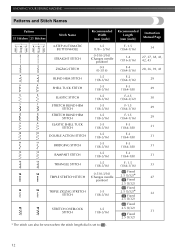
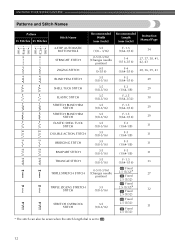
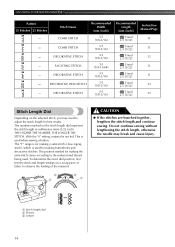
... MACHINE Patterns and Stitch Names Pattern 35 Stitches 25 Stitches Stitch Name Recommended Width (mm (inch)) Recommended Length (mm (inch)) Instruction Manual Page 4-STEP AUTOMATIC BUTTONHOLE STRAIGHT STITCH ZIGZAG STITCH BLIND HEM STITCH SHELL TUCK STITCH ELASTIC STITCH STRETCH BLIND HEM STITCH STRETCH BLIND HEM STITCH ELASTIC SHELL TUCK STITCH DOUBLE...
... MACHINE Patterns and Stitch Names Pattern 35 Stitches 25 Stitches Stitch Name Recommended Width (mm (inch)) Recommended Length (mm (inch)) Instruction Manual Page 4-STEP AUTOMATIC BUTTONHOLE STRAIGHT STITCH ZIGZAG STITCH BLIND HEM STITCH SHELL TUCK STITCH ELASTIC STITCH STRETCH BLIND HEM STITCH STRETCH BLIND HEM STITCH ELASTIC SHELL TUCK STITCH DOUBLE...
Users Manual - English
Page 16
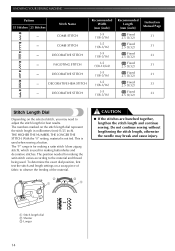
... material and thread being used. With the "0" setting, material is used for making the satin stitch varies according to adjust the stitch length for making buttonholes and decorative stitches. The "F" range is for making a satin stitch (close zigzag stitch), which is used when sewing a button. To determine the exact dial position...
... material and thread being used. With the "0" setting, material is used for making the satin stitch varies according to adjust the stitch length for making buttonholes and decorative stitches. The "F" range is for making a satin stitch (close zigzag stitch), which is used when sewing a button. To determine the exact dial position...

Users Manual - English
Page 30
... 5. 1 Thread cutter 28 Cut both threads with the needle still in the 3 new direction. ■ Finishing Sewing You can use a triple stretch stitch for making buttonholes and decorative stitches. STRAIGHT AND ZIGZAG STITCHING ■ Changing Sewing Direction Stop the machine at the point where you sew using the needle as a reinforcement...
... 5. 1 Thread cutter 28 Cut both threads with the needle still in the 3 new direction. ■ Finishing Sewing You can use a triple stretch stitch for making buttonholes and decorative stitches. STRAIGHT AND ZIGZAG STITCHING ■ Changing Sewing Direction Stop the machine at the point where you sew using the needle as a reinforcement...
Users Manual - English
Page 36
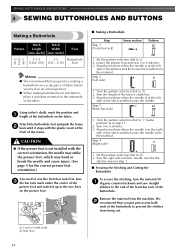
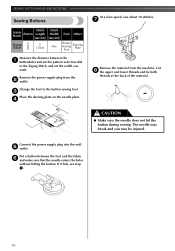
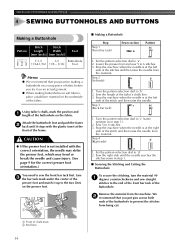
...ends of the stitches and then raise the needle from the material. CAUTION ● If the presser foot is at the left side of the buttonhole to sew the front bar tack first. Stop the machine when the needle is at the right side of the frame. Step 2 b (Left ... the pattern selection dial to 'a'. 2. Set the pattern selection dial to 'c' (same position as in step 1. ■ Securing the Stitching and Cutting the Buttonhole To secure the stitching, turn the material 90 1 degrees counterclockwise and sew straight stitches to 'd'. 2. Stop the machine when the needle is at the front...
...ends of the stitches and then raise the needle from the material. CAUTION ● If the presser foot is at the left side of the buttonhole to sew the front bar tack first. Stop the machine when the needle is at the right side of the frame. Step 2 b (Left ... the pattern selection dial to 'a'. 2. Set the pattern selection dial to 'c' (same position as in step 1. ■ Securing the Stitching and Cutting the Buttonhole To secure the stitching, turn the material 90 1 degrees counterclockwise and sew straight stitches to 'd'. 2. Stop the machine when the needle is at the front...

Users Manual - English
Page 37
...in the + direction. • This adjustment ensures both sides of the buttonhole are the same. 2 1 3 Adjusting Buttonholes If the stitching on the right 3 side, stitch the buttonhole and observe the feeding. If the left side is too coarse, turn the buttonhole fine-adjustment screw with the stitch length dial. 1 1 Stitch length ...the same, you may slip and you can make the following adjustments. Set the stitch length dial between "F" and 1.5 1 and sew the buttonhole on a scrap piece of fabric to cut through any stitches. After obtaining a satisfactory feed on the two sides of the...
...in the + direction. • This adjustment ensures both sides of the buttonhole are the same. 2 1 3 Adjusting Buttonholes If the stitching on the right 3 side, stitch the buttonhole and observe the feeding. If the left side is too coarse, turn the buttonhole fine-adjustment screw with the stitch length dial. 1 1 Stitch length ...the same, you may slip and you can make the following adjustments. Set the stitch length dial between "F" and 1.5 1 and sew the buttonhole on a scrap piece of fabric to cut through any stitches. After obtaining a satisfactory feed on the two sides of the...
Users Manual - English
Page 38
Change the foot to the Zigzag Stitch, and set the width you may be injured. Put a button between the 1 buttonholes and set the pattern selection dial to the button sewing foot. 3 Place the darning plate on the needle plate. 4 Remove the material from the 2 outlet..... Connect the power supply plug into the wall 5 outlet. The needle may break and you want. Remove the power supply plug from the machine. SEWING BUTTONHOLES AND BUTTONS Sewing Buttons At a slow speed, sew about 10 stitches. 7 Stitch Stitch Stitch Name Pattern Length Width Foot Other [mm (inch)] [mm (inch)] ...
Change the foot to the Zigzag Stitch, and set the width you may be injured. Put a button between the 1 buttonholes and set the pattern selection dial to the button sewing foot. 3 Place the darning plate on the needle plate. 4 Remove the material from the 2 outlet..... Connect the power supply plug into the wall 5 outlet. The needle may break and you want. Remove the power supply plug from the machine. SEWING BUTTONHOLES AND BUTTONS Sewing Buttons At a slow speed, sew about 10 stitches. 7 Stitch Stitch Stitch Name Pattern Length Width Foot Other [mm (inch)] [mm (inch)] ...
Users Manual - English
Page 51
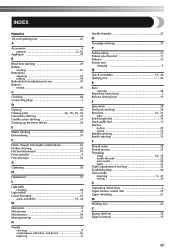
INDEX Numerics 1/4-inch quilting foot 43 A Accessories 6 , optional 6 41 Appliqués 39 B Blind hem stitching 29 Bobbin winding 16 Buttonhole adjusting 35 making 34 Buttonhole fine-adjustment screw 35 Buttons sewing 36 C Cleaning 44 Connecting plugs 7 D Darning 38 Darning plate 36, 38, 39, 42 Decorative stitching 33 Double action stitching ...
INDEX Numerics 1/4-inch quilting foot 43 A Accessories 6 , optional 6 41 Appliqués 39 B Blind hem stitching 29 Bobbin winding 16 Buttonhole adjusting 35 making 34 Buttonhole fine-adjustment screw 35 Buttons sewing 36 C Cleaning 44 Connecting plugs 7 D Darning 38 Darning plate 36, 38, 39, 42 Decorative stitching 33 Double action stitching ...

Owner's Manual (Español) - Spanish
Page 1
1 KNOWING YOUR SEWING MACHINE 2 STRAIGHT AND ZIGZAG STITCHING 3 BUILT-IN STITCHES 4 SEWING BUTTONHOLES AND BUTTONS 5 USING ATTACHMENTS AND APPLICATIONS 6 APPENDIX Operation Manual
1 KNOWING YOUR SEWING MACHINE 2 STRAIGHT AND ZIGZAG STITCHING 3 BUILT-IN STITCHES 4 SEWING BUTTONHOLES AND BUTTONS 5 USING ATTACHMENTS AND APPLICATIONS 6 APPENDIX Operation Manual

Owner's Manual (Español) - Spanish
Page 5
... 22 Drawing up the Lower Thread ...24 Sewing with a Twin Needle ...24 Thread Tension ...25 FABRIC, THREAD, AND NEEDLE COMBINATIONS 26 2. SEWING BUTTONHOLES AND BUTTONS 34 Making a Buttonhole ...34 Adjusting Buttonholes ...35 Sewing Buttons ...36 3 CONTENTS 1. STRAIGHT AND ZIGZAG STITCHING 27 Please Read Before Sewing ...27 Straight Stitching ...27 Zigzag Stitching ...28 3. BUILT...
... 22 Drawing up the Lower Thread ...24 Sewing with a Twin Needle ...24 Thread Tension ...25 FABRIC, THREAD, AND NEEDLE COMBINATIONS 26 2. SEWING BUTTONHOLES AND BUTTONS 34 Making a Buttonhole ...34 Adjusting Buttonholes ...35 Sewing Buttons ...36 3 CONTENTS 1. STRAIGHT AND ZIGZAG STITCHING 27 Please Read Before Sewing ...27 Straight Stitching ...27 Zigzag Stitching ...28 3. BUILT...
Owner's Manual (Español) - Spanish
Page 7
... 1 3 4 7 62 51 G F 8 9 0 C A B 1 Bobbin winder (Page 16) This winds the thread onto the bobbin for use this in either direction to choose the stitch you want. F Buttonhole fine-adjustment screw (Page 35) G Handwheel Used to raise and lower the presser foot. Parts Code for sewing with accessory compartment (Page 10) B Presser foot...
... 1 3 4 7 62 51 G F 8 9 0 C A B 1 Bobbin winder (Page 16) This winds the thread onto the bobbin for use this in either direction to choose the stitch you want. F Buttonhole fine-adjustment screw (Page 35) G Handwheel Used to raise and lower the presser foot. Parts Code for sewing with accessory compartment (Page 10) B Presser foot...
Owner's Manual (Español) - Spanish
Page 8
Part Name 5 Buttonhole Foot (1 pc.) 6 Button Sewing Foot (1 pc.) 7 Extra Spool Pin (1 pc.) 8 Screwdriver (1 pc.) 9 Darning Plate (1pc.) Part Code USA Others X59369-321 X59375-121 130920-021 ...
Part Name 5 Buttonhole Foot (1 pc.) 6 Button Sewing Foot (1 pc.) 7 Extra Spool Pin (1 pc.) 8 Screwdriver (1 pc.) 9 Darning Plate (1pc.) Part Code USA Others X59369-321 X59375-121 130920-021 ...
Owner's Manual (Español) - Spanish
Page 14
... MACHINE Patterns and Stitch Names Pattern 35 Stitches 25 Stitches Stitch Name Recommended Width (mm (inch)) Recommended Length (mm (inch)) Instruction Manual Page 4-STEP AUTOMATIC BUTTONHOLE STRAIGHT STITCH ZIGZAG STITCH BLIND HEM STITCH SHELL TUCK STITCH ELASTIC STITCH STRETCH BLIND HEM STITCH STRETCH BLIND HEM STITCH ELASTIC SHELL TUCK STITCH DOUBLE...
... MACHINE Patterns and Stitch Names Pattern 35 Stitches 25 Stitches Stitch Name Recommended Width (mm (inch)) Recommended Length (mm (inch)) Instruction Manual Page 4-STEP AUTOMATIC BUTTONHOLE STRAIGHT STITCH ZIGZAG STITCH BLIND HEM STITCH SHELL TUCK STITCH ELASTIC STITCH STRETCH BLIND HEM STITCH STRETCH BLIND HEM STITCH ELASTIC SHELL TUCK STITCH DOUBLE...
Owner's Manual (Español) - Spanish
Page 16
THE HIGHER THE NUMBER, THE LONGER THE STITCH. The position needed for making buttonholes and decorative stitches. Do not continue sewing without lengthening the stitch length, otherwise the needle may need to adjust the stitch length for making the ...
THE HIGHER THE NUMBER, THE LONGER THE STITCH. The position needed for making buttonholes and decorative stitches. Do not continue sewing without lengthening the stitch length, otherwise the needle may need to adjust the stitch length for making the ...

Owner's Manual (Español) - Spanish
Page 30
... Zigzag Stitch, and then start sewing in the "F" range produces a satin stitch (close zigzag stitch). The Satin Stitch can use a triple stretch stitch for making buttonholes and decorative stitches. To prepare the machine for the next seam, 4 pull about 10 cm (4 inch) of thread through the toes of the presser foot...
... Zigzag Stitch, and then start sewing in the "F" range produces a satin stitch (close zigzag stitch). The Satin Stitch can use a triple stretch stitch for making buttonholes and decorative stitches. To prepare the machine for the next seam, 4 pull about 10 cm (4 inch) of thread through the toes of the presser foot...
Owner's Manual (Español) - Spanish
Page 36
... when the needle is at the right side of the stitch and then raise the needle from the material. Sew 5 to 6 stitches. 3. Attach the buttonhole foot and push the frame 2 back until the needle reaches the stitches sewn in step 1). 2. Sew the right side until it on an actual garment.... ● When making a buttonhole on a scrap piece of fabric before you try it stops with the correct orientation, the needle may strike the presser foot, which may bend or...
... when the needle is at the right side of the stitch and then raise the needle from the material. Sew 5 to 6 stitches. 3. Attach the buttonhole foot and push the frame 2 back until the needle reaches the stitches sewn in step 1). 2. Sew the right side until it on an actual garment.... ● When making a buttonhole on a scrap piece of fabric before you try it stops with the correct orientation, the needle may strike the presser foot, which may bend or...

Owner's Manual (Español) - Spanish
Page 37
...or fine, adjust the feeding of the material with the right side, adjust the buttonhole fine- Be careful not to open the buttonhole, do not put your hand or finger in the middle of the 3 buttonhole with a large screwdriver in the - Set the stitch length dial between "F" ...screw as described below. After obtaining a satisfactory feed on the two sides of the buttonhole is too coarse or fine compared 4 with the stitch length dial. 1 1 Stitch length dial 2 Buttonhole fine-adjustment screw 3 Left side 4 Buttonhole appearance 2 3 1 Right side 2 Shorter 3 Longer 35 Cut an opening in...
...or fine, adjust the feeding of the material with the right side, adjust the buttonhole fine- Be careful not to open the buttonhole, do not put your hand or finger in the middle of the 3 buttonhole with a large screwdriver in the - Set the stitch length dial between "F" ...screw as described below. After obtaining a satisfactory feed on the two sides of the buttonhole is too coarse or fine compared 4 with the stitch length dial. 1 1 Stitch length dial 2 Buttonhole fine-adjustment screw 3 Left side 4 Buttonhole appearance 2 3 1 Right side 2 Shorter 3 Longer 35 Cut an opening in...


