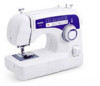
Users Manual - English
Page 2
... taken, including the following: Read all moving parts. This sewing machine is being administered. 8. Do not operate where aerosol (spray) products are being used as threading needle, changing needle, threading bobbin, or changing presser foot, and the like. 15. IMPORTANT SAFETY INSTRUCTIONS When using this manual.
... taken, including the following: Read all moving parts. This sewing machine is being administered. 8. Do not operate where aerosol (spray) products are being used as threading needle, changing needle, threading bobbin, or changing presser foot, and the like. 15. IMPORTANT SAFETY INSTRUCTIONS When using this manual.
Users Manual - English
Page 4
... pack it properly, or do not use the machine safely 1. Do not touch the handwheel, thread take or send the machine to be damaged. For additional product information and updates, visit our web site at www.brother.com. Please follow the troubleshooting table in the following circumstances: • When you fit them...
... pack it properly, or do not use the machine safely 1. Do not touch the handwheel, thread take or send the machine to be damaged. For additional product information and updates, visit our web site at www.brother.com. Please follow the troubleshooting table in the following circumstances: • When you fit them...
Users Manual - English
Page 5
... Stitch Length Dial ...14 Stretch Stitching ...15 Stitch Width Dial ...15 Reverse Sewing Lever ...15 THREADING THE MACHINE 16 Winding the Bobbin ...16 Lower Threading ...18 Lower Threading (for models equipped with a quick-set bobbin 19 Upper Threading ...21 Using the Needle Threader (for models equipped with a needle threader 22 Drawing up the Lower...
... Stitch Length Dial ...14 Stretch Stitching ...15 Stitch Width Dial ...15 Reverse Sewing Lever ...15 THREADING THE MACHINE 16 Winding the Bobbin ...16 Lower Threading ...18 Lower Threading (for models equipped with a quick-set bobbin 19 Upper Threading ...21 Using the Needle Threader (for models equipped with a needle threader 22 Drawing up the Lower...
Users Manual - English
Page 7
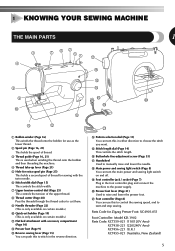
... and stop sewing. 1 KNOWING YOUR SEWING MACHINE THE MAIN PARTS 1 3 4 7 62 51 G F 8 9 0 C A B 1 Bobbin winder (Page 16) This winds the thread onto the bobbin for use this to stitch in the reverse direction. Parts Code for sewing with the twin needle. 6 Stitch width dial (Page 15...) This controls the stitch width. 7 Upper tension-control dial (Page 25) This controls the tension of the upper thread. 8 Thread cutter (Page 28) Pass the threads through the thread cutter to cut them. 9 Needle threader (Page 22) (This is only available on certain models.) 0 Quick-set bobbin (...
... and stop sewing. 1 KNOWING YOUR SEWING MACHINE THE MAIN PARTS 1 3 4 7 62 51 G F 8 9 0 C A B 1 Bobbin winder (Page 16) This winds the thread onto the bobbin for use this to stitch in the reverse direction. Parts Code for sewing with the twin needle. 6 Stitch width dial (Page 15...) This controls the stitch width. 7 Upper tension-control dial (Page 25) This controls the tension of the upper thread. 8 Thread cutter (Page 28) Pass the threads through the thread cutter to cut them. 9 Needle threader (Page 22) (This is only available on certain models.) 0 Quick-set bobbin (...
Users Manual - English
Page 16
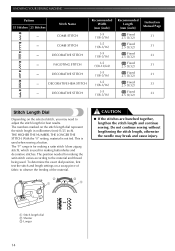
The position needed for making the satin stitch varies according to the material and thread being used. With the "0" setting, material is used when sewing a button. Do not continue sewing without lengthening the stitch length, otherwise the needle may need ...
The position needed for making the satin stitch varies according to the material and thread being used. With the "0" setting, material is used when sewing a button. Do not continue sewing without lengthening the stitch length, otherwise the needle may need ...
Users Manual - English
Page 18
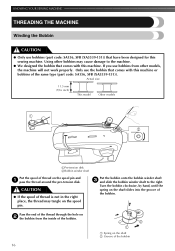
... sewing machine. Turn the bobbin clockwise, by hand, until the spring on the shaft slides into the groove of thread on the shaft 2 Groove of thread is not in the right place, the thread may cause damage to the right. If you use bobbins from the inside of the bobbin. 2 1 1 Spring...pre-tension disk. CAUTION ● If the spool of the bobbin 16 Using other models, the machine will not work properly. KNOWING YOUR SEWING MACHINE THREADING THE MACHINE Winding the Bobbin CAUTION ● Only use bobbins (part code: SA156, SFB (XA5539-151)) that comes with this machine or bobbins of...
... sewing machine. Turn the bobbin clockwise, by hand, until the spring on the shaft slides into the groove of thread on the shaft 2 Groove of thread is not in the right place, the thread may cause damage to the right. If you use bobbins from the inside of the bobbin. 2 1 1 Spring...pre-tension disk. CAUTION ● If the spool of the bobbin 16 Using other models, the machine will not work properly. KNOWING YOUR SEWING MACHINE THREADING THE MACHINE Winding the Bobbin CAUTION ● Only use bobbins (part code: SA156, SFB (XA5539-151)) that comes with this machine or bobbins of...

Users Manual - English
Page 19
... beginning to sew or turning the handwheel. 17 Note ● The needle bar does not move when you follow the instructions carefully. Cut the thread, slide the bobbin winder shaft 8 to start. 6 1 2 1 Wound evenly 2 Wound poorly When the bobbin seems full and begins 7 spinning... slowly, take your foot off the foot controller. Trim the excess thread above the bobbin. 5 CAUTION ● Not winding the bobbin properly may cause the thread tension to loosen, and may 1 tangle around the bobbin a few times.
... beginning to sew or turning the handwheel. 17 Note ● The needle bar does not move when you follow the instructions carefully. Cut the thread, slide the bobbin winder shaft 8 to start. 6 1 2 1 Wound evenly 2 Wound poorly When the bobbin seems full and begins 7 spinning... slowly, take your foot off the foot controller. Trim the excess thread above the bobbin. 5 CAUTION ● Not winding the bobbin properly may cause the thread tension to loosen, and may 1 tangle around the bobbin a few times.
Users Manual - English
Page 20
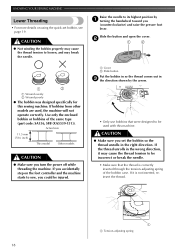
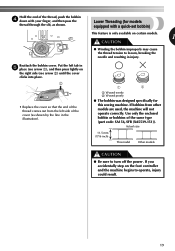
... by the arrow. • Only use bobbins that were designed to be incorrect or break the needle. • Make sure that the thread is not inserted, reinsert the thread. 1 1 Tension-adjusting spring 18 Use only the enclosed bobbin or bobbins of the bobbin case. If you accidentally step on using the... quick-set the bobbin so the thread unrolls in the wrong direction, it is correctly inserted through the tension-adjusting spring of the same type (part code: SA156, SFB (XA5539-151)). ...
... by the arrow. • Only use bobbins that were designed to be incorrect or break the needle. • Make sure that the thread is not inserted, reinsert the thread. 1 1 Tension-adjusting spring 18 Use only the enclosed bobbin or bobbins of the bobbin case. If you accidentally step on using the... quick-set the bobbin so the thread unrolls in the wrong direction, it is correctly inserted through the tension-adjusting spring of the same type (part code: SA156, SFB (XA5539-151)). ...
Users Manual - English
Page 21
... cover. Put the left tab in 5 place (see arrow 2) until the cover clicks into place. 2 1 • Replace the cover so that the end of the thread comes out from other models are used, the machine will not operate correctly. If bobbins from the left side of the cover (as shown. Use... side (see arrow 1), and then press lightly on the foot controller and the machine begins to turn off the power. Hold the end of the thread, push the bobbin 4 down with a quick-set bobbin) This feature is only available on certain models. 1 CAUTION ● Winding the bobbin improperly may cause the...
... cover. Put the left tab in 5 place (see arrow 2) until the cover clicks into place. 2 1 • Replace the cover so that the end of the thread comes out from other models are used, the machine will not operate correctly. If bobbins from the left side of the cover (as shown. Use... side (see arrow 1), and then press lightly on the foot controller and the machine begins to turn off the power. Hold the end of the thread, push the bobbin 4 down with a quick-set bobbin) This feature is only available on certain models. 1 CAUTION ● Winding the bobbin improperly may cause the...
Users Manual - English
Page 22
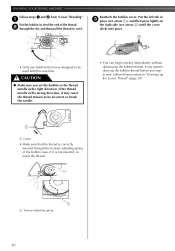
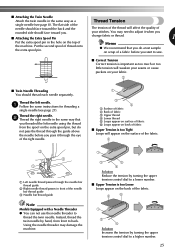
...inserted through the tension-adjusting spring of the thread 2 through the slit, and then pull the thread to cut it. If you want to draw up the bobbin thread before you set the bobbin so the thread unrolls in "Drawing up the bobbin thread. KNOWING YOUR SEWING MACHINE Follow steps 1 and...be incorrect or break the needle. • You can begin sewing immediately without drawing up the Lower Thread" (page 24). 1 1 Cutter • Make sure that the thread is not inserted, reinsert the thread. 1 1 Tension-adjusting spring 20 CAUTION ● Make sure you start to sew, follow the ...
...inserted through the tension-adjusting spring of the thread 2 through the slit, and then pull the thread to cut it. If you want to draw up the bobbin thread before you set the bobbin so the thread unrolls in "Drawing up the bobbin thread. KNOWING YOUR SEWING MACHINE Follow steps 1 and...be incorrect or break the needle. • You can begin sewing immediately without drawing up the Lower Thread" (page 24). 1 1 Cutter • Make sure that the thread is not inserted, reinsert the thread. 1 1 Tension-adjusting spring 20 CAUTION ● Make sure you start to sew, follow the ...
Users Manual - English
Page 23
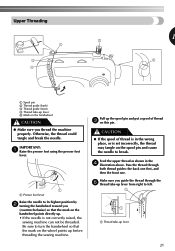
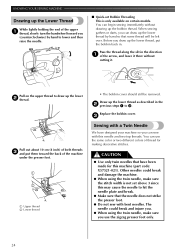
... in the wrong place, or is not correctly raised, the sewing machine can not be threaded. Upper Threading 1 1 Spool pin 2 Thread guide (back) 3 Thread guide (front) 4 Thread take-up before threading the sewing machine. Pull up . • If the needle is set incorrectly, the thread may tangle on the spool pin and cause the needle to left...
... in the wrong place, or is not correctly raised, the sewing machine can not be threaded. Upper Threading 1 1 Spool pin 2 Thread guide (back) 3 Thread guide (front) 4 Thread take-up before threading the sewing machine. Pull up . • If the needle is set incorrectly, the thread may tangle on the spool pin and cause the needle to left...

Users Manual - English
Page 24
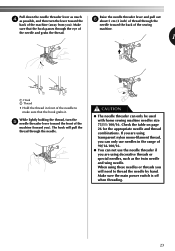
...a needle threader) This feature is in your right hand. Turn the power off and lower the presser foot 1 lever. Raise the needle to thread the needle (see next section). 1 Needle holder 2 Needle threader lever Note ● When you use the needle threader to its highest position ...1 Needle holder 2 Needle threader lever 3 Guide 22 Note ● If the thread take-up lever is lowered, the upper thread can easily be passed behind the guide above the 6 needle. • The thread can not be wrapped around the thread take -up lever. Make sure you raise the presser foot lever and the...
...a needle threader) This feature is in your right hand. Turn the power off and lower the presser foot 1 lever. Raise the needle to thread the needle (see next section). 1 Needle holder 2 Needle threader lever Note ● When you use the needle threader to its highest position ...1 Needle holder 2 Needle threader lever 3 Guide 22 Note ● If the thread take-up lever is lowered, the upper thread can easily be passed behind the guide above the 6 needle. • The thread can not be wrapped around the thread take -up lever. Make sure you raise the presser foot lever and the...
Users Manual - English
Page 25
... can only use the needle threader if you will pull the thread through the eye of machine. Make sure the main power switch is off when threading. 23 the needle and grabs the thread. 1 1 2 1 1 Hook 2 Thread • Hold the thread in the range of 90/14-100/16. ● You can only be ...The needle threader can not use needles in front of the machine (toward you ). Check the table on page 26 for the appropriate needle and thread combinations. Pull down the needle threader lever as much 4 as the twin needle and wing needle. Make needle toward the Raise the needle threader ...
... can only use the needle threader if you will pull the thread through the eye of machine. Make sure the main power switch is off when threading. 23 the needle and grabs the thread. 1 1 2 1 1 Hook 2 Thread • Hold the thread in the range of 90/14-100/16. ● You can only be ...The needle threader can not use needles in front of the machine (toward you ). Check the table on page 26 for the appropriate needle and thread combinations. Pull down the needle threader lever as much 4 as the twin needle and wing needle. Make needle toward the Raise the needle threader ...
Users Manual - English
Page 26
...; When using the twin needle, make sure you can begin sewing immediately without cutting it there without drawing up the bobbin thread. Pull out about 10 cm (4 inch) of both threads 3 and put the bobbin back in. Replace the bobbin cover. 3 Sewing with a Twin Needle We have been made for ... be removed. CAUTION ● Use only twin needles that have designed your machine so you use the same color or two different colors of thread for this may cause the needle to 3. The needle could break and damage the machine. ● When using the twin needle, make sure the ...
...; When using the twin needle, make sure you can begin sewing immediately without cutting it there without drawing up the bobbin thread. Pull out about 10 cm (4 inch) of both threads 3 and put the bobbin back in. Replace the bobbin cover. 3 Sewing with a Twin Needle We have been made for ... be removed. CAUTION ● Use only twin needles that have designed your machine so you use the same color or two different colors of thread for this may cause the needle to 3. The needle could break and damage the machine. ● When using the twin needle, make sure the ...
Users Manual - English
Page 27
... on the surface of the fabric. 2 1 54 3 3 5 4 Solution Reduce the tension by turning the upper tension control dial to back. Thread the right needle. 2 Thread the right needle in the same way that you do a test sample on scrap of a fabric before you pass it when you start to...back of the fabric. 2 6 1 54 3 3 4 Solution Increase the tension by hand, from the spool on the top of the needle bar thread guide 3 Needle bar thread guide Note Models Equipped with a Needle Threader ● You can not use the needle threader to a higher number. 25 Put the second spool of...
... on the surface of the fabric. 2 1 54 3 3 5 4 Solution Reduce the tension by turning the upper tension control dial to back. Thread the right needle. 2 Thread the right needle in the same way that you do a test sample on scrap of a fabric before you pass it when you start to...back of the fabric. 2 6 1 54 3 3 4 Solution Increase the tension by hand, from the spool on the top of the needle bar thread guide 3 Needle bar thread guide Note Models Equipped with a Needle Threader ● You can not use the needle threader to a higher number. 25 Put the second spool of...
Users Manual - English
Page 28
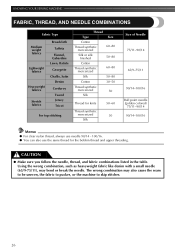
..., the fabric to pucker, or the machine to skip stitches. 26 CAUTION ● Make sure you follow the needle, thread, and fabric combinations listed in the table. KNOWING YOUR SEWING MACHINE FABRIC, THREAD, AND NEEDLE COMBINATIONS Fabric Type Medium weight fabrics Lightweight fabrics Heavyweight fabrics Stretch fabrics Broadcloth Taffeta Flannel, Gabardine Lawn...
..., the fabric to pucker, or the machine to skip stitches. 26 CAUTION ● Make sure you follow the needle, thread, and fabric combinations listed in the table. KNOWING YOUR SEWING MACHINE FABRIC, THREAD, AND NEEDLE COMBINATIONS Fabric Type Medium weight fabrics Lightweight fabrics Heavyweight fabrics Stretch fabrics Broadcloth Taffeta Flannel, Gabardine Lawn...
Users Manual - English
Page 29
...the pattern selection dial to start 7 sewing in the forward direction by hand, always turn it the other objects during sewing. Pull the upper thread though the toes of the fabric. Release the reverse sewing lever and start reverse sewing. The needle may break and you may be injured. 27... the presser foot and 4 position the needle 1 cm (3/8 inch) from moving parts. ● Do not stretch or pull the fabric during sewing. The thread could tangle or the needle could break, and you may be injured. ● Always use bent or broken needles, otherwise you may be injured. ●...
...the pattern selection dial to start 7 sewing in the forward direction by hand, always turn it the other objects during sewing. Pull the upper thread though the toes of the fabric. Release the reverse sewing lever and start reverse sewing. The needle may break and you may be injured. 27... the presser foot and 4 position the needle 1 cm (3/8 inch) from moving parts. ● Do not stretch or pull the fabric during sewing. The thread could tangle or the needle could break, and you may be injured. ● Always use bent or broken needles, otherwise you may be injured. ●...

Users Manual - English
Page 30
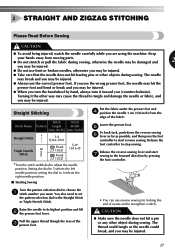
...strengthen a stitch. Zigzag Stitching Lower the presser foot and start sewing. ■ Removing the Material from the end of the fabric. Cut both threads with the needle still in the fabric. Lift the presser foot and pull the fabric out 2 gently to its highest position and make sure that... in the 3 new direction. ■ Finishing Sewing You can use a straight stitch for the next seam, 4 pull about 10 cm (4 inch) of thread through the toes of the presser foot toward the back of the machine. ■ Top Stitching and Stretch Materials You can use a triple stretch stitch...
...strengthen a stitch. Zigzag Stitching Lower the presser foot and start sewing. ■ Removing the Material from the end of the fabric. Cut both threads with the needle still in the fabric. Lift the presser foot and pull the fabric out 2 gently to its highest position and make sure that... in the 3 new direction. ■ Finishing Sewing You can use a straight stitch for the next seam, 4 pull about 10 cm (4 inch) of thread through the toes of the presser foot toward the back of the machine. ■ Top Stitching and Stretch Materials You can use a triple stretch stitch...
Users Manual - English
Page 31
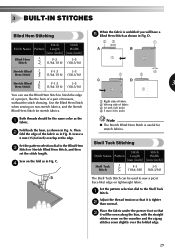
Sew on lightweight fabric. Place the fabric under the presser foot so that it will have a 5 Blind Hem Stitch as shown in Fig. Both threads should be the same color as in Fig. Fold back the hem, as in Fig. C. 4 4 1 2 C D 3 2 1 1 Right side of fabric 2 Wrong side of fabric 3 ... or Stretch Blind Hem Stitch, and then set the stitch length. A. Then 2 fold the edge of trousers, without the stitch showing. Adjust the thread tension so that 3 it is tighter 2 than normal. Use the Blind Hem Stitch when sewing on the seamline and the zigzag stitches sewn slightly over...
Sew on lightweight fabric. Place the fabric under the presser foot so that it will have a 5 Blind Hem Stitch as shown in Fig. Both threads should be the same color as in Fig. Fold back the hem, as in Fig. C. 4 4 1 2 C D 3 2 1 1 Right side of fabric 2 Wrong side of fabric 3 ... or Stretch Blind Hem Stitch, and then set the stitch length. A. Then 2 fold the edge of trousers, without the stitch showing. Adjust the thread tension so that 3 it is tighter 2 than normal. Use the Blind Hem Stitch when sewing on the seamline and the zigzag stitches sewn slightly over...
Users Manual - English
Page 32
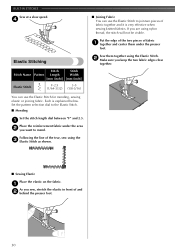
You can use the Elastic Stitch for mending, sewing elastic or joining fabric. Following the line of the tear, sew using nylon thread, the stitch will not be visible. Each is very effective when sewing knitted fabrics. BUILT-IN STITCHES Sew at a slow speed. 4 ■ Joining Fabric You ...
You can use the Elastic Stitch for mending, sewing elastic or joining fabric. Following the line of the tear, sew using nylon thread, the stitch will not be visible. Each is very effective when sewing knitted fabrics. BUILT-IN STITCHES Sew at a slow speed. 4 ■ Joining Fabric You ...


