
Users Manual - English
Page 2
Always unplug the machine from all instructions before using. To reduce the risk of the machine and foot control free from the electrical outlet when removing covers, lubricating, or when making any other user servicing adjustments mentioned in this manual. 3. Do ...in the instruction manual. 16. WARNING - Do not allow this machine only for use as threading needle, changing needle, threading bobbin, or changing presser foot, and the like. 15. Use this machine to turn the main switch to the symbol "{" position which represents off when making any adjustments in ...
Always unplug the machine from all instructions before using. To reduce the risk of the machine and foot control free from the electrical outlet when removing covers, lubricating, or when making any other user servicing adjustments mentioned in this manual. 3. Do ...in the instruction manual. 16. WARNING - Do not allow this machine only for use as threading needle, changing needle, threading bobbin, or changing presser foot, and the like. 15. Use this machine to turn the main switch to the symbol "{" position which represents off when making any adjustments in ...
Users Manual - English
Page 5
... removing the needle or any other part; • if there is still there, please consult your machine a longer life 1. Do not store anything on the foot controller. Use only mild soaps or detergents to turn off the power switch and unplug the cord: • when you have stopped using the machine...
... removing the needle or any other part; • if there is still there, please consult your machine a longer life 1. Do not store anything on the foot controller. Use only mild soaps or detergents to turn off the power switch and unplug the cord: • when you have stopped using the machine...
Users Manual - English
Page 6
... ...8 ACCESSORIES ...9 Optional Accessories ...9 USING YOUR SEWING MACHINE 10 Connecting Plugs ...10 Main Power and Sewing Light Switch ...11 Foot Controller ...11 Checking the Needle ...11 Replacing the Needle ...12 Changing the Presser Foot ...13 Flat-Bed Attachment ...14 THE CONTROLS ...15 Pattern Selection Dial ...15 Patterns and Stitch Names ...16 Reverse Sewing...
... ...8 ACCESSORIES ...9 Optional Accessories ...9 USING YOUR SEWING MACHINE 10 Connecting Plugs ...10 Main Power and Sewing Light Switch ...11 Foot Controller ...11 Checking the Needle ...11 Replacing the Needle ...12 Changing the Presser Foot ...13 Flat-Bed Attachment ...14 THE CONTROLS ...15 Pattern Selection Dial ...15 Patterns and Stitch Names ...16 Reverse Sewing...

Users Manual - English
Page 7
APPENDIX ...53 MAINTENANCE ...54 Changing the Light Bulb ...54 Cleaning ...55 Troubleshooting ...57 Repacking the Machine ...60 INDEX ...61 6 5. USING ATTACHMENTS AND APPLICATIONS 43 Zipper Insertion ...44 Gathering ...45 Darning ...45 Appliqués ...46 Monogramming and Embroidering ...47 OPTIONAL ACCESSORIES 49 Using the Walking Foot ...49 Using the Quilting Foot ...50 Using the 1/4-Inch Quilting Foot ...51 6.
APPENDIX ...53 MAINTENANCE ...54 Changing the Light Bulb ...54 Cleaning ...55 Troubleshooting ...57 Repacking the Machine ...60 INDEX ...61 6 5. USING ATTACHMENTS AND APPLICATIONS 43 Zipper Insertion ...44 Gathering ...45 Darning ...45 Appliqués ...46 Monogramming and Embroidering ...47 OPTIONAL ACCESSORIES 49 Using the Walking Foot ...49 Using the Quilting Foot ...50 Using the 1/4-Inch Quilting Foot ...51 6.
Users Manual - English
Page 9
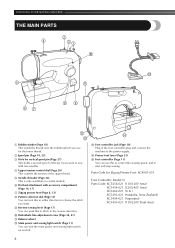
... the upper thread. 5 Needle threader (Page 24) This is only available on certain models. 6 Flat bed attachment with accessory compartment (Page 14, 17) 7 Zigzag presser foot (Page 8, 13) 8 Pattern selection dial (Page 15) You can turn the main power and sewing light switch on and off. D Presser... screw (Page 34, 41) A Balance wheel B Main power and sewing light switch (Page 11) You can turn this in the foot controller plug and connect the machine to the power supply. C Foot controller jack (Page 10) Plug in either direction to choose the stitch you use this to control the sewing speed...
... the upper thread. 5 Needle threader (Page 24) This is only available on certain models. 6 Flat bed attachment with accessory compartment (Page 14, 17) 7 Zigzag presser foot (Page 8, 13) 8 Pattern selection dial (Page 15) You can turn the main power and sewing light switch on and off. D Presser... screw (Page 34, 41) A Balance wheel B Main power and sewing light switch (Page 11) You can turn this in the foot controller plug and connect the machine to the power supply. C Foot controller jack (Page 10) Plug in either direction to choose the stitch you use this to control the sewing speed...

Users Manual - English
Page 10
...1 1. 2. 3. 4. 5. 6. 7. 8. 9. We have designed these accessories to help you have bought. 9 No. No. Part Name 1 Zipper foot (1 pc.) 2 Bobbin (3 pcs.) 3 Needle Pack (Regular Single Needle HAX130 (3 pcs.)) 4 Twin Needle (1 pc.) Part Code USA Others No. Part Name X59370...-051 5 Buttonhole Foot (1 pc.) SA156 SFB (XA5539-151) 6 7 Button Sewing Foot (1 pc.) Extra Spool Pin (1 pc.) 129583-001 8 Screwdriver (1 pc.) X57521-001 9 Darning Plate (1pc.) Part...
...1 1. 2. 3. 4. 5. 6. 7. 8. 9. We have designed these accessories to help you have bought. 9 No. No. Part Name 1 Zipper foot (1 pc.) 2 Bobbin (3 pcs.) 3 Needle Pack (Regular Single Needle HAX130 (3 pcs.)) 4 Twin Needle (1 pc.) Part Code USA Others No. Part Name X59370...-051 5 Buttonhole Foot (1 pc.) SA156 SFB (XA5539-151) 6 7 Button Sewing Foot (1 pc.) Extra Spool Pin (1 pc.) 129583-001 8 Screwdriver (1 pc.) X57521-001 9 Darning Plate (1pc.) Part...
Users Manual - English
Page 12
...or an electric shock. Dispose of any bent needles safely. Note (For U.S.A. When you press the foot controller down lightly, the machine will stop. You should make sure that nothing is placed on the foot controller when the machine is not in use. 1 2 1 Parallel space 2 Level surface (bobbin cover...up on a flat surface. 2 Check the needle from the top and the sides. only) ● Foot Controller: Model N This foot controller can be straight and sharp for Model XL-2121, XL-2125, XL-2230. . 11 Main Power and Sewing Light Switch This switch turns the mains power and sewing light on ...
...or an electric shock. Dispose of any bent needles safely. Note (For U.S.A. When you press the foot controller down lightly, the machine will stop. You should make sure that nothing is placed on the foot controller when the machine is not in use. 1 2 1 Parallel space 2 Level surface (bobbin cover...up on a flat surface. 2 Check the needle from the top and the sides. only) ● Foot Controller: Model N This foot controller can be straight and sharp for Model XL-2121, XL-2125, XL-2230. . 11 Main Power and Sewing Light Switch This switch turns the mains power and sewing light on ...
Users Manual - English
Page 13
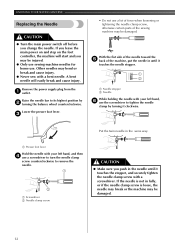
... SEWING MACHINE Replacing the Needle CAUTION ● Turn the main power switch off before you leave the main power on and step on the foot controller, the machine will easily break and cause injury. • Do not use a lot of force when loosening or tightening the needle clamp... screw, otherwise certain parts of the machine, put the needle in the same way. 1 Presser foot lever Hold the needle with a bent needle. Lower the presser foot lever. 3 1 Needle stopper 2 Needle While holding the needle with a screwdriver. If you change the needle. With ...
... SEWING MACHINE Replacing the Needle CAUTION ● Turn the main power switch off before you leave the main power on and step on the foot controller, the machine will easily break and cause injury. • Do not use a lot of force when loosening or tightening the needle clamp... screw, otherwise certain parts of the machine, put the needle in the same way. 1 Presser foot lever Hold the needle with a bent needle. Lower the presser foot lever. 3 1 Needle stopper 2 Needle While holding the needle with a screwdriver. If you change the needle. With ...

Users Manual - English
Page 14
... you leave the power on and step on the presser foot is not installed with this machine. CAUTION ● If the presser foot is in . 1 ■ Presser foot installation orientation 2 1 1 Presser Foot 2 Shank Put a different presser foot on the needle plate 3 so that have to change the... presser foot. Using other any presser feet may bend or break the needle...
... you leave the power on and step on the presser foot is not installed with this machine. CAUTION ● If the presser foot is in . 1 ■ Presser foot installation orientation 2 1 1 Presser Foot 2 Shank Put a different presser foot on the needle plate 3 so that have to change the... presser foot. Using other any presser feet may bend or break the needle...

Users Manual - English
Page 16
Note ● When you turn the pattern selection dial, the needle, presser foot or fabric may be damaged. ■ 11 stitches 1 1 1 Pattern selection dial 2 Chosen pattern number 2 3 4 5 6 7 8 9 10 11 ■ 8 stitches 1 2345678 15 THE CONTROLS Pattern Selection Dial ...
Note ● When you turn the pattern selection dial, the needle, presser foot or fabric may be damaged. ■ 11 stitches 1 1 1 Pattern selection dial 2 Chosen pattern number 2 3 4 5 6 7 8 9 10 11 ■ 8 stitches 1 2345678 15 THE CONTROLS Pattern Selection Dial ...
Users Manual - English
Page 18
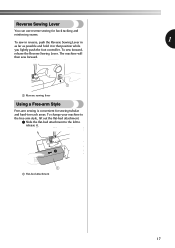
... areas. Reverse Sewing Lever You can use reverse sewing for sewing tubular and hard-to release it in that position while you lightly push the foot controller. The machine will then sew forward. 1 1 Reverse sewing lever Using a Free-arm Style Free-arm sewing is convenient for back tacking and reinforcing seams...
... areas. Reverse Sewing Lever You can use reverse sewing for sewing tubular and hard-to release it in that position while you lightly push the foot controller. The machine will then sew forward. 1 1 Reverse sewing lever Using a Free-arm Style Free-arm sewing is convenient for back tacking and reinforcing seams...
Users Manual - English
Page 20
... around the bobbin a few times. While holding the end of the clutch engaging when beginning to sew or turning the balance wheel. 19 Press the foot controller to start. 6 1 2 1 Wound evenly 2 Wound poorly After the machine stops automatically when 7 the bobbin is normal to hear the sound... of the thread, gently 4 press the foot controller to wind the thread CAUTION around the bobbin and cause the needle to break. Then stop the machine. ● Make sure you slide the...
... around the bobbin a few times. While holding the end of the clutch engaging when beginning to sew or turning the balance wheel. 19 Press the foot controller to start. 6 1 2 1 Wound evenly 2 Wound poorly After the machine stops automatically when 7 the bobbin is normal to hear the sound... of the thread, gently 4 press the foot controller to wind the thread CAUTION around the bobbin and cause the needle to break. Then stop the machine. ● Make sure you slide the...
Users Manual - English
Page 21
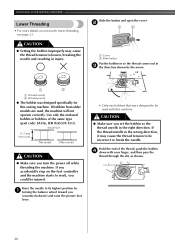
... one-touch lower threading, see page 21. KNOWING YOUR SEWING MACHINE Lower Threading • For more details on the foot controller and the machine starts to work, you (counterclockwise) and raise the presser foot lever. • Only use bobbins that were designed to be used , the machine will not operate correctly. If...
... one-touch lower threading, see page 21. KNOWING YOUR SEWING MACHINE Lower Threading • For more details on the foot controller and the machine starts to work, you (counterclockwise) and raise the presser foot lever. • Only use bobbins that were designed to be used , the machine will not operate correctly. If...
Users Manual - English
Page 22
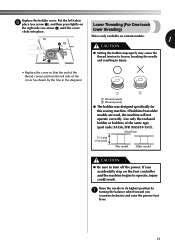
If you (counterclockwise) and raise the presser foot lever. 21 Actual size 11.5 mm (7/16 inch) This model Older model CAUTION ● Be sure to its highest position by the line in 5 place (... bobbin improperly may cause the thread tension to operate, injury could result. Lower Threading (For One-touch lower threading) This is only available on the foot controller and the machine begins to loosen, breaking the needle 1 and resulting in injury. • Replace the cover so that the end of the thread...
If you (counterclockwise) and raise the presser foot lever. 21 Actual size 11.5 mm (7/16 inch) This model Older model CAUTION ● Be sure to its highest position by the line in 5 place (... bobbin improperly may cause the thread tension to operate, injury could result. Lower Threading (For One-touch lower threading) This is only available on the foot controller and the machine begins to loosen, breaking the needle 1 and resulting in injury. • Replace the cover so that the end of the thread...
Users Manual - English
Page 24
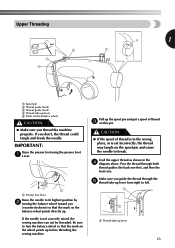
... wheel toward you guide the thread through both thread guides: the back one first, and then the front one. IMPORTANT: Raise the presser foot using the presser Foot 1 Lever. 1 1 Presser foot lever Raise the needle to left. 1 1 1 Thread take-up lever 23 Make sure you (counterclockwise) so that the mark on this pin...
... wheel toward you guide the thread through both thread guides: the back one first, and then the front one. IMPORTANT: Raise the presser foot using the presser Foot 1 Lever. 1 1 Presser foot lever Raise the needle to left. 1 1 1 Thread take-up lever 23 Make sure you (counterclockwise) so that the mark on this pin...
Users Manual - English
Page 25
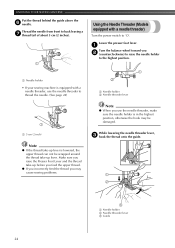
KNOWING YOUR SEWING MACHINE Put the thread behind the guide above the 6 needle. Lower the presser foot lever. 1 Turn the balance wheel toward you use the needle threader to 'O'. Make sure you raise the Presser Foot Lever and the thread take-up before you feed the upper thread. ● If you incorrectly feed...
KNOWING YOUR SEWING MACHINE Put the thread behind the guide above the 6 needle. Lower the presser foot lever. 1 Turn the balance wheel toward you use the needle threader to 'O'. Make sure you raise the Presser Foot Lever and the thread take-up before you feed the upper thread. ● If you incorrectly feed...
Users Manual - English
Page 27
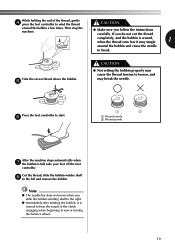
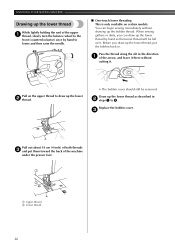
KNOWING YOUR SEWING MACHINE Drawing up the lower thread While lightly holding the end of the machine under the presser foot. 1 2 1 Upper thread 2 Lower thread 26 You can draw up the lower thread as described in the direction 1 of the arrow, and leave it . Replace the ...
KNOWING YOUR SEWING MACHINE Drawing up the lower thread While lightly holding the end of the machine under the presser foot. 1 2 1 Upper thread 2 Lower thread 26 You can draw up the lower thread as described in the direction 1 of the arrow, and leave it . Replace the ...

Users Manual - English
Page 28
... of the needle should face toward you . ● When using the thread from front to thread the twin needle. Do not use the zigzag presser foot only. ■ Attaching the Twin Needle Attach the twin needle in the same way as a single needle (see page 16) you threaded the left needle...
... of the needle should face toward you . ● When using the thread from front to thread the twin needle. Do not use the zigzag presser foot only. ■ Attaching the Twin Needle Attach the twin needle in the same way as a single needle (see page 16) you threaded the left needle...

Users Manual - English
Page 33
... injured, watch the needle carefully while you need to set the Pattern Selection Dial to tangle and damage the needle or fabric. Lower the presser foot. 5 • You can use bent or broken needles. If you do , you may also be injured. ● When you may be injured. ● Always.... ● Take care that the needle does not hit basting pins or other objects during sewing. Turning it toward the front of the 3 presser foot. Pull the upper thread though the toes of the machine (counterclockwise). The thread could tangle or the needle could also be damaged and you use...
... injured, watch the needle carefully while you need to set the Pattern Selection Dial to tangle and damage the needle or fabric. Lower the presser foot. 5 • You can use bent or broken needles. If you do , you may also be injured. ● When you may be injured. ● Always.... ● Take care that the needle does not hit basting pins or other objects during sewing. Turning it toward the front of the 3 presser foot. Pull the upper thread though the toes of the machine (counterclockwise). The thread could tangle or the needle could also be damaged and you use...

Users Manual - English
Page 34
... at the end of the seam or where you want 1 to change direction with the thread cutter on the 3 left hand side. Lift the presser foot and pull the fabric out 2 gently to 2 line up lever is also in its new direction using the needle as a turning point for the fabric... the next seam, 4 pull about 10 cm (4 inch) of thread through the toes of the presser foot toward the back of the machine. 1 2 Lower the presser foot and start sewing in the fabric. Raise the presser foot and turn the fabric to the left hand side of the machine. ■ Top Stitching and...
... at the end of the seam or where you want 1 to change direction with the thread cutter on the 3 left hand side. Lift the presser foot and pull the fabric out 2 gently to 2 line up lever is also in its new direction using the needle as a turning point for the fabric... the next seam, 4 pull about 10 cm (4 inch) of thread through the toes of the presser foot toward the back of the machine. 1 2 Lower the presser foot and start sewing in the fabric. Raise the presser foot and turn the fabric to the left hand side of the machine. ■ Top Stitching and...


